 For the most part, we all have busy schedules. When we do get a break, there is barely enough time for the range, reloading or hunting. However, there is something we can do that isn’t too time consuming and will assure shooting sports will be around in the future; introduce youngsters to shooting sports and/or make sure they remain engaged.
My eldest son and his family live in Texas, my wife and I live me Maine. Our youngest granddaughter, Bella, began shooting at the age of six during a family visit to Maine; closely supervised, focused emphasis on safety and outings for short intervals of time. Both of her parents are supportive of her being involved in shooting sports, her father and mom are recreational shooters and they want Bella to be knowledgeable of firearms so that she will be safe around them, will know how to navigate through situations where firearms are present and so that she will not grow up with an irrational fear of firearms.
Her first rifle was a lightweight, compact single shot bolt action that served well as a vehicle for teaching firearm safety and marksmanship without distractions. Bella was already competing in sports and participating in performing arts. Subsequently, by the time we discussed firearms with her, she was already familiar with the dynamics of being coached, focusing, asking questions, and following instructions.
Recently, in anticipation of her eight birthday, my wife and I sat down with her in front of a computer screen, paging through online catalogs to get an idea of what she liked or wanted in her next progression of rimfire rifle. The idea of an autoloader was appealing; more shooting, less motion, and she really formed an attachment to a bright blue, laminated thumb hole stock and matte black hardware. She assumed grandpa was going to make sure it was accurate, reliable and comfortable to shoot.
The Ruger 10/22
When each of our grandchildren were born, my wife and I made little fancy hinged top benches out of pine so they would have something to safely stand on when they needed to be taller and compartment for their little treasures; all little kids have treasures… feathers, shiny rocks, dead bugs, etc. My plan was to give each a legacy quality, walnut stocked, bolt action rifle after each mastered safe shooting. My wife explained to me that would be appropriate if they were all 60+ year old men, and that something with greater entertainment value might be more of an inducement for them to be involved in shooting sports (i.e. See Bella preferences).
I’ve tried other autoloaders before arriving at the Ruger 10/22… Marlin’s Model 795 and forerunners, Remington’s Model 597 and 552 and Browning’s Semi-Auto 22 all with good success, but each with its limitations. Marlin and Remington autoloading rimfire rifle required a little work to make them reliable, most centering around magazines and magazine transitions. I like the idea of the little take down Browning, but I never cared for the bottom eject as it can be annoying and the length of pull is actually very long for young shooters. Probably more the issue, none of them have commanded the vast array of aftermarket specialty parts and accessories that are available for the Ruger 10/22.
The Ruger 10/22 has been with us for over fifty years. Its design has been tuned and tweaked from one iteration to the next until it became a rock solid, very accurate and very reliable rimfire rifle. Available in many forms from compact to target versions, this project began with a basic Model #1151 with alloy steel and aluminum hardware and a black basic synthetic stock. Since a good deal of it was going to be replaced, there was no reason to buy a more premium model. MSRP as of this writing is $289, however, they are typically available at or below $240. A used Ruger 10/22 rifle could have been purchased for half that amount, but it seemed starting with a known quantity would be best.
A stock in “Good Golly!” blue

My granddaughter loves bright colors. In fact, almost every Christmas my wife and I look for the craziest color sneakers we can find as one of her gifts, so… This stock came from Boyd’s Gunstocks. The first one received had been cut through the laminate with a disk sander and it had numerous white birch areas that missed dye coloration. It took a few weeks of time consuming and frustrating back and forth communications, but they eventually replaced the stock with one that looked much better. The specifics of the stock are –
|
3Z2681W1B1ZZ |
RIMFIRE THUMBHOLE RUGER10/22; |
$123.95 |
|
CL0P15 |
12 3/4″ LENGTH OF PULL *1/2″ PAD ONLY* |
$0.00 |
|
C10016 |
CUSTOM UPGRADE – RIFLE BLANK SKY LAMINATE |
$0.00 |
|
Total |
$123.95 |
|

Trigger without Roy Rogers… anyone still living familiar with the reference?
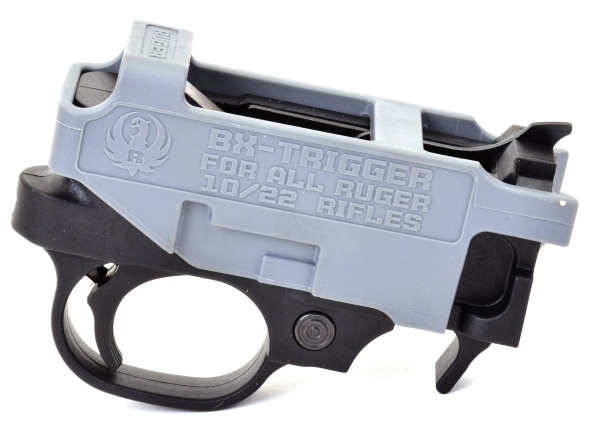
Things encountered along the way…
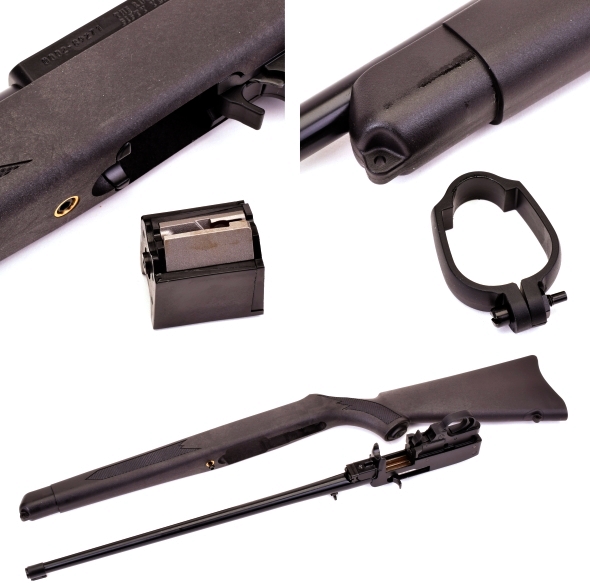
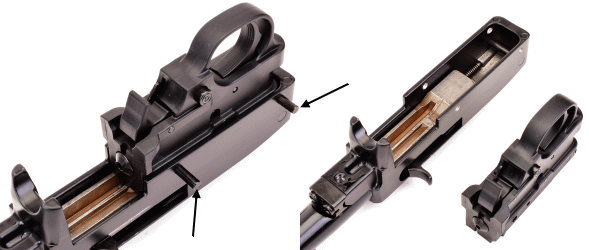
Ruger indicates that a 1/8″ flat nose punch may be used to drift out the two trigger group assembly pins (arrows). In reality, I have never seen pins that did not fall out just by tipping the action to one side or the other. In fact, there is another pin, the bolt stop pin located just above the rear assembly pin that will also drop out with little provocation.
The new BX-Trigger plops into place, aligns to the pin holes and begins to feel secure when the trigger assembly pins are reinstalled. There is not a lot that can be screwed up… unless you really, really work at it.
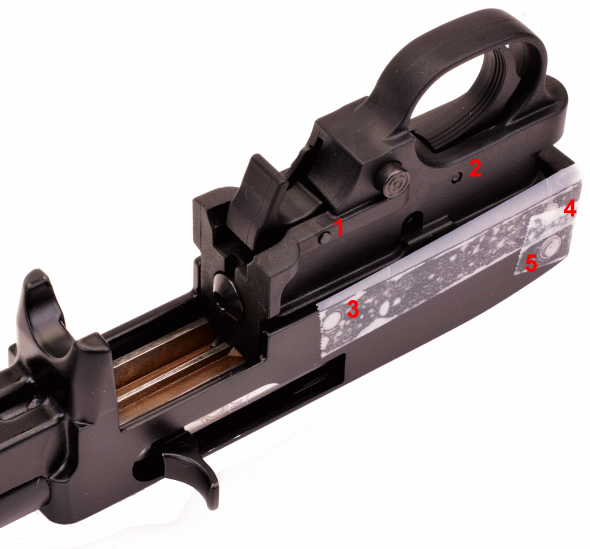
Specialty gunsmithing tools from Staples? I am too old and too slow to walk around the shop, dropping pins all over the place and looking for them when they roll under benches. A little tape over the indicated 5 pins, both sides, will keep them in place until barrel work is done and the barreled action is joined with the stock. Sometimes I use Scotch tape, sometimes I use duct tape… depending on which is close to where I am working.
Soft face hammer… or a number 5 wood
Do not attempt to rotate a loosened barrel with the bolt forward. When forward, the extractor sits in a recess in the barrel face and it can be damaged by rotating the barrel. The V Block and V Block fasteners are removed easily with a 5/16″ hex wrench, however, the slip fit barrel is held on by invisible gorilla fingers that will allow the barrel to turn in the receiver, but not actually come out.
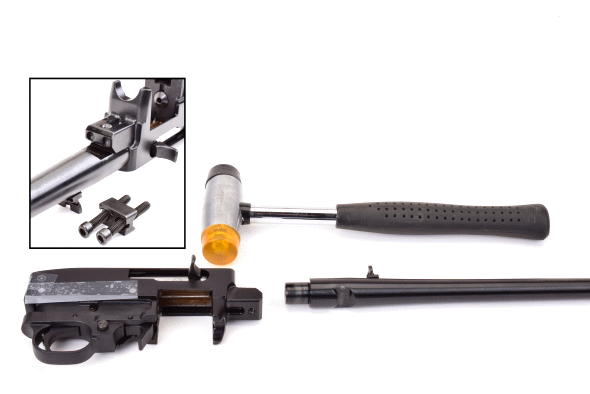
The two can easily be separated by clamping the barrel in a soft jaw vise, not the easy to crush receiver, holding the receiver in one hand so it will not fall to the floor when it comes free, and tapping the face of the receiver with a soft face hammer. Patience and small taps are all that is required.
Don’t leave an impression
The Ruger 10/22 barrel is not a press or interference fit and the instructions for the Tactical Solutions barrel CLEARLY states it should have a close, but not a force fit. So don’t break out a bigger hammer, do drop the barrel in dry ices, just install it as intended. The new barrel will probably not fit into the receiver as the receiver will have finish gunk inside the barrel bore and the barrel tenon will be anodized to a thickness larger than the standard barrel. A little 400 emery cloth wrapped around a pinky or pencil will clear misguided finish out the receiver barrel bore.
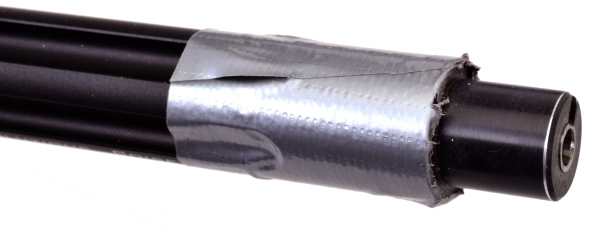
Putting the barrel, gently, between soft wood vise jaws allow shoe shine stroking the barrel tenon with emery cloth, while keeping the cloth parallel to the barrel surface and working the pressure around the tenon for uniform material removal. The duct tape protects the finish on the rest of the barrel from the emery paper. It takes very little material removal to get a tight slip fit, so trial fitting to the receiver often is a good idea. The barrel as pictured is completed and fits properly into the receiver. Don’t forget to remove the tape before installing the barrel.
I’ve seen lots of apprentice for assuring the barrel is indexed properly to the receiver, mostly bubble levels, squares and lasers suspended from sky hooks. I put the barrel in place, allow the bolt to move forward with the extractor in place in the barrel groove. I install the V Block finger tight, gently wiggle the barrel side to side so I can center the extractor in the groove in the barrel notch, and tighten the V block a little more, then repeat until the barrel is fully seated and the V Block hardware is tight. Because there are no metallic sights, the important thing about indexing is that the extractor clears and the barrel is fully seated.
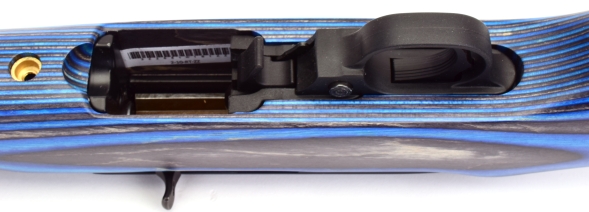
The safety is centered, the pin holding tape is removed and the stock in plopped into place. The take down screw from the original stock is transferred to the new stock and tightened down. An empty magazine should be trial fitted to make sure there is proper clearance and alignment. I was standing by with an assortment of files, rasps and cutting chisels… which was very impressive in the work place, but absolutely not required.
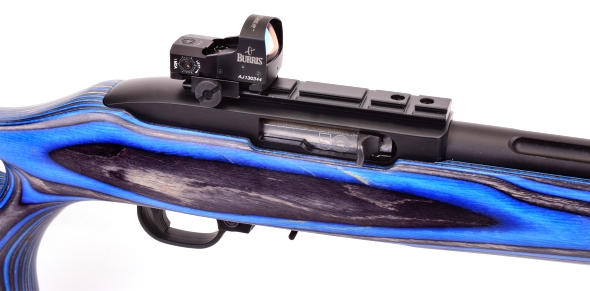

The Weaver rail that was included with the original carbine was installed and topped with Burris Fast Fire III Red Dot. After a mechanical check out the rifle fired cleanly. A scope was mounted for accuracy check which yielded 3/8″ to 1/2″ groups at 50 yards, depending on ammunition.
| Model Ruger 10/22 | |
| Manufactured | Ruger U.S.A |
| Item Number | 1151 |
| Type Action | Autoloader |
| Caliber | 22 LR |
| Capacity | 10 |
| Receiver | Aluminum |
| Barrel | Steel Lined Aluminum |
| Trigger Pull | 2 Lbs 12 Oz |
| Barrel Length | 16 1/2″ |
| Rifling | 1:16 RH |
| Sights | Weaver Rail |
| Type Safety | Cross Bolt |
| Overall Length | 34″ |
| Weight | 4 Lbs 11 Oz. |
| MSRP | $289 Original |
The finished project rifle was cleaned, placed in an inexpensive hard case with all manuals, literature and small tools for the right and sight.
The new rifle will open up new opportunities for our granddaughter and, hopefully, extend her interest in shooting sports. If not, it will make a good personal rifle for her when her dad takes her to the range, or we get her to the range on our next visit.
For you folks, men and women, who have been firearm enthusiasts over their life time, isn’t there a youngster you might know who would benefit from your knowledge, time and effort?
The next build here will be a centerfire rifle or a handgun, or perhaps a hunting trip, or maybe some instruction on reloading.

Email Notification