
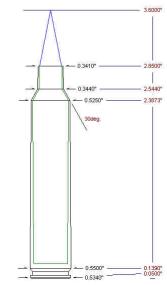
 Case trimming is essential to producing high quality, safe handloads. Cases that vary in length can prevent proper die set up and misplace the crimping position. Furthermore, cases that are too long can be dangerous. Jammed against the chamber throat transition, the case mouth can grip the bullet to an extreme , and drive chambers pressures up to dangerous levels.
The problem with manual trimming is that the process can be tedious, boring, annoying,…. less than exciting. Long periods of manual trimming may result in the death of brain cells, therefore accuracy of trim length may suffer with the operator’s loss of concentration. One minute he’s watching those little brass chips drop off the cutter, the next minute he’s thinking he might bring back tuck and roll upholstery as an improvement to his wife’s SUV – Wham! 200 rounds of .300 Ultra Mag brass, cut down in their prime to .38 Special length. See what I mean?
My point is, there are some areas of handloading where automation makes sense. Accurate manual trimming is the result of concentration and uniformly applied pressure. The task is tedious and a simple powered unit can be justifiable, and I don’t mean like an electric powered, infrared beam linked, powder trickler…honest.
 There are many sources for the Trim Pro™, I picked up a trimmer kit from Midway USA for about $175, which included freight. I use Midway USA with some frequency these days, since they seem to always have items are in inventory and the prices are reasonable. Another excellent source is Lock Stock & Barrel. They have the same kit for $160; the price does not include shipping and handling.
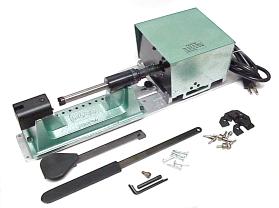
If you already have a manual Trim Pro™, you can upgrade and easily add the power unit for $157, or $137 from LS&B. This unit does not come with the accessory kit. The kit consists of popular trimmer case holders cutter pilots. The motor handle foreground and case release handle go together in a couple of minutes, following the instructions included with the trimmer. RCBS always does and excellent job with documentation.
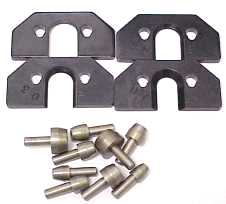 The included shell holders; 2, 3, 4, 10 cover a wide array of rifle cartridges – all .30-06 type case head cartridges, .30-30 type rimmed, all belted magnums based on the .375 H&H, and the small .222 and .223 Remington.
The trimmer pilots, the small hardened buttons that locate the case neck at center on the cutting head cover all popular bore sizes. The kit includes .22, .24, .25, .27, .28, .30, .35, .44, and .45. To this I added .33, .37, .416, and since the powered unit utilizes the same pilots as my manual trimmer, these bore omissions from the kit were no big deal.
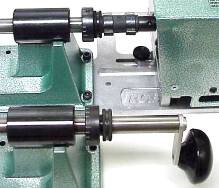 This is how RCBS transfers power to the trimmer without having to deal with critical driver-drivee alignments. The connection between motor and cutter shaft is accomplished through what RCBS calls a TP Coupling Assembly; for those of us who don’t have to make up complex terminology to enhance the perception of a product, this drive device is also known as a short piece of rubber hose and two hose clamps.
Manual or powered trimmer version, the depth of the cut is still controlled by the course and fine adjustment bushings.
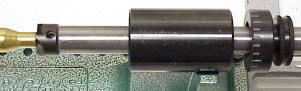
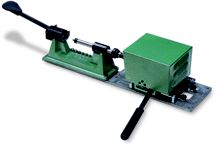
 In macro, the trimmer is comprised of three basic components: trimmer, power unit and the base plate that holds it all together. The trimmer and base are assembled in a fixed fashion, the power unit is designed to move in and out with the cutting head.
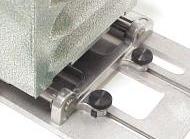
In the picture on the right you can see the two round rails that support the movable motor. The two black locking knobs set the general position of the rails in the base plate locating slots. The stroke of the motor on the rails is about an inch, and the rails can be located +/- several more inches along the slots in the base plate. Think of the motor movement range as cutting and minor cartridge length adjustment; think of the base plate slot adjustment for use when changing over from the .338-378 Weatherby to the .222 Remington.

 This is a warning notice that appears on the top of the motor housing, it is not a caution to ignore.
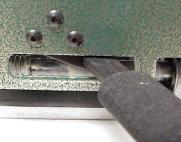
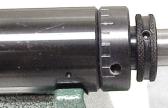
It’s a little hard to see in the picture on the right, but the spring loaded operating handle is resting on a hook in the case, and pressing against a simple contact switch that shuts off the motor; the stop position. The unit has no actual on/off switch, so when the handle is moved down from this detent, the motor and cutter begin to turn. Unfortunately, all of the set up adjustments are done with the handle out of the stop position. Make sure the unit is unplugged when setting up.
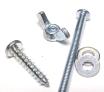 The first thing I did when prepping the trimmer for use was to toss the wood screw mounting hardware. Actually, the first thing I did was have a Wendy’s double cheeseburger and some really tasty fries, so the second thing I did was toss the wood screws.
I have limited bench space, and while a lot of equipment is necessary overall, individual pieces may be used infrequently. Replacing the base plate mounting wood screws with 8-32 screws, wing nuts and washers, made the trimmer fast and easy to set up and put away. The trimmer has 6 mount holes which is more than enough to make the unit rock steady. My bench top is slab side lamination of 2’x1.5″x2″ oak, which makes for a very hard and non-splitting surface. Every time I get a new piece of equipment I check to see if it will secure though existing holes, then if not, I just drill a few more holes to fit. These holes also work well in keeping small debris off the bench top, and on the floor where it belongs. Unfortunately, “debris” may also mean small springs and detent springs from loading presses, so I restrict the area of the bench that is used for this mounting purpose.
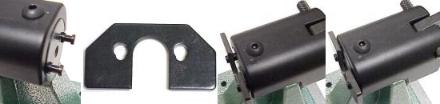 RCBS has a nifty way of securing cases while trimming. The case holding end of the trimmer has notched compression pins, the flat shell holder has keyhole shaped mounting holes that drop over notches in the compression pins. When the handle is pressed downward the shell plate is carried forward and releases pressure on the case rim, and when the handle is released, spring pressure pulls the compression pins and shell plate rearward, clamping the case rim firmly. It’s certainly a lot easy and faster to use than a collet. I needed a #3 holder for the .25-06 and a #4 for the .257 Weatherby, which follows the numbering sequence for the press shell holders. This end of the trimmer has the job of holding the case firmly to prevent rotation, while keeping the case generally square with the cutter.

The cutter driven when at work. The trimmer pilot being inserted at the left is hardened and of bore size. In use it fits into the case mouth, where its job is to keep perpendicular alignment between the case mouth and cutter. The pilot is held in place with a set screw, and the cutter itself in threaded into the cutter shaft and kept in place by direction of shaft rotation.
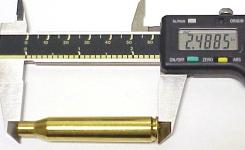 I fished around in my pile of brass, pulling samples to find a case closest to “trim to” specification. Since the trimmer is designed to cut to an overall length, rather than to remove an predefined increment of material, it’s easier to begin with a case as close to spec as possible.
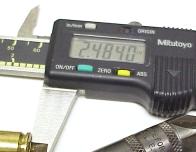
The best I could do was to locate a .25-06 cases that was 2.488″, or .006″ under max of 2.494″, but .004″ longer than the trim to length. Ordinarily I wouldn’t trim at this length, but I thought I was using the case for set up while writing this story. The .257 Weatherby got a little more complicated because different manuals reference different specifications. I went with the specs that are packaged with the trimmer and happen to match the Speer #13 manual.2.549″ max, “trim to” of 2.539″ – I found not a single piece of brass that was long enough to trim this time around. Isn’t the Weatherby suppose to flow brass so badly it pours out of the bolt handle and grows cases to hacksaw cutting length?
 The easiest way to set the cutter depth is to, first make sure the trimmer is unplugged, then mount a case in the shell holder. Then loosen the set screws for the coarse and fine adjustment bushings, release the handle from the stop position, and ease the cutter shaft forward until the trimmer pilot enters the case, and the cutter is resting against the case mouth.
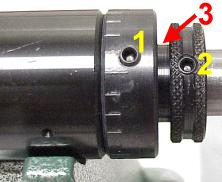 The fine adjustment bushing #1 is actually threaded onto a collar #3 that is part of the course adjustment bushing #2. Fine adjustment is made by moving the bushings closer together or farther apart. With the course adjustment bushing locked to the cutter shaft, moving the bushings farther apart decreases cutting depth; closer together increases depth of cut.
With the cutter resting on the untrimmed case mouth, the loosened fine/course adjustment bushings are moved up against the cutter guide. The course adjustment bushing #2 is backed out of the fine adjustment bushing to the end of the smooth collar surface, #3. If the bushing has been backed out too far, threads on the coarse adjustment bushing’s collar will be exposed. The set screws are then placed in horizontal alignment, and the course adjustment bushing set screw is tightened to lock this bushing to the cutter shaft. The fine adjustment bushing is still free to turn in and out on the threads of the course bushing collar .
 Referring to the earlier length reading from the .25-06 case, I needed to trim approximately .004″ to get to the proper “trim to” length of 2.484″. All I needed to do at this point was to turn the fine adjustment bushing in toward the course bushing by 4 white index marks; each white line increment is .001″.
After locking the fine adjustment bushing in place, the motor is pulled back on its tracks and locked in the stop position. The unit is plugged in to a receptacle, and the unit is ready to trim cases. To put all of this in proper perspective, it took about 15 minutes, not counting mount hole drilling time, to get the unit out of the box, set up and trimming cases. The next set up took probably 5 minutes. The best bet is to save one in spec case for future set ups, then all that’s needed is to plop the case in, and adjust the cutter up against the case mouth – a 2 minute set up.
 Production takes a little finesse. The motor is heavily spring loaded toward the case being trimmed, and care must be taken not to slam the cutting head into the case mouth.
 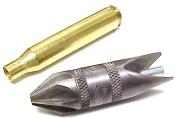 I believe the best results come from letting the unit’s spring pressure do the cutting versus applying additional hand pressure through the handle; too much pressure creates large burrs. It only takes a few minutes to get a feel for the process and the cutter turns very slowly so there is little chance for the process to get away from you. Deburring, regardless the cutting approach taken, is essential.
 The final result was right on measurement and, under machine repeatable cutting pressure control, consistent to .001″ or better over a large number of cases. If I only needed to trim 5 cases, I’d still use this unit; the set up adjustment process is the same for both manual and powered trimmer, so why not use the better process? In situations where there are more than 40 rounds or so, there’s no contest, the powered unit consistently produces better quality output, in about half the time.
There were very few things I didn’t like about the Trim Pro™ Power Case Trimmer. I really don’t like the motor stop position power on/off control, and absence of a separate power switch. If this unit were only going to find it’s way into a shop environment, it might not be a problem, but in a retail consumer environment, someone will unexpectedly end up length trimming a finger, or power rolling a shop rag around the cutting shaft.
I would also take issue with the comment in the trimmer’s documentation, that suggests trimming normally should be done after sizing the case, but that the power trimmer allows you to trim before sizing. Huh? The trimmer has absolutely no bearing on the case shoulder/neck stretch that occurs when the case is sized and the sizing ball is pulled back through the case mouth. I have a feeling someone at RCBS has a theory, but I’d like to see this articulated.
I’d like to see a more modern approach to the packaging, and maybe a shot at designing the tool for vertical actuation like a drill press, which would give a more natural feel to the operation for those of us who are not lathe operators, and a vertical approach would take up much less bench real estate. Maybe this type of layout could serve as an all in one power unit for a series of easy to set up powered reloading tools.
 I believe the RCBS Trim Pro™ Power Case Trimmer is a very useful handloading accessory. I probably think the $110 difference over the manual Trim Pro™ is a bit excessive but, based on the equipment design and complexity, probably understandable. There are competing products out there; There is a Lee power trimmer for about $20 less that uses a collet type case holder, and requires operator supplied pressure to control uniformity of cutting. Forster makes a base that works with an existing drill press for $60 and relies on the press’ depth stop to control critical dimensions – my drill press stop adjusts within +/- about .010″. Lyman makes a Power Pack for $75, but requires you to provide a hand drill for power.
I’m happy with the purchase. RCBS does an excellent job of being a comprehensive source of tools for the handloader and I, for one, greatly appreciate the effort.
Thanks
Joe
Email Notification