.357 SIG headspace update
 As a follow to the article on the .357 SIG headspace problem, I just stopped reloading with Speer Lawman empties, which seems to have resolved the misfire problem. Once again, Speer Lawman ammo never misfired in my SIG, only reloads made with Speer brass. The problem appears to be the cases are well below trim length so headspacing is totally dependent on the shoulder placement.
Still can’t tell if the headspace on the SIG is marginal. I do know the Speer brass is about .010″ below minimum trim length. I have seen other communications where SIGs with interchangeable barrels are described as having shallow primer contact and misfires, so I am not discounting the gun or interchangeable barrel as the central issue. I’m still looking into this part of the equation.
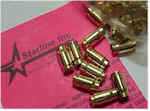 I did pick up a bunch of new .357 SIG brass from Starline Inc. The prices were good, the material was delivered to my door in 5 or 6 days, and it was of very good quality. Ordering over the Internet was easy, and through a secured server.
As received, the cases were dimensionally very consistent, notably all were right between the “trim to” and “max case length” specs. I ran a bunch through my barrel/dial indicator set up and every case headspaced well within a reliable range. Other than a little case mouth deburring, and cleaning away process oil residue, they were ready to go. This material, with no other changes in my die set up, resulted in no misfires and less shallow firing pin indentation.
The price from Starline was $58/500 and, in looking at the other cartridges they support, Starline’s prices are between 20% – 25% less than Remington or Winchester bulk brass, as sold through discount mail-order suppliers.
Speer Reloading Manual #13
Speer Reloading Manual #13 has four more rifle loads and three less handgun loads than #12. A section was added addressing Cowboy Action Shooting, and this is reflected in the loading data changes. Unfortunately, not much else is, which makes the new manual appear dated.
| Rifle adds: .260 Remington .32-20 Winchester .38-40 Winchester .44-40 Winchester .45 Colt Rifle |
Handgun drops: 6mm T/CU 7mm Intl Rimmed 7mmIHMSA |
Handgun Adds: .32 auto .32-20 standard .357 SIG (2 loads!) .44 Russian .44-40 Winchester .45 Schofield |
What’s missing ? Basically every proprietary high performance rifle load that has been introduced in the past 5 years, and half the Weatherby product line, including the 45 year old .378 and the 40 year old .460. There are no 7mm STW loads, no big bore .416 Rigby’s….
In light of all the pressure the industry is under, and the decline in firearm sales in this country, wouldn’t it be nice if a bullet manufacturer put more support behind well established, and exciting new cartridge developments ? We’re at a cross roads. The industry will either find a way to gain support and survive, or it will keep raising prices, offering less, until it implodes in the absence of a viable economic base.
$20 is a lot to pay for what amounts to a bullet manufacturers catalog, that contains less current information than the powder companies provide on the Internet for free. If your stuck for load data for your rifle or handgun, try –
Accurate Arms
Alliant Powder Company
Hodgdon Powder Company
Nobel Sport
IMR Smokeless Powders
Winchester
The first three companies in particular have been very helpful answering questions, or redirecting to other helpful sources. They’ve sent info in the mail and they are very current. Both Alliant and Winchester use an Acrobat format, so it’s easy to download and read offline.
Nosler Reloading Guide Number 4
The Nosler book was a little puzzling. It stopped at the .378 Weatherby and offered no data for bore sizes beyond the .375, even though they offer a .416 400 grain spitzer and a 300 grain .458 suitable for the .45-70. They also have a decent selection of .451 bullets, but no data for the .454 Casull. They did not include the .357 SIG, but they also don’t offer much in 9MM (.355″) bullets.
What they do have is the 7mm STW, the .30-378 Weatherby, the .358 STA and a slew of bench rest pistol cartridges. Is it worth $25 ? Probably not, there is too much electronic data out there. I wouldn’t doubt if somebody got smart, and offered subscriptions to a reloading data site that could be updated continually and accessed as necessary.
Ruger Bisley .45 Long Colt II
This week, I spent time on basic handloads and practice shooting. Each day I’ve gone through 100 rounds of .22 target pistol and 50 rounds of .45 Colt. It gave me an opportunity to learn more about the Ruger, get some sorely needed practice, and research some potential refinements for the future. The gun will eventually be used for hunting, so any modifications will have to make the gun more accurate, have more power, be more reliable, or be more durable. It’s not easy to choose.
When is .45 not .45 ? When it’s a .45 Colt of course
I like firearms, so I like digging through the details, even if just to make sure I understand information I’m exposed to. As an example, I’ve seen published, several times (including once in a letter appearing on this site), that current .45 Colt Ruger production has undersized cylinder throats, a condition which causes: lead accumulation, bullet deformity and subsequent inaccuracy. Honing the cylinder above .452″ seems the consensus corrective action. The following is an excerpt from Bowen Classic Arms –
******************
“For years, cylinder throats in .45 Colt single-actions have been reamed too large for optimal performance with modern bullets. Leading and inaccuracy have plagued .45 shooters of Colt, Ruger and S&W revolvers too long.
The Ruger Co. has listened to it’s customer’s concerns and downsized the throats. Unfortunately, they overcorrected. Now, most .45 Bisleys, Blackhawks and Vaqueros have throats that are from .449-.451. This is too small for .451–.4515 barrels and swages down the bullets until they are undersize causing, you guessed it, leading and inaccuracy.
There is a simple cure… honing to size. We use a Sunnen industrial honing machine for superior results, honing up to .4525–.453, the optimum diameter in our experience.“
******************
From 1873, until just prior to World War II, the .45 Colt had a bore diameter of .454″. Post war production changed to .451″ – .452″, duplicating the .45 auto. Modern cast bullets available through retail always seem to be spec’d at .452-.454″, however, cast bullets always run a little larger. Jacketed bullet size seems to vary depending upon the manufacturer; Speer .451″, Hornady .452″ and Sierra fence straddles at .451″.
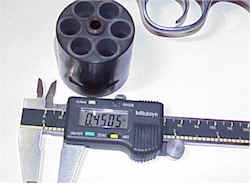 I pulled the cylinder from the Bisley and measured all six holes. They were pretty much all the same at .450″. The bore measured .451. So I thought, “undersize throats = an inaccurate gun, but the gun shoots .600″ groups.” So I decided to dig a little further.
I disassembled several of the Winchester Silvertip cartridges I’d been using, to see if this component would explain the gun’s accuracy.
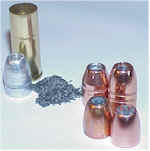 While I was at it, I took some measurements from a couple of other .45 cal bullets designed for both the Colt and the .45 auto:
.455″ 225 grain Silvertip, far left
.452″ 250 grain Hornady, rear, left
.451″ 300 grain Hornady, rear, right
.451″ 185 grain Remington, front, left
.451″ 185 grain Speer, front, right
The Silvertip, dimensionally, was a whopper and clearly subject to swaging through the undersized cylinder throats prior to entering the bore. The condition, however, certainly didn’t have an adverse effect on accuracy. I tried Hornady 250 and 300 grain bullets, and got the same accuracy results.
I think the undersize throat theory is interesting, however, I have another. The bullet gets pressed through a round hole in the cylinder maybe .001″ smaller than the bore. The accelerating bullet, hot and relatively elastic, hits the rifling under high pressure, upsetting the bullet material along the rifling path, and displacing it into the barrel groove, thereby sealing the bore.
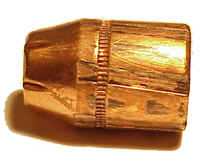 To the left is an example of a bullet that expanded to..looks like about 1.25″ … kidding. This is a picture of a 250 grain .452″ Hornady bullet, driven into the barrel with only primer generated pressure. The diameter of the bullet at the land formed grooves is .442″, and the diameter at the groove surface is .451″ – which is the bore size. The bullet really does look normal.
So what does this all mean ? Probably nothing more than I don’t have to spend $100 – $200 and wait 11 weeks to get a $350 gun to shoot straight. It also means I can use the money saved toward getting a decent finish put on the gun, or maybe some nice exotic wood grips, or I can toss the aluminum ejector rod housing for a steel replacement. I think Ruger deserves a reward, the gun already shoots better than I can. I bought the steel ejector housing, it was the only item I could cover with the savings.
Freebore – didn’t I just get rid of that ?
Near the end of the 1400’s, when rifling was introduced to firearm technology, there was a universal theory that explained why this rotation of a projectile increased accuracy. It seems that devils cannot stand on a rotating surface, therefore they could not come in contact with the bullet and misguide it from its intended path. I’m pretty much okay with that.
I think there are a lot of things you can do to improve a firearm’s accuracy. Sometimes the shooter is even good enough to take advantage of those improvements. I also think it’s possible to spend an incredible amount of money in areas that may offer no measurable improvement for any shooter. Considering we are always subject to the laws of physics, amazingly there is little reciprocity of opinion between experts who shoot rifles, and experts who shoot single action revolvers. Please keep in mind I fall into neither category, but I can offer this example, freebore –
Most handloading publications, when dealing with the issue of accuracy, will advise seating bullets so the chamber round will rest within .030″ – .100″ of the rifling. Some target and bench rest shooters go so far as to reduce handload powder charges so they can seat bullets against the rifling, while avoiding excessive pressure spikes. I know when I am working up loads for the rifles and the TC, I’m always stretching rounds to the maximum COL that will feed reliably, and still come within .030 of the rifling. This approach delivers absolute and measurable results, particularly with heavier bullets.
I was a little surprised to see Alpha Precision charging to put freebore in a customer’s gun – Taylor Throating. The site states freebore, two to three calibers long (.900″), will increase accuracy by 50%. They claim the improvement is the result of the bullet having a chance to stabilize before being gently guided into the rifling. I may have difficulty with the word “gentle” being applied to; a soft projectile, getting stuffed into an undersized hole, while accelerating to 1,200+ fps, in a temperature/pressure environment high enough to erode stainless steel. More so, short of fixing a broken gun, I don’t think I’ve seen any single mod that made a gun twice as accurate
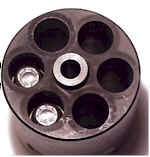 The chambers in a standard Ruger are approximately 1.710″ long. Max length of a .45 Colt round is approximately 1.600″, but the bullet ogive places the surface that will eventually make contact with the rifling, much further down in the cylinder. Between cylinder length, cylinder gap, and forcing cone, the bullet will travel a full half inch before hitting rifling – 5 times typical engagement distances for an accurate rifle.
Most of the time revolver shooters try to overcome an open breech by tightening cylinders, closing gaps and truing forcing cones. A process that removes almost an inch of rifling, would seem a little drastic. It’s possible I’m just missing something.
What to do…what to do ?
Not relating to Alpha, but gunsmithing services of this type in general – I don’t know what to make of these services and modifications. I’d like to have a really slick gun at some point in time, but I think I want the factory engineered functionality, only smoother, with less rattles, cleaner looking, and with greater consistency. I’ll revisit all of these areas in the near future.
I do think I will pass on opening the “tight” factory Ruger cylinder for $100, especially when there is a service on the other side of the street offering custom tightened of cylinders for $350. The entire gun only cost $350. I have no idea why each service brings up the fact that they use Sunnen equipment for boring and honing. The process has been around for over 25 years, and line boring/honing is not an exotic process.
I don’t understand the need for a $1,000 cylinder/bore line-boring job. It seems that achieving perfect alignment between the chambers in the cylinder and the barrel bore may initially make for incredibly tight and uniform alignment, but any normal wear of any of three or four parts that locate and lock up the cylinder, would more than offset any possible gain.
I don’t need to go retro on the Ruger and put a half cock hammer position back in the gun. I don’t need a cylinder that spins in both directions when unlocked, or will align for loading at the click. I don’t need a special 5 shot .50 caliber cylinder fitted for big game, my other revolver is a .338-378 Weatherby, nor do I need a more expensive version of the same sights that came with the gun. I especially don’t want anything that would make my Ruger look like a Colt.
In fact, unless deer or pigs get smaller, or the distance of 100 yards gets farther away, I’m pretty happy with the excellent, low cost product Ruger was able to bring to market. Are there modifications I will have done in the future ? Sure, but not right now. Triggers get rough, revolvers eventually require timing, gaps between cylinders and barrels widen. Eventually small parts, weak links, break and fall off, and cosmetics of a gun get boring or worn. We’ll see – there’s a lot to consider.
Practice loads – first handloads for the .45 Colt
There are so many loads and sources of information for this cartridge. Shows what 125 years of accumulated info can offer. I wanted to use Jacketed bullets, I wanted to use something at 250 grains and above in preparation for hunting loads, but I wanted something I could shoot a lot without having screws fall out of the gun, or my elbow. I also wanted to see if I could use a powder/primer combination in concert with other cartridges.
I decided on a 250 grain bullet for light target practice and to reserve the 300 grain bullets for something closer to hunting loads. The selection of Hornady in this instance, does not mean this is the final selection for the purposes outlined. It does mean I’ve had good luck with this product in terms of cost, quality and accuracy –
 |
Light target practice: Bullet: Hornady 250 grain XTP Powder: 7.0 grains Unique Primer: Federal #150 Brass: Remington Bulk Approximate ballistics: 750 fps, 312 ft/lbs. |
 |
Heavy practice: Bullet: Hornady 300 grain XTP Powder: 23.0 grains Win 296 Primer: CCI #350 Brass: Remington Bulk Approximate ballistics: 1250 fps, 1040 ft/lbs. |
As I work through this portion of the project, developing load data, I’ll evaluate each for 50′ or 25 yard accuracy. Near the conclusion of the series, I’ll drag a sample of each work up to the outdoor facility, and test longer distance accuracy, chronograph each, and summarize all of the data.
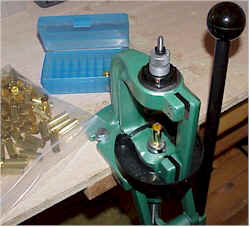 Okay – retro cartridge, retro press. This is a new procedure form me. Whenever I start loading a different cartridge, it goes into the single stage Rock Chucker until I’ve rung out various combinations. Then if there is to be volume runs, I move the cartridge over to the progressive press.
Step one was to run all of the virgin brass through a carbide resizing die (no lube) and into the first controlled lot. There are always little things to remember when changing from one cartridge to another.
Standard sizing dies are adjusted by raising the ram and screwing the die down until it contacts the shell holder, then tightened another 1/8 to 1/4 turn to “cam over”, or force the face of the die into the shell holder when the press handle linkage is fully extended. Carbide dies are hardened and do not respond well to impact, or direct pressure stress. Dies are screwed in until they just touch the shell holder, and no further.
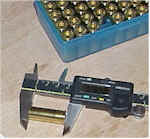 The Remington brass came out of the sizing die looking pretty good. The carbide actually burnished the cases and the overall case length was 1.280″ – about halfway between the “trim to” and max.
The full length resizing die took the case down in size significantly. There was perhaps a .003″ difference between the straight wall that passed through the die and the area immediately above the case head, .477″ compared to a spec of .480″. I don’t believe this will mean very much in use. The cases are not going to be filled to capacity, even with max loads, and I am not sure what the manual’s base line wall thickness was.
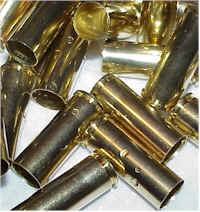 Prior to priming and slightly expanding the case mouth, I used an inside/outside chamfering tool to clean off any original manufacturing burrs. The cases were all washed to get rid of any process oil, prior to priming.
The new cases felt dry to the touch, or without a slippery film, but sizing 100 cases left drops of oil in the shell holder which had bled through the open flash holes. Without washing, this reside could have collected in the primer and caused misfires.
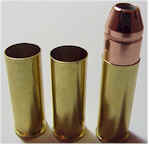 The cases were all run through the expanding die to facilitate bullet seating. Too much expansion works the brass and shortens its useful life. Too little expansion and the bullet could collapse the case when being seated.
I think the rule of thumb is to back out on the expander plug and very gradually ease it down until a bullet will just sit up inside the case mouth.
In previous articles, I’ve noted that I use the RCBS APS system, for lots of reasons. The APS press assures consistent primer seating. There is less handling of primers, which means greater ignition reliability. APS does not always mean CCI brand primers. In this case, I had an inventory of quality Federal primers that I wanted to use, so I loaded empty APS strips, using the tool RCBS offers for this purpose.
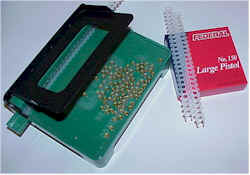 The primer box is inverted and opened into the tray of the tool, which also acts as a primer flipper, so bare hands don’t touch primers. Shaken side to side, the anvil side edge of the primers catch on the tray’s ribbed surface, roll over to anvil side up, and are ready to load into the plastic strips.
A discipline that is required when working with the APS system, is to use the correct color coded strip. White, for example, indicates these are large pistol primers. After filling, the strips are placed on large adhesive labels that seal the open side of the primer from contamination.
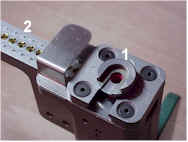 The change over from one cartridge to another with APS is very straight forward. The unit uses standard shell holders (1), so the same one can be swapped between the loading press and APS press.
You can see the strips loaded into the press, and the small safety shield. It’s a very compact unit that shares a mounting hole location with a powder measure. I have mine all held in place with wing nuts so I can clear them all off the bench when not in use.
The priming process took less than 7 minutes for 100 rounds, and that included un-sticking 4 case rims that became wedged in the shell holder of the press. First I thought I had a problem shell holder, then I noticed the rims on some of the cases looked oddly coined on the case head, so I checked some out.
| Sample | Diameter” | Var | Thickness” | Var |
| Spec | .512 | – | .060 | – |
| 1 | .506 | -.006 | .057 | -.003 |
| 2 | .505 | -.007 | .055 | -.005 |
| 3 | .503 | -.009 | .056 | -.004 |
| 4 | .504 | -.008 | .055 | -.005 |
| 5 | .504 | -.008 | .057 | -.003 |
| 6 | .505 | -.007 | .060 | 0 |
| 7 | .506 | -.006 | .055 | -.005 |
| 8 | .506 | -.006 | .056 | -.004 |
| 9 | .506 | -.006 | .057 | -.003 |
| 10 | .505 | -.007 | .053 | -.007 |
Looks like I just picked up some bulk brass with undersized rims. I don’t believe there is anything that will prove significant in use, but it caused the casings to really slop around in the shell holder.
The bullet seating die set up quickly; screw the die down until it hits the case mouth, crank the seating plug down until the bullet is properly positioned. Then back off on the seating plug, turn the die down 1//8 turn at a time until there is a proper roll crimp, then screw the seating plug in until it contacts the bullet. It’s a lot easier than it sounds and this is about 25% the size of the explanation that’s packed with the dies.
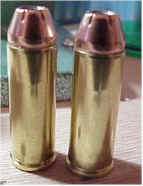 If the roll crimp is correct, at least in this case, it should be rolled into the bullet cannelure – not to large as to interfere with chambering of the round, not so small it won’t hold the bullet in place under heavy recoil.
It was nice working with this small chunky press. It took a little over an hour to load 100 rounds, but I don’t think a single round was off the 1.595″ overall cartridge length or had a malformed crimp. The simple single stage press produced very uniform results without any of the worries of missed charges, jammed primer shuttles or incorrectly seated primers.
 The only problem I had using this setup was the way I had equipment laid out, or maybe the fact I didn’t have things specifically set up. It was very awkward and difficult to establish a smooth pattern of motions.
I figure a few hundred rounds of struggling with the process will determine where things need to be, and how I can set up the work area and specific elements. But that’s probably another story.
I’ve had a chance to put quite a few rounds through the Ruger. The 250 grain loads group okay, probably capable of sub 1″ at 50′ which is fine for me. The recoil and muzzle blast are negligible, more of a “pop” than a roar and that heavy weight and grip soak up and potential jolts. I think the barrel must be made out of rubber, based on the way the front blade droops down below the rear sight after shooting 50 rounds or so. All I have to do now is find someone who can install a carbon fiber wrapped 6″ barrel.
The 300 grain bullet loads were not suitable for lots of paper punching, and they really changed the personality of the gun. This load is not without recoil, and it is not a quiet round to shoot. It actually seemed more accurate than the 250 grain loads. Several of the manuals or publications containing a wide variety of loads for the .45 Colt listed “accuracy” loads. It was interesting that none were very low velocity. I may try bumping the 250 grains up to 900 – 1000 fps and see how that effects accuracy.
I have bullets in several other brands arriving this week, several varieties of powder, some with magnum and some with standard large pistol primers. Right now it’s difficult for me to tell how sensitive the cartridge is to any particular components. I’m sure you’ve noticed that similar bullet weights, types and loads never track from one manual to another. Nice gun to work with, but really, really large. Can’t think what it would be like to shoot one of the Freedom Arms revolvers on a routine basis.
| More “Ruger Bisley .45 Long Colt”: |
| Ruger Bisley .45 Long Colt |
| Ruger Bisley .45 Long Colt Part II |
| Ruger Bisley .45 Long Colt Part III |
| Ruger Bisley .45 Long Colt Part IV |
| Handload Data |

Email Notification