

You wouldn’t think that “lead”, such a basic component of bullet casting, would be offered in so many forms. Pure lead is too soft for bullet material, and pure lead has some properties that make it less than idea for casting. The addition of modest amounts of tin and antimony can work to overcome both deficiencies; this alloy flows more uniformly into a mould, and it can be composed for greater hardness. Hardness is a major factor in determining a cast bullet’s suitability for various shooting applications, and hardness determines acceptable velocity levels for bullets made from a given alloy.

Lead, and lead alloy, are frequently assigned a Brinell Hardness Number. A Brinell hardness test is conducted by applying a specified load against the material, through a steel ball of known diameter, for a specified period of time. The load is then removed, and the area of the impression made into the material, is measured; Force is P (kg), D is the diameter of the ball, and d the diameter of the impression. I omitted the use of absolute numerical values because these may be changed, to some degree, in proportion; the ball diameter may vary with the applied force and duration of load. There are other common testers used to assign a hardness value to lead, such as the one produced by SAECO. With this tool, hardness is measured by comparing the penetration of an indenter into the test material, to penetration into a material of known hardness. The short fall is that the result is relative hardness, so the test is only as accurate as the rating of the test standard material, and the indenter covers a smaller area than the Brinell ball, so smaller hard spots in the alloy may result in erroneous readings.
Pure lead has a BHN of 5.3 @ 75º F, wheel weight alloy generally has a BHN of 9.0, #2 Alloy, at BHN 15, and hard Linotype is 22 BHN. These variations in hardness are determined by varying the proportions of lead, tin and antimony present in the alloy. Some forms of lead alloy may also be hardened through a heat treating process. As an example, properly heat treated wheel weight alloy could be increased in hardness from 9 BHN to 32 BHN without the addition of other metals.
| Alloy % composition1 | ||||
| Alloy | Lead | Tin | Antimony | BHN |
| Linotype | 86 | 3 | 11 | 22 |
| #2 Alloy | 90 | 5 | 5 | 15 |
| 16:1 | 94 | 6 | 0 | |
| 10:1 | 91 | 9 | 0 | 11.5 |
| Wheel weights | 95.5 | .5 | 4 | 9 |
| Pure lead | 100 | 0 | 0 | 5 |
Bullets cast from # 2 Alloy, or maybe halfway between wheel weights and #2 alloy, appear to be a good mixture for penetration on game, controlled bullet expansion and reduced bore leading. Bullets at this level of hardness seem to mushroom, but hold together within velocity ranges of 1500 fps to 2100 fps, whereas softer bullets tend to fall apart, and harder bullets may begin to fracture, splinter and lose a good deal of their original weight while passing through game animals. Most of the helpful mail I receive, advises me to forget cast bullet expansion and go for the large bore, large wound channel result. Still, if I have an opportunity to achieve cast bullet controlled expansion, it would be foolish for me not to at least make the attempt.
If you would like to know more about lead, and who wouldn’t want to know more about this electrifying subject, there are lots of good Internet sources. I would recommend beginning with “The Canadian Metal Group” technical section regarding lead. It will put a lot of the previously noted characteristics of lead into context.
Sources of lead and alloy metals
There are lots of sources of lead that may be suitable for bullet casting, although some forms may require the addition of other metals to make a viable bullet alloy. Scrap lead may be used, however, if the material is of unknown origin you probably won’t know not know the material’s composition, even if you could determine its hardness. I’d put lead recovered from range backstops into this same category, along with ballast weights, lead plumbing salvage and containers used to hold Kryptonite. You should not attempt to recycle some forms of lead, such as lead recovered from batteries, or lead that has received exposure to other harmful or hazardous chemicals. I’d also probably be hesitant to purchase scrap lead from nuclear power plants, or Russian submarines. I came to the conclusion I would only use new material of identifiable composition, or reclaim material from wheel weights received in their original form.
Cost effective retail sources of lead may not be in abundant supply. Special handling and storage of lead, as byproducts of environmental safety considerations, have added cost to lead distributing operations. With an atomic weight of 207, compared to metal such as copper at 63, lead is an exceptionally heavy material. Cost per pound notations on a supplier’s price list represent only a portion of the cost, as the addition of special handling, combined with a hefty shipping charge, can virtually double the listed price by the time the product arrives at your front door. You probably want to make sure you know the total tariff before you crank out that credit card information.
Used wheel weights are frequently cited, in information relating to cast bullets, as a low cost source of bullet making alloy. I don’t believe this economic opportunity would apply to new wheel weights, as new wheel weights at your local auto parts supply store could run between $2.00 and $3.50 per pound. With 7,000 grains to the pound, and assuming 400 grain bullet weight, you’d get 17.5 bullets per pound; a cost falling somewhere between 11¢ and 20¢ per bullet. If you are going to go this route, I’d try to stick with larger 2 oz+ weight sizes, because each weight will have a steel clip that will be discarded. So if you buy small weights, the clips will represent a larger percentage of waste per weight. In any event, beyond the expense of new wheel weight material, as with reclaimed weights, the use of wheel weights will add an extra step in the bullet making process; either material added to the alloy, or heat treatment for hardening.
Virgin lead and alloy can be purchased in ingot form from a number of places. The Antimony Mansite not only offers lead, tin and antimony in a wide variety of alloys, but it also contains a good deal of information regarding these materials. When I checked this location for prices, #2 alloy was $1.35/lb, plus handling and freight. They were also offering an enriched alloy of 33.3% each; lead, tin and antimony for $8/lb. Purchasing the more expensive alloy has the potential of reducing shipping as a cost component of bullet making, when this purchased alloy is combined locally with free reclaimed wheel weights at a ratio of 1:5 or 1:10 alloy:wheel weights. Other bullet alloy lead ingot sources are Meister Bullets, Buffalo Arms, both with prices in the $1/lb range, plus shipping and handling.
If you don’t mind the sales policies and practices, Midway USA sells a good selection of alloys in the 90¢ – $1.20/lb range. Of course they sell by the approximate pounds per ingot unit of measure, plus a 10% surcharge if you don’t meet the $40 minimum purchase requirement, and you can’t get the volume discount if you mix alloy types, and you have to pay the “Midway special deal” handling and UPS shipping charge….
Dependant upon your geographic location, local wheel and tire shops may not be eager to part with scrap metal to hobbyists; fear of litigation, and/or loss of salvage revenue. So you may need to dig a little. Used wheel weights from a friendly tire shop is no doubt the best deal, free of cost, no shipping charges, and the material can be mixed or treated for appropriate hardness. If you live in one of “those” areas where you may be concerned that you’ll get an anti gun reaction if you make a reference to bullet making, just tell them you want the lead to cast fishing sinkers. Better yet, tell them the lead is for bullets, they’ll probably give you the stuff just to get you to go away. If you go the reclamation route, or you go with new wheel weight material, picking up some solder bar stock at a plumbing supply house, can get you to a ready supply of harder #2 Alloy; 1 lb of 50/50 (lead/tin) solder bar, combined with 9 lbs of wheel weights, yields 10 lbs of #2 Alloy.
My wife and I went to various area wheel and tire shops in search of wheel weights. We offered to purchase the lead scrap from all, none took our money, and none refused our request. The first two larger franchised shops, concerned with EPA lead disposal logs, each gave us perhaps 20 lbs of wheel weights, the last shop gave us over 100 lbs in a large pail. In total, we would have enough lead for over 2,000 400 grain bullets, even without additive alloy. Always take a pleasant person with you when you are on a lead hunt.
Ingots from wheel weights
Wow, halfway through Part II, still no fires, and this bullet casting deal is getting to be a lot of fun. At this point we were going to establish a “Guess the melting point of ordinary household objects” pool, but even the potential of that much fun wasn’t worth the risk to life and limb. As an example, water in virtually any form that penetrates the surface of the molten lead, will convert to a gaseous state and travel to the surface of the lead and out into the atmosphere. Unfortunately, the exiting pressure can also take significant quantities of molten lead along for the ride, and if your giant gourd head is in the way….. Speaking of gourd heads, if anyone knows the whereabouts of a guy named John Durbin from Kentucky, married to one Mabel Durbin, let him know I’m looking for him. Thanks.
 The following is not meant to be a detailed check list to follow to convert wheel weights into bullet alloy ingots. It is a description of the process I followed, and I tried to note false starts and missteps as they occurred. When I was done, I had some items left over that will require further research, hopefully answers that will be in place for the final installment.
I can’t stress enough, the need to wear safety equipment, and to follow safe practices in handling material. Do not work with this process where a pregnant woman, or young children, may receive even incidental exposure to lead. Wear gloves, lead is absorbed through the skin. Don’t use the mask as pictured, if you are going to cast bullets on any sort of regular basis, it is insufficient. Wash your hands frequently, and don’t take a lunch break in the work area where food can come in contact with lead, unless it’s a hamburger, hamburgers taste better with almost everything on it. Keep all forms of liquid and moisture away from the molten lead, and never break the pot’s surface with a ladle that hasn’t first been heated to burn off all traces of moisture or condensation.
There are a lot of very hot items when working with cast lead, over 900ºF at times, none of which seem to radiant a lot of heat. Molten lead, as it is poured, does not smoke or produce steam, so many of the visual signs of heat and hot items are missing. It is because of these missing visual cues, concentration on the task at hand is essential, and you need to plan ahead in anticipation of things that could go wrong. After all, You wouldn’t want to come to the realization, when you have melted lead streaming from a stuck furnace nozzle, that you can’t molten lead in a Styrofoam coffee cup, after you’ve filled your ingot mold and lead pot.
Material Preparation
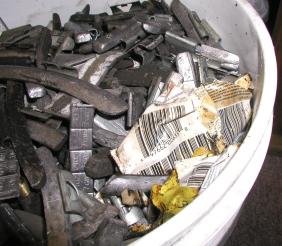 Included with free wheel weights is what I like to call “bonus” material, the manmade version of road kill. One of the big buckets we received, in addition to some fine used wheel weights, contained a few old valve stems, a piece of threaded brass tubing, a couple of tire size labels, and some heavy duty road dirt mixed well with anti freeze, and some unidentifiable meat. I also found weights that were cast coded AL-MC, and stick on weights with long runs of adhesive and rubber backed tape. I searched weight manufacturers’ catalogs, identifying and noting the codes that appeared on the weights to insure I knew what I was going to toss into the melter.
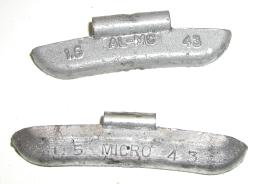 I found the AL-MC cast marked weights listed by the manufacturer as polymer coated lead weights, a coating designed to protect alloy wheels from contact corrosion with lead. I think, in the early days of aviation, that was called galvanic corrosion. Where I was unsure of an alloy and concerned the weights might be made of zinc or a similar metal, I scale weighed a sample of each, then immersed each sample into a cup of water with a scribed water level mark, to insure they displaced approximately the same volume; same weight, same volume, same material density – same or similar lead alloy.
 I placed what was deemed to be acceptable material in a shallow flat pan, and washed the weights thoroughly with kerosene. I did this outdoors, and it took a lot of elbow grease to get the gunk off. This is a really important step, because the junk being left behind could have turned into flammable or toxic vapor if subjected to lead melting temperatures.
When I was done with the kerosene scrub, I used an aggressive degreasing detergent to remove all traces of the petrol based and flammable kerosene cleaner. I used Simple Green, which is biodegradable, and removed any remnant of grease from the weights. I’ve also started to use Simple Green for brass case cleaning, it does a great job of removing carbon deposits from case interiors and, as a concentrate, it is relatively inexpensive. When the weights were clean, I placed them on newspaper, outdoors, to thoroughly dry.

Above left, is representative of the material that made the final cut. As I worked through the pile, with gloved hands, I rubbed the now loose adhesive backing form the stick on weights. Again, left in place it would have been more gunk to get out of the melter, or more unpleasant fumes to inhale. The pot of the Lee’s Melter holds 10 lbs of material, so I weighed out 12 lbs of the cleaned and separated material on a postal scale. I assumed some percentage of this weight would be lost to steel retaining clips and impurities in the alloy, both which would be removed as the metal reached a molten state. Almost all material is lighter than lead, so steel retaining clips from the wheel weights float to the surface as the lead melts away.
Using the Lee Production Pot IV
Generally speaking, the case to be made for bottom pour pot, versus a melter designed to be used with a ladle dipped into the top of the solder pot, is control of oxidation. Oxidation is considered to be an impurity in the alloy and will contribute to less than optimal quality production. The top surface of the pot will oxidize over the molten alloy and prevent further oxidation, and using a bottom pour melter diminishes the need for the protective surface of the pot to be disturbed. The Lee Production Pot is a bottom pour model with extra room beneath the nozzle for mould clearance.

I know I’m stating the obvious but, at the risk of causing readers’ eyes to glaze over… The chemicals, materials and processes used in bullet casting make for a relatively corrosive environment. Therefore, whenever you receive new tools and equipment, they will be covered with some sort of petroleum based protective coating; remove this before use.
Casting has a tendency to play tricks on your senses, so you have to really pay attention. In most other parts of the universe, steel is very heavy and sinks like a rock, which is more heavy material. So why do furnace and melter producers insist on hanging heavy weights on the lever, that you will use to actuate the steel rod that allows the flow of molten lead to the bottom nozzle ? Because steel is lighter than lead, and the flow cut off rod would float upward when immersed in lead, allowing the flow of molten lead through the nozzle. Is there a point to this speech? Of course, assemble all equipment as instructed, don’t leave things off because the purpose isn’t obvious.
I set the melter up near an open exit door and placed a fan on the floor that would pull fumes out of the room, while not blowing air across the lead pot. Airflow over the pot would alter the temperature of the lead. I also parked a fire extinguisher close by, and wore safety glasses and gloves. Next to the melter I placed a short check list of the steps I would take, and the safety points I needed to remember. I know that may make me sound like a dumbo, but sometimes things happen when following a new process, a distracting noise or a phone call; a short check list keeps me on track. Considering every pilot works a check list, for every flight, regardless the years of experience with the equipment and the process, I think it’s safe to assume hazardous environments require exceptional precautions.

This is the 10 lb capacity pot, surprisingly filled with 2 lbs of wheel weights. There is a huge difference between 10 pounds of molten lead volume, and a pile of unwieldy automotive parts. The melter has a range from a low setting of 450ºF to a stable 900ºF, but the pot has no thermostatic control, only a relative power level knob marked “Lo” to “Hi” with the values 2 – 9 in between. While casting is best done at or slightly below 650ºF, various guides suggest expedient melting near 750ºF. This higher temperature is still below the melting point of unwanted material that might be present. As the lead melts, this material remains solid and can be skimmed out along with the steel retaining clips> From the periodic table – zinc with a melting point of 787ºF, and aluminum with a higher melting point of 1220ºF are two such undesirable materials. I set the temp control know to “7 ½” – I figured I’d be close.

After 10 minutes of melter operation, the weights began to disappear below the pot rim, as the weights they were resting on began to melt. There was now room for more weights to be added, but I was concerned about condensation forming on the steel clips as part of an evaporation process, and getting pulled beneath the surface of the molten lead. I decided I would only add more weights as long as there was a base of whole weights in the pot to support them. This would allow the weights being added to preheat before they reached the molten alloy.

This is what 5 lbs of lead look like in the Lee Melter after approximately 20 minutes of operation. The last of the lead, protruding up from the glop, was dropped in perhaps 5 minutes earlier. The smoke was pretty vile, and the melted contents looked like someone’s melted garbage. No, I don’t actually know what melted garbage looks like, but I bet this is close.
I began running an extendable magnet over the surface of the melted alloy, pulling what I thought would be all of the scrape retaining clips from the surface. I would suggest not using this type of tool as the magnets will quickly heat and melt the plastic material that retains them. Then you will have to locate another magnet to fish the first out of the pot. When I was done pulling steel clips, and there were plenty – almost 30, I had a somewhat smooth and, I thought, relatively clean pot full of fine bullet alloy; nope, not even close.

All instruction available from any credible source, all pointed to the need to locate a tool that would scrape dross from the sides and bottom of the pot, pulling it to surface center, in preparation for fluxing. Old metal spoons topped the list, and I quickly discovered that ladles are not right for this application. I may of also discovered why a 20 lb pot is better than a 10 – there would be more working room.
I found a thin stainless bladed tool designed for this purpose. If you can’t locate one at your local bullet casting store, you might want to try looking for a narrow stainless cake spatula at your local housewares store; $8 with a heat insulating heavy wood handle. Preheated first, the blade was run down the sides of the pot and the dislodged scum was lifted to the center of the molten alloy. I was careful not to lift the rod that seals the nozzle while I was in there poking around. Once the dross was in the center, I plopped some Marvelux on the top of surface of the alloy and watched as it melted. Marvelux is not to be forced down into the allow while it is melting, it is a water absorbing substance. The surface began to solidify in a thick pile of steel and what I believe to was zinc and remnants of poly coating.

I thought the lead alloy was reasonably clean before I started the scrape and flux process. To the left is a portion of what came up from the sides and bottom of the pot. There were more clips that I assume were trapped beneath the surface, maybe under the valve rod, and large chunks of metal that were not melting even though the temperature was relatively high, I assume this is zinc.
I fished around with preheated tools and magnets for maybe 15 minutes, fluxing again, then stopping when the alloy was smooth and a bright silver color. The silver then turned to a uniform dull gray, which is how the pot should look after the surface has oxidized over, with tin floating on the surface. This flux deal isn’t as straight forward as it may first appear.
You and your flux
Just when you think you know what flux is, you find out you don’t, or at least you discover differing opinions as to why you would use any of the fluxing products. I’ve seen seasoned commercial sites refer to flux as a catalyst that recombines alloys such as tin and antimony with lead in the melter or furnace. I’ve seen others that suggest flux is used to extract or consolidate oxidation debris from molten lead for easy removal of the same. Lyman’s “Cast Bullet Handbook” actually contains two conflicting articles; one (page 57) suggesting flux is used to recombine separated metals, the other (page 51) insists the flux does not act to combine metals, but rather serves only the purpose of pulling separated dross (impurities) from the molten alloy. Other books, such as “Practical Casting” by Tim McCreight pretty much give flux credit as a cleaning agent, an accumulator of dross. “The Complete Book of Sand Casting”, C.W. Ammen, defines flux as a combining agent for metal oxides separated out by extreme temperature. The text book definition of flux is an agent used to prepare for fusion by removing oxides. At this point, I’m not sure which explanation is correct, but the important contribution is uniform across all – flux will act as an agent for gathering dross for removal, which may mean these are all correct definitions, just differently expressed, and some more extensive in definition than others.
What I encountered, when fluxing, probably tracks more to the page 51 description. Flux, in the form of Marvelux, paraffin or beeswax is plopped into the middle of the molten alloy. These are small quantities; the book references a pea sized portion of paraffin or beeswax. Flux cannot combine with the metal and will remain, for 20 minutes or so, in a liquid state floating on the surface. The dross, mostly beneath the surface, would not come in contact with the floating flux. The method for putting dross in contact with the flux, is to scrape the dross from sides, bottom with a ladle or spoon, then pull the scrapings to the center of the alloy and up to the surface, and into contact with the flux. This is where the collected dross will reside until removed from the lead alloy with a ladle or similar, and this is about how it worked for me.
Casting ingots of bullet alloy – finally!
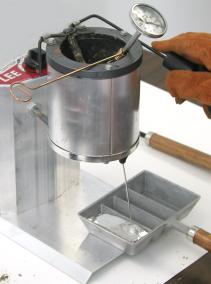
This is a pretty good picture of what not to do when pouring alloy. First, there is the improper positioning of the wire support that wraps around the thermometer. It should prevent the thermometer from falling into the molten alloy, and it should keep the tip off the bottom of the pot. It’s like a poultry thermometer, don’t hit bone or it will give an erroneous reading. Mine clocked 1,000ºF + before it was moved to a more temperate 750ºF climate. Over temping alloy is bad in that it is possible to burn off alloy components such as tin, and cause an irregular grain structure that would appear as a frosted finish on bullets cast from the material. Better to start at a lower temperature, and work as close to 650ºF as possible.
I think it is best to keep the vessel receiving the lead as close to the nozzle as full vision permits. Poured from up high, the liquid will puddle, then begin forming high formations of lead bubbles. See below.
 Make sure you have plenty of space for the molten lead. I made reference to this before, but the lack of space could become a serious problem if the valve bar can’t seal the nozzle closed.
I found that thick untreated seasoned blocks of wood make great places to park a hot ingot tray while it is cooling. Don’t work on this part of the process with anyone else nearby. A “Look over there!” with a friendly intent, is enough to cause a hole to burn through your work bench, or shoe. What you need more than anything else, except for maybe lead, is focus during the process.

Emptying the pot is a lot like draining the swamp, you get to see a bit of what ordinarily lies beneath the surface. One look at the scunge on the walls suggest this is not a neat and clean process.
I drained the pot when I was done, however, the melter manual suggests leaving half an inch of lead in the pot to protect it and the nozzle valve seat from corrosion. I took the other path that suggest draining the pot so it doesn’t start out with the nozzle stuck open the next time it is put into use. The pot pictured on the left is too dirty to be placed in any type of long term storage. If storage was the intent, I would have scraped, wire brushed, then sprayed with a rust inhibitor.
Was it worth the effort?

I made these ingots. Sure, they may be amateurishly poured, and slightly discolored from improper fluxing and too high melting temperature, but they’re mine. Next time, taking into consideration what I learned from this experience, it will take less than half the effort, and result in a much more professional result. More so, the process was fun, and I was able to get over 4 lbs of clean lead alloy from 5 lbs of scrap lead wheel weights.
Sometimes I’ll hear from an enthusiast who won’t work in certain areas because they require too much labor. I always figure it’s all part of the enjoyment of firearms, and where would the line be drawn; too far to walk to hunt, to time consuming to handload, too much time to drive to the range?
I’m going to press on with my bullet casting exercise and see if I can make some bullets that shoot straight, bullets I made with my own hands.
I think I’ll close with the note that RCBS hasn’t lost a step since the take over by Alliant. They were very courteous in helping me find a retail source for a couple of odd moulds, and everything in now sitting on my bench, waiting to be used in the next installment.
More “Casting bullets and selecting fire extinguishers”:
Casting bullets and selecting fire extinguishers Part I
Thanks
Joe
Email Notification