I’d like to thank Tom Henry for writing to me about the original article and for pointing out areas I might revisit. Good points and the comments were constructive. I don’t always get it right and I want to make sure the best information possible resides on the site. This time I changed the emphasis of the article and hopefully was more fair and accurate in my assessment. With that said –
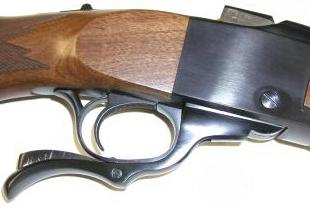
A Ruger No. 1 Tropical .375 H&H magnum is an interesting gun; not a lot of fancy stuff, but clean and simple design and very strong. Ruger always seems to achieve efficiency of design in their firearms, handgun or long gun, and form always seems to follow function. Since the gun was so sound to begin with, when my .375 H&H Ruger No. 1 Tropical became the basis for the .358-378 RG project, only the barrel needed replacement, all other original parts were retained, with only slight modification, so the integrity of the original design would be retained.
In modified form, the result was a nicely finished, relatively accurate, 9.5 lb boulder lobber, that kicked like a mule and had a ragged 6 lb trigger pull. I didn’t mind the recoil so much, it sort of woke me up and got my attention when I was shooting, but that rough and uneven 6 lb trigger pull was difficult to manage and just had to go. There is some degree of trigger spring loading and over travel adjustment in the Ruger factory trigger, but I was unable to bring the pull down below 5 1/2 lbs. The pull range varies from one specimen to another. I have a second gun, a stainless version, that begins at about 5 lbs and can be adjusted down to about 4 3/4 lbs. The two primary factors beyond the small trigger spring that contribute to trigger pull are the sear spring, and the sear/hammer finish and engagement. The sear spring is easy to change, but modification of the hammer/sear engagement is typically work for a gunsmith. It takes a good deal of skill to properly modify these parts for safe operation and once the metal comes off, it’s not going to go back on.
An alternative approach to a trigger job that can provide most of the benefits is an adjustable trigger kit. I started thumbing through catalogs for potential replacement trigger suppliers and came up with the T. L. Moyers Ruger #1 and #3 Steel Adjustable Trigger which, in this case, was offered throughBrownells. The Moyers trigger appeared to offer a wide trigger pull adjustment range, as well as the addition of an adjustable sear engagement screw, items important for the reasons previously noted.
Then gas should be $160 per gallon
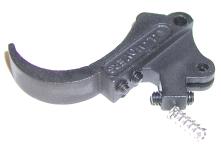 The little cast part, with its three set screws and a small sear spring, showed up in a blister pack. At $53, I was pretty sure there was a prize to be found in the package but none was to be found. Still, at $53, it was $46 less than an even more diminutive assembly offered by Wild West Guns for a Marlin lever gun – one of the reasons I passed on a Marlin based project. The Moyer part was of quality finish, meaning it would enhance the appearance of the Ruger once installed.
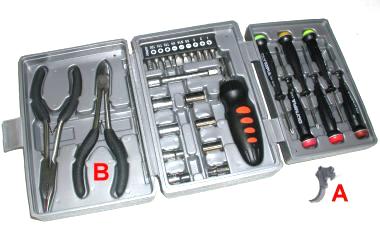
As for comparable value, I can offer the examples at the left. “A” is the $53 1″ piece of investment casting with 3 tiny set screws and spring. “B”, the fold up tool kit: spring loaded cutters and needle nose pliers, 9 piece driver set including common, Phillips, hex and Torx, extension, 8 sockets, a driver handle, 6 anti magnetic micro screw drivers – $9.95 at three local retailers, and yes, I think the cost of parts like this are excessive. Of course, there is free choice to buy, or not.
Preface – The trigger as a very, very small seesaw
I believe, at some point, all the aftermarket trigger guys got together and decided they would entice a certain segment of the shooting public with the product warning message, “Whatever you do kids, don’t adjust the trigger pull below 2 lbs as this would be too light and dangerous”. A clean and predictable trigger is probably more useful than a light mushy trigger, however, I’ve recently read where a predictable trigger isn’t as good as an unpredictable trigger that causes the shooter to anticipate the firearm discharging. Personally, 4lbs and crisp is fine for me. I have a difficult time shooting a gun with a very light trigger pull.
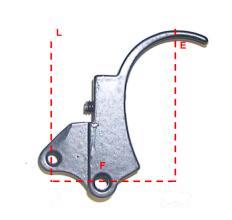
The No. 1 Ruger trigger is a simple lever. The side that contacts or connects to the balance of the firing mechanism represents “load”, the curved area of the trigger where the finger makes contact represents “effort”, and the center pivot point is the “fulcrum”. The distance from “L” to “F” is approximately .440″, the distance from “F” to “E” is approximately .600″ which yields, I believe, a mechanical advantage of about 1.3:1. From any dimensions I was able to check, the Moyer trigger appears not to differ from the factory trigger, which would suggest it offers no mechanical advantage over the factory trigger outside of the ability to reduce sear/hammer engagement to reduce pull. Based on the force required to lift the sear where it linked to the trigger, I though 4 lb was the lightest pull that could be achieved by using the reduced power sear spring, but without reducing the sear./hammer contact.
Disassembly and installation
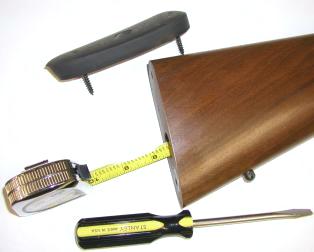
A less than exciting, sort of illustrated, 17 step set of instructions was provided on the back of the trigger’s blister pack. If you are new to the Ruger No. 1 and attempting this task, you may want to have a more complete assembly guide handy. I used “Sporting Rifle Take Down & Reassembly Guide. Second Edition” by J.B. Wood to fill in the blanks. The Moyer instructions have a step “A” in the midst of numbered steps, which don’t related to “Spring A”, but rather the “Sear Spring”, a part with the label “Sear Srping” that points to a pivot pin. The actual sear spring recess and spring are not illustrated within the drawing. Once through it, the process is very simple.
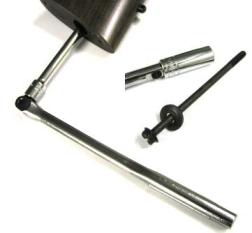 The J. B. Wood book made reference to a “B-Square Stock Tool” for butt stock removal, I’m pretty sure that’s Esperanto for a 10″ shank common screw driver, or a 7/16″ 12 point thin wall deep socket, a 10″ extension and a 3/8″ drive breaker bar. Either will work as the long hex head bolt does have a narrow cross slot. The B-Square tool, a little over engineered for the task, sells for $46.95.
I prefer the socket approach, as long thin screw drivers don’t generate a lot of torque, and the bolt is really stuffed in there. I use extension bars with locking detents, this way the socket can’t easily bind on the bolt head and drop off the extension, way down in that deep hole, where it obviously could only be retrieved by cutting 10″ off the end of the stock.
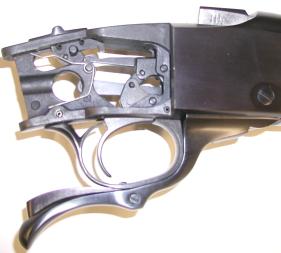 If you own a Ruger single action revolver and have ever removed the grip panels, you’ll find the same quality investment casting manufacturing process has been employed in the Ruger No. 1. There is nothing sloppy about the assembly, parts are properly machined and detailed, with no sign of flash or rough surfaces.
There are only a few parts in there to deal with for the purpose of changing triggers: trigger, sear, safety, safety bar, a safety spring, etc.. The heavier parts: breech block, operating lever, transfer block, hammer spring and strut assembly are all forward, with a portion of those assemblies extending out into the forearm. At this stage of disassembly, the T.L. Moyers instructions were useful.
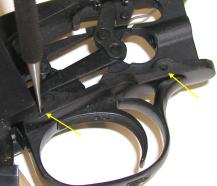
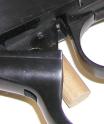 I always have a difficult time supporting slab sided assemblies, either the supporting surface gets in the way of the work, or mars the surface of the assembly. The hard oak dowels from an old oak tie rack (right) solve both problems and are hard enough to not dampen hammer taps to a punch. With the rifle’s buttstock removed, the next step was to punch out the trigger guard roll pins, as marked with the yellow arrows in the left photo. The holes are chamfered on the right side, so pins are driven out from the left.
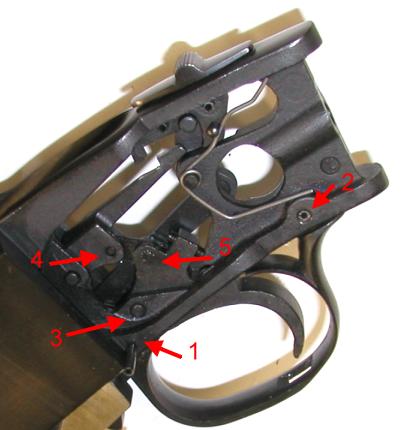
The disassembly and assembly steps are relatively straight forward. The only error I found in the instruction card was a minor issue relating to the trigger guard removal sequence.
After removal of the guard pins #1 & #2, the interior guard curve hits the back of the Ruger trigger before the guard’s locating surfaces can clear the action. Removing pin #3 allows the trigger to be moved forward, providing enough clearance for the guard to clear. Conversely, it is easier to install the guard prior to installing pin #3, the trigger pivot pin, on reassembly.
Pin #5 affixes the sear link to the trigger, and is easier to remove after the trigger has been removed from the rifle.
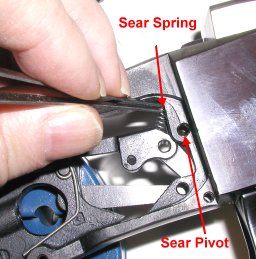
Changing the sear spring is not a big deal once the trigger is out of the way. The sear pivot pin is removed with light finger pressure. The trick with a reduced rate sear spring is to maintain a balance between reducing spring loading friction, while not reducing pressure to the extent there is insufficient force holding the sear and hammer in position when the gun is cocked and loaded.
It is probably a good idea to have some new roll and stake pins around. Hardware tend to get a little sloppy in fit if any assembly is taken down enough times. As an example, the trigger pivot, without the butt stock to hold it in place, tends to fall out when least expected, dumping the trigger spring out of its recess in the process. Also, the guard roll pin tended to get deformed even with the proper punch and handling.
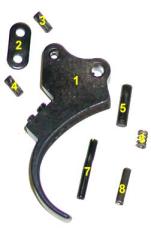
Reassembly is accomplished by reversing the prior procedure. The guard needs to be placed, but not secured, before the trigger is anchored. There are only a handful of parts to work with.
1) Trigger
2) Sear link
3)Sear link pin – sear side
4)Sear link pin – trigger side
5)Trigger pivot pin
6)Trigger adjustment spring
7)Forward trigger guard retaining pin
8) Rear trigger guard retaining pin
#’s 2, 3, 4, 5 and 6 are transferred to the new trigger.
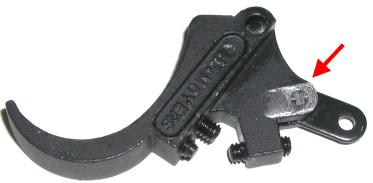
The sear link pin, when fully seated, protruded from the side of the Moyers’ trigger and interfered with the safety bar. A quick pass with the milling machine cut the pin flush with the trigger’s surface, and provided sufficient safety bar clearance. A file would have done the job, but the little micro mill is easy to set up and makes for much cleaner and precise work. The small milling machine and lathe are in use all of the time.
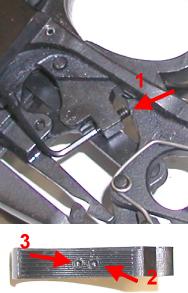
After all of the parts are stuffed back into the action, a three step adjustment completes the job.
1) With the safety off, the action closed on an empty chamber, the trigger’s sear engagement screw in turned slowly clockwise until the hammer falls. The adjustment screw is then backed out 1/2 to 1 full turn.
2) With the hammer recocked, the over travel screw is turned clockwise until it contacts the receiver frame. The trigger is then pulled, and finger pressure maintained, as the over travel screw is backed out until the hammer falls, then the screw is backed out an additional 1/4 to 1/2 turn.
3) The weight of pull screw is turned clockwise to increase trigger pull, counter clockwise to reduce pull. From compressed to slack, the change in trigger pull is approximately a pound, so the pull range is shifted down more than broadened.
Which left me with….
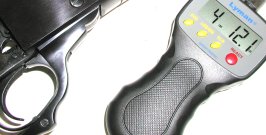
Using a Lyman digital trigger pull gauge, and prior to adjusting the sear/hammer engagement, I checked the new assembly in at roughly 5 1/2 lbs, then adjusted the trigger spring out until there was no change resulted in a pull of 3/4’s of a pound less or 4 lbs 12 ounces. Attributed to the lighter sear spring, pull was reduced by approximately 1 1/4 lbs. At this point I went back in and reinstalled the original trigger with the light sear spring and got virtually identical results.
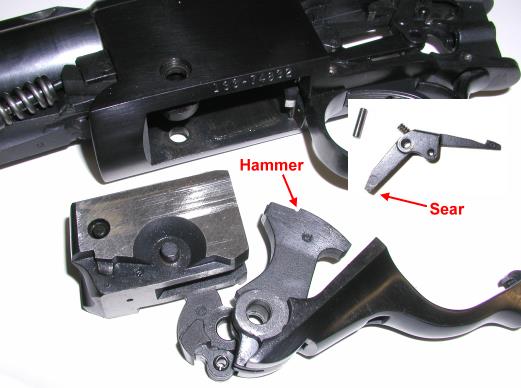
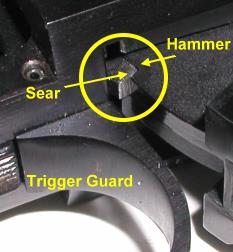 After making the proper detailed sear/hammer engagement and over travel adjustments, was able to hit a low of 3 1/4 lbs with the trigger screw turned out until no change occurred with further adjustment. The trigger pull was fine, but it seemed a little rough, enough to feel the surface imperfections transferred through the trigger. The circle identifies the sear/hammer engagement. If you look closely you can see the tool marks on the sear.
I’m not going to detail this process. That would be better served by a proper manual outlining the procedure of polishing these particular surfaces without rounding anything over or altering the angle of the surfaces. I mentioned before, what comes off can’t be put back on and the hammer is not a stocked spare piece part, so if it’s ruined you’d be on your own.
The balance of the disassembly is not complicated with the assistance of a guide to help where little tricks and some cautions can help simplify the task. Essentially, the forearm was removed, the hammer strut is unloaded, pinned and removed, and the lever, hammer, breech block and breech block arm were pulled out.
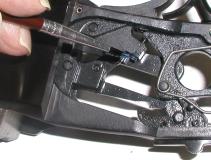 I basically placed each part in a soft jawed vice and polished out the tool marks with a square smooth white ceramic stone, making sure to remove no more than absolutely necessary. After refitting the parts, I went back and made the same set screw adjustments to compensate for any changes in fit and the tool mark clean up. As I was making my final adjustments, I used a small brush to dab a little medium hold Loctite on the set screw threads, being careful not to let excess run off into other areas. Parts secured with blue Loctite can be removed in typical fashion, but will not vibrate out of position. I rechecked the fit of all the parts for interference, pin insertion, operation of safety and part engagement, then got out a rubber mallet and thumped away on the stock, action and barrel of the cocked empty rifle to make sure it would not fire inadvertently. The final result was an adjustment range down to 3 lbs. Not the 2 lbs indicated by Moyer, but certainly a vast improvement over where I was when I started the project.
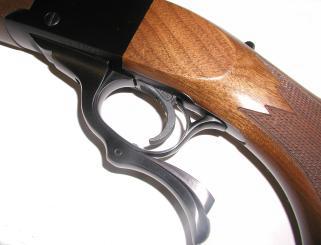
The trigger feels very good, there were no misfires or unexpected events, and it looks like a decent modification. There are only a couple of suggestions I could make on the product. The first is for a lower price. $53 is a lot for a simple casting, even when it represents a good idea. The second, corrected and improved documentation would make proper installation and assembly a snap. Too many parts guys are gunsmith snobs and assume everyone buying the product will know how to install without documentation. To tell you the truth, the marketing sort of obscured the primary benefit of the product; a light and adjustable trigger pull, with no hand fitting required.
12/02/2010
Thanks
Joe

Email Notification