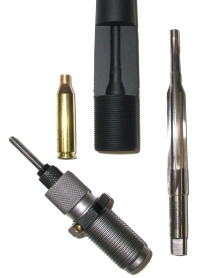
 So a chamber reamer, a cartridge case, a sizing die and a barrel walk into a bar….. I know, you’ve probably heard this one before, but I thought I might tell it again for the folks who haven’t. If you’d like to optimize your handloads for your specific rifle, and have not made much of an investment in controlling cartridge headspace and cartridge overall length, you may want to follow along. I know I’m reading much of this for the first time myself.
Why should anyone care about headspace and COL? The theory has been advanced that minimum headspace and maximum COL lead to diminutive and consistent group sizes. The theory is that minimal headspace means a cartridge can’t move forward or around in a gun’s chamber when unsettled by a firing pin strike or expanding gases, and a maximum COL bullet can’t take a right turn while making that precarious leap across a barrel’s unrifled throat to the security of the rifled bore just ahead. I’m not a competitive shooter, I don’t own sophisticated firearms, but I can usually get MOA or better groups out of my rifles. I do handload to minimum headspace and maximum C.O.L., so maybe there is something to all of this.
Accuracy and consistency are very important, however, controlling headspace and setting proper C.O.L. also represent improved safety and reduced cost of handloading. Excessive headspace can cause case head separation and gases in excess of 60,000 PSI escaping from a rifle’s chamber. Too little headspace can result in a chamber forced bullet crimp and a bullet that becomes an obstruction more than a properly secured projectile. Excessive C.O.L. can result in a rifling bound bullet, a condition that could result in spikes of excessive pressure. As a matter of economics, excessive headspace causes brass to become work hardened, which typically results in premature case failure. Annealing can restore proper case temper and hardness, but nothing can repair brass that has been stretched to the point of fracturing. As interesting as all of this sounds (Hey! wake up!) let me define some of the contributing factors.
Mechanical associations and creating a common set of reference
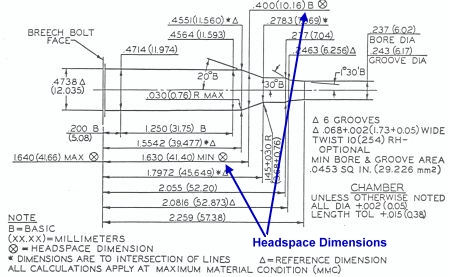
Most cartridges used within the United States are defined within ANSI/SAAMI Z299.3-4. In the case of the .243 Winchester, as an example, there are pressure specifications, cartridge drawings and, as pictured above, chamber drawings. Armed with a chamber drawing, each manufacturer producing a firearm for the .243 Winchester knows the proper standard dimension to cut chambers and set headspace. Notice there are two headspace reference dimensions for the chamber. The upper is a place in the chamber where the shoulder is .400″ in diameter; the “datum” or “basic” line. The lower is the 1.630″~1.640″ minimum – maximum dimension from the breech face (bolt face) to that point in the chamber that measures .400″. The actual headspace of any firearm is the distance from the breech face to the point in the chamber that is intended to prevent forward motion of a cartridge.
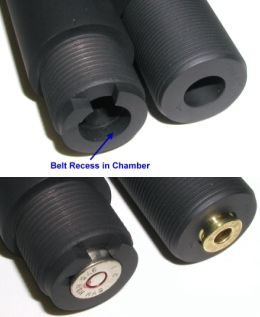
These are but two examples of a number of methods employed for locating a cartridge within a barrel. On the left is a Ruger No. 1 barrel chambered for the .375 H&H, the barrel on the right is a Savage Model 110 type chambered for the .243. Notice the Ruger barrel has a radial recess cut at the rear of its chamber to locate the cartridge on the leading edge of its belt and prevent it from moving forward beyond that contact. The .243 barrel has no such groove, as the forward movement of that cartridge is obstructed at the shoulder point noted earlier on the chamber drawing.
How far a cartridge case head extends from a chamber, when comparing two different types of firearms may be irrelevant. The case head of the .243 projects from the rear of the barrel, where it will be enclosed within the Savage 110 bolt head recess. Because the Ruger utilizes a breech block that travels vertically, rather than fore and aft like a bolt action firearm, the barrel must provide full support of the cartridge case head. The notch in the barrel where the case extractor groove is exposed is filled by the gun’s extractor when the breech is closed. Chambers of exacting dimensions are cut into barrels with reamers.
Chamber Reamers

A reamer is basically chamber dimensions transferred to a high speed cutter. If you look closely, squint your eyes just right, you’ll see the outline of a .243 Winchester case. If you aren’t squinting correctly, you might see a naked lady, an overbearing parent or a giant rabbit flying an airplane, but we can address that subject for a different time. The 2.055″ red highlighted dimension is the cartridge case portion of the reamer which concludes at a case mouth accommodating .277″ diameter. The next portion of the reamer, begins with a .246″ diameter and tapers to .243″ over the span of perhaps .250″ of an inch, this forms the chamber throat which is located just forward of the chamber. The reamer then tapers from .243″ groove diameter to .237″ bore diameter which forms the leade, or the section of the rifling where land height is increased groove diameter to .237″ bore diameter; the distance between opposing lands. There is no significance to the further reduction of the reamer to .221″ diameter, other than it is small enough to have no effect on the barrel’s bore or rifling. The remaining .750″ or so of the reamer is a non cutting .237″ section, bore diameter, that acts as a pilot to align the reamer while it is cutting the chamber.
Historically, most case shape and taper designs have been less the result of intended performance and more to do with the then state of tool making. The belt on the back of those H&H cases and derivatives had more to do with ensuring the case head was in the vicinity of a firing pin and breech surface at a time when machines and tools that reamed chambers may have been exacting, than to add strength to what was a cartridge with a moderate operating pressure.
A barrel in the aftermath of a reamer attack
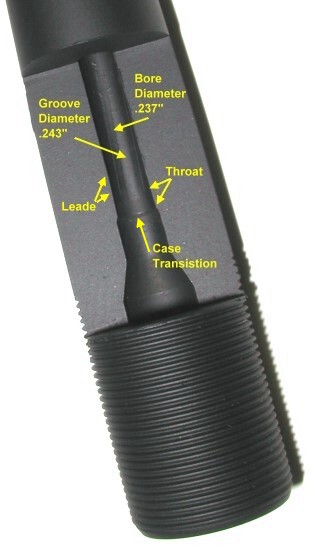
If you run a chamber reamer into a barrel with a rifled bore, this will pretty much be the result, without the nifty chamber compensator. I didn’t want to cut up a good barrel, so I attempted to buy something from Pac Nor. Unfortunately, they never answered my sales inquiry so I had to go with an Adams & Bennett barrel. I clamped it down in a small milling machine and lobbed away until I had this cutaway. I think I learned a lesson about rough milling versus finish milling, and I learned that I can’t increase the amount of material that can be removed with each pass, just because I’m bored into a stupor.
Rifles barrels can be acquired not chambered, short chambered so the final cut can be made to finesse headspace to a specific action or, like this one, fully chambered. Some rifles allow shooters to change barrels with simple tools, as is the case with the Savage Model 110. Other require accurate work by a gunsmith – machinist and a lathe large enough to pass a barrel through the spindle; not a casual endeavor.
Some people go through a lot of trouble to keep chambers tight, and there are special order reamers that allow personal preferences for throat diameter and length, there are roller tipped pilots, spiral flutes, straight flutes, roughers and finishers, and a few things in between. A standard reamer runs about $85 from outfits like Brownells. I’ve purchased custom reamers for wildcat projects at about twice that cost from Clymer. Reamers can be used multiple times and they can also be resharpened.
Another part of the equation
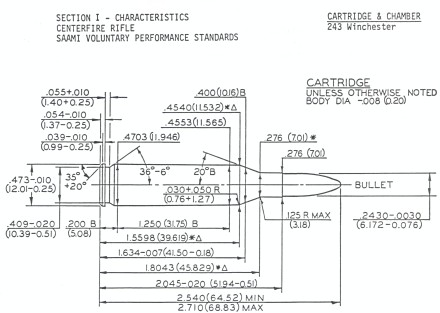
There wouldn’t be much point in having a specification for a chamber, if there wasn’t going to be one for the cartridges that it holds. In addition to chamber drawings, there are cartridge drawings. The one for the .243 Winchester looks a lot like this.
How things match up
 The chamber headspace spec is 1.630″~1.640″, while the cartridge reference spec is 1.634″(+000/-.007″). Based on spec, it would seem theoretically possible to have a cartridge longer than a chamber, so headspace within specification may range from a .004″ crush fit to .013″ clearance. I have never had a factory round or new brass that was too large to fit the smallest chamber. I assume they do not want to suffer the embarrassment of shipping ammo that won’t fit a minimum chamber so they rely on the elasticity of cartridge brass to literally take up the slack.
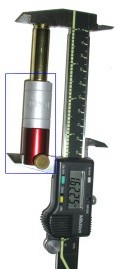
Stoney Point makes an inexpensive ($30) cartridge headspace gauge (framed) that can check the headspace reference dimension of: new brass, cartridges and, almost, a gun’s headspace dimension. The opening in the silver bushing that is locating the case for measurement has a .400″ opening, the basic dimension on the cartridge drawing. Funny how that all comes together. Unfired brass checked in at 1.622″ or well below minimum chamber and case spec. Factory ammo, from several sources ran 1.620″; shorter still. Brass fired in my Winchester Model 70 measured 1.630″ and brass from my .243 Browning BLR measured 1.631″. My brilliant deduction is that new case handloads and factory cartridges see as much as .011″ headspace in my firearms when initially fired, and that is substantial as headspace goes. Fired, pressure formed cases are well within the spec range defined by ANSI/SAAMI specification. Using fired brass as a guide when setting my reloading sizing die, I am able to keep all of my handloads based on fired brass at 1.629″. Headspace is reduced to just .001″~.002″, and rounds still chamber reliably to ensure no feed jams in the face of a charging tree squirrel.
Sizer die setting for minimum headspace
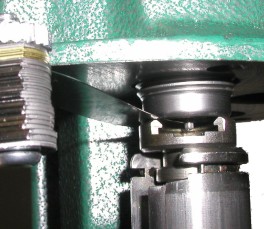 The easy way to size to a fired case is with a neck sizing die that does not contact the case body. However, one of the rifles I handload for is a lever action Browning that lacks the mechanical advantage of a bolt action rifle when extracting. This means I need to full length resized handloads for this application. Normally a die would be adjusted down until it touched the case neck, and maybe a 1/4 turn more, but the force required to run a full length resizing die down over a cartridge does not permit this approach. I back off the sizer die, run the ram to the top, put a feeler gauge between the die and the shell holder, then turn the die in until it just makes contact with the feeler gauge. In this case a .008″ feeler gauge yielded a 1.629″ case head space reference dimension. It is easy to start with a thicker feeler gauge and work down while checking progress with the Stoney Point gauge.
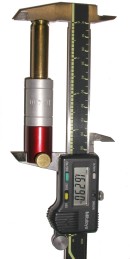
I’ve heard that dies set up for minimum headspace should be adjusted to just make contact, then another .001″~.002″ further to assure enough room for the cartridge to chamber. When I load for more than one rifle utilizing the same cartridge, I typically set my sizing die to just contact the shortest fired case. It takes somewhere around 12,000 PSI to get brass to expand and conform to a chamber, but even 60,000 PSI of full chamber pressure will not cause brass to expand to and remain at the exact size of the chamber. Case material temper will cause it to spring back a couple of thousandths after firing so the necessary clearance is built in, when the sizing die just contacts the shoulder of the fired case.
Once the case is sized to minimum reasonable headspace, MRH from now on, it is reasonable to move on to establish overall cartridge length and an OK way to measure the same. A couple of tools that work well for these purposes are the Stoney Point O.A.L gauge and the Stoney Point Bullet Comparator. No, I don’t know what they call their Overall Cartridge Length gauge and O.A.L gauge and not an O.C.L. gauge, especially since the little instruction sheet packed with the product reads, “(1) Determine overall cartridge length (O.A.L.).
Determining Cartridge Overall Length
Earlier in this article I indicated that some handloader prefer to seat bullets out close to the rifling, without actually touching the rifling. The objectives are to minimize a bullet’s need to be loosely guided by an unrifled barrel throat, while preventing pressure spikes created by bullets starting their journey wedged in position against rifling. Where legitimate sources of handload data do not provide critical information regarding COL and bullet seating dept these days, there needs to be methods to determine these critical dimensions. The bullet below is actually from a .416 Weatherby, which means it is big and easy to photograph. So humor me and pretend you didn’t notice the substitution for the sake of illustration.
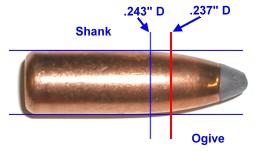 The length specification for the .243 Winchester cartridge is 2.540″~2.710″. This dimension only mandates how long the cartridge can be and still cycle through rifles chambered for the round. You cannot assume that a 100 grain round nose bullet assembled into a 2.710″ length cartridge will chamber safely in any and all rifles. The approach is to assemble a cartridge of a maximum overall length where the diameters along the ogive of the bullet are always minimally smaller than the adjacent bore when the round is fully chambered and the action is fully closed. This is actually a lot easier than I’m making it sound.

For about $35, the Stoney Point O.A.L. gauge (above) makes this pretty easy. The gauge is comprised of an anodized aluminum body, threaded on one end to hold a modified cartridge case and a push rod with a locking collar; simple but effective. In addition to the gauge, you need an example of each type of bullet you will be handloading.
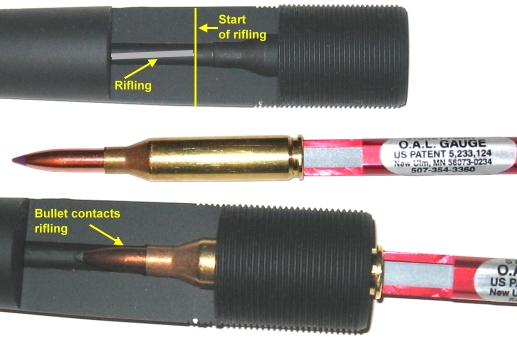
The top image shows point we are attempting to identify, the point forward of the chamber where a bullet would make contact with the onset of rifling. below the first image is a picture of the O.A.L. Gauge with the modified cartridge screwed in place and the sample bullet inserted in the case. The bullet is only lightly held in the case neck and can be moved by the gray push rod that runs through the center of the gauge, through the case and rests against the bullet base. In the last panel, the gauge with case and bullet in place, is inserted into the chamber, the case is fully seated, then the push rod is moved forward until the bullet makes contact with the rifling. At this point the push rod is locked in place and the gauge/case/bullet assembly are extracted for measurement.
I eventually discovered it is not necessary to remove the barrel from my rifles, much less machine away material to look in the chamber, to take these measurements. Thank God, I was having a heck of a time getting that Browning to let go of its barrel. Stoney Point even makes a short curved gauge to work through the ejection port of most lever action rifles.
What’s rounder, an orange?
OK, so now we have identified a way to created a sample cartridge assembly where a point on the ogive makes contact with rifling. Now we need some way to accurately measure this example and translate that into routine measurement of handload production.
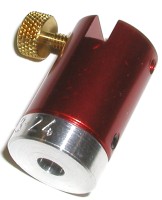 Dial calipers can’t be used to measure from case head to bullet tip, because soft lead bullet tip length varies significantly. To better quantify that problem, I measured 10 boat tail bullets from heel to tip out of the same fresh box of bullets and found a .011″ variation amongst that group. Bullet jacket dimensions are much more critical and therefore much more uniform. A bullet comparator ignores the bullet’s tip and locates on a bullet at diameter slightly larger than the size of a rifle bore, .240″ in this case.
The Stoney Point Bullet Comparator has interchangeable bushings (aluminum insert) that cover basically every bullet diameter a handloader would encounter. The gauge assembly is designed to clamp on the traveling jaw of a caliper and sells for about $30, complete with a basic set of bushings to cover 6 calibers.
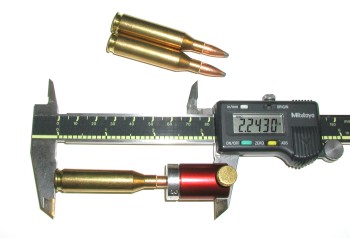 To illustrate the difference between measuring cartridges case head to tip and using the comparator, I measured a box of PMC .243 Winchester rounds. The critical measurement taken with the comparator from the bullet’s ogive surface didn’t vary more than .001″. On the other hand, measurements taken tip to case head with a caliper varied by more than .008″ within the group. The comparator can be used to measure assembled cartridges as well as individual bullets when conducting quality control efforts or collecting data. The O.A.L. and Bullet Comparator work together to determine maximum safe cartridge overall length.
A set of dimensional references for my rifles

After using the Stoney Point O.A.L. gauge, the modified cartridge gauge with bullet in place is measured as an assembly with the bullet comparator. The head space gauge is notched to allow the caliper stationary jaw to line up at the center of the modified cartridge case for accurate measurement. To provide a margin of safety by accounting for dimensional variations of components, etc. It is reasonable to reduce the bullet comparator measured O.A.L. by perhaps .020″ to ensure no contact is made with rifling.
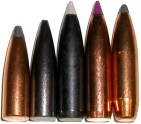
Pictured left are 5 bullet types I have previously handloaded for the .243 Winchester. They are L-R: Speer 80 grain, Berger 80 grain, CT 95 grain, Nosler BT 95 grain, and a Sierra 100 grain. I thought it might be interesting to compare the very accurate Stoney Point assessment of maximum C.O.L for each, to the conclusions I had arrived at previously through the use of handload manual data, RCBS and similar precision cartridge mics and forms of educated and derived guesstimation. I am pretty sure the results would have been more dramatic if I had selected a cartridge that utilized round or flat nose bullets, or a large bore caliber with spitzer as well as round nose solids.
| Bullet Manufacturer |
Weight In Grains |
Original Tip COL |
Revised Tip COL |
Original1Comparator Ogive COL | Revised1Comparator Ogive COL |
| Speer | 80 | 2.625″ | 2.722″ | 2.172″ | 2.264″ |
| Berger | 80 | 2.710″ | 2.710″ | 2.264″ | 2.264″ |
| CT | 95 | 2.710″ | 2.720″ | 2.255″ | 2.264″ |
| Nosler | 95 | 2.710″ | 2.709″ | 2.251″ | 2.250″ |
| Sierra | 100 | 2.710″ | 2.670″ | 2.295″ | 2.260″ |
|
1 = Includes .020″ additional safety clearance |
|||||
The solid numbers are in the “Revised Comparator Ogive COL” column number. Tip measurements will always vary considerably and only appear for reference. There really wasn’t a consistent change in direction; longer or shorter. But there were at least two that offer greater potential as handload charges were cut off as signs of excessive pressure arose, and those symptoms may have been spikes caused by the cartridge being too long and being contact with rifling when the bolt was closed. Any time a bullet seating depth changes, charges need to be reexamined. Even though several bullets slightly exceeded the 2.710″ maximum length spec for feeding and ejection, they all worked without a problem and there was still room to spare. Now all I need to do is figure out how to integrate the bullet comparator measurement into the site data.
Modified cases
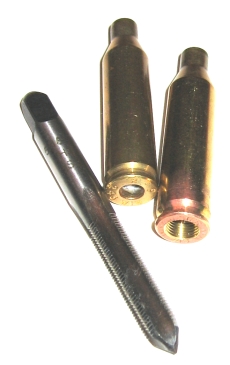 Stoney Point modified cases for their O.A.L. gauge can be purchased through retail for about $5 per and the company will make cases for cartridges not listed. I’m cheap, I can’t help it, so when I noticed standard cartridge headstamps and oversized tapped primer pockets, I thought there must be some excuse I could find to make them myself. Mostly, this is a waste of time.
I thought there was something to be gained by using fired cases from my own guns because of the chamber match, but upon further examination, and after some thought, I realized the modified case is pushed against the chamber shoulder to get O.A.L readings, so headspace variations are relatively meaningless. However, sometimes I am in a hurry and don’t want to order and wait for a modified case to show up. I made up modified cases for my .30-30 WCF and .270 WSM by just drilling out applicable fired case primer pockets and tapping them to fit the Stoney Point A.O.L. gauge. Stoney Point picked a relatively weird tap size, gee I wonder why, but it looks like a 5/16 x 36P from Enco works perfectly. It takes about 10 minutes to rework a standard case.
Factory modified cases are inside neck reamed so the bullet can move easily for adjustment. I found using an inertial puller to remove a seated bullet, or the tapered expander from a sizing die screwed out to avoid case sizing makes for a perfect slip fit.
Conclusions, concussions, regrets…
Actually, this was one of the more worthwhile expeditions I’ve been on for a while. The stuff from Stoney Point works, the tangible results are good, the cost is reasonable, and I will actually continue to use the equipment on a routine basis. Neat.
Thanks,
Joe

Email Notification