
Pictured, Brownells # 767-000-868 Stainless Steel Remington Model 700 Short Action – bottom metal and the rest of the rifle parts to be determined. Beginning a rifle build at this level of assembly allows for more choices when selecting the balance of the required parts. Additionally, without a stock and barrel in place, prep work is much simpler to perform. I realize that types of modifications fall in and out of popularity, but there are some basic action clean up steps that in my experience have quantifiably tightened group sizes when applied to sporting rifles. The work is aimed at aligning and squaring all of the parts from breech through muzzle to assure symmetrical stress under fire.
For the purposes of this project there are three reworks to be performed on the: lap the bolt lugs and lug seats for uniform contact, face the receiver to its centerline and true the gun’s bolt face so it is perpendicular to the bore. Each of these tasks is typically accomplished with precision tooling in concert with a lathe, however, Brownells offers corresponding precision tools that require only a modest amount of manual labor to accomplish the same objective. The bolt lapping portion is covered in the text that follows. The other two operations will be covered within subsequent project installments.
Brownells Bolt Lapping Tools
Looking into the front of the receiver, the bolt lug seats are visible. When the bolt is closed, the rear lug surfaces come into contact with the bolt lug seats. The third frame shows the relationship between the two parts with the bolt in place. Lapping is a process where a very mild abrasive is introduced to the lug seats and the back of the bolt lugs surfaces, then the bolt is rotated open and closed until both surfaces are more uniformly in contact with one another.

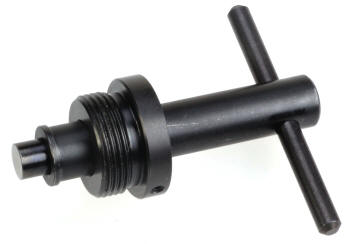
Brownells Bolt Lapping Tool #080-097-701 is for a single gun application. In this case, the Remington Model 700. Other single gun tools are available – Winchester Model 70, Savage, M14, Garand etc. Single gun tools can be converted for use on other firearms by changing the thread sleeve.
The single gun tool cost is less than $50. Threaded sleeves to adapt the tool to other firearms run approximately $25 each. There is a master set # 080-097-000 that covers most popular rifles and is priced at approximately $250.
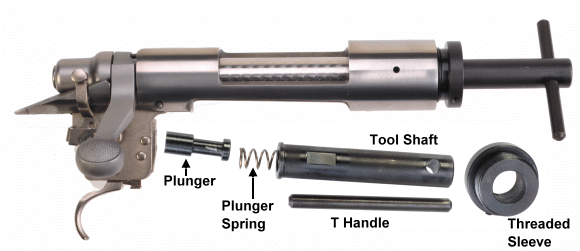
Above, the bolt lapping tool seen in position in the receiver and broken down into its component parts. Essentially the tool, held in alignment by the receiver’s barrel threads, applies constant pressure to the bolt’s face to assure there is uniform load on both bolt lugs against the bolt lug seats while lapping. Prior to lapping the bolt lugs, the action should be stripped of the trigger assembly and the bolt should be disassembled so that nothing obstructs the process and so that lapping compound doesn’t find its way onto unrelated contact surfaces.
Receiver disassembly

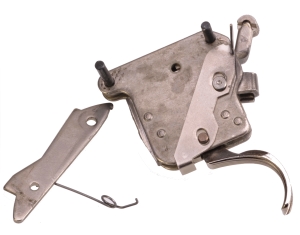
The trigger comes off easily; safety “On” to the clear bolt stop pin, the first pin to be removed. Then the bolt stop and bolt stop spring, then the sear retaining pin. Pins are driven out right to left and installed left to right. A bench block supports the bolt and provides clearance holes for the pins to drive through. Brownells non marring # 080-000-492 Rifle Bench Block is a good one for only about $16.
If the trigger is removed carefully, and the pins are reinserted at their respective location, all of the pieces stay together which simplified reassembly. Taking digital pictures along the way is always helpful when reassembling.
If the sear pin is not installed to keep parts in place, the sear safety cam can pivot upward out of position and release the sear spring; a half inch long, eighth inch diameter coil spring. The spring could fall out and do something like… bounce off the front of your hooded sweatshirt and behind the tongue of your left shoe where you might not think to look. You might end up crawling around on the floor with a flashlight and a magnet for half an hour until your wife says, “Did you check your shoe?”.
Bolt disassembly
There are many ways to remove the firing pin assembly from a Remington bolt and not a day goes by that I don’t stumble across a new one. The idea is to grab the cocking piece on the underside of the bolt, pull it back out if its “V” shaped detent in the bolt body against the resistance of the mainspring, then unscrew the whole firing pin assembly from the bolt body. To make my life easier, and as a concession to tool decadence, I used a Sinclair firing pin removal tool, Brownells #988-000-004, which is actually part of a modular Remington bolt disassembly tool. An ejector compressor tool #988-000-005 and a Mainspring changing tool #988-000-006 can be added to complete the set as the need arises. 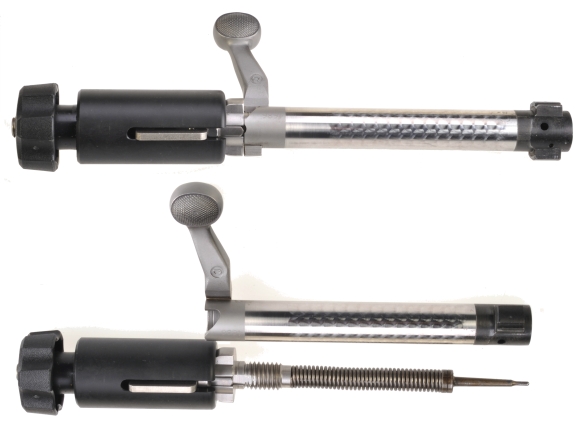
The firing pin removal tool slips over the bolt plug, a small claw on the tool grasps the groove in the underside of the cocking piece and the knob at the end of the tool is turned clockwise to compress the mainspring and withdraw the cocking piece from the detent “V” notch in the bolt body. The firing pin assembly is then unscrewed from the bolt.
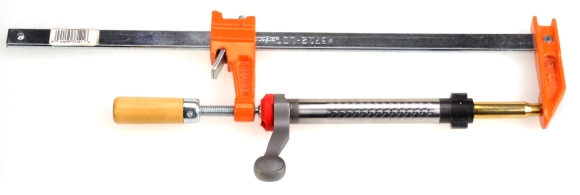

I could have purchased the ejector removal tool noted above, but I was determined to to find an inexpensive alternative, no matter how much it cost, I used a wood working clamp and empty 308 Winchester case to compress the ejector assembly while I tapped out the ejector pin. The extractor was left in place.
I actually made a small compressing bushing out of an AR 15 buffer weight, then machined a slot in the head of a C clamp to hold it in place… then I realized I spent four hours on that project and decided it made more sense to spend $26 on the Sinclair ejector removal tool.
Qualifying what needs to be done…
The instructions furnished with the bolt lapping tool indicates that the bolt lug to bolt seat surface contact should be 95%. Since this might be the case with an action as received, it seemed as though surface contact should be baselined before rework was attempted. The bolt lug seat in the receiver and the back of the bolt lugs were lightly coated with DYKEM, Brownells #262-100-004 DyKem Steel Blue Layout Fluid. The dye thickness is only 0.0002″, so when two coated contact surfaces are rubbed together, high surfaces rub through and show as bright metal and the rest will remain a non-glare and very dark blue. 
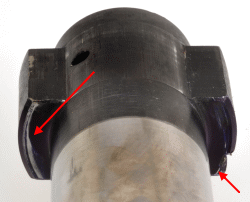 The lapping tool was screwed into position in the receiver, then the bolt was inserted and pushed as far forward as possible against the resistance of the tool’s plunger before being rotated closed. This prevented the DyKem coated lugs from scraping over the edge of the seat and giving a false contact reading.
Once in position, the bolt handle was rotated up and down 45°, the closed bolt contact area, for perhaps ten cycles. Then the bolt was removed and both bolt lugs and the bolt lug seats were inspected. On this action the results indicated approximately 15% contact and predominately only on one lug.
The instructions packaged with the bolt lug lapping tool recommend 600 or 800 grit lapping compound. Brownells offers several types in this range, Silicon Carbide – Mohs 9.5, Aluminum Oxide – Mohs 9.0 and Garnet – Mohs 8.5. Mohs is a relative hardness index with diamond at the top with a rating of 10.0. Silicon and Aluminum Oxide are good for removing material aggressively from hardened steel. Garnet is not as aggressive and it is particularly non-embedding. Since the amount of material being removed was actually very minor, I went with 600 grit Garnet concluding that 800 grit was too fine and a highly polished finish was not on the agenda.

Lapping compound was lightly brushed on the back side of both lugs as well as the receiver’s lug seat. Very small amounts as more is a waste of time and the abrasive material could begin to spread out into other areas. The recommended initial 50 strokes resulted in the degree of improvement shown far right. Total contact increased to approximately 40% with still no contact in areas indicated by arrows.
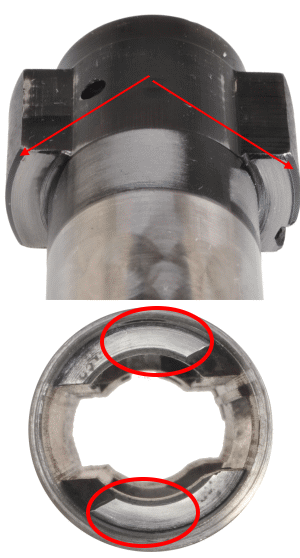 Ultimately, it took 200 strokes to achieve 90%-95% contact, stopping every 50 strokes to clean off the lugs and lug seats and apply fresh lapping compound. The outer, roughly 0.020″ of the lugs are beveled so contact is never made in these areas. The receiver’s bolt lug seats cleaned up also. Where there is a little discoloration outside of the circled areas, it really doesn’t matter as this area is outside of bolt lug travel. Where there is contact, the two surfaces mesh and share a common finish.
The instruction sheet indicated that as a final check, both bolt and receiver should be thoroughly cleaned, then DyKem contact checked. The problem I encountered was that the surfaces were so smooth after lapping that it took a lot of effort to wear through the blue layout fluid. So I made a clean up pass with the lapping compound, wiped the contact surfaces down with oil then wiped them dry and examined the parts. They are as pictured, right.
I took several readings with a depth micrometer during the process, measuring the distance from the receiver face to the center of bolt face. The difference throughout the process never reached a full 0.001″ change. The elements of 600 grit abrasive are only 8 microns or 0.00033″ is diameter, and it is mostly spread out flat on compression between the two pieces being lapped. Lapped only to clean up and equalize contact, there is no noticeable effect on headspace, nor is there any danger of cutting through surface hardness of heat treated components.
A break….
Reassembled in the same manner as disassembled, the bolt went back together easily, as did the trigger assembly. The action already felt smoother on close, which led me to add a bit more to the action rework. This will be covered in Part II which will feature, as the King suggested, “A little less conversation, a little more action”.
A Remington Rifle Build – Unplugged Part I
A Remington Rifle Build – Unplugged Part II
A Remington Rifle Build – Unplugged Part III
A Remington Rifle Build – Unplugged Part IV
A Remington Rifle Build – Unplugged Part V
A Remington Rifle Build – Unplugged Part VI

Email Notification