
 I buy a lot of gun related stuff; rarely expensive, frequently for a special purpose and, mostly unable to stand the test of time for usefulness. I’ll buy a product with great, but not quite specific sense of purpose, I’ll force myself to use the item at least once, then slowly but surely allow it to migration to the back of same dark and distant closet.
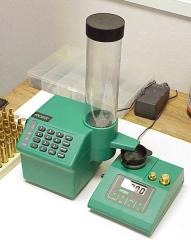
In a very recent article I made the statement, “If I had large quantities of the same powder type, but of numerous varying charges, I would have dragged out my scale linked RCBS Powder Master Dispenser”. Now see, what I’m doing here for the sake of ego preservation, is to elude to a useful purpose for this equipment, while not actually subjecting the equipment to a task that would expose its total lack of utility, and my $185 purchasing….minor error in judgment.
When I got to the .257″ Weatherby portion of the “Quarter Bore” series, I dragged out the Powder Master, determined to use it to measure out 20 cartridge loads of IMR7828. The unit must be calibrated prior to metering a powder type, so I parked it on the bench top next to my RCBS Powder Pro Scale, and kicked them into calibration mode. The Powder Master motored and whirled, coughed up a little powder, paused and thought about it for a moment, accepted some feedback data from the infrared port on the scale, then sputtered on and off until it ran approximately 120 grain of powder into the scale pan, and lights steadied to let me know it was ready to meter powder. It took 20 minutes of binary conversation between the dispenser and scale before the linked units could figured out how to dispense and weigh powder. Okay, still maybe not so bad, I could see starting the calibration sequence and letting it run while working on other tasks. Don’t casting furnaces have to come up to temperature before they can be used ?
I punched “70.0” grains into the rubber keypad, hit “Enter” and “Dispense”, and powder began to dribble out again. Unfortunately 4 minutes later, the Powder Master had only metered 30.4 grains of powder. I’m not sure what happened between this attempt to use the equipment, and the first use of the equipment when it only took a minute to meter a similar amount of powder. Perhaps the cause could be traced back to the powder type of charge size, I don’t really know, but 4 minutes or 1 minute is way too long to wait for a charge that could have been manually trickled in a few seconds. For the $180 – $195 these gems run, in my estimation, it will remain a great but poorly executed idea, and the unit is destined to see duty as a door stop.
Getting Things to Fit
 I am not allowed near gunstocks with power tools, because everything I touch comes out looking like a book case or a pig shaped cutting board. Occasionally I have a need to make some minor changes in fit and finish, but I limit this work to finesse tools only.
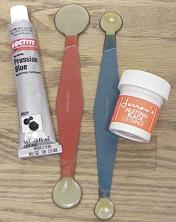
Jerrow’s Inletting Black brushed onto the underside of a barrel, will show exactly where the metal is making contact in the barrel channel. Once you find that pressure point that’s causing your 3 shot groups to grow from .010″ to .015″, an official Jerry Fisher Stockmaker’s Inletting scraper of the appropriate size, will let you scoop out the interfering wood without slipping and removing that expensive Lignum Vitae forend. The scrapers run about $10, the Inletting Black about $5 fromBrownells.
Loctite Prussian Blue is great for checking for high spots on metal to metal contact; lightly coated surfaces are moved against one another, and high spots show up as bright blue streaks. Finally the potential for an answer to the question, “Do all of those little Mark V locking lugs really make contact ?”. Prussian Blue is not to be confused with Dykem, the mostly blue layout fluid that’s used to make high contrast background for scribe lines, and is also very handy to have around, and also available from the same folks for about the same price.
Running Circles Around Bullets
 If you load for some of the heavier recoiling rifles, particularly if the ammo is held in a tubular magazine and subject to being slammed by adjacent rounds, roll crimping is probably a requirement. In fact, many manufacturers producing bullets for use in .45-70 lever guns, honor the 2.540″ overall maximum cartridge length by placing a cannelure at the proper location.
There are also, however, manufacturers producing .45-70 plain shank bullets for more broad rifle applications; lever, bolt, trapdoor, and falling block actions that can ingest cartridges to varying lengths. When I found myself with some of these, and a number of excellent soft copper jacket bullets from Hawk, I decided it was time to find a cannelure tool so I could ready these bullets for my lever gun, and also experiment with seating depth.
 I like all of the neat tools, fixtures and dies CH4D produces, and I really like the organization, but the C&H Cannelure Tool was a little rough around the edges. I think a little finishing work would make it more consistent with the shop’s typical product quality.
As an example, there were no instructions packaged with the tool to suggest function, set up and operation. Of course the process wasn’t hard to figure out. The fixture looked to be made up of a hodgepodge of left over hardware, with bolts and nuts of different grades; through holes in the base where there should have been blind holes and shouldered bolts, bolts hanging onto nuts by two or three threads, ragged edges on parts that contact the bullet. In short, it was a little ugly, but correctable with a little effort with a file and stone, and one trip to the hardware store.
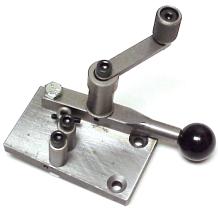
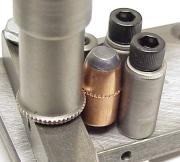
 The tools operation is simple. Basically, a bullet is placed on an adjustable post “3”, and is sandwiched between a hardened knurling ring “2” and two rollers “1”. The post can be adjusted to set the position of the cannelure on the bullet shank, and another stop can be adjusted to set the depth. Effort and number of turns required to press a groove into the bullet is dependent upon bullet diameter and jacket hardness.
For set up, I measure 10 bullets to make sure I considered the longest length of .878″, then I added this to the maximum case length for the .45-70 of 2.105″, and subtracted the size of the longest loaded ammo the rifle would feed, 2.540″. – the cannelure needed to be .443″ up from the heal of the bullet.
 I measured the distance from the tool’s base plate to the bottom side of the knurling ring (2), .565″, subtracted .443″, the placement of the cannelure on the bullet shank, and cranked up the bullet support post (3) until it protruded .122″ up from the base. I plopped in a bullet and proceeded to put cannelures exactly where they were suppose to be.
Alternatively, I think a small mark with a felt tip pen could be made on the bullet where the cannelure is to be located, then the support post could be cranked up or down until the mark on the bullet visually lined up with the knurled ring.
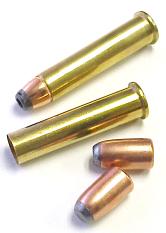
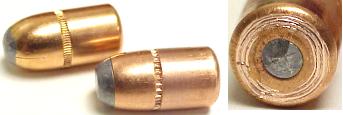 At the far left is a Hornady with factory cannelure, a Hawk with a cannelure I cut, and the far right view of what the CH4D cannelure tool does to a bullet jacket if the support post isn’t pulled and polished before use.
The CH4D tool is capable of forming a cannelure to factory depth with minimal time and effort. The Hornady cannelure is .008″ deep,Remington bulk .010″ and Speer .008″. The adjustable stop on the CH4D tool makes this depth consistent to whatever setting is selected. Oh, one other thing, crank the handle clockwise, if you go counter clockwise you overcome the leverage of the handle and the bullet will keep popping out. I believe the tool in some cases could be a necessity, handy in other case but, in either case, it’s a welcome addition to a loading bench. Since I’ve owned this little gem, I have gotten improved results with the .45 LC, .338-378 and .357 SIG. At $52, this is an easy cost to justify.
Getting a Grip
 There was a time when I’d push on a cleaning rod handle, and make maybe three or four laps around the room before the bore was clean. I was always short a couple of hands when installing a scope, and the simple task of bore sighting became adventures in bore sighting. That’s all in the past.
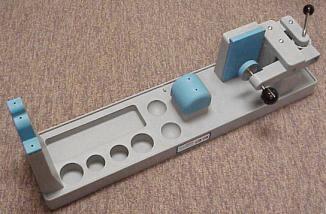
The Gun Vise from Midway USA is great for these projects and many more. The Vise is well built, can lock a rifle solidly in position, and is strategically padded to prevent damage to any gun’s finish. I believe the current price is $42 and it’s worth every penny.
Thanks
Joe
Email Notification