
Another word on case inspection
It pays to be observant when firing off rounds that will make their way into the reloading process as empty casings. Dented cases and deformed rims, cartridges that are difficult to chamber or extract, and cases with primer leaks all warrant an extra close look before getting dumped into the pile for processing into handloads. Whenever I encounter a cartridge that looks odd, or functions differently, I tend to set it aside for further investigation.
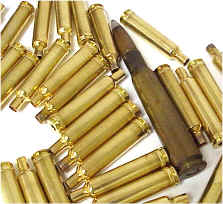 Before cleaning, I dump the empties out onto a bench covered with white paper, then scan for anything that differentiates one case from another. Then, one by one, I hold each case under a magnifying lamp and look for soot from hairline pressure cracks, signs of leaking primers, odd spot discolorations – anything I may have more difficulty spotting after cleaning. “Reading” primers can help to spot pressure and headspace problems early on. Then I subject cases to a final, pre-handload inspection after the cases are decapped and cleaned.
The point is, I’ve learned that inspection and problem detection comes in many forms, under many circumstances. If you are interested in more detail on case inspection and reading primers, you might want to refer to articles in the Real Guns Archive, “Primer Appearance” located toward the end of a handgun cartridge article and the middle part of a .338-378 titled “Just be careful out there” deals with the specifics of brass inspection. These sources are, of course, brief summaries when compared to the prefix contents of any quality handloading manual.
Establishing proper case length
I’d like to go on record as saying few bottle neck cartridges grow longer as a direct result of chamber pressure and brass flow. Most case length increases are the result of sizing dies that inadequately support the case mouth and shoulder as the expander ball is pulled back through the case neck during the sizing operation. RCBS acknowledged this problem with the introduction of their X Die series, the die promoted as putting an end to case trimming. RCBS accomplishes this task by placing a mandrel in the sizing die that prohibits the case mouth’s forward movement when the expander ball is pulled from the case. Unfortunately, because RCBS offers only limited cartridge coverage with this product, and because I don’t wish to replace what looks like an expensive pile of die sets at the end of my work bench, I prefer the classic method of sizing and trimming – aka mishandle the case until it needs to be trimmed.
 Prior to stuffing anything into a sizing die, I run cases through my ultra high tech prep/cleaning equipment. Here you see the height of decadence – not one, but two RCBS accessory handles; one holds a inside neck cleaning brush, the other a primer pocket brush. The neck brush is actually an 8-32 standard thread nylon bore brush, and the primer pocket brush is made of steel wire.
Scotch Brite pads from the supermarket does an admirable job of removing light residue at the case mouth without damaging the brass. Some people like to chuck brass into a powered case trimmer and spin them against a Scotch Brite pad, but I think this too abrasive and significantly accelerates case wear.
 I’ve used both spray and pad methods of applying case lubes; spray in the hopes of more efficient use of materials and better control of the process, however, this didn’t work for me. The pad is much more efficient to use, controls application more precisely and lasts for a long time. Periodically, the pad should be replaced or at least washed out to prevent an accumulation of carbon and other gunk from being transferred to the lubed case and into the sizing die.
In the beginning, I would lube cases much like I packed wheel bearings; if a little is good, a lot must be better. Friends wondered where I was getting all of those “special” cases with fluted shoulders. After learning the sins of excess, I then reduced lube on cases until I needed to buy a stuck case remover and many, many replacement decapping pins. I finally figured out what I needed to do to get this step right – follow the RCBS directions that come with the lube pad, some things aren’t rocket science.
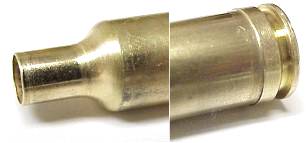 If you look closely, you can see rub marks on the brass where the full length sizing dies contacted and formed the once fired brass. These are typical contact marks; the neck just short of the shoulder, the case immediately following the shoulder and the case just forward of the case head. Even virgin brass should be passed through a sizing die before it is loaded for the first time.
 I believe these split images are beginning to make me dizzy. The factory fresh unfired brass began life at 2.545″ overall length and remained 2.545″ after being run through the sizing die. Untouched by chamber pressure, these cases are on the overall small side.
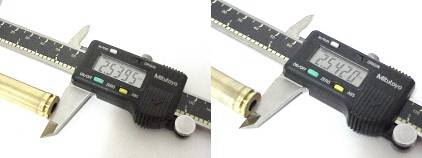 The once fired brass, which were compressed at the case head, shoulder and neck, and then subjected to the extraction of a neck expander ball, began life .006″ shorter than factory fresh brass, then grew .003″ in the sizing operation. As I worked through the balance of the fired brass, the increase in length ran from .003″ to .007″. In larger brass, I’ve seen the sizing growth extend as much as .012″, so this is something to look for. If I had been using a progressive press, the cartridge would have been sized and made to exceed the length specification, then rotated on to completion without even a further check, much less correction.
Would you like the specification or the standard dimension ?
Virtually all cartridges, from the little .17 Mach IV to the .50 BMG have a maximum length and a “trim length” difference of .010″. The way it works is if the case is less than maximum length, leave it alone, but when it exceeds maximum, trim it back to .010″ below maximum. There is a danger in using excessively long cases. The chamber of a firearm is cut to a standard depth, and there is a step in the chamber where it reduces down from the diameter of the case neck to the diameter of the throat, the area between the chamber and the rifled bore. If the overly long case neck is driven into this area when the action is closed, it will be force crimped into the bullet, perhaps causing dangerously high chamber pressures when fired. My maximum measured length was 2.546″ so I set out to check this against specification.
 One of the best investments I feel I’ve made in handloading paraphernalia is handloading manuals and software. While they all may provide accurate information, each provides different information. Manuals from bullet manufacturers may offer numerous powder alternatives dependent upon their business alliances and biases. Powder manufacturers are primarily concerned with the use of their own brand products and may use generic bullet descriptions defined only by weight and type. It’s nice to have a variety of manuals to compare loads and cross reference information
In the case of Weatherby cartridges specs, differences appearing in manuals may be the result of independent data collection, since no Weatherby cartridge carries SAMMI certification or has an associated cartridge specification. No, the process is not out of control if you’re a Weatherby cartridge handloader, but you will be referencing industry specifications rather than SAMMI specifications, and you may run across some minor differences.
| Manual | Cartridge | Drawing Length | Max Case Length | Trim Length |
| Hornady #5 | .257 WM | 2.549″ | 2.545″ | 2.535″ |
| “ | .25-06 | 2.494″ | 2.494″ | 2.484″ |
| Barnes #2 | .257 WM | 2.545 | 2.545″ | 2.540″ |
| “ | .25-06 | 2.494″ | 2.494″ | 2.484″ |
| Speer #`13 | .257 WM | 2.549″ | 2.549″ | 2.539″ |
| “ | .25-06 | 2.494″ | 2.494″ | 2.484″ |
| Nosler #4 | .257 WM | 2.549″ | – | – |
| “ | .25-06 | 2.494″ | – | – |
I included the .25-06 as a SAMMI standard cartridge for comparison. Notice no specification within any manual was different for the .25-06. When it came to the Weatherby, it looks like everyone took a stab at the spec and came up with somewhat different numbers. All industry reference drawings I could access, as well as all loading manuals, with the exception of Barnes, suggested a case 2.549″ in length. Virtually all similar cases with a SAMMI spec set maximum case length to the same as the drawing length, so I settled on 2.549″ as maximum. Then I subtracted the industry standard -.010″ trim length and settled on 2.539″ as the trimmed length.
Case trimming
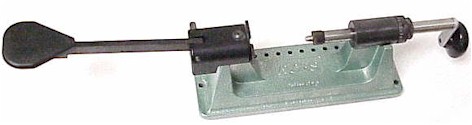
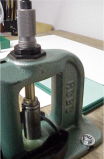
I trim all of my cases with what is typically described as a lathe style case trimmer. There are several brands of similar products, most differing only in the way the trimmer secures the case for cutting. There is a powered version of the RCBS trimmer, as well as a conversion kit for people who initially purchased a manual model as pictured above. Each time I begin working my way through a pile of brass, I swear I’m going to get a power conversion, but I never do. There just always seems a better place to spend the $150 price of the conversion, and the conversion also takes away some of the trimmer’s flexibility. The trimmer has several optional attachment cutting heads designed to ream and turn case necks, none of which are designed to be used under power.
If you’ve been around RCBS equipment for while you know they have a variety of shell holders for different applications. I don’t mean different size shell holders, I mean different types of shell holders. My Ammo Master Press as an example, uses a multi-station shell holder, my Rock Chucker uses a single place traditional shell holder and my trimmer takes another type shell holder. What they do have in common in the size numbering system. So if a #4 is the designation for the Ammo Master shell plate, it is also the number for the same cartridge for the traditional shell holder and the number for the trimmer holder. The same applies for the new Pro 2000, which uses standard shell holders that can be interchanged with the Rock Chucker or APS bench tool.
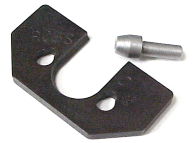
 The trimmer has a flat shell holder that is pulled into place with heavy spring pressure, and released by pushing on the long lever at the back end of the trimmer. This makes it a quick release setup, which really comes in handy when you have a lot of brass to work through. Outside of needing to have the correct shell holder for the cartridge you plan on trimming, you’ll also need a pilot that fits through the center of the cutter and aligns the case before it is cut. The pilots are sized by caliber.
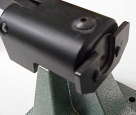
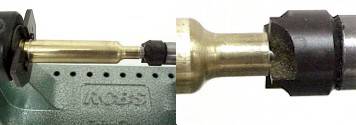 This is what everything looks like with the shell plate installed, the pilot secured in the center of the cutter and an empty cartridge in place.
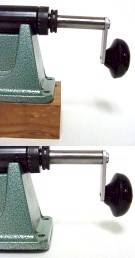
The small holes located in the back of the trimmer base are storage spaces for pilots not in use. With this feature you can not only trim cases, but crawl around on your hands and knees looking for dropped pilots every time you put your trimmer away. The trick to fast trimming and uniform trim length is patience. As a result of not demonstrating patience, I’ve invented more new wildcat cartridges in the course of trimming than in any other similar operation.
 The trimmer has a knurled locking ring and a micrometer adjustment that permits very small increments of material to be removed from a case being trimmed. I usually set the lock ring, with the adjuster flush against it, to permit a .020″ cut. Then I back out the micrometer adjustment until the cutter can just barely come in contact with the case mouth. I finish by gradually adjusting the indexed micrometer ring, one tick is approximately .001″, until the correct case length is attained. After this initial set up, the balance of the trimming session should require no further adjustment, however, it pays to measure each case as completed. There are case length gauges to speed this process.
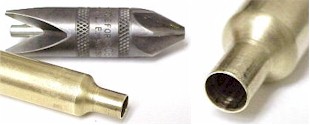 The trimming process will generally leave a burr of some degree at the case mouth. An inexpensive inside/outside reamer will quickly and easily clean this out. When complete, the case mouth should be clean, round, uniform in height, and free from any sharp edges. At this stage, new and once fired cases are dimensionally the same.
 A couple of notes on the issue of trimming – cutters will last indefinitely if they are used only for trimming brass cases, as will pilots and a decent trimmer. Unless there is a good deal of production, a powered trimmer may cause more mistakes then offer any real efficiency.
If available, use an accessory base. If there is nothing under the trimmer to raise it above table level, you’ll spend a lot of time taking the skin off of your knuckles on the work bench. Don’t brush powdered brass off the work bench with bare hands, unless you intend to use them as scouring pads shortly afterward.
It doesn’t hurt to use some liquid detergent and wash any residual lube and brass particles from the cases. I just dump them in a plastic quart container, shake them up a little bit, then rinse them out in very hot water. It is very important to let them dry out thoroughly to avoid that whole gun powder/water problem. At this point I separate brass into boxes as once fired and virgin. All cartridges are identified and logged, and the identification will remain with the cartridges throughout the .257 Weatherby Magnum work up. This is critical identification for some inspections that will take place the next time these cases are inspected and reloaded.
So far, I have only used the single stage press for two independent operations with critical off-press steps occurring in between. In the course of normal auto progressive presses, these off-press steps would typically be skipped over. The inspection and trimming operation took a total of 20 minutes to complete 60 cases.
The next installment will cover the final steps in loading and inspecting finished production.
More “The .257 Weatherby Ultra Lightweight”:
Pick up Day for the .257 Weatherby Ultra Lightweight
Thanks,
Joe
Email Notification