
 I’ve been laid up…sports injury. I was watching TV when tennis came on. I grabbed for the remote, fell off the couch and put my lower back into orbit. I’m fine as long as I don’t sit, stand or lay down for a few weeks, but it seemed a good time to set aside some of the bone jarring gun related projects and work on the Astra NC-6. I still had a few metal cutting modifications to get out of the way before the gun could be refinished.
The standard Astra NC-6 sights are decent; rear adjustable for windage and elevation, front ramped with a serrated facing blade. While the serrations make for a non-reflective surface, the sight is black and easy to lose against a dark background. I didn’t want to use tape or paint to brighten the front sight as these solutions won’t stand up to moderate use or cleaning solvent. Fortunately, Brownells offers an insert kit that can put a bright contrasting sight on older firearms and some of the newer value brands.
The Brownells Front Site Insert Kit #081-000-370 is not a one shot wonder. The kit services multiple firearms and includes a selection of five different colors for inserts. My guess, based on the few drops of activator consumed for each gun, is that the kit will service approximately twenty firearms. The retail kit cost is $59 and each component is available separately to replenish the kit. Activator is $12, acrylic is $20 and colors are approximately $5 each. A single kit could be put together that would service multiple firearms, at a cost of approximately $37.
Making fire without matches…
 The insert modification involves two steps; cutting a dovetail in the face of a gun’s front sight blade, then filling the dovetail with colored acrylic. If the milling machine had arrived this week, I would have probably made the dovetail with a 60º dovetail cutter. With no milling machine in the house, I went with a couple of files and a #5 drill. Besides, the manual labor approach seemed appropriate as a more typical way the kit would be applied and because the job is relatively simple to accomplish with hand tools.
Round bullets and oval barrels…
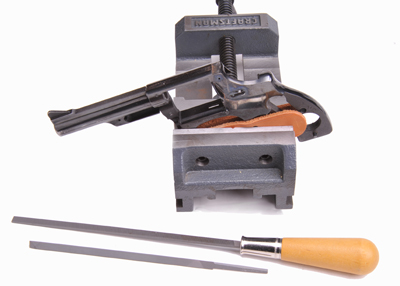
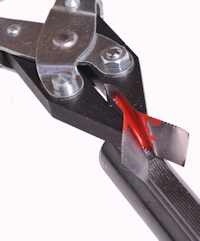
Its a good idea to avoid clamping a gun down by its barrel, even if only to avoid the need to cast oval bullets. Generally speaking, it’s always a good idea to clamp firearms on solid surfaces and to wrap them with something to protect the surface at those locations. In this case, it was the frame and trigger guard wrapped in a piece of sling leather and held in a machinist’s vise. Notice the gun is tipped nose down. This was done to keep the sight ramp’s face parallel with the ground and to facilitate filing when the liquefied acrylic insert material is poured.
File choice isn’t critical, something between a cheese grater and a jeweler’s file should do nicely. In this case, I selected a narrow pillar file, Brownells #3360-312-121 because its narrow width was appropriate for the slot width, the sides are non-cutting surfaces and its 1/8″ thickness matched the depth of the slot that would be formed. The second file #080-648-160 is a 60º sight base file with a cutting edge on one side only. I was able to lay the file in the notch cut by the pillar file and form the undercuts without fear of cutting further into the base of the dovetail. You know how that can go. You make a light cut but dig in a bit, you attempt to square the surface with another cut and that digs in. Before you know it, the sight is gone and you’re trying to convince yourself you really wanted to mount a scope on that .38 snubbie.
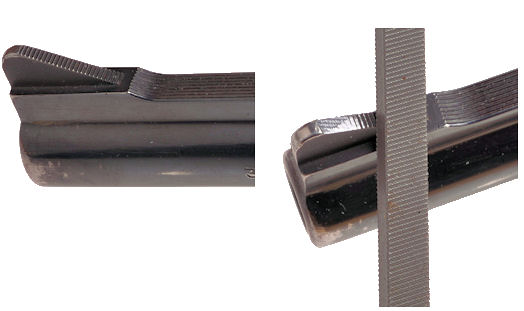
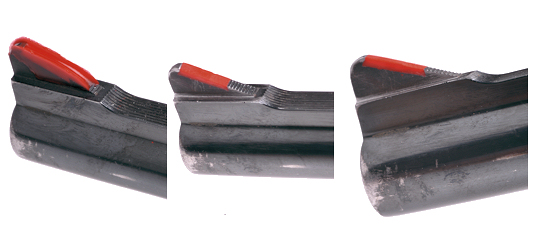
Above, the unmodified front sight with serrations intact. The first cut was with the pillar file, beginning at the first serration. The insert needs to extend to the top of the sight blade or the gun will shoot high. The metal was easy to work so file cuts needed to be made with patience. I’m sure you’ve heard it said many times when it comes to removing metal, “You can always take more off, it’s really tough to put it back on…unless you know someone who owns a MIG welder”.

Top left, the pillar file work is done at this point with a flat bottom cut approximately 1/8″ deep. The slight radius at each end didn’t pose a problem as they were removed with the first cuts of the dovetail file. The dovetail, above right, is almost complete, right, with the undercuts on either side formed. It took less than ten minutes to accomplish this part. Yes, I know, there are still ends to square up.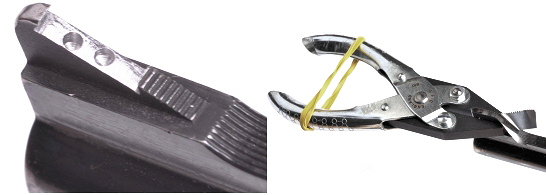
With the dovetail completed, the last step in metal prep was to drill two holes approximately 1/8″ deep in the face of the dovetail. A #5 drill or smaller is recommended. These holes fill when the insert material is poured and serve to locate the piece laterally. Since the insert is poured in liquid form, an impromptu mold was required. To that end, I cut a piece of 0.003″ shim stock, then bent it into a “U” shape that wrapped around the front of the sight blade and extended down to covered the sides of the dovetail slot. The shim stock was held in place with a pair of parallel pliers, its handles held together with an elastic band. The shim stock is available within a useful assortment from Brownells #080-544-024, as is the parallel pliers #348-181-105.
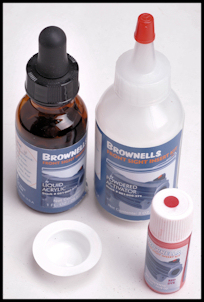 Mixing the compound is relatively easy and not so time critical that rushing is necessary. Seven or eight drops of the liquid acrylic are placed in one for the little mixing dishes that come with the kit. The dye is in a concentrated powdered form, so only a very small amount is required. The instruction booklet suggests adding whatever will fit on the end of a toothpick. There are five colors included with the kit: red, green, orange, yellow, and white In this case, red was selected.
 After the liquid acrylic and dye are mixed together, powdered activator is added – just a little bit at a time, blended after each addition until the mixture has the consistency of 10w-30 motor oil. The instruction suggest the activator added should be equal to approximately 1/4 the volume of the liquid acrylic/dye mixture. Once at the correct consistency, the mixture was then poured into the dovetail. I made the shim stock mold a little too high, which made filling a little more difficult. I used a tooth pick to poke solution into the undercut areas, then poured the rest on top and let it set up for 30 minutes.
When I pulled off the shim stock mold, I thought, “Wow! This is pretty terrible”. Then a little work with an Exacto knife to clean up the sides and a couple of passes over the top with a fine mill file and a 220 grit stone and the insert was in proper shape. A little wipe with gun oil removed any traces of even fine scratches. One dried, the material has the consistency of Delrin or Nylon 6/6. Between the dovetail undercuts and locating holes, the insert material is locked in and it’s not going to shoot loose or dissolve when in contact with solvents. Pretty spiffy.
The concluding pizza…
 Beyond the result of having an enhanced front sight, the insert kit is excellent as the basis for a classic firearm enthusiast’s project. With a little patience, the outcome will be good, skill levels are developed and confidence is built that will carry into more sophisticated future projects. The tools acquired serve general purposes so, at least to me, they represent an investment in essential tools. In fact, I was so pleased with the outcome of this insert project, I took a shot at making chicken Alfredo, spinach, mushroom and cheese pizza from scratch. This kit is listed as Brownells #101-….
One Man’s Surplus is Another Man’s Project Gun… Part I
One Man’s Surplus is Another Man’s Project Gun… Part II
Email Notification