
 I always liked Elmer Keith stories and I liked that hats he always wore. With articles dating back to the 1920’s, each passing year brought bigger stories and bigger hats. He achieved a level of integrity, or at least was viewed as having a level of integrity, few men could claim – after all, it was assumed that if Elmer told a hunting or firearms related story, the detail were all true.
The stories always went something like this. “I saw the elk walking along the firebreak. I estimated the distance to be 600 – 602 yards. I hadn’t planned on hunting that day, so I was carrying only my Colt Bisley in .44 Special with a 5 1/2″ barrel. I held about 33 feet over his head and, now that he was at a dead run and heading for the trees, I led him by 40 feet or so….” I’m okay with that that. Anybody who credibly contributed so much to hunting and the industry, for such a long time just gets a free pass on some issues.
When I recently decided to explore the world of revolvers, mostly single action revolvers, and I was looking for research material, I ran across a special edition of the highly promoted book, “Big Bore Sixguns” by John Taffin. I was a little put off by this $45 autographed version. Maybe it’s just me, but I don’t get real excited about having some guy’s signature in my book, especially when it adds 30% to the cost. So I found standard hard copy at traditional outlets and I was left dealing only with the book’s occasional self-congratulatory contents.
Setting all that aside, on material content the book is very good. A lot of history, a lot of progression tracking of cartridges and guns, details of specific designs and production runs, custom revolvers, and cartridge and gun performance reviews. I found it to be a reference book I frequently utilize, and an invaluable tool in developing and understanding the evolution of the big bore revolver.
Ruger Single Action Revolver Modifications
I’m going to spend some time on some popular, simple and helpful modifications that can be made to the Ruger by a careful owner. These will all be relative inexpensive projects, and I will try to run in order of escalating complexity, but none will be all that difficult.
Belt Mountain Base Pin
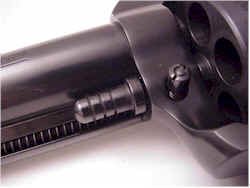 A popular modification to the Ruger is replacement of the factory base pin. Replacement pins are typically hardened, slightly larger in diameter and centerless ground to closer tolerances. Some also have an oversized knurled head for easier removal, and a locking set screw to prevent them from popping out if the base pin latch is bumped, or jarred loose under recoil.
The objectives in replacing the pin are: to tighten up the cylinder to base pin fit, making it’s rotation closer to concentric and improving chamber/bore alignment, to have a harder bearing surface for longer wear, and to make the pin easier to remove and install.
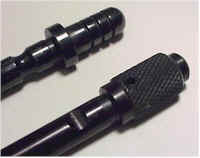 I selected a replacement heavy duty, knurled locking base pin from Belt Mountain Enterprises in Bozeman, Montana. They actually have 13 different types of blued and stainless base pins available for Colt and Ruger revolvers, all priced at $21.95. The parts can be ordered directly from Belt Mountain, or through suppliers such as Brownells.
The Belt Mountain part (bottom right) is .2495″ is diameter, the standard part measured .2475″, and the standard part already showed score marks after a few hundred rounds of use. The installation process is pretty straight forward.
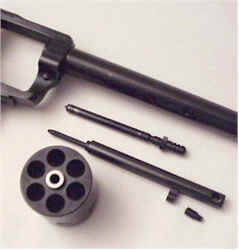 The first and most important step is to check all chambers and make sure you are working with an empty gun. The next step is to remove the cylinder and the ejector rod housing.
The cylinder is removed by opening the loading gate, depressing the base pin latch and sliding the base pin forward. The single screw at the end of the ejector rod housing is the only hardware retaining the housing to the gun. One the housing is removed, the base pin can be pulled forward and completely removed from the frame. Belt Mountain suggests that you save the original part so it can be reinstalled if the gun needs to be returned to Ruger for service.
The frame and cylinder should be cleaned, particularly the holes that locate the base pin, prior to moving on with the installation. I used a small bronze brush with solvent, then applied a light coating of gun oil. There was actually a lot of gunk left over from the manufacturing process in the cylinder and frame holes so this was a good opportunity to clean things up a bit.
 After cleaning, the new base pin is trial fit to the cylinder, with the cylinder still off the frame. The pin should fit smoothly and the cylinder should rotate around the pin without any signs of roughness or binding. Because the pin fit is tighter than a standard part, there is less room for small imperfections.
If there is an indication of small rough spots within the cylinder base pin hole, the roughness can be lightly polished out with emery paper. This is a clean up, and only if necessary. Material should not be removed to the point of changing the hole dimensions, emery paper is used only to remove small burrs.
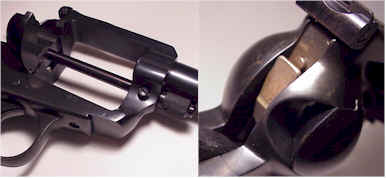 The purpose of this next check is two fold. First, the new base pin is inserted and locked up in the frame and checked for fit and proper clearance. Any rough spots are remedied with the use of emery paper, as when fitting the pin to the cylinder.
The second check is for transfer bar clearance. The base pin without cylinder is left locked in place, the loading gate is closed and the muzzle pointed down. The base pin should be applying enough pressure on the face of the transfer bar for it to clear the firing pin without bumping or hanging. There is no adjustment for this so the pin either fits correctly and keeps the transfer bar away from the firing pin or it doesn’t. Belt Mountain includes a support phone number in the event there is a problem at this stage.
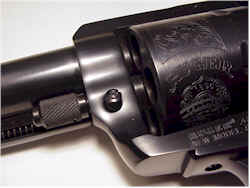
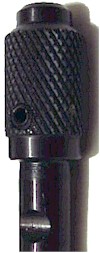 Left – This is how it looks when everything is put back together again and working. The finish matches the factory Ruger bluing and the part if cleanly made. There is one last step that I just couldn’t bring myself to do.
To the right you may be able to make out the small Allen head set screw that crosses through the knurled portion of the base pin. The final installation step is to force tighten the screw until it is literally driven into the underside of the barrel. This is to provide a locking point that will retain the base pin so it won’t pop loose under recoil, or by the base pin catch being accidentally bumped.
I’m going to try it without the lock and see how it holds up under recoil. If there is a tendency for it to pop out, I’ll make the mark with a punch rather than subject the new base pin to the lateral stress of being forced away from the barrel while trying to make an indentation with a screw. There were no permanent modifications made to the gun.
Overall, I think it’s a nice piece and it does make it easier to assemble and disassemble the gun. The original factory part would start to turn and get wedged under the barrel when being pulled from the cylinder, and the new part has a more substantial appearance. Amazing how some close up shots can find so much junk and crud on a gun. I was shamed into taking the gun down and thoroughly cleaning it immediately after finishing this article.
Thanks,
Joe

Email Notification