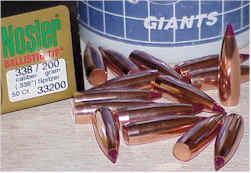
 I am so tired of those people who suggest the Weatherby .338-378 isn’t a flexible cartridge. It’s mostly those wimps with the heavy barreled .22 centerfire, or .243’s making all the noise. “whine, whine, whine…muzzle brake…yap, yap, yap, stop, my ears are bleeding… ” It’s always something.
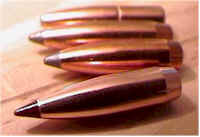
Nosler Ballistic Tips look almost too good to shoot, but every cartridge needs a varmint load for crows or prairie dogs, or maybe a little informal Accumark plinking.
 Cartridge: .338-378 Weatherby
Bullet: 200 grain Nosler Ballistic Tip SPBT
Powder: IMR 7828
Charge Wt.:111.5 grains
Primer: CCI #250
Cartridge C.O.L.: 3.700″
Muzzle Velocity: 3,500 fps
Best 100 yard group: 1.5″
I couldn’t get a group under 1.5″ but, for the day, I was also seeing less than exciting results with standard Sierra 250 and 215 loads, and factory Nosler Partition loads. Typically the gun can shoot Sierra bullets in groups half that size. Recoil for the 200 grain loads was a thought stimulating 52 pounds, compared to thought scattering 76 pounds for the 250 grain loads. A recoil reduction is always appreciated.
|
Yards |
0 |
100 |
200 |
300 |
400 |
|
Bullet drop “ |
-1.50 |
3.43 |
5.06 |
2.79 |
-4.03 |
|
Velocity fps |
3500 |
3243 |
2009 |
2762 |
2537 |
|
Energy ft/lbs |
5439 |
4671 |
3989 |
3387 |
2859 |
|
Taylor Index |
33.80 |
31.30 |
28.90 |
26.70 |
24.50 |
|
T.O.F. sec. |
0.00 |
0.09 |
0.19 |
0.29 |
0.40 |
When I disassembled the Weatherby for cleaning, I found very heavy copper deposits in the barrel, which could have been my group spread problem. I, of course, will go back to some baseline loads and recheck again. Cleaning may resolve the general issue of wider than normal groups, however, that would not necessarily qualify the Nosler Ballistic Tip bullets as having high accuracy potential in this setup.
Factory Partition ammo performance has been less than exciting, and I have not been able to achieve the best accuracy with Nosler Ballistic Tips in either .243 or .224 caliber. All of my guns seems to have a penchant for cheap bullets, which actually works out to be a pretty good deal.
.30/30 165 grain Spitzer – Sharper, and slightly faster than a pointed stick
 This past week, I concluded with a reloading press full of these pointed things,Hornady 165 SPBT bullets, pressed into .30/30 cases. I was trying for a longer heavier bullet that I though might stabilize better in the Contender 1:10 twist.
Cartridge: .30/30 WCF
Bullet: 165 grain Hornady BTSP
Powder: Win 748
Charge Wt.:36.0
Primer: CCI #200
Cartridge C.O.L.: 2.720″
Muzzle Velocity: 2,125 fps
Best 100 yard group: .850″
Guess the day range day had some redeeming qualities, as this load out shot the Weatherby at 100 yards, with several sub 1″ groups. Recoil seems no greater than 150 grain loads, however reassuring that is, and only one case showed minor signs of potentially high pressure – a slightly flattened primer.
|
Yards |
0 |
50 |
100 |
150 |
200 |
250 |
|
Bullet drop “ |
-1.00 |
2.57 |
4.04 |
3.25 |
0.00 |
-5.95 |
|
Velocity fps |
2125 |
2039 |
1956 |
1875 |
1796 |
1721 |
|
Energy ft/lbs |
1654 |
1523 |
1401 |
1288 |
1182 |
1085 |
|
Taylor Index |
15.4 |
14.8 |
14.2 |
13.6 |
13.0 |
12.5 |
|
T.O.F. sec. |
0.00 |
0.07 |
0.15 |
0.23 |
0.31 |
0.39 |
This is my favorite Contender cartridge / load combination and it’s enjoyable to shoot. Maybe I’ll have to revise my thoughts on hunting with a single shot and try this on boar. I just can’t get over the idea that a gun with a 14″ barrel can be so accurate (compared to my rifle shooting anyway), especially with an old cartridge like the .30/30.
…..and still ticking
![]() My favorite rifle is a 7MM Remington Magnum. I just like the wide range of bullets, the generally flat trajectory, and the magnum performance in a less than deck gun size package. It’s also the most accurate gun I own. I probably work mostly in the 140 – 165 grain bullet range, only because I’d move up to the .338 for anything that would require a 175 grain 7MM bullet, or down to the .243 for anything requiring less than a 140 grain 7MM. 160 grains is my favorite.
My favorite rifle is a 7MM Remington Magnum. I just like the wide range of bullets, the generally flat trajectory, and the magnum performance in a less than deck gun size package. It’s also the most accurate gun I own. I probably work mostly in the 140 – 165 grain bullet range, only because I’d move up to the .338 for anything that would require a 175 grain 7MM bullet, or down to the .243 for anything requiring less than a 140 grain 7MM. 160 grains is my favorite.
Cartridge: 7MM Remington Magnum
Bullet: 160 grain Sierra SPBT
Powder: Alliant Reloader 25
Charge Wt.: 67.7 grains
Primer: CCI #250
Cartridge C.O.L.: 3.290″
Muzzle Velocity: 3,010 fps
Best 100 yard group: .500″
|
Yards |
0 |
50 |
100 |
150 |
200 |
250 |
300 |
|
Bullet drop “ |
-1.50 |
2.74 |
2905 |
3.25 |
2.54 |
0.56 |
-2.82 |
|
Velocity fps |
3010 |
2905 |
2802 |
2701 |
2602 |
2505 |
2411 |
|
Energy ft/lbs |
3218 |
2997 |
2788 |
2590 |
2404 |
2229 |
2064 |
|
Taylor Index |
19.05 |
18.9 |
18.2 |
17.5 |
16.9 |
16.3 |
15.6 |
|
T.O.F. sec. |
0.00 |
0.05 |
0.10 |
0.16 |
0.21 |
0.27 |
0.33 |
Sierra bullets seem to work well with just about everything, and they are typically the least costly of the major manufacturers. Reloader 25 has been an excellent alternative to IMR 7828 and I’ve settled in with Power Pistol for most of my .357 SIG loads. So I picked up a few pounds of Reloader 19 to try with some of my .243 loads, and 7 MM loads with lighter bullets.
Yikes! A market Microsoft missed ?
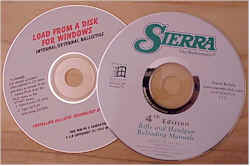 Interesting contrast between two companies. Load From A Disk ballistic software is a well thought out and well executed package. The math for trajectory and projected load performance looks good, in comparing the programs output to long standing published ballistics tables, as well as to handloads I’ve worked with and chronographed.
Other areas, like calculating blank range, produce some odd results. As an example, if you specify 5″ as the max variance from zero, then plug the resulting zero range into the trajectory calculator, you’ll get plots that significantly exceed 5″ at various points along the curve. Also the max is 5″. Not earth shaking errors, but enough to make me want to do further verification before trusting starting load data in areas I do not have personal experience.
Being able to add loads, bullets, calculate wildcat case capacity, and dream wheel results are a big plus. Within an half hour of having this capability, I had designed the .22/.357 SIG, the .22/.378 Weatherby and the .375/.22 Rim Fire. On a less creative, but more productive note, I also gained a bunch of different starting loads for the .338-.378. The interface is very easy to use, and the bullet, powder database is very complete and current.
The program installed easily. Although the files are actually only large enough to fill a couple of floppy disks, making the CD-ROM unnecessary, the CD-ROM is more convenient and more durable as archive material. Maybe the author will develop the product site so the software could be distributed, and subscription updated, over the Internet. With bullets, and even powder types, being released every few months, it would be a natural fit to provide routine updates.
Within a couple of hours, I had scrounged through all of my lists and notebooks and transferred a pile of my own data to the Load From a Disk program. Unlike the Sierra product which remains on the CD, the ballistic software program installs to hard disk and opens the door to user and custom file.
The Sierra loading manual on CD-ROM is a little bit like the old notion of putting recipes on a computer. Static data on a computer, except in very large amounts, is somewhat of a waste of time. In the case of the Sierra manual, I’d almost rather thumb through a hard copy manual, with clear fonts and easy to scan tables, then try to peer through a multitude of blotchy small on screen windows. Sierra set all text files in the Times New Roman in Rich Text Format. This would have done nicely as an Acrobat application. The program is a little over 3 megabytes of space on 650 megabyte’s of storage medium.
I think for just about everyone who produces data that has a shelf life measurable in months, they should put the manuals on a web site, or at least the frequent updates on bullets, cartridges and load data. Charge a monthly or annual fee, but make it convenient for users to get current information. I think the time for manuals on CD has come and gone. I’m not even sure why bullet or powder companies charge for what amounts to a product data book.
Little things Mean a Lot
Ever walk around a gun shop, and notice some guys have one arm like Popeye, and the other like Olive Oyl ? Those are the guys who use a manual case trimmer. And if they have skinned knuckles, they are also the guys who didn’t buy the accessory plate that increases the trimmer’s clearance between the crank handle and the counter top. I was handloading some of my favorite stuff this evening –
I had the little case kicker turned too far to the outside of the shell plate, and it jammed on a case. I was trying to manually index the plate, when it suddenly popped free, rotated, and ran the kicker into my index finger.
I don’t mean it bumped into my finger, I mean the exposed 3/4″ of tempered wire ran up into my finger tip, and stayed there until I realized I probably should remove it. It was a squirter, so I grabbed a bench rag and put direct pressure on the small puncture. Unfortunately it didn’t register, that moments earlier, I had saturated the rag with Nitro Solvent and used it to wipe out a set of dies. I thought I might just stick my finger back on the wire, to recreate a time when I was only wounded, and not also chemically on fire. I was hopping around pretty good, and I started thinking….maybe a little late in the process….
 Why don’t I clip a small piece of plastic tubing from my fish tank air pump, and slide it over the wire kicker. Then I’d avoid those impromptu inoculations and, maybe, have fewer jammed cases.
In fact, it was a good day for clearing up a lot of annoying little things that always seemed to take away from the enjoyment of handloading.
The 29 cent trimmer accessory plate
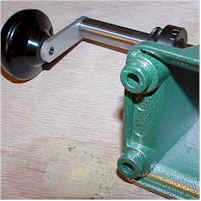 I have my bench drilled for the trimmer and the APS press. I use wing nuts to hold them in place when I need them, making them quick to install and remove, and I get a flat bench top when they are stowed away. The only two problems are; the standard trimmer locates the handle too close to the bench so I’m always scuffing my knuckles, and the three point mounting pads offer little support, and allow the trimmer to wobble.
I didn’t want to spend $25 for an accessory base, and I wanted a mount that would provide support for the whole underside of the trimmer, not just at the three pad points.
 Using the mount pads as a template, marked the spots, and used a Forstner bit to bore clean, sharp edged, half inch holes in a piece of redwood. I wanted the mount pads recessed tightly into the holes so they would carry the lateral load of the trimming motion, rather than the small 1/4″ 20 bolts. Keeping the trimmer steady would make for a more uniform cutter motion.
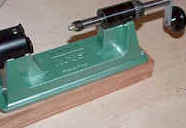 After the 1/2″ holes were bored, I ran the block through the jointer and planer until it was nice and square, and press fit the trimmer to the block so they would stay together even when removed from the bench.
I picked up an 1 1/2″ more crank clearance, and a really solidly mounted trimmer, with an investment of 20 minutes and a piece of scrap wood.
Too many holes in a funnel
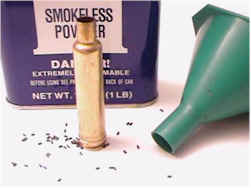 If this scene looks familiar, you’ve got ants in your reloading area, or you’re reloading anything based on the .378 Weatherby case.
The wide case shoulder prevents  the funnel from seating against the case mouth, so when the funnel is pulled away, all of the case grains trapped between the neck and the funnel tube spill out on the bench. It makes a mess and it’s a pain when you have a few boxes of the stuff to load.
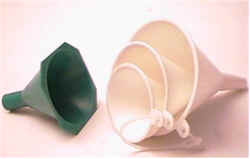 At $6 – $12 a pop, you can spend all day buying .22 – .45 cal reloading funnels, but they’ll all do the same thing. So you may want to take advantage of this special offer.
For only $45, I can deliver these custom fit funnels. A set of three, they cover most popular calibers: .22-.30, .338 – .40, and .45 – “Jeez, you’ve got to be kidding me”.
The funnels have a sharper taper than typical reloading funnels, tend to not block or bridge, and powder flows through much faster. If you’re in a real hurry to get them, you can also pick up a set at your local supermarket’s kitchen utilities aisle for about a buck.
Fabricating an autoclasperometer
 Sometimes I rely on expensive, ultra high tech fracture detection methods, such as the autoclasperometer. It is inserted into the case, hook end toward the case wall, until it comes in contact with the interior case head. Light pressure is then applied to the hook, as the hook is slowly pulled along the interior case wall, right up through the neck. The tip needs to be shaped into a point with a small jeweler’s file, or emery board, so it will pick up even a fine line inside the case.
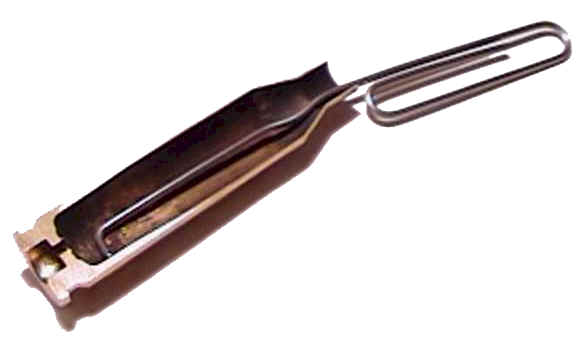 The inspection checks for interior ridges or radial fractures approximately .250″-.500″ above the case head that would indicate the brass is a candidate for case head separation, and you may have a need to check that load data. Probably isn’t necessary to show the clip and case in cutaway view, however, it is one more example of why I absolutely needed that high speed bench belt/disk sander.
Just be careful out there
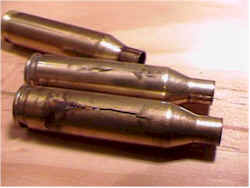 I think most people would assume, these cases have been reloaded too many times, or are the result of heavy powder loads. Actually, the cases had been reloaded only once before, and with light to moderate powder charges.
I’m not sure exactly what caused this early case failure, although I have a suspicion it was the result of excessive case length, poor case preparation and resulting higher pressures.
When I’m doing things correctly, I always decap, size, and tumble clean all cases prior to inspection. Removing carbon buildup, and pulling the case back into shape, help to bring visible defects to the surface. Some bright light and a magnifying lens aid in the process.
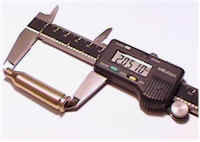 In this example, a routine check of overall case length showed an out of spec condition at 2.058″. The .243 has a max case length of 2.045″, and is trimmed to 2.035″ when found to exceed the maximum limit.
The check was done after sizing. It is very common to have a case exhibit a minimal increase in length when fired, then increase .003 – .004 when when the neck expander plug is pulled through.
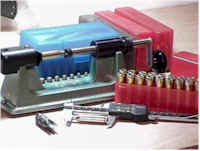 Excessive case length can very easily cause high chamber and case pressures. High pressures, in addition to the obvious safety risk to firearms and person, may only do something as simple as fatigue and fracture brass. Proper trimming of cases can increase the margin of safety, and greatly extend case life.
Case trimming can be relatively monotonous. There are powered trimmers to shorten the task, and special dies available from most manufacturers that dramatically minimize the frequency of the task.
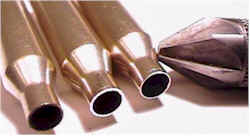 There are a couple of steps in the process, after the brass is removed from the trimming tool. The first case on the left is untrimmed, and the next is trimmed as it leaves the tool, complete with a large burr. The third case has been deburred with an inside out side hand chamfer tool.
Where brass has thickened considerably, neck turning will bring a case back into spec.
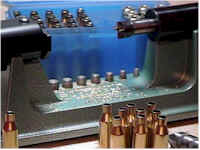 I mentioned that trimming can quickly become a boring proposition, but probably of greater importance, uniform torque and cutting motion of a powered trimmer would yield dimensionally more uniform cases.
That sparkling yellow stuff isn’t gold. I ran a little over a hundred cases and had a pile of brass that spread out all over the place. You want to make sure it’s cleaned from cases, flash holes in primer pockets, and not left on the bench to find it’s way into tools, guns and other assemblies.
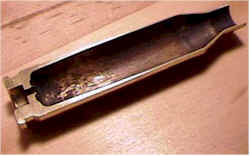 There are numerous areas to address in case preparations. Primer pockets and flash holes should be cleaned and clear of obstructions. Primer and powder residue can prevent a primer from properly seating and cause a misfire. Flash holes blocked from residue, or even tumbling medium, can cause erratic ignition.
I wouldn’t recommend cutting up too many cases like this. You’ll find they all look the same inside, and it really gets quite difficult to keep the powder from falling out.
In preparation for a group of us target shooting on the weekend, I went ahead and ran about 150 cases through preparation. It’s nice to start reloading with clean, properly dimensioned brass. During the process I picked up another piece of information that has proven helpful.
Juggling Drop Tubes
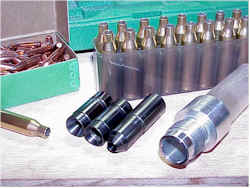 IMR 7828 yields pretty exceptional results in loads, from heavy bullets in .243’s up, through the large magnums. Unfortunately, it’s difficult to uniformly feed with a mechanical powder measure, frequently hanging somewhere between the measuring cylinder and the drop tube.
The three drop tubes pictured cover .22 – 270, 7mm – .45 cal and pistol. While the .22 – .270 tube would not feed, the pistol tube metered uniformly to the .243 case, within .2 grains.
Unfortunately the .243 case, much longer than a pistol case, drove the drop tube up into the clear plastic extension tube, blocking the view of powder dropping from the measurer into the drop tube. A little disconcerting, not to have that visual check.
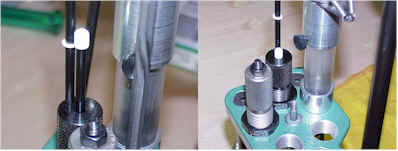 Use of a powder level checker restored the safety check, and left me with a little more confidence in the process.
I scale checked every 10 rounds, but never had to make an adjustment.
Good to a fraction of a grain…what fraction would that be ?
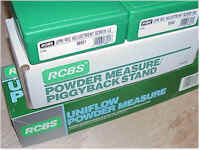 I’ve been using a press mounted Uniflow dispenser for most of my reloading. I also do a lot of short run loading, off the progressive Ammo Master, and use a scale to measure all of these charges.
I thought I would set up a second powder measure on the bench to use for these short runs, and save on frequent change over of the press mounted measure.
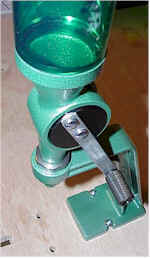 The Uniflow and piggyback bench mount are easy to install. In fact, the dispenser shares the same foot print as the APS press, so I was able to use the quick detach mount holes already drilled through the bench top.
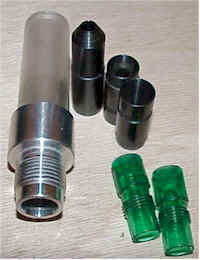 The dispenser came with installation hardware and two drop tubes, .22 – .270 and 7MM – .45 cal. It also came with a bracket that would permit mounting the dispenser at bench level, rather than on the piggy back mount.
The green plastic drop tubes are for the bench mount, the three metal drop tubes fit into the extension tube used on the press mount. The weight of metal tubes is necessary for them to reliably follow the motion of the cartridge case as the shell plate is being raised and lowered in the press.
New dispensers, like new dies and almost anything else that contains machined parts, are shipped with a petroleum based rust inhibitor. These items need to be disassembled and cleaned before use, or else any powder passed through the measuring cylinder will meter erratically and/or become oil soaked and ruined. Contaminated powder burns erratically, and with unpredictable results.
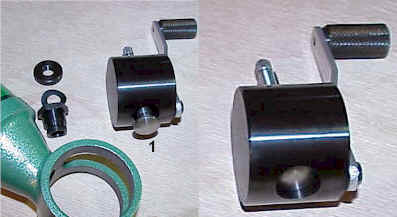 Fortunately, dispensers are simple assemblies. A bushing is removed, the measuring screw is pushed out of the top of the hopper, and the measuring cylinder, or drum, slides out.
Measurement with a mechanical dispenser is based solely on volume. The metering screw (#1) is adjusted in and out of the measuring cylinder to alter the volume of the cavity. The handle rotates the cavity under the powder in the hopper, and the cavity is filled. Then the handle is rotated back to the original position, rotating the measuring cylinder until it empties the powder into the drop tube. Any powder caught between the cylinder and hopper, on rotation, is sheared.
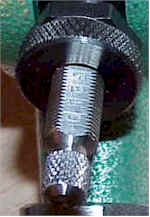 The standard measuring screw has a flat on one side and is indexed with relative numbers. While the measuring screw may be adjusted to create a specific size cavity in the measuring cylinder, the physical difference in powder types make any index only an approximation.
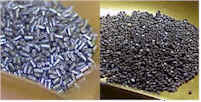 IMR4895 is extruded, or stick powder. Win 748 is spherical or ball powder and has a much higher density for a given volume.
I changed the powder type in the measure, but made no other metering adjustments. The Uniflow went from dispensing 40 grains of 748 to dispensing only 32 grains of 4895. The settings are reasonably repeatable, however, within the same powder type. If setting the metering screw to 10 on the scale yields 37 grains of Win748 today, it will yield approximately the same a month from now. The standard scale is a little difficult to read and is not indexed for fine increments.
 RCBS offers micrometer type metering screws for their powder measures, one for a measuring cylinder with a large cavity, and one for small, or the small Vs. the large end of the quantity spectrum.
The scale resolution for each is about the same, 50 clicks to the thimble and 10 + half increments on the barrel, but this scale is still only relative. The finer increments closer logging of historical settings for quicker set up in the future and are, for this purpose, easier to use than the standard metering screws. More important, these look really impressive on the bench, particularly to the uninformed.
So after all of this preciserocity, how well does a mechanical dispenser measure or, what is a good reason not to start at maximum loads, and why should charges be scale checked at least at every 10 throws ?
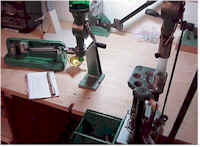 Measures are usually spec’d as “meter within a fraction of a grain”. I just never knew what the manufacturer had in mind when they wrote that statement, 1/10 or 9/10 ? I set up two powder measures, one press mounted and one bench mounted, then basically metered a bunch of powder to check them for accuracy and consistency.
I kept drop tubes consistent throughout the checks. The new measure was disassembled and cleaned before starting the process, and I ran through a pound of powder before logging scale checks. An RCBS 10/10 scale was used to verify each of the powder throws. I used large capacity empty cases for collecting powder output from the press, to insure the actuation of the measure would be the same as in normal use.
| Powder | Press/ Bench |
Type | Bas e Wt. |
1 | 2 | 3 | 4 | 5 | 6 | 7 | 8 | 9 | 10 | Grai ns var. |
% to Base |
| Win748 | P | S | 10. 0 | 10.0 | 9.0 | 9.9 | 9.7 | 10.0 | 9.8 | 9.8 | 9.9 | 9.9 | 9.9 | .3 | 3.00 |
| Win748 | B | S | 10. 0 | 10.0 | 10.0 | 10.0 | 10.0 | 10.0 | 9.9 | 10.0 | 10.0 | 10.0 | 10.0 | .1 | 1.00 |
| Win748 | P | S | 20. 0 | 20.0 | 19.9 | 19.9 | 19.7 | 20.1 | 20.0 | 20.0 | 20.1 | 20.1 | 20.1 | .4 | 2.00 |
| Win748 | B | S | 20. 0 | 20.0 | 20.0 | 20.0 | 20.0 | 20.0 | 20.0 | 19.9 | 20.0 | 20.0 | 20.0 | .1 | .50 |
| Win748 | P | S | 40. 0 | 40.0 | 39.9 | 40.0 | 39.9 | 39.8 | 39.9 | 39.9 | 39.8 | 39.8 | 39.7 | .4 | 1.00 |
| Win748 | B | S | 40. 0 | 40.0 | 40.0 | 39.7 | 40.0 | 40.2 | 40.4 | 40.3 | 40.4 | 40.5 | 40.7 | 1.0 | .02 |
| IMR7828 | P | C | 40. 0 | 40.0 | 39.6 | 39.5 | 39.6 | 39.1 | 39.5 | 29.3 | 49.6 | 39.6 | 39.6 | 20.3 | 50.0 0 |
| IMR7828 | B | C | 40. 0 | 40.0 | 40.2 | 40.2 | 40.3 | 39.7 | 40.5 | 39.2 | 39.6 | 39.4 | 40.0 | 1.3 | 3.20 |
| IMR4895 | P | C | 40. 0 | 41.4 | 39.6 | 39.6 | 39.8 | 39.6 | 39.6 | 39.7 | 39.7 | 39.7 | 39.6 | .8 | 2.00 |
| IMR4895 | B | C | 40. 0 | 40.0 | 40.0 | 39.8 | 40.1 | 39.9 | 39.9 | 39.9 | 39.8 | 39.9 | 40.0 | .3 | .75 |
| H870 | P | S | 80. 0 | 80.0 | 79.9 | 80.3 | 79.7 | 79.5 | 79.6 | 79.3 | 79.7 | 79.5 | 80.0 | 1.0 | 1.25 |
| H870 | B | S | 80. 0 | 79.8 | 79.9 | 80.3 | 79.7 | 79.5 | 79.6 | 79.3 | 79.7 | 79.5 | 80.0 | 1.0 | 1.25 |
| Unique | P | F | 8.0 | 8.0 | 7.9 | 7.8 | 8.2 | 8.2 | 8.0 | 8.0 | 8.3 | 8.0 | 8.0 | .4 | 5.00 |
| Unique | B | F | 8.0 | 8.0 | 8.0 | 8.0 | 8.0 | 8.0 | 8.1 | 8.1 | 7.9 | 7.9 | 7.9 | .2 | 2.50 |
| Power Pistol | P | F | 13. 0 | 29.9 | 12.9 | 12.9 | 13.1 | 13.1 | 13.1 | 13.0 | 13.1 | 12.9 | 12.9 | .2 | .15 |
| Power Pistol | B | F | 13. 0 | 13.0 | 13.0 | 13.0 | 13.0 | 13.0 | 13.0 | 13.0 | 13.0 | 13.0 | 13.0 | .0 | 0 |
| P=Press mounted B=Bench mounted S=Spherical C=Cylindrical F=Flake | |||||||||||||||
Well, absolute accuracy, as measured in tenth grain increments, probably isn’t as important as over/under percentage of charge. I believe the bench mounted measure was consistently more accurate in powder throws – I don’t know why. I do know that powder measures depend upon consistent lever actuation and cycling, to maintain uniform density of powder residing in the hopper and above the measuring cylinder. The jarring of the progressive press may cause irregular compacting of powder in the hopper, A good reason to never have a vibratory cleaner running on the same counter as a powder measure.
As much as I’ve read about ball powder feeding so much better than other types, I see nothing that would indicate this to be the case. There was a serious problem with IMR 7828, that I believe is unique to this specific type of powder. It has long cylindrical granules, and a tendency of getting stuck somewhere in the pipeline. In this case, half the charge obviously got hung up between the cylinder and the drop tube, then fell free on the next cycle. The problem would have been detected by a powder level checker in the press, but the error is still disconcerting.
I asked IMR for a measuring device recommendation for 7828, they indicated there really was none, other than a scale, but the benefits of 7828 offset the inconvenience. Interesting. There really is a solution to the IMR 7828 dispensing problems, that would be Reloader 25, or Hodgdon H870, or…..
I think I need to keep looking for a method that will maintain 1% or less variance within a powder type. I may also look at ways of pre-compacting powder in the hopper, or using a constant pressure source. Think I need to check out a combo electric dispenser / scale set up…
More “A varmint load for the .338-378 Weatherby”: A varmint load for the .338-378 Weatherby A varmint load for the .338-378 Weatherby II.. Handload Data 338-378 Weatherby Magnum
Thanks
Joe

Email Notification