As manufacturers attempt to expand sales, they tend to look for and promote new uses for established products. Sometimes the effort is the result of good applications engineering and verifiable customer feedback, sometimes it’s just the work of a marketing manager’s fertile imagination. When I was working through the .45 Super® project I ran across some ad copy and web site product info that piqued my curiosity. If you’ve ever had your curiosity piqued, you know how painful that can be:
-
Specialty steel firing pins can prevent primer flow, smearing and pin breakage
-
High rate recoil springs can improve primer firing pin penetration

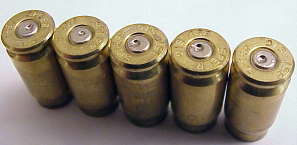
My handloads have yielded many, many odd looking primers, so I feel more than qualified to make a product assessment. Above we have primer flow, primer flow and flattening, a classic case of primer smear, and a case of quasi primer smear with primer flow and minor primer flattening – and these were all from only two guns, a Kimber .45 Gold Match and a P229 .357 SIG.
I already had a pile of recoil springs for both guns, so I placed an online order with Brownells for firing pins. As always, order confirmation, shipped from stock and on time arrival. I’m actually up to three organizations I just don’t worry about when it comes to reliability; Brownells, Lock Stock & Barrel and Starline Brass. Nope, I don’t get anything free when I mention them, and I doubt if they know me in the context of this web site or in any other manner. I’m just a consistently satisfied customer.
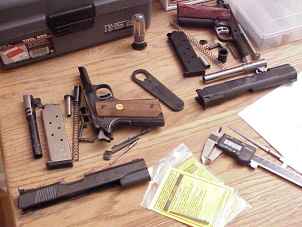 I like to start a new project with my bench top covered with as many disassembled guns as possible. During this project, the count grew to 5. At the end of each project, I like to mix all the parts together and see if I know my guns well enough to get all of the pieces back to the right frame. That’s why I own a Bisley in .40 S&W with a 3.8″ barrel.
More accurately, when the parts arrived, I broke this project into two sections; the first dealing with firing pins, the second with recoil springs. I then opened up a couple of guns to record some comparisons between the original parts, and the new third party material
Fact or Fiction
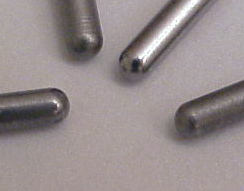 Each firing pin manufacturer indicated they placed a specially profiled tip on their firing pins that would prevent primer material from flowing into the hole in the breech face of the slide – primer flow. Each firing pin tip, factory or third party was virtually identical in shape and radius to the others.
The Chip McCormick stainless firing pin was in fact identical to the Kimber factory part in every way. My assumption is a common source and a very standard firing pin. McCormick, Ed Brown and Kimber parts are Colt Series 70/80 compliant with a groove cut in the shank to clear the Series 80 firing pin lock plunger. This is of no use in the Kimber, which does not contain a firing pin safety locking mechanism so I’m not sure why they have selected it, except possibly the economics of volume production and, since it has no impact on firearm operation, why not ?
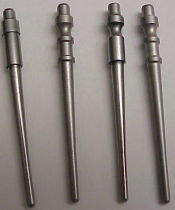 Left to right: Colt 70 Series Gold Cup, Kimber Gold Match, Ed Brown Heavy Duty, Chip McCormick – all .45 Auto type. I also took some time to look at several other factory parts. The firing pins are very typical in design with only very superficial differences.
The Kimber and the Chip McCormick parts have a small band of metal removed just below the plunger groove that provides some weight relief, but nothing of consequence. The Ed Brown part is almost identical to a standard Colt 80 series firing pin.
Both Ed Brown and Chip McCormick parts are touted as having a special taper that eliminates primer flow, or improves accuracy, or a must for major power factor loads. The tapers are standard Colt.
| Spec | Colt 70 | Colt 80 | Kimber | McCormick | Brown |
| Length | 2.28 | 2.27 | 2.26 | 2.26 | 2.26 |
| Weight – grains | 70.5 | 66.5 | 63.5 | 63.3 | 67.6 |
| Tip Dia. .000″ | .090 | .091 | .092 | .091 | .090 |
| Breech Opening | .093 | .093 | .093 | N/A | N/A |
I’m not sure what this is all about. I’ve used both Ed Brown and Chip McCormick parts efore and they’ve been fine, although some of the McCormick material reminds me of the less than exciting investment casting parts from Ruger. In terms of solving firing pin breakage problems, I’ve never seen a 1911 with a propensity for breaking firing pins that didn’t have a worn or misaligned slide firing pin channel. The weight differences are not enough to effect lock speed in any measurable way. The tapers and tips are strictly Colt standard spec, including the diameters and non-tapered first .515″ or so of the firing pin tip.
I tried the pins with numerous brands of ammo and handloads – statistically, they had absolutely no performance gain over factory original parts in regard to primer flow, cratering, extrusion or any other primer phenomena associated with higher pressure cartridges. Why the bogus promotion ? Well, if you sell to replace broken firing pins you sell once. If you sell improvement, you can sell at $5 over and over and….
For just 4 times that price you can get firing pins from the same manufacturers in titanium. If there is any pitch for titanium at half the weight of steel, it may be safer relating to accidental discharge in Series 70 type designs. In case you don’t know, the firing pin resides in a circular channel in the slide, pushed back away from the opening on the breech face and cartridge primer by a spring, but retained in the slide under pressure by the firing pin stop at the rear of the slide. The pin is shorter in length than the channel and relies on being struck hard enough by the hammer to carry it the length of the channel, out the breech face, and into contact with enough force to adequately compress the primer. The pin then retracts back into the slide, safely away from contact with the primer of the newly chambered round – an inertial firing pin. In theory, if the slide cycled and returned to battery with enough force, it’s possible the inertial firing pin can be driven forward and discharge the freshly chambered cartridge. A lighter pin, half the weight, would be far less prone to discharge in this manner.
The effect of recoil springs on primer strikes
There was a section on one manufacture’s web site that explained how an increase in recoil spring rate, could correct a light primer strike condition in a 1911 type semi auto pistol by driving the slide more forcefully into battery position. The theory expressed the spring would reduce headspace and move the casehead and primer closer in proximity to the firing pin. My understanding is the dimensional relationship of the slide’s breech face, the barrel and cartridge are established when the barrel link rotates the barrel’s upper lugs into the grooves cut into the slide, and the lower barrel lug is resting on the stop pin. If I owned a gun where changing a recoil spring would push the barrel slide assembly forward after lock up far enough to make a visible difference in primer strikes, I think I’d be looking for a good gunsmith, not a new spring.
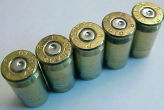 I don’t have a .45 that produced consistently light strikes, but it seemed if the manufacturer’s assertions were correct, if I varied the spring rates enough in either direction, I should be able to see a correlation in primer indentation depth. So I grabbed a pile handloaded ammo, all produced at the same time to the same spec, and headed for the range. These were moderate loads that had been chronograph verified for consistency of velocity, and I fired them across a full range of recoil springs. There were noticeable differences in ways I would expect. Empties ejected different distances with different spring rates, and at the extreme high end of the spring range, I even managed to get a stovepipe jam. Outside of this the session was pretty uneventful, although it did seem felt recoil was reduced with heavier springs working against the slide cycling.
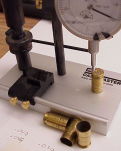
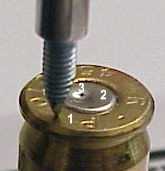 When I completed the firing portion, I set up a dial indicator to capture what I felt was relevant data. I zeroed the indicator at approximately .050″ below the trimmed length of a .45 auto case to make sure the stylus would always be in contact with all measured surfaces, recorded measurements at three points (noted in the picture at the right) from all fired cartridges, then used the shortest case length measurement as the baseline, and interpreted all other measurements from that point.
Case length to baseline: The length of a case compared to the shortest case. Plus readings represent how much closer the specific case’s primer surface was to the firing pin.
Primer rise to base: The fired primer’s surface compared to the baseline measurement. I thought that deep versus shallow strikes might just be related to how far the primer rose around the firing pin when struck and really had little to do with firing pin penetration.
Gross firing pin indent: The depth of the firing pin indent relative to the highest surface of the primer, ignoring all other measurements.
Net firing pin Indent: The depth of the firing pin indentation, after adjusting for factors that placed the primer farther from, or closer to the firing pin – such as the effect of a longer or shorter case.
| Firearm: |
Series 70 NM Colt Auto |
|||
| Cartridge: | .45 auto Remington brass 200 gr Speer JHP 10.0 grains of AA# 7 MV 800 fps |
|||
| Spring | +Case length to baseline | +/- Primer rise to baseline | Gross firing pin Indent | Net firing pin Indent |
| 7 | .003 | .004 | .012 | .011 |
| 10 | .004 | .003 | .017 | .018 |
| 12 | .000 | .001 | .016 | .015 |
| 141 | .004 | .003 | .024 | .023 |
| 162 | .005 | .005 | .019 | .019 |
| 18.5 | .005 | .004 | .015 | .010 |
| 20 | .005 | .004 | .015 | .014 |
| 24 | .005 | .005 | .019 | .019 |
| 28 | .004 | .004 | .015 | .015 |
|
Notes: 1 = standard Gold Cup spring |
||||
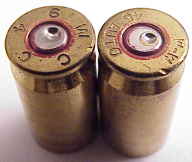 Besides the handloads, I also fired a bunch of production 230 grain standard velocity and 185 +P loads to see if there was a major change in pin strikes based on load type. There was no appreciable difference.
I did, however, recognize that higher pressure load primers almost always look more like shallow pin strikes, only because the pressure slamming the primer against the breech face flattens the normal rise of the fired primer. In this picture on the left, both cases have an almost identical net strike depth of .015″. High velocity on right.
 I’ve had misfires with my P229 with the .357 SIG round, but never when firing .40 S & W. After a lot of analysis I’ve attributed the problem to insufficient firing pin penetration, caused by improper case sizing and improper location of the shoulder resulting in excessive headspace.
Of note, in every case of these misfires, the overall case length was correct, but the case mouth did not properly locate the cartridge. When the 357 SIG was first introduced, it was suggested by SIG and gun writers, that the case head spaced on both the shoulder and case mouth…err okay. In reality, unless SIG cuts all of their barrel chambers out of spec, they are too deep to properly locate the case at the mouth. I changed to head spacing at the shoulder, just as I do with virtually every other bottle neck case, and I haven’t had a failure since.
I thought I’d see what the SIG round would look like when checked in the same manner as the .45 auto, including some older loads that resulted in misfires. The SIG isn’t like the 1911, but rather establishes headspace with the barrel located against a locking lug insert and a trigger pivot cross pin located in the frame, and the breech face of the slide contacting the barrel hood or extension. I had purchased my SIG as a .40 S & W and purchased the 357 SIG optional barrel, so the recoil spring was already lower than factory spec for the 357 SIG loads.
| Firearm: |
SIG P229 |
|||
| Cartridge: | 357 SIG Remington factory loads 125 grain metal case |
|||
| Spring | +Case length to baseline | +/- Primer rise to baseline | Gross firing pin Indent | Net firing pin Indent |
| 161 | .006 | .008 | .010 | .008 |
| 172 | .008 | .007 | .010 | .011 |
| 19 | .004 | .008 | .009 | .005 |
| 21 | .008 | .008 | .009 | .009 |
| 213 | .000 | .003 | .004 | .001 |
| 213 | .003 | .004 | .005 | .004 |
|
Notes: 1 = standard for .40 S&W 2 = standard for 357 SIG 3= misfires |
||||
I wasn’t left with a very good feeling. Most 1911 design guns have a problem with feed and ejection, but unreliable ignition isn’t high on the list of inherent problems. The SIG has never had a problem digesting ammo, however, it has been marginal regarding proper and reliable ignition with the 357 SIG barrel in place. The recoil spring had no bearing on the gun’s ignition performance, however, extra power springs did help a great deal in stopping the slide from slamming around on the frame. I left the 21 lb spring in the gun.
My conclusion is I can forget recoil springs as having any impact on firing pin penetration, but I can appreciate them for what they do well when properly applied; insure reliable feed and ejection, and keep the slide under control to prevent premature wear or damage to the slide and frame. In the mean time, since I’m not going to cure primer ailments with springs, firing pins and other assorted pieces of hardware, I thought I would take a moment and restate typical problem symptoms expressed by fired primer condition.
Primer appearance
The appearance of spent primers can offer a lot of information about the condition of a cartridge or firearm. Sometimes the message may not seem precise, but placed in context with other information, primer appearance could be a pretty specific pointer. A “leaking” primer, surrounded with soot, might be diagnosed as an oversized primer pocket, or an excessive powder charge. But if, when the round was handloaded, only very light pressure was required to achieve proper seating, and powder charges were kept to a moderate level, then a leaking primer would probably point to an oversized primer pocket.
Of course the primer pocket may have been enlarged as the result of overuse of the case, improper use of primer pocket cleaning tools and equipment, or even earlier exposure to an excessive charge, However, the immediate corrective action remains the same – toss the case and don’t attempt to reload it again. Unless the symptoms appeared in some other setting, I wouldn’t start examining the gun for flaws, or look for another handload recipe. But if the loads were hot, and primer seating pressure was normal, it would be time to stop shooting, back off on the loads, and check the gun for signs of damage resulting from excessive pressure. So it pays to look around and not use a single factor to jump to conclusions.
 This .243 Winchester round exhibits a relatively normal primer, unfortunately, it has a two inch pressure fracture running down the side of the case. The headspace was correct, the powder charge was heavy, there was enough excessive pressure to fracture a twice fired case, but the primer alone offered no clue.
Backed out primers: This condition is predominately caused by low chamber pressure rather than oversized primer pockets. When struck, the ignition pressure of the primer compound drives the primer slightly from the cartridge case. The powder charge is then ignited and, under normal operating pressures, the case will follow the primer to the breech face of the firearm, seating the primer, resulting in a normal fired case/primer appearance.
 When a power charge does not generate sufficient pressure, the primer charge will still back the primer out, but there will be insufficient pressure for the cartridge case to follow and the primer will be left protruding slightly from the case. If the problem were a loose primer pocket, the case would still have enough pressure to be driven back flush with the primer.
Not that this has ever happened to me, but as you can see from the lifelike artist rendering on the right – The rim looks normal, the primer is backed slightly from the primer pocket but retained a normal fired appearance. There is no flattening of the primer face or signs of leakage.
 Cratered or extruded primers: “Cratering” is the result of primer material being extruded or pressure formed into the firing pin opening on the recoil face of the slide. Very minor narrow ring around a firing pin indentation is typically caused by excessive clearance between the firing pin and firing pin opening in the slide. Larger areas of cratering, as illustrated in the picture on the right is generally caused by excessive pressure.
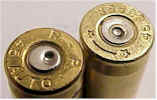 Flattened Primers as a function of pressure: Flat primers exist in degrees, and the degree determines cause. As seem to the right – a primer flattened around the face and firing pin indentation would normally be viewed as a primer exposed to high pressures, as long as the radius along the perimeter of the primer was intact. A primer flattened across it’s entire surface where the normal gap between the cartridge case and primer radius is essentially gone, is usually attributed to head spacing.
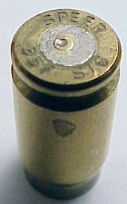 Flattened Primers as a function of headspace: It takes years and years of experience to put a handload together with this special combination of incorrect headspace and excessive powder charge. In fact, I’ve only been able to accomplish that feat on a couple of occasions.
In the case of the .357 SIG, the oversized gap between the rear of the case and the recoil surface of the slide, permitted the primer to be driven far out from the support of the primer pocket. In the next phase of ignition, powder generated pressure ballooned the primer outward, then the case was driven back against the recoil face of the slide flattening both case head and primer. The now oversized diameter primer expanded to fill the gap between it and the outside diameter of the primer pocket.
The SIG problem stopped when I stopped believing 357 SIG cartridges could be reliably head spaced on the case mouth. In fact, I found few suppliers of brass who even hit the nominal length dimension for the case. Since I switched to focusing on the shoulder position, I’ve had no further headspace related problems with the SIG.
Thanks,
Joe

Email Notification