 A new rifle typically holds my full attention for a few days. Once I’ve walked through it’s unique features, it becomes of more routine interest and I’ll shift gears to cartridge development. This time I’ve been having a lot of fun with the little Remington and I’ve held on to that initial level of interest. The other day I installed a shooting sling and found myself taking a little more care in fitting, making sure everything worked right and looked right. I decided it was time for a scope.
Elsewhere is the Real Guns archive is an quick story on the Warne quick detachable mount system. Because the Seven has metallic sight and would be used for many purposes, I decided the Warne quick detachable mount system would be right for this rifle. I also wanted to avoid all temptation for oversized optics in a package that would make the gun look like it was about to fall over. As a result, I went for a Burris Compact, seen below next to a Tasco full size.
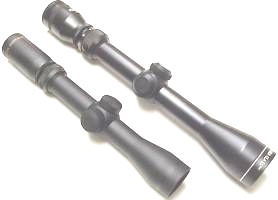
| Comparison | Burris Compact |
| Magnification | 3x-9x |
| Field of View | 25′ – 11′ |
| Objective Bell | 39mm |
| Objective Lens | 32mm |
| Eye Relief | 3.75″ – 5″ |
| Weight | 12 oz |
| Overall Length | 10.4″ |
| Mount Spacing | 4.53″ |
| Price | $241 |
What the Compact gives up in field of view, and theoretical image brightness, it gives back in compact form, light weight and welcome eye relief. While not quite the bargain of the $68 Tasco, it does cost about a third less than a comparable Leupold.
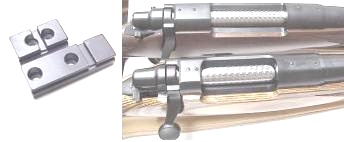 Remington 700 and 40x rifles share a base pattern with Weatherby Mark V actions. Unfortunately, they share only a front mount with the current Model Seven. I had to chase around a little to locate the proper close hole mount to fit the Model Seven action – bottom right picture. I located one at Warnes.
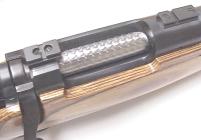 After spending most recent time installing the Redfield/Leupold type mount systems, the Warnes bases were a nice change of pace. They are surprisingly exact in position, clearing the bolt without leaving a receiver gap, and very low and flush fitting. They are secured with machine screw threaded cross slot screws.
There are also offset or extended bases to permit users to arrange for varying scope and action length; quite flexible.
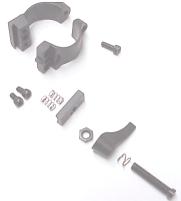 I apologize for the really poor quality image. I just couldn’t get them to sit still. I have to tell you, when I first began to disassemble the rings, I grew concerned – too many parts result in too many weaknesses. This was not the case with the Warne Quick Detachable system.
The rings clamp to the scope normally, one top Allen screw, two lower. The springs position the “V” block that clamps the scope ring to the base. The “V” block does the clamping, and they are clamped on and off with the small lever. In fact, the system is very stout with most of the small parts meant to dampen screw loosening vibration, and permit indexing of the locking levers.
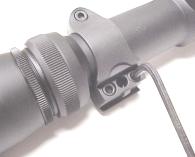 The Warne ring is secured to the scope tube by removing the quick detach lever and base locking assembly, then removing three Allen screws, sandwiching the scope tube between the ring halves and tightening the down again.
The Warne clamps not heavy, but they are heavily constructed. The interior surfaces are smooth and even for full scope tube contact, and the whole setup locks up really well. I clamped the rear ring on, using the magnification index dot to square the reticle to the ring.
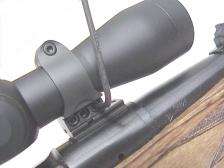 The rear ring was set back as far as mechanically possible. I thought I would have to use a front extension base to fit the short scope, but the front ring actually dropped right into the notch in the base, fully forward on the scope tube.
Without the scope ring set resting in both front and rear bases, I went ahead and made very minor rotational adjustments, then went ahead and tightened the rings together. Once the base clamp and lever assembly are installed, the lower ring clamping fasteners are not accessible.
 This was the difficult part, installing the base clamps and levers. I had one hand holding the springs and clamp in place, the other holding the lever in position, and the other…well, that’s where I ran into a problem, much like the NY Giants who apparently can’t advance a ball more than 6 or 7 yards in a series of downs.
I did what any many would do, I asked my wife to help; first to by changing to the Redskin game, then by tightening the Allen screw that secures the clamp. Neat.
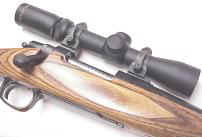 Once the scope is in place and everything is secure, the levers can be parked in any position by pulling out from the ring and rotating. First I tipped them forward, then realized the rear lever stuck out into the ejection port. Back interfered with bolt handle access, so “up” was the only real option.
The only thing left for me to do was to bore sight the scope and get it as close to correct alignment as possible.
 Without adjustment, the scope came in about 4 clicks to the left and 2 clicks high – the Burris has 1/4 MOA increments. I went ahead and made the adjustments in preparation for an actual range day.
I also wanted to see if the quick disconnect setup stayed put or moved around when the scope was removed and reinstalled. I out the rifle in a maintenance rest, left the bore site in place, and removed and reinstalled the scope with the quick detach feature 22 to 25 times. Each time the scope returned exactly to center in the bore site grid, which is a very accurate measurement of the mechanical relationship between the scope and bore centerline. As all parts are steel, I did not get the sense and parts were going to work into a sloppy fit any time soon.
 A little difficult to get an entire gun into a photo, but this should be enough to show rifle and scope in scale. I was very please with the way everything came together, including the shooting sling.
For Part II, I’m going to sift through a pile of bullet types, powder and some load data and see what I can wring out of this rifle. Who knows, maybe this one will work out so well I’ll want to add a 7mm-08 or a .350 mag. At least now I know why so many people like them.
More “The Remington Model Seven”:
The Remington Model Seven…a great place to start
The Seven Project Part I Quick Detach Mount System
The Seven Project Part II Handload Development
‘The Seven Project Part III – even more development
The Seven Project Part IV
Handload Data – 223 Remington
Thanks,
Joe

Email Notification