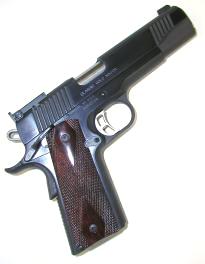
 When I was looking for a 1911 type pistol, I latched onto Kimber. The Classic Gold Match was purchased because it had the general look and feel of a 70 series Gold Cup; heft, feel and almost trigger. After some years of flogging it with +P loads and a transient .45 Super conversion period, it still feels like new and it shoots just as good. I thought I might clean it and get rid of a couple of deficiencies that have been an irritation since it was new; the cheapo plastic mainspring housing and the “dipped in plastic” look grips.
There are a number of sources for steel mainspring housings, some are noted in the table below. They come in different profiles such as flat, arched and bobtail; the latter requiring frame modification. Springfield Armory offers a version with a small key that locks the pistol when not intended for use. There are lots of finishes: white blued and bare stainless, with many variation of checkering and serrations.
| Manufacturer | Material | Surface | Contour | Retail Price |
| Baer Custom | Blued, Stainless | Serrated | Flat | $27 |
| Briley | Blued, Stainless | 20 lpi checkering | Flat | $38 |
| Ed Brown | Blued, Stainless | Smooth&Snakeskin | Bobtail | $62* |
| Brownells | ||||
| John Masen | Blued, Stainless | 20 lpi checkering | Flat & Arched | $19 |
| Smith & Alexander | Blued, Stainless | 20 lpi checkering | Flat & Arched | $35 |
| Springfield Armory | Blued, hard chrome, silver | 22 lpi checkering | Flat, integrated lock | $50 |
| Wilson Combat | Blued, Stainless | 30 lpi checkering | Flat | $45 |
|
Note* must also purchase a $42 frame trimming jig |
||||
Virtually all models for single stack government and Officer’s models are listed specified as being cast oversize, then machined to maximum spec dimension for a tight fit, but are still drop in installation. The problem with “drop in” is that there is a very loose tolerances and specifications for the original 1911 Government Model, a much more stringent set of modern manufacturing specs that reflect computer controlled machine operations, and intention for the gun to be used in a less hostile environment, however, all modern manufacturers may or may not share a common set of specifications and tolerances.
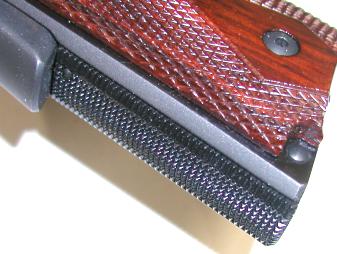
The Kimber plastic part is…well, nasty. It’s a part more appropriate for use in a child’s toy and disrupts the appearance of an otherwise very nice assembly. The use of this part probably represents $4 worth of cost reduction from an all steel gun. Cost reduction for profit is not an evil concept, but this choice and the limited savings potential, probably isn’t worth the loss of quality reputation and eventual loss of new gun sales. To remedy the situation, is selected replacement parts from Baer Custom (below left) because I am always impressed with the quality of their firearms, and John Masen to see if a lower priced part meant the customer should expect proportionally reduced quality.
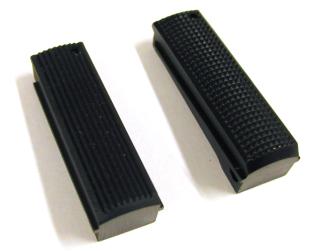
The new parts arrived in good shape, no malformed serrations or diamonds, the finish was dark and uniform, however, the Masen piece had a slight gloss to its finish, where the Baer piece was flat and was a nice match with the Kimber parts in the surrounding area – both were obviously much better than the original shinny plastic piece. Each weighed approximately 1 full ounce, compared to .2 ounces for the plastic part.
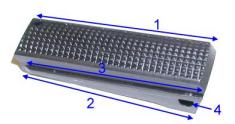
Since most of the literature describing these parts emphasized a close tolerance fit and no rattle, I thought I’d measure all and compare to get a better feel for the differences amongst selected parts.
| Comparative measurements of Mainspring Housings | ||||
 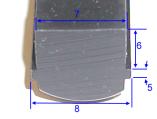 |
Location | Kimber | Baer | Masen |
| #1 | 2.069 | 2.057 | 2.054 | |
| #2 | 1.919 | 1.916 | 1.914 | |
| #3 | 1.880 | 1.806 | 1.917 | |
| #4 | 0.152 | 0.152 | 0.150 | |
| #5 | 0.073 | 0.076 | 0.078 | |
| #6 | 0.296 | 0.274 | 0.267 | |
| #7 | 0.533 | 0.540 | 0.532 | |
| #8 | 0.616 | 0.626 | 0.602 | |
Pistol Disassembly
 I think it may be a function of age and energy, but the thrill of spending hours trying to recall the proper location for a spring I removed from an unfamiliar assembly weeks earlier, is gone. There is a difference between field stripping a pistol, and more detailed disassembly. As an example, the mainspring housing pin is under load from the mainspring, as well as the pin retaining plunger, and the pin can’t be properly removed if the hammer is in the cocked position. Since I don’t often change mainspring housings, I thought I might overlook this point, and spend an hour banging away at the pin, or I could avoid the pain and anxiety of ignorance by making sure I had a copy of Vol I & II of Jerry Kuhnhausen’s “The Colt .45 Automatic Shop Manual”.
Kuhnhausen’s books are one of the best generally available sources of information for Colt 1911 types, and some derivatives. The books cover the theory of operation, detail disassembly, checking the firearm parts and assemblies for proper fit and function, and a guide to trouble shooting, and instructions for reassembly. There are also sections dedicated to improving accuracy, including cost effectiveness of most popular modifications. The cross section illustrations and photographs are first rate for this type of publication. If you are contemplating performing maintenance or modifications on your pistol, or you are planning on having modifications done by a professional gunsmith, the information contained in these volumes will greatly aid in preparation.
There are two approaches to disassembly and removal of the mainspring housing; correctly and incorrectly. I opted to begin with the fast and incorrect approach, thereby deluding myself into thinking I had superior skill and talent, and I could change the title of the story to “How to upgrade a mainspring housing in 5 minutes”. Unfortunately, “How to start a simple project, avoid application of common sense, and turn the project into two or three days of aggravation” was almost more appropriate. I will document the error of my ways, explain why the initial approach created a problem, and then try to cover a more conservative and correct approach.

The pin that secures the mainspring housing is cleverly labeled “Pin” is panel 1. After double checking for empty and pulling the mag, I dug around for an Allen wrench to remove the Allen head grip screws Kimber uses to insure owners will not be able to field strip their gun in the field, and removed the grip panels. I made sure the hammer was down and not cocked, to minimize compression of the mainspring and loading of the mainspring housing was not cocked. Then I placed a cloth on top of the left cupped side of the mainspring so the punch wouldn’t damage the pin finish, and proceeded to pop the pin out. A couple of comments – The pin is not a driven fit, it is held in place by light pressure from the mainspring housings pin retaining plunger. The pin is driven out left to right.
As the nose of the punch moved to replace the pin in position through the frame and mainspring housing, the mainspring housing dropped slightly against the smaller diameter punch, still lightly loaded from the mainspring in contact with the hammer strut. I placed the heel of the mainspring housing on the workbench top, applied slight pressure to push the housing back into the frame slightly, withdrew the punch, and eased off on the pressure to release the housing – pictured above in the far right photo frame.
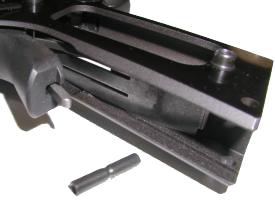
This is what it looks like in there with the mainstream housing removed, only not quite as fuzzy as the photo. The slotted sear spring lays flat in the recess, the grip safety rotates out from the frame, and that is the hammer strut poking out from the grip safety.
You’ll note there is a tapered groove in the center of the mainspring housing pin. The spring loaded mainspring housing pin retainer rests in this groove when the pistol is assembled, and locks the pin in place. This is one of the reasons the pin won’t budge if the hammer is cocked and applying high levels of pressure against the mainspring and pin retainer.
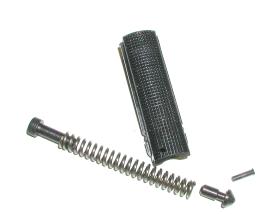 New mainspring housings, like the type selected, do not contain the internal parts of the complete assembly, so the internal parts must be transferred over from the old to the new. Pictured on the right is the original plastic Kimber mainspring housing, the mainspring cap at the top of the spring, the mainspring or hammer spring, the mainspring housing pin retainer and, finally, the mainspring cap pin that keeps all of the parts together under pressure within the housing. As a person with recoil spring plug indentations in the ceiling above my work bench, a couple of shop walls and the center of my forehead, I’ve come to routinely wear safety glasses and exercise care in handling any assembly that contains springs.
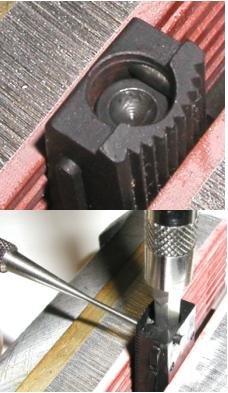
To the left is an assembled mainspring housing with rust, which can’t be good, and the mainspring cap pin holding down the mainspring cap. It is easy to work with this assembly by locking it down in a vise, with soft jaws in place to avoid damaging the part’s finish.
The cap pin that runs across the top of the mainspring cap installs in only one direction, and the pin’s oversized head is sandwiched between pistol’s frame and the mainspring housing. Under direct pressure of the mainspring cap when the assembly is removed from the pistol, the cap and spring need to be compressed to permit withdrawal of the pin. With the assistance of a driver handle and the largest diameter round nose hex driver that would clear the pin, I compressed the mainspring and used a punch to push out the cap pin – easy deal. Then, reversing the process, I installed all of the interior parts in the new Baer Custom mainspring housing.
I attempted to put things back together reassemble without further disassembly. I tucked the sear spring in place, positioned the hammer strut on top of the mainspring cap as I slid the new mainspring housing into place, I compressed the mainspring enough to align the mainspring housing pin holes, and closed. I pulled the hammer back, and it returned without the benefit of a trigger pull. Hmm…
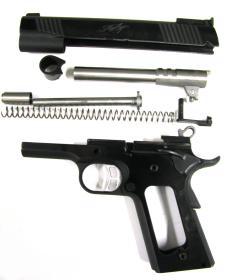
I know what you’re thinking, but you’re wrong, the picture on the right is not the result of further .45 Super experiments. Not knowing why the sear and hammer were not properly engaging, I thought it would be better retrace my steps and complete the rest of the disassembly as recommended by the shop manual.
I won’t cover the detail of slide removal, the instruction appear in every gun’s operating manual. Pulling the bushing and recoil spring, aligning the slide stop tab to the round relief in the slide, popping out the slide stop, and removing the slide are the basic steps. This top end disassembly needs to be accomplished before the frame disassembly can be attempted. In this case, I needed to next remove the thumb safety, the hammer assembly, the mainspring housing (again), the grip safety and the sear spring to get back to the point of proper disassembly in preparation of mainspring housing reinstallation.
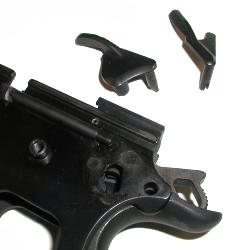
The Gold Match has an ambidextrous safety. The right side is secured with a cross slot in a shaft, can be wiggled out as long as the right grip has been removed. The removal method for the left side of the thumb safety is to cock the hammer then, while rotating the thumb safety into the “safe” position and at about the halfway point, pull outward. When you discover the part has obviously been welded in place, resist the temptation of hooking it to a wheel puller. I followed the manual’s direction on dealing with newer assemblies, or parts with burrs, and moved the lock to the halfway rotation point and wobbled it until it came free.
Lower the hammer, but never do this by pulling the trigger if the slide has been removed and the hammer is loaded by spring pressure. The hammer striking the frame can easily deform the frame and cause a reinstalled slide to bind.
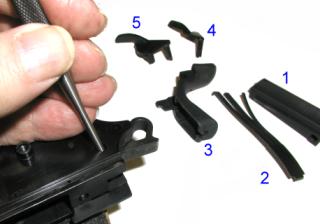
Because I had previously removed the mainspring housing, when the safety lock, or thumb safety, was pulled, the grip safety also fell loose. So far I had removed 1) mainspring housing, 2) sear spring, 3) grip safety, 4) right side thumb safety 5) left side thumb safety.
Normal sequence of lower half disassembly would be; thumb safety, hammer, the mainspring housing, grip safety, and sear spring. The grip safety would have been freed from the thumb safety cross shaft, but the installed mainspring housing would have interfered with the grip safety’s removal.
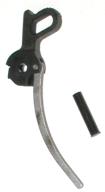 With no external loading on the mainspring assembly, no more than a nudge was needed to remove the hammer pin, along with the hammer and hammer strut – strut pin assembly. Because this Kimber is similar to a pre Colt 80 series design, there is no associated firing pin plunger lever, or corresponding notch in the frame that is part of post Colt 80 Series inertial firing pin safety system that arguably makes the design less prone to accidental discharge.
.
With the last required disassembly completed, I took a few minutes to poke around and look at the parts that would not normally be visible. The Kuhnhausen authored Volume I manual lists Colt sear spring thicknesses of .036″ to .0375″ as standard and .034″ to .035″ as reduced power. The Kimber sear spring, at .036″ was on light side of standard thickness.
 The problem I encountered with the earlier attempted assembly was caused by my inverting the pistol while juggling parts and getting the sear spring out of position with the sear. When the hammer was rotated back, the sear wasn’t pulled into contact with the notches in the hammer, so the pistol wouldn’t cock. The sear actually accomplishes several tasks, the left prong of the sear spring (1) locates the sear, the middle prong (2) positions the disconnector and the right prong (3) holds the grip safety out and in the safe position.
With the hammer/hammer strut assembly reinstalled, and rotated up and out of the way for better visibility and easier handling, the bottom locating tab of the sear spring was positioned in the cross slot in the frame , and with the spring’s fingers properly positioned. The mainspring housing was pushed partially into position to hold the sear spring in its proper place while I completed the rest of the assembly.

In the left photo you can see the hammer in place and the strut barely protruding into mainspring well in the mainspring housing. With partial insertion of the mainspring housing, the strut can’t come out and flop around, and the sear spring is retained in proper position. In the center photo, the grip safety is moved into position and the left side of the thumb safety assembly is being installed. In the right photo both sides of the thumb safety are in place, as is the grip safety, and the mainspring housing is ready to be moved up into position for pinning.

With the hammer down to reduce load on the mainspring to a minimum, the mainspring housing is moved fully into position and the housing pin is pressed in from the left side of the frame. When fully assembled, I ran a check of all safety devices as outlined in the shop manual, cycled the slide and checked for function and freedom of travel, checked the mag for proper release, checked the gun for proper feed, extraction and ejection. Finally, the gun was fired to check live fire function. Everything worked fine.
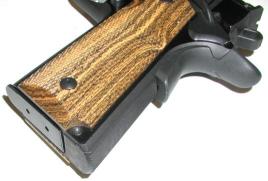 I frequently feel as though I need to apologize to my firearms when I work on them, and I thought nothing says I’m sorry better than a pair of Ahrends’ Exotic wood grips. I ordered Cordia wood checkered combat style; they come with the proper cuts behind the right panel to clear the ambidextrous safety and a circular recess around the mag release. Ahrends grips are also available in diamond checker and covered mainspring housing pin versions. The new grips and mainspring housing fit great, the metal finish matched the Kimber, and the installation ended up scratch and mar free; the effort was fun and educational.
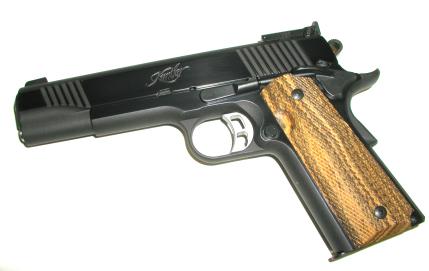 The cost of the new mainspring housing was $27, and I ended up with a very nice all steel gun.
While I dragged you though the details to demonstrate potential for errors in assembly and disassembly, the actual time required to complete this process was less than 45 minutes, even for a snail like myself.
The grips retail for $36, but can be had for under $25 is you shop around a little. The new profile and sharp checkering improved the gun’s feel and it is easier to hold a consistent grip. My 25 yard groups, shot offhand, dropped below 2″…no, of course not really, but the grips and mainspring housing look very good, and sometimes that’s reason enough to make some quality changes.
Joe

Email Notification