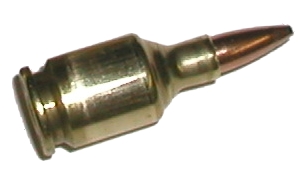
 I was really surprised at the amount of mail I got from people who thought the 17-357 RG was just me goofing around again with a fictitious cartridge. Well, if you’ll forgive the pre fire formed shoulder, it looks a lot like the gem to the right and it is, in fact, a very real cartridge. If you are not familiar with the concept, you may want to scan through Part Iand Part II of the project for some of the details.
While I like the results of projects like the 17-357 RG, I don’t like the lack of instant gratification. The use of multiple shops is required, lead times are long and a slip or two can put plans into a tailspin.
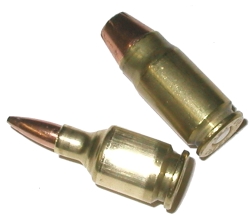
Changing the .357 SIG, top left, to the .17-357 RG beneath it created a need for set of custom forming and reloading dies, as well as some innovative work to come up with a couple of handgun barrels. Machine shops may be able to set a high priority and cut metal relatively quickly, but sending the same out for heat treating can take seemingly forever. In this case, the actual production and delivery time for the set was approximately 14 weeks.
Barrels were coming along well, 10 days as a schedule for machine work and installation of liners. Unfortunately, I asked for a twist rate much tighter than would be found used on a .17 HMR, custom inserts needed to be produced, and lead time went to 8 weeks. One of my grandkids finished preschool while I was waiting, but it was worth the wait.
 You’re probably wondering how these little dies can make those big cartridges. It isn’t easy. I was glad to see the box-o-dies arrive from CH4D. Wow! More shine than the chrome on a ’57 Buick and probably as much metal. Because the change in neck diameter from the standard 357 SIG case to the little 17 is so severe, 7 progressive forming dies are required in addition to the more common full length resizing and seater dies. The dies we nicely finished, free of metal working gunk and extraneous tool marks. The dies are heat-treated for hardness to 59 Rockwell C to a depth of .030.” which is actually quite deep, and each die is hand polished. Each item stamped with identifying marking, forming dies numerically progressive. The dies were received in two plastic storage boxes, A slip sheet was included that outlines use and set up of each dies type, which allowed me to plop the first 6 of the set into my RCBS Turret Press and crank it around to see what would come out. After the forming process, and for subsequent reloading of formed brass, I only need to use the more traditional full length sizer and seating dies; not as much fun, but a lot fewer steps.
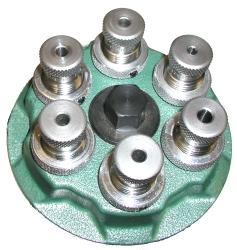
I was a little concerned that there might be a problem using the RCBS Turret press for the forming operation; preciseness of stages and force required. I loaded forming dies 1-6 and ran off maybe 20 cases to see how many were lost in the early stages of the forming process. I actually lost none. I was using Starline new brass at that point, which is typically pretty soft, so I switched over to fired factory brass after decapping with the a universal decapping die and there was no difference; no collapsed brass, no split necks.
I popped in number 7 forming die, ran the batch, installed the full length resizing die and immediate began collapsing every neck. At this stage the neck was getting pretty thick and the inside case neck dimension was below .155″. So I pulled the expander ball/decapping pin assembly and ran a few more cases that formed correctly. Hmm….

This is typical progression of the case through the forming dies. The case necks started at approximately .381″ OD and were approximately .218″ after the 7th step. The full length sizer, or 8th step concluded with the case at .204″ OD.
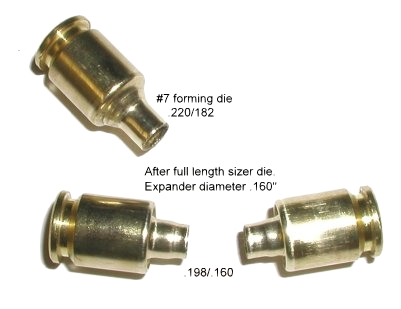
The cases, bottom right, are representative of what happened to cases when moved through the full length sizing die with the expander ball in place.
Closer inspection of the inside of the case neck and some measurements of the neck and expander suggested the expander contact thickened case walls of a smaller diameter, the narrow chamfer of the expander could not open the case neck, but rather drove the neck down into the shoulder, collapsing the case. Without the expander the case formed properly.
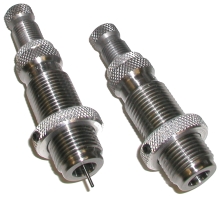
I’m pretty sure there is still a reamer die on the way that should make for a nice straight inside neck diameter. If not, I will power inside neck ream the cases when I trim to correct overall length. When I first attempted to seat bullets, the seating die deformed the bullet ogive, split a couple of necks and collapsed a couple more. Duh! I reamed a couple of cases and the seating die worked just fine. It takes patience to wait for material on a project like this, and patience to work with the tooling for a bit to understand its function and to utilize it properly.
If I make any alterations to the tooling, at this stage at least, it will be to put a more gradual taper on the expander to ease the pressure required to expand necks, or at least break the edge on the narrow chamfer lead on the expander. I know I am going to have to exercise care in neck forming and monitor material hardness if I am going to use a roll crimp, the case headspaces on the shoulder. For now, I am sure the long neck and neck tension will be enough for proper bullet retention. I intend to spend some time learning how to use the tooling properly and making good finished brass. When I am happy with the quality of cases, I’ll load up some first ammo and see how the round performs, how the brass handles pressure and how it responds to reloading. More soon – promise.
More “The 17-357 RG – Real Guns Project Cartridge”
The 17-357 RG – Real Guns Project Cartridge Part I
The 17-357 RG – Real Guns Project Cartridge Part II
The 17-357 RG – Real Guns Project Cartridge Part III
The 17-357 RG – Real Guns Project Cartridge Part IV
The 17-357 RG – Real Guns Project Cartridge Part V
The 17-357 RG – Real Guns Project Cartridge Part VI
The 17-357 RG – Real Guns Project Cartridge – Finished
Handload Data 17-357RG
Thanks,
Joe

Email Notification