So now that we are mostly a membership site, we are always looking for ways to promote membership, which usually means giving away stuff we can hardly afford. This AM, I walked in the shop wearing a T shirt, Cargo shorts and sneakers and jumped when someone took my picture. Apparently the plan was to put my picture front and center on the Real Guns home page with the promise it would not be seen by anyone logged in as a Real Guns member. I miss Rodney Dangerfield.

The process of final chambering of a short chambered barrel is not difficult, however, care and patience can make the difference between a precise chamber and one with rough walls and excessive headspace. The difficult machine work is completed by the supplier; shank size, barrel threads, recoil lug shoulder location, barrel length, target crown, profile, and finish. All that is left is to assemble the barrel to the action as covered in Part 5, and to cut the chamber to the proper depth to achieve proper headspace, verified with a go / no go gauge set.
| Manufacturer | E.R. Shaw |
| Caliber | 270 Weatherby |
| Material | 416 Stainless Steel |
| Length | 26″ |
| Crown | 11° |
| Twist | 1:10″ |
| Profile | Remington #2 |
| Threads | Remington Model 700 |
| Finish | In The White |
| Chamber | 0.050″ Short Chambered |
There are a number of companies selling short chambered barrels, although there are probably only a few manufacturers that actually make them.
Price is not always a barometer of quality, as price can be a reflection of material cost and/or the number of resale channels the product passes through before it gets to the consumer, individual or gunsmith. Quality can be judged by material, quality of machine work and tolerances held and by, my favorite, the precision and accuracy it delivers in use.
E.R. Shaw was selected because I wanted a 270 Weatherby chamber, 416 Stainless, a 26″ length, and a profile that would drop into a factory stock. A Remington #2 is a Remington factory magnum profile; 1.250″ at the receiver, 0.665″ at the muzzle, with a weight of 3 lbs 2 oz.
Better than a drill bit or rat tail file…
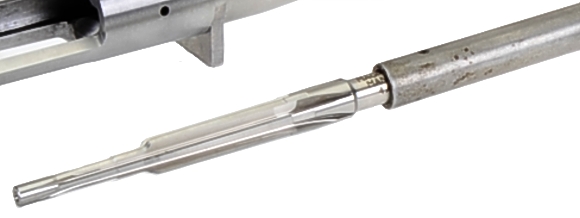
There are all sorts of chambering reamers available. In this case, a SAAMI spec, solid pilot finisher from David Manson Precision Reamers was selected as consistent with our intended purposes and anticipated future use; item code F270Wby Price $135.
 The Manson reamer has strait flutes, five cutting surfaces and it is made from high speed steel. A reamer of this type can machine cut 50 chambers or so without needing to be resharpened. High Speed Steel, in my experience, cuts smoother chambers by machine or hand finished and, as a practical matter, I’ve not seen a need for a live pilot where a handful of firearms are chambered. The control afforded by hand finishing a chamber can make for excellent results.

A Clymer 12″ reamer extender helps a lot. They are long enough to adequately clear the action with a reamer attached and they help to hold center cutting pressure on the reamer. They are available as pictured above with T handle and square drive versions for use with a tap wrench, Brownells 184-054-512WB and 184-054-650WB respectively $35 each. A reamer’s square drive head fits into the front of the extender and is secured with a set screw. I only use the T handle version because there is not enough there to put much force on the reamer and because it is easy to feel how the cut is proceeding.
Headspace versus headroom
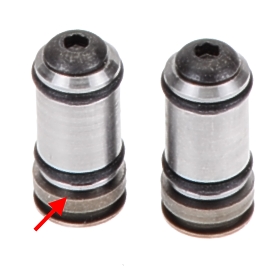
If only there were a device that indicated when the chamber was cut to the proper depth… at least before the pilot peeked out of the muzzle of the barrel. Wait! There is!…!!, a headspace gauge. Available from numerous sources, these are Manson GOBlt belted go gauge and NGBlt Belted NO Go gauges, $60 for the pair. The Go gauge reflects a SAAMI minimum headspace measurement, the No Go slightly longer. The idea is to hand ream just until the bolt can close on the Go Gauge, but not so far as to allow the bolt to close on the No Go gauge.
The headspace reference surface for the 270 Weatherby, as is the case with all SAAMI belted magnums, is at the forward surface of the belt (see arrow. Yes, the one in the picture to the left) and extends back to the firearms breech face. The minimum headspace for the 270 Weatherby is 0.220″ minimum and 0.224″ maximum. Coincidentally, the associated dimension of the Go gauge measured 0.220″ and the No Go gauge measured 0.225″. There is another type of gauge, a Field gauge, that is even longer than the No Go gauge and intended to verify a firearm is not only out of spec, but unsafe to use. I do not own any of them, gauges or firearms.
And then the pictures got ugly…
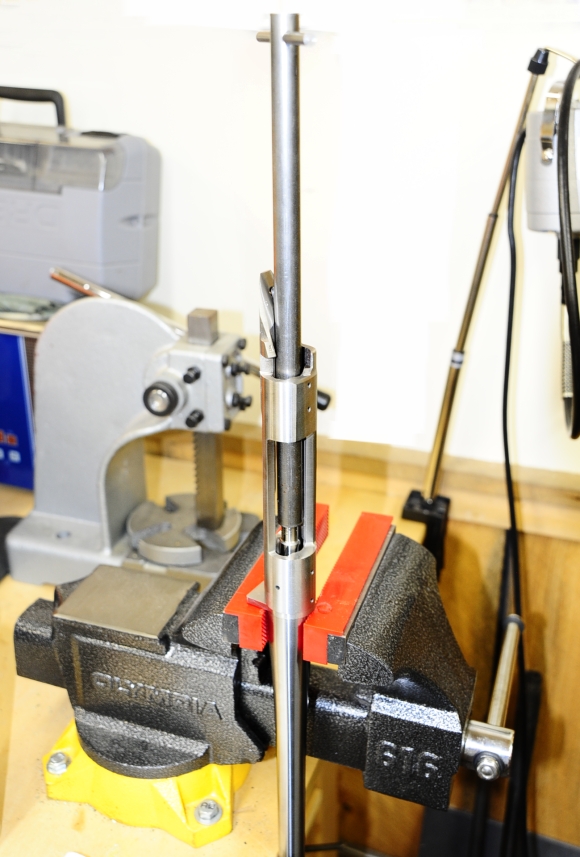
No, you don’t need an arbor press to do this job. As a reader, you are important to me, but not enough to make me wrestle with the arbor press and other assorted and sundry pieces of equipment to create a clean photo. Hey, we’re real people, working in a real shop, in the town of Tristan da Cunha. In any event, one of the most efficient tools is gravity. Clamping the barrel in a padded vice and lowering the reamer and extension gently into place uses the weight of the tools to assist in cutting. Additionally, cutting oil tends to do its job and carry metal removed from the chamber down the bore and onto the shop floor… unless you were forward thinking enough to put a small pan beneath the muzzle.
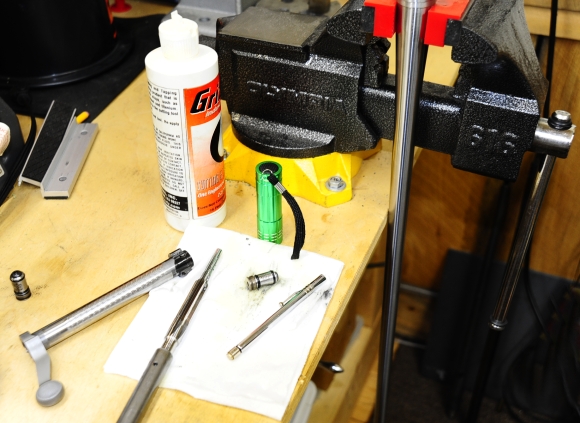
Small but helpful tools to have handy. The disassembled bolt which is used to trial fit as cutting progresses. The Go gauge handy and the No Go gauge handy, but away from reach while working until the bolt closes on the Go gauge and you want to check to make sure your hand reaming exuberance didn’t make you overshoot your mark. A small magnet to fish out the Go gauge after every cutting session as the extractor will only partially pull the stubby gauge from the chamber. A small flashlight to peer into the chamber and bore after each cutting session. A can of compressed air or a handy small compressor will blow out chips and contaminated cutting oil, lots of cutting oil.
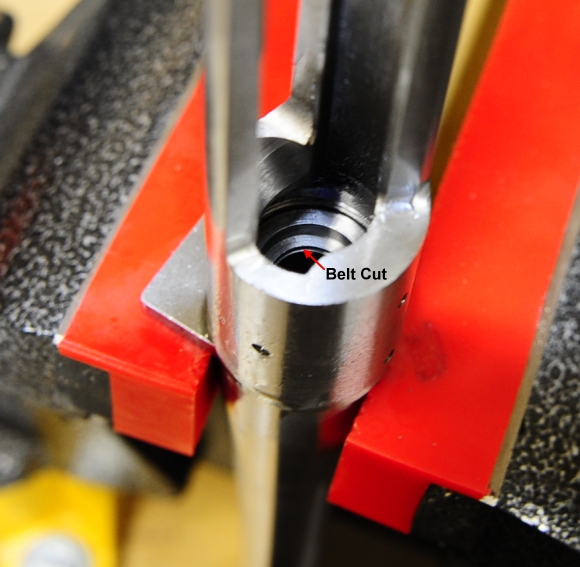
The belt cut in the barrel determines headspace, but the cutting edges ahead of the belt cutting surface of the reamer, bring the rest of the chamber into compliance. The short chambered barrel did not have a belt cut when the manual reaming process began. Some cautions –
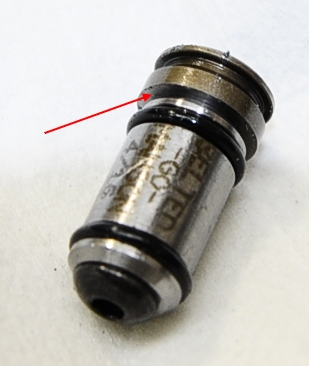 After each cutting cycle, and before checking with the Go gauge, flush the chamber and reamer with solvent and air. Be particularly careful to remove any grit from the belt cut in the barrel and from the corresponding contact surface on the Go gauge as this would throw off the readings taken.
I do not remove the extractor for a couple of reasons. The first, is to avoid riveting on a new one and the second is to be able to extract the tight fitting Go gauge after checking at the end of each cutting cycle. Subsequently, it is important to make sure the extractor has slipped over the rim of the gauge and is not sitting on top of it. If you’re not sure, lift the bolt handle a minuscule amount to verify it is tugging on the Go gauge. My routine is to place the bolt in the lug ways and let it free fall onto the gauge.
The cutting is done when the bolt will close with light smooth resistance and no more. When this is accomplished, try the No Go gauge and make sure the bolt doesn’t even begin to close. I keep a neck sized only, once fired dummy round and make sure the bolt will close over the round. Which all means cutting with patience and finesse.
I oil soak the reamer, gently lower it into position and, with both hands resting in the T handle, rotate the cutter 360°, ten times. Then I pull the reamer and extension, flush the reamer and chamber, conduct a Go gauge check, oil the reamer, and take another 10 cuts.
I put a depth mic measuring rod down the bore of the action, resting the mic on the rear action ring flat, made 10 cuts, and measured again. This was done a couple of times and the 10 cut cycles were actually pretty consistent, approximately 0.003″ was cut per ten reamer cycles and 185 reamer cycles were needed to get the job done. Estimates could have been made, cycles could have been extended… blah, blah, blah but I did not want to take any chances with the rifle being out of spec or sloppily chambered. Not only was the headspace right, but checking with a bore scope the walls were clean, the leade was clean and there were no visible mismatched transition cuts.
OK, wake up… we’re done here
I am going to take a break while I research possible stocks and finish. I think I want a less than shiny black finish on the stainless and I am leaning toward a walnut.. laminated… synthetic stock. I don’t know right now, but I will soon.

Email Notification