 I didn’t leave the country, I’ve just been grappling with the mechanics of handloading for shotguns. Shotgunners apparently forgot to check in with the metallic cartridge bunch before venturing into handloading, so they have their own: vocabulary, sort of similar methods and a rather disconcerting way of discouraging people from freelancing load development. Further analysis for the sake of safety and sanity has been necessary and I am beginning to understand the underlying concern.
Fast powder and small charges make handloads for shotshells more critical than high pressure metallic cartridge reloading. Substitution of same size and type, but different brand hulls can result in a several thousand psi rise in pressure. Same type wad substitution may be worth 500 psi in pressure variations in some cases and primer substitution from Winchester to almost any other brand can result in swings of several thousand psi, a problem greatly amplified by the low operating pressures limits associated with shotguns. Shotshell interiors vary like the insides of a variety of metallic cartridges even though they may look identical on the outside. I haven’t as yet determined if this is a powder cavity volume capacity issue of if the length of the flash hole through the wad or wad contour makes for the difference in pressure when all other components are the same. I’m digressing, thinking out loud or at least in a public place, so I better get back to the update.
Is there potential to step away from 100 years of trap shooting and duck hunting tradition that serves as the foundation for published shot loads and guides future load development ? There are some pretty hefty turkey numbered shot and buckshot loads out there and Hornady is wringing 2,000 fps from their 300 grain SST sabot slug loads and touting a 200 yard reach and 2 MOA consistency . The absolute performance isn’t earth shaking; I already own a 45-70, so a 300 grain .45 caliber bullet producing a bit over a ton of ME isn’t really that much of a boomer. However, in an area where rifles are not permitted, the implications of this load are significant.
Hornady’s load performance out of a high volume, low pressure cylinder is remarkable; a integrated component muzzle loader running on smokeless powder. I have a feeling someone will eventually figure out this makes short range shotgun laws a little less effective in high population density areas. I’d rather drop the high B.C. approach to a long range slug and concentrate on a 100-150 yard hog, deer and bear gun. If I find myself in some circumstance where 200 – 300 yard shots need to be taken, I should be carrying a rifle. So I won’t be looking for the highest velocity shot or slug load, just the best thumper load I can put together while keeping a shotgun together.
Equipment Selection
 I don’t particularly need to handload 3 ½” shotshells. The SAAMI pressure limit for that ammunition is 14,000 PSI, compared to 11,500 PSI for other 12 gauge ammo so none of these rounds will be barn burners. There is more than enough propellant capacity even in the 2 ¾ shells, most of the added hull length of the 3″ and 3 ½” is dedicated to carrying a heavier shot load or to accommodate larger volumes of lower density shot. Still, I didn’t want to lose the option of going to a 3 ½” shell if there was potential to exercise, so the capacity to load 3 ½” shotshells became a selection criteria.
After some research, I purchased a MEC Steelmaster press; amongst other things it handles the 3 ½”, 3″ and 2 ¾” shotshells with only modest changes. As it’s name suggests, the press ships configured for steel shot, but it can also load lead shot with minor changes. Other equipment reviewed but not selected – The Lee Load All II did not load 3 ½” shells. The RCBS Mini Grand is very capable, but I wanted a press where the tooling was pulled down to a fixed shell position, rather than raising the shell to the tooling and I didn’t care for the way shot and powder containers were changed out. Other models from these and other manufacturers seemed intended for high volume and were considerably more expensive. I will underscore my lack of shotshell reloading experience by saying it appears most production equipment is geared for high volume of same or very similar loads. For this purpose, there is a lot of semi and fully automated progressive equipment from which to choose.
 The cost of the press is $186.00 from Midway USA or Cabelas or most any other online supplier. The short kit to allow loading of 3″ and 2 ¾” shells runs about $21. The MEC manual indicated a conversion kit is needed to reload lead shot, rather than steel, which consists of a lead shot container (#8042) and a grommet (#304G). I purchased the container, a plastic bottle for $4.89. The grommet was already a part of the press as delivered. In checking with MEC tech support, I was told there was no reason to change out these parts and they weren’t quite sure where the author of the MEC manual was headed when the reference passage was written. Their web site FAQ’s indicated no changes are necessary. My guess is that the change recommended by the manual was geared to avoid lead contamination, perhaps with some EPA compliance undertone, or to prevent errors in handling mixed components. For my purposes, purchasing the bottle was cheap insurance against contamination and errors and represented not a drop in the bucket compared to the $27,001.42 I spent on needless accessories.
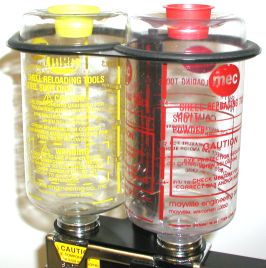
I had to buy a MEC bottle support, the black hoops around the tops of the bottles that connect to a vertical strut behind the bottles that connect to the measure assembly under the bottles. Why did I need to buy this accessory for $17? The large capacity lead shot container is 12″ high, compared to 6″ for the steel shot container, both are held in place on the press by only their thin plastic bottle mouth threads. The optional tall container carries more than twice the weight, twice the distance from the pivot point that allows shot and powder to be changed by tipping back the measure assembly. Rather than be embarrassed by my giant butt sticking up in the air while crawling around on the floor trying to collect 9 million pieces of spilled #6 shot, I thought I would install the kit and lock those containers in place. It is a cheap price to protect friends and family from a potentially traumatic experience and always of great importance, it made the press look more nifty.
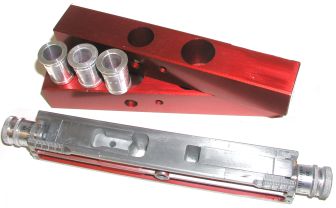
The Steelmaster came with one shot bar and three powder bushings; 1 ½ ounce steel shot and numbers 36, 37 and 39A powder bushings. The shot weight rating is predicated on metering BB-2 size shot and the actual powder weight dispensed through these relative size bushings is determined by a matrix of bushing and powder type, verified through scale checking.
Wanting to load lead shot in charges of 1 ½ and 2 ounces, I went out and bought the appropriate lead charge bars at 10 bucks a pop, then realized this was the beginning of a less than exciting financial trend. Compounding the concern was $2 per for imprecise powder bushings I would need to purchase if I wanted to vary charges. Flashbacks to setting up a fish tank for one of the grandkids; a buck for the little gold fish, then $100 worth of fishbowl, sunken treasure chest, gravel, and a snail to eat up all the garbage on the bottom resulting from over feeding. I stopped buying charge bars and bushings and purchased a Multi Scale. Essentially, the unit is adjustable to meter both steel and lead shot; lead from ½ oz to 2 ¼ oz, steel from 7/8 oz to 1 ½ oz. Multi scale can also vary powder charge from 12 to 55 grains. I will own up to wanting a set up more closely related to modern metallic reloading processes. The cost of the Multi-Scale is about $32 and can be purchased from many retail outlets. It also makes the press look nifty..er.
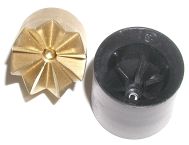
There is a lot of plastic material when it comes to shotshells, including shotshells. Plastic isn’t my favorite material for use on a reloading press, even when preceded with the term “space age”, so I have set out to replace as much of it as possible. Hopefully the Ballistic Products metal Super Crown crimp starter will make clean crimps easier with new hulls. There us an 8 and 6 point model, so I went for the 8 point as the press comes with 6 point crimp starters. Most factory ammo utilizes a 6 point star crimp so I thought I would try both and measure the results. I also have a roll crimp tool and hull vice on order that will enable me to experiment with overshot wads roll crimps.

After violating the first rule of…first rules, “Thou shall not buy replacement part upgrades prior to acquiring experience with the original parts”, I realized I still has a box of left over parts and it was time to assemble the rest of the press. The documentation packaged with the Steelmaster was of good quality. It read well, offered decent diagrams and exploded views. The difficulties I encountered were few; some photos were too small to represent the detail under discussion, the manual was for the Sizemaster, the same press when configured for lead, so the conversion references were backwards. There were dated slip sheets pointing to the not required pieces to convert from steel to lead, and some presumption that the operator has at least a passing knowledge of shotshell reloading.
When all was done, between the manual and the MEC web site I was able to work my way down to one unidentified part. Eventually, after poking around on the MEC web site, I figured out it was the shell lifter that fits in the center of the collet. It is the flanged tube in the foreground of the photo to the right. To an experienced person, the answer was probably obvious, to this guy, it could have been a really big 1911 one piece guide rod.
General set up and some highlights

Securing a reloading press has a major impact on the quality of production. Having a way to take a press down easily is a really nice feature. The Steelmaster comes with a hefty steel base and 4 screws secured with wing nuts. I use an old heavy oak credenza for my loading bench and it is drilled for every major piece of equipment I use. Four 9/32″ holes were required to mount the press. The only minor gripe is the screws are made to be countersunk and the manual suggests tightening and pulling the heads into the mount bench, and tightening the wing nuts from the top. The wing nuts do not clear the base, so a screw driver is required to tighten from underneath while holding the wing nuts so they don’t scratch up the press. Also, most threaded fasteners are positioned so gravity will not cause them to fall out if they become loose. Mounted, the press is solid and I am sure it will meter shot and powder uniformly with little effort. The press will also stand a good deal of pressure when seating wads.
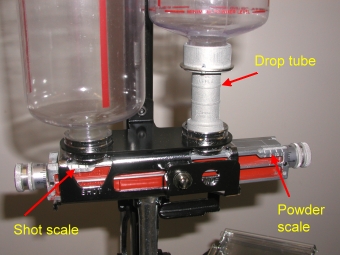
I pulled the charge bar received with the press; fixed shot charge, bushing powder selected charge and intended for steel. In it’s place I installed the Multiscale bar and drop tube. It took two minutes to make the change. The neoprene grommet between the powder and charge bar is retained, but a flat brass washer is installed between the grommet and the sliding surface of the charge bar. Its serves as a scraper to ensure fine powder particles do not accumulate in the surface of the charge bar.
The Multiscale charge bar has vernier adjustments for shot and powder that adjust the metering cavity size, not unlike a metallic cartridge powder measure.
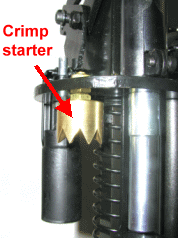
I removed the MEC supplied crimp starter and installed the 8 point Super Crimp Starter. It is installed tight against the lock nuts when new hulls are being crimped and allowed to float when crimping fired hulls. After the crimp is started the shell is moved to the next position for the final crimp.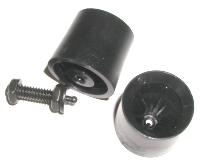 You can probably see the small ball socked in the mount stud for the MEC original crimp starter assembly (right) that is made to allow the part to float and self align to a hull. I am going to try both pieces to see if the replacement was a waste of time and money, or if it really does make forming new hulls an easy process. I assume the fact the blades are tapered upward to the center makes the hull self align to the tool.
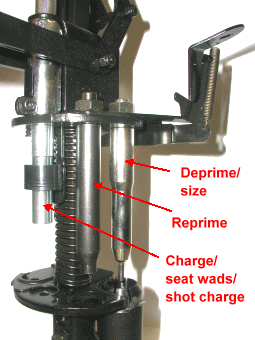
Where most metallic cartridges work on the outside of the cartridge case, shotshells are predominately worked from the inside and there isn’t always a direct correlation between the two.
A spent shell is deprimed and the brass or brass over steel case head, because the tool grabs the shell from the bottom, is sized in a collet type forming tool. While different methodology, these steps are still common to metallic case reloading.
 During reprime, rather than a shell holder securing the case head when a primer is pressed in with force from below, the shell sits on a spring loaded primer seating assembly that is installed in the press stage, and the reprime punch applies pressure from above. The press stations are fixed, the operator moves the shell.
The charging station accomplishes several steps with the use of the hollow ramming tube as pictured above. Powder is dispensed, wads are placed and the shot charge is added. The upper portion of the press that the ramming tube passes through offers two indications, the depth of the material being inserted in the shell, and the pressure in ft lbs the press is applying the same. The installed height of components and pressure applied is critical to completeness of powder burn and proper chamber pressure. The next two and final stations I’ve already covered, crimp start and final crimp.
Observations
It has become more difficult to get reloading supplies in this local area. Antigun attitude and government interference with firearm ownership I am sure is a large part of the problem, but so is local retail competition from online and mail order discount stores. My sense is that shotgun shell reloading is further impacted by the lack of good foundation information and the more complicated aspects of the process. I could not locate a single source of hulls even from very large local retailers, wads were selectively available and helpful information was zero. There are a number of online sources of components, few offer new hulls, not many more include used hulls. Where new hulls were available the brands were BPI, Fiocchi, Federal. All were primed. Buck shot was also in limited supply, numbered shot is out there, but much of it is an alterative to lead alloy. There are specialty shops like Ballistic Products and Circle Fly Wads that carry a good amount of supplies and handloading tools, but it is typically not good to have few competing resources.
I did purchase a copy of Lyman Shotshell Reloading Handbook 4th Edition. It represents basically everything you want to know about shotshell reloading and then some, and it contains tons of quality illustrations of all components and tons of reloading data. Great book. It will be very useful over the next couple of weeks.
Next installment should have live fire results and an explanation of whatever I did wrong in my initial shotshell reloading efforts.
Everything I know About Shotguns… Part 1
Everything I know About Shotguns… Part 2
Everything I know About Shotguns… Part 3
Everything I know About Shotguns… Part 4
Thanks,
Joe

Email Notification