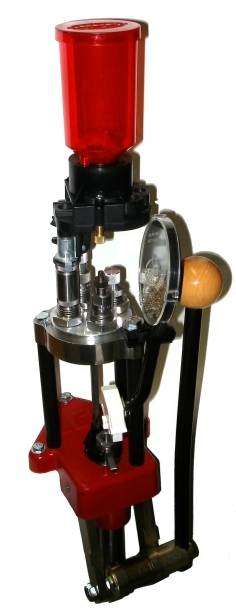
The day began with my wife offering her observations of the press while I set up to take pictures, “That is pretty! I love that red and the bright aluminum and steel pieces. The selection of wood for the handle was perfect.” She was making my ears bleed, “No, it doesn’t look pretty. It is a piece of equipment. It looks rugged, durable… Hmmm, I guess it is pretty”. So if you’re looking for a clunky chunk of cast iron, painted turtle green or crossing guard vest orange, there are other brands. If you want to get a piece of equipment that can reload ammunition AND attract women, you’ll have to go for the Lee Classic Turret Press. It’s cheaper than a Corvette.
As the wrap up article for this series, I thought setting up the press and making some ammo was the best way to go. Since the Classic Turret Press is an “ala carte” product, not sold as a kit, I wanted to cover the press and selected subsystems that support the press in auto indexing mode and in primary applications. To that end, the information that follows addresses the Lee Classic Turret Press, Lee Pro Auto Disk Powder measure with swivel and riser attachments, Lee Lever Prime and Safety Prime systems, and Lee Deluxe Pistol Die Set and shell holder.
Noteworthy is the well thought out integration of these various components. Each accessory came with multiple configuration hardware to insure the item could be mounted on any applicable Lee press and eliminating the need to chase hardware and/or brackets. Every component fit right out of the box; no bending or tweaking or parts that looked like they didn’t belong, and instruction were thorough. There were so many unique gadgets that were novel in function, the equipment was actually entertaining to use and evaluate.
Interesting gadgets is not synonymous with complicated gadgets. I may not be the 100 watt bulb in a pack of 60’s, but it still only took me 20 minutes to mount the press, add the accessories, set up the dies and crank out one good piece of ammunition. Much of the effort was intuitive and I only needed to glance at the instructions occasionally. See comment above regarding bulbs and wattage.
Decisions, decisions, decisions….decisions.
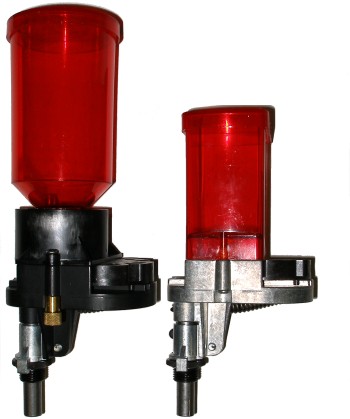 One of the weakest components of any reloading system is frequently the mechanical powder measure; they don’t actuate reliably, or they feed inconsistently. It doesn’t seem to matter if the measure is a press mounted unit, or bolted to a bench, and it doesn’t seem to matter if the price for the unit is a few dollars or a few hundred dollars.
Beam scales are great. They are accurate and typically dampened so they don’t bounce around, and the fulcrum is often a synthetic gem that will not wear in general use. Digital scales, good digital scales, are a bit faster, at least as accurate and a little more durable. The digital scale is my choice of weapon for lab work when I work up a whopping 5 cartridge combination. Unfortunately, mechanical or digital scales are like the connections my Internet cable service provider, sloooooow.
The automated measures, computer controlled feed, are interesting and accurate and they make pretty cool sounds. Unfortunately, if you are over the age of 25,you may be in a managed healthcare facility before one of these units throws half a dozen charges. Based on the performance of the standard Lee Auto Disk during my initial Classic Turret Press check out, I thought I would try to incorporate the Auto Disk into production and, hopefully, buck the trend of a less than stellar historical relationship with powder measures. The use of the Auto Disk measure would, of course, be backed up with an electronic scale audit and I would not attempt to throw maximum charges. Lee Precision is one of the few manufacturers that specifically acknowledges that mechanical measures are not intended for maximum loads. Lee cites a 16% smokeless powder density variation which would, of course, effect any method of volume based mechanical measure to at least that degree.
The benefits of Turning Pro
Lee Precision’s product philosophy seems very much like the philosophy of the UNIX operating system – there are lots of alternatives to get the customer to the solution they need, and in the manner in which to go there. Another way of saying that is you do not get a single solution jammed down your throat with the options of “take it” or “leave it”. Lee offers a standard Auto Disk Measure, a Pro Auto Disk Measure and a kit that, for the most part, converts a standard unit into a Pro type measure. These products are priced in retail channels at $20, $30 and $14 respectively. They may be utilized on both Lee Precision and other brand presses. While I was playing around with powder measure, I plopped the Pro and Lee die set into my RCBS Turret and it worked without a hitch. The problem is the RCBS unit was so ugly I had to take the press down and lock it in a cabinet before it frightened someone. Just joking…but only a little.
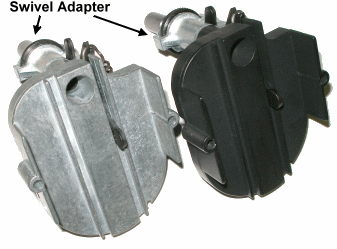
There is a big difference between the words “price” and “value” and the Pro model definitely represents a major value at $30. For one thing, the Pro model comes with the Swivel Adapter that is a $6 option for the standard model. The Adapter has a knurled thumbwheel that makes removing the measure from the press a quick and clean process and it allows swiveling the measure’s body out of the way of dies and primer trays.
While the cast body appears to be identical in material and form, the Pro is Teflon coated. I assume the Teflon provides lubricity of surface to reduce wear on the shuttling charge disk surface and makes for a nonstick surface for powder.
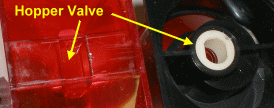
Another improvement to be found in the Pro model is the use of a circular elastomer wiper. The wiper rides on the shuttling charge disk upper surface and seals as powder is passed between the hopper and disk. The standard model uses the plastic material of the hopper in contact with the charge disk as a seal. I suspect, over a long extended period of time, the standard measure’s hopper would wear and replacement of the hopper would be required to insure consistent metering and to prevent powder leakage. A replacement wiper for the Pro model is a $1, a replacement hopper for the standard model is only about $2. Not much difference at that level of cost, but the elastomer wiper of the Pro model will always provide a better seal. The shuttling disk arrangement is an important element within Lee Precision measures, Pro or standard models. Unlike rotating cavity drum or Culver type measures supplied by most manufacturers, the Lee Auto Disk does not attempt to shear granules of powder.
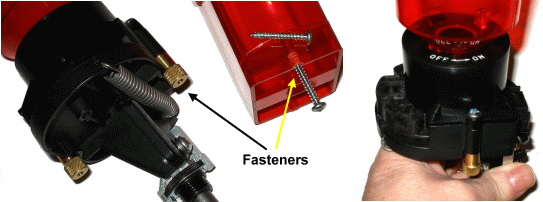
The last couple of items are well thought out enhancements made to the Pro model. The standard model hopper is secured by two sheet metal screws that pass upward through the measure’s body casting and directly into the molded plastic hopper. Eventually these have to wear out. Again, $2 for a replacement part is not of major consequence, but it is a source of inconvenience. The Pro model has machine thread screws that are affixed to the hopper and pass through the measure’s body. The assembly is held together with knurled brass nuts, which makes change out of charge disks and service a snap, and eliminates the chance of worn out plastic hopper threads. The final enhancement is the “Off – On” hopper valve control. With a twist of the hopper, powder flow to the charge disk is interrupted and the hopper can be removed without spilling powder. Again, the kit offered by Lee to upgrade the standard Auto Disk measure to a Pro model provides all of the features with the exception of the Teflon coated body.
Setting Up
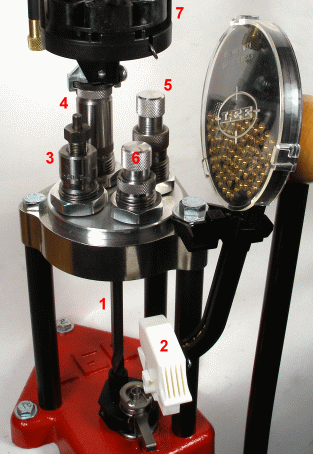
1) I removed the indexing rod to facilitate moving the turret head around while adjusting dies and powder measure. Minor deal; you rotate the turret to clear the lugs and lift it out, pull the rod, then reinstall the turret head. Same approach to go to non auto indexing.
2) A bushing on the turret bracket mount bolt sets vertical height of the assembly. To laterally align the Safety Prime trigger; leave the press mount bracket just loose enough for the unit to move side to side, press the trigger to the primer lever, then tighten the mount bracket. If you look closely at the washer on the mount bracket, pictured left, just across from the crimp die, you’ll notice the washer radius is facing the press. This is incorrect and my mistake. The washer flat has to face the press or it may interfere with turret rotation when using non Lee die sets. Once installed correctly – no problem.
3) Typical full length sizer adjustment; screw in until the die contacts the shell holder and finger tighten the lock ring. The decapper is tightly secured by a collet. If you are use to chasing decapper rods in and out of a sizer die made by other companies, you will not encounter that problem here. The sizer in the 45 Colt Deluxe Die Set has a carbide insert so lube is not required and wear is almost nonexistent.
4) The Expander is screwed in until contact is barely made with the case mouth, then backed out one turn, then adjusted inward gradually until the desired minimum flare is achieved. Powder is metered through the center of this die, so after installation the powder measure is attached using the measure swivel’s thumb wheel. The powder measure is actuated when the case mouth enters the die.
5) The bullet seating die sets up in typical fashion also; screwed in until contact is made with the shell holder, then back out three turns. The central bullet seater plug is adjusted to establish the correct cartridge overall length. The seater plug floats to assist in alignment of the bullet. The plug nose is contoured to accommodate various bullet shapes, however, custom plugs can be purchased from Lee for $8. While I used a Lee Factory Crimp Die, the bullet seater can also make a conventional roll crimp if desired.
6) The Crimp and Post-Size case die set up is conventional; screw the die in until it touches the shell holder and back out the adjusting screw. Raise the ram with an assembled round in place, screw in the adjusting screw until it just touches the case, lower the ram a bit, then turn in the adjusting screw half a turn or a bit more until you get the crimp you want. This die also does a final check on sizing; once when the cartridge goes in and again when extracted. This is assurance the case won’t be oversized and cause chambering or extraction problems. This step won’t additionally work harden the brass as sizing only occurs with cases that have expanded to oversize during the crimping process.
7) Powder measure set up was easy although quite a departure for me. I checked the included chart for the powder and charge weight for the load I selected, Win 296, found the Volume Measuring Density of .0656, multiplied by the intended charge of 24 grains, and installed the correct charge disk at the 1.57 cavity. I threw 25 charges, ignoring the first 5 charges then scale weighed the balance. The weight drifted up from 22.9 grains to 23.4 grains over the next 15, then stayed at 23.5 for the final 5. I attribute the increase to parts of the Auto Disk seating, small areas filling up and me actuating the measure more uniformly. I ran 25 more; 20 scaled at 23.5, 4 scaled 23.6 and one, about 15th in the overall sequence, hit 23.8. Incredible consistency for a mechanical measure and within the tolerance of my relatively expensive RCBS electronic scale.
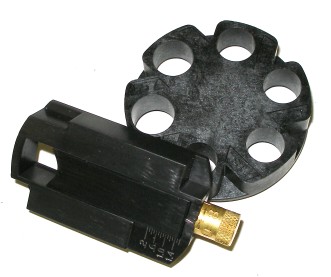 The measure is mounted to the top of the expander die. The expander has a floating plug that goes 3/8″ into the cartridge case when the ram is raised then stops dead inside the die when extracted from the case. The motion of the plug causes a small jolt that shakes loose any powder remaining in the die. This seems to work well.
For those who are eagle eyed, you may have notices I planned on 24 grains and got a consistent 23.5. That’s because powder density varies, but charge disk cavity hole size does not. In this case, 23.5 worked just fine for me. I had two other choices. Since I have the option of using dual disks in combination, could have worked toward a combination that yielded 24 grains, or I could have installed a Lee Micrometer Adjustable Charge bar and set it precisely to 24 grains.
Production
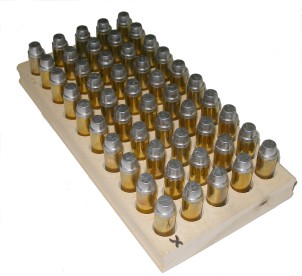
The Lee Classic Turret can be operated in auto indexing or manual mode; you can let the press rotate the turret in sequence as you cycle the operating lever, or you can manually rotate the turret head to the position of choice in the sequence of choice. Why would you want to use the auto indexing feature? Because it is fast and concise when you follow a set sequence and make lots of finished ammo. Why would you want to manually operate the press? Because sometimes you may want to operate out of standard sequence, perhaps performing some off press steps as part of the overall sequence. Maybe you want to prime and size some cases when you have spare time, but not commit them to finished ammo. We are handloaders, we tend not to follow the shortest distance between two points. In checking out the press, I set it up for auto indexing and production.
The Nature of Auto Indexing Presses
 I wanted a performance load for the 45 Colt that wouldn’t tax handguns or rifles, but would clearly be a step above standard fodder. I settled on a 255 grain hard cast bullet, 23.5-24 grains of Winchester 296 ball powder, 1.595″ COL and CCI 350 large pistol magnum primers. That’s about 1680 fps out of a short barrel Winchester Trapper and just under 1400 fps out of a Ruger Bisley. It is a very accurate load, even if one not suitable for other firearms chambered for the .45 Colt.
It only took about 5 minutes of operating the press to recall my past auto indexing experiences. In batch processing of handloads, each step is applied to the entire production quantity before progressing to the next. In auto indexing, a cartridge case is started and a round is completed before another bare case enters the process. Operating an auto indexing press requires a modest amount of concentration, coordination and organization and an sharp eye to monitor critical steps. I know, then what am I doing using an auto indexing press?
My first few pulls on the new press caught me with a handle on the down stroke, a fresh bullet in my hand, staring at an empty case in a shell holder with powder nowhere to be found. None of these problems were caused by the press, they were caused by phone interruptions, someone knocking on my “Do Not Disturb” sign on my closed shop door, and me thinking about getting a good milsurp firearm on the weekend. A quick walk around the parking lot, a little coffee and I was back at the bench, uninterrupted and making good ammo. It took me 35 minutes to make the first 25 rounds. It took 15 minutes to crank out the next 50.
The process in sequence
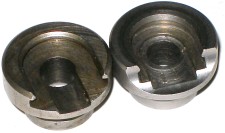
Beginning at the beginning – When people talk about presses and other reloading equipment, they tend not to look at the detail, a level where most of the refinements and good ideas are implemented. The shell holder on the left is what you get from RCBS and Hornady. The radius on the face of the Lee shell holder, right, means you can feed a case rim without ducking your head down to see the alignment or fumble around to locate the case. Little touches like this cost money in production. It is nice to see a company make something better, not just cheaper.
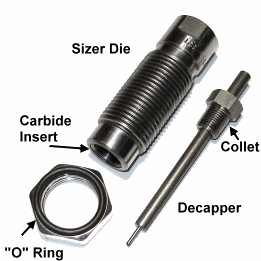 On the down stroke of the operating lever the ram is raised and a case is sized. While the ram is in the up position, the Safety Prime System trigger is pressed and a live primer is dispensed into the cup on the LPS primer arm.
Sizing is very smooth as the press has a good deal of leverage and the carbide insert has a slight radius to facilitate smooth entry. The “O” ring embedded in the lock ring is a nice feature. It allows finger adjustment while making sure the die stays put. If the “O” ring wears out, they are available as an inexpensive replacement part, although I can’t imagine how much use it would take to produce that amount of wear. As I mentioned earlier, the collet type clamp locks up the decapping rod firmly; loose enough to prevent a broken decapper or deformed case, but tight enough not to slip in normal use. The dies are polished, not chromed, so there is no flaking in the future.
Raising the operating lever, the primer is seated as the ram bottoms and the turret rotates to the next position. This is the first press I have ever used that had a great “feel” for on press priming and I had no problems with the system. At one point primers did not feed to the track from the primer tray. It turned out I had the plastic cover slightly rotated out of position and it was blocking the flow of primers. I never experienced any actual problems with the Safety Prime System. I’ve learned not to rush to pick up a phone and make calls to customer support without taking a deep breath and reviewing the situation. This way I spare myself the embarrassment of having to say, “Huh? So when the red dot is showing, that’s when the trigger works?”. I like the Safety Prime System because it doesn’t feed automatically with indexing. All I needed to do was push on the trigger when it was time to prime and there was no risk of wedged primers, or more primers being fed while I was doing something else on the press.
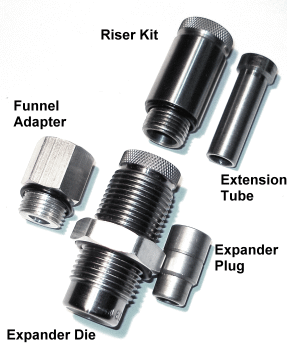 In the next lever down stroke, the primed case is pressed into the expander die to flare the case mouth. This action also activates the Pro Auto Disk powder measure mounted atop the expander die. Powder is metered and dropped through the expander into the waiting case. The powder system worked flawlessly and charges were very uniform. The funnel adapter is supplied with the standard expander die. As the name implies, it is funnel shaped inside and permits use of the Auto-Disk measure or manually pouring powder through the die. The riser kit is used in place of the funnel adapter and is intended to raise the measure to clear tall die sets and the Safety Prime System primer tray. The extension tube acts as a push rod and activates the Auto Disk Measure when mounted on the riser.
A normal requirement and good reloading practice – clean dies inside and out before use and clean them periodically to keep them free of bullet lube and other accumulation. I loaded 250 cast bullet rounds without needing to stop and clean, so the die does not need unusual attention to function properly.
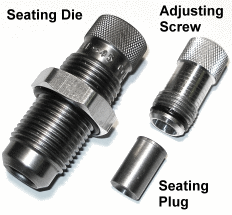
Raising the lever, lowering the ram, indexes the turret to the next station; bullet seating. Sometimes interesting approaches come in simple, few moving part, designs. The Lee bullet seating die, unlike and RCBS die as an example, has a floating seating plug. The plug has a conical recess in its nose and rests at the bottom of a bore inside the seating die. The adjusting screw is located further up the bore where its job is to limit the upward travel of the seating plug, and thereby establishing the COL of the in-process cartridge. The floating plug initially offers light resistance to the bullet and the conical shape of the plug guides the nose of the bullet to the center before the back of the plug contacts the adjusting screw and the bullet is pressed into the case. A lot of words to say, the floating plug helps to center the bullet before it is pressed into the case.

Raising the operating lever lowers the ram and rotates the turret head to the next position, the factory carbide crimp die. Lee Precision has a number of solutions for crimping cases. I’ve used their collet type die in conjunction with a number of cases, the 30-30 WCF and 45-70 Gov’t extensively. They make perfect crimps without ballooning case necks and they really hold bullet tightly.
The Carbide Factory Crimp Die uses a floating crimp sleeve rather than a forming collet or a fixed restriction in the die body as might be found in seating dies with roll crimp capability. The floating sleeve aids in crimp alignment and placement. The die, as the name implies, also has a carbide insert, not unlike the sizer die. It’s purpose is to insure the crimped case does not exceed maximum case diameter. In normal use, the carbide ring would not come in contact with cases so there is no issue of overworking brass. As an example, none of the cartridges I crimped exceeded .475″. The die’s carbide insert has an ID of .477″. The 45 Colt chamber spec is .480″ +.004″/-.000″; the carbide ring an insurance policy against feed and extraction problems.
The quality of handloads
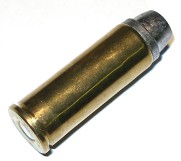
Wow! Three articles, two, maybe three tons of equipment and bad grammar, then out comes this little thing…well, actually 250 this time around. To begin with, all rounds fired and all had a proper powder charge. I know that may not seem like much in the way of expectations, but when operating a new press there is always the concern of human error or improper adjustment that causes primers to not be fully seated, resulting in click with no bang, or a misstep in process that seats a bullet while omitting the powder. The absence of these types of problems is a good indication that Lee Precision equipment is easy to use, easy to set up and built to avoid mistakes or place too much of a skill demand on the operator. I’m OK with that. The idea is to make ammo and shoot guns, not become a reloading technician.
The load as defined yielded approximately 1625 fps out of the Trapper 16″ barrel and just under 1400 fps from the 7.5″ barrel Bisley. I had a high of 1637 and a low of 1619 for a median of 1627, an average deviation of 3.38 fps and a standard deviation of 4.42. I know, so what? Let’s just say the performance in terms of velocity consistency was excellent despite as much as a 3 grain variation in cast bullet weights. Rifle accuracy was good at 50 yards, about a third of the groups well under and inch, some under 1/2″ and the rest under 1 1/4″. Again, the Lee equipment produced good results, on par with or better than earlier handloading efforts with other equipment and scale measured powder charges. Much of accuracy is based on selection of components and firearms, however, if the reloading effort wasn’t up to snuff, variations in assembly would result in significant variations on velocity, loss of reliability and lack of accuracy. None of this occurred, the Classic Turret and related equipment performed admirably.
I did not measure cartridge concentricity. A cast bullet blob is not the most round object to poke with a dial indicator and they would not be representative the of equipment’s capability to produce concentric ammo. The same applies to attempting measurement of COL; referencing the ogive of a semi wad cutter cast bullet, complete with raised mold parting lines. I had to go with the abstract performance indicators of uniform reliability, velocity and accuracy. Yes, yes I am being sarcastic. Next up are some critical handloads for the 270 WSM.
Lee Equipment
It’s funny how less than credible Internet information, and product promoting magazine articles, can leave a false impression. Fortunately, false impressions are easily corrected with a little investigation. The bottom line is, Lee Precision produces a wide range of products from very cost effective entry level equipment to sophisticated production equipment. In short, they make the right equipment for many applications. Lee Precision backs their product in several ways. There is a 30 Day “Satisfaction or your money back” guarantee, a two year parts and labor guarantee covering failure in normal use. In addition, any product in current production, regardless of age, can be refurbished to like new condition and receive a new equipment guarantee for half the current price of a new unit.
The Lee Classic Turret performed well beyond my expectations and out performed much of the large pile of green and orange equipment I have laying around. The Classic Turret and accessories now serve as my production equipment. I am an equipment geek. I can’t remember having so much fun writing about and using tools.
For more related information:
Lee Classic Turret Press Part I – Lee Equipment – It’s not just for Kids
Lee Classic Turret Press Part II – Form Follows Function – A closer Look
Lee Classic Turret Press Part III – It’s Pretty, But Does it Make Good Ammo?
Thanks,
Joe

Email Notification