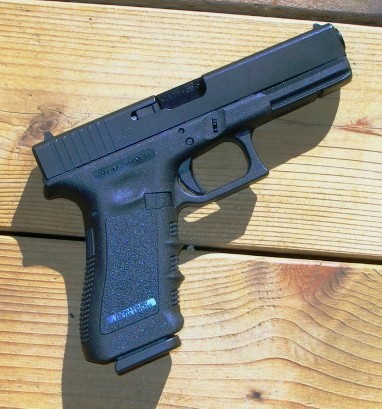
 It’s not that I don’t like Glocks, it’s…well, no, that’s it precisely, I don’t like Glocks. It’s not like they’ve ever said or done anything to me personally. They haven’t disparaged my family name or backed into my Chevy truck and drove off without leaving a note, it’s just that they are so…Euro.
Sure; Tenifer, Rockwell 64, hard as cubic zirconia, arsenic induced blackened finish, as obsessively discussed on Glock message boards. Yes, Glock did a good job of reducing wear and tear and making a gun that is highly corrosion resistant. With polymer frame and low parts count, the gun’s persona is one of: cost reduction, moderately modern manufacturing technology, high reliability, and so – so accuracy. It is enough to raise most firearm enthusiasts’ interests all the way to the level of tepid.
The current factory production looks like it was finished on the back steps of the factory with a can of Rustoleum semi-gloss touch up paint. The trigger pull feels first like squeezing a bag of worms, then like the snap of green kindling. The gun is too light, or at least a little bit top heavy. The slide comes back like a rocket sled and brakes by using the shooter’s hand and wrist like a piece of bridge jumping bungee. Unlike the purity of design espoused by many of its technology bent owners, it is one of the least original designs in handguns. The 21.5° grip angle was borrowed from the 22° grip of the Luger, the camming lock up was borrowed from the SIG and what there is of its ancient lock work design, was first seen on the 1907 Roth Steyr. Useful controls, with the exception of the trigger, are all located safely out of reach. Yes, that was sarcasm. If the mechanical design isn’t enough to put most people off, the Glock is ugly, and not the good kind of ugly. Fortunately, it is purposeful and functional. The flat top slide makes finding a target easy, its safety systems can resist firing even if the gun is inadvertently dropped from a speeding train and it lands on a sidewalk. There is no cocked hammer to fall, or look like it will fall, and there is no little floor shift that needs to be worked to decock its fire control system. The trigger pull is lighter than most double action only pistols and it does fill the shooter’s hand without feeling like most bloated double stack guns. It field strips so easy, pole dancer reference deleted after some consideration, you would have to be a total goober to spend more than 10 seconds taking it down.
 The red stripes in the picture may be decorative, but that isn’t their purpose. One of the curious aspects of the Glock is its lack of frame rail support, which leads to question how it consistently locks up or the slide stays on. The Glock has a total of 1.580″ of perimeter slide engagement. The SIG, 8.9″, the Colt 1911 6.570″. The rail engagement depth is greater for the Glock, 0.090″ versus approximately 0.062″ for the others. I don’t think the slide is going to pop off, but this doesn’t seem like much of a mechanical guidance system. The Glock slide is not a lightweight at 18.75 ounces compared to 17.6 ounces for the SIG, so there is not less Glock mass to support as the basis for the slide rail minimalist approach taken by the gun’s designer. My guess is that Glock didn’t want to spend the money on overall precision and
high parts count, they focused on precision where the slide stops on either end, paying less attention to the journey in-between (i.e. who cares if the slide wobbles when it moves as long as it locks up straight when it is in battery?)
 Out of the box the gun shoots…and shoots…and shoots some more. At least this is true of the G22 and the 40 S&W cartridge, in the event there is actually some substantial difference amongst various models beyond my frame of reference. You can load up and blast away, in a two-hand hold at 15 yards, and put a bunch of shots in a three inch group. You can put the same gun in a rest and shoot a bunch of shots in a…three inch group. You can stand on your head and do the same. Maybe it’s the fault of the factory rifling that insists on forcing round things through oddly shaped holes, or that lame allocation of slide rail surface or, possibly, the distinctive unintentional bow of the under barrel accessory rail? Maybe it’s that pathetic excuse for a guide rod, or hump backed grip, or that elastic band pulling trigger ? Am I being overly critical ?
 Range time, around here at least, means I took the Glock and my SIG P229 out on the back porch for some informal target work. This is where I think I am supposed to insert a picture of myself, striking a dramatic pose, while shooting some substance with the Glock that simulates an angry mature guacamole. I’m not very dramatic, I only own baseball caps and who gives a crap what the author looks like anyway ? Both guns were loaded with Winchester USA 165 grain full metal jacket 40 S&W ammo and the G22 could not keep up with up with the P229 in terms of accuracy. The standard white outline sights on the Glock were quite visible and, thanks to the slab top slide, easy to get and hold on target. Recoil seemed a bit sharp compared to the SIG; probably a function of the Glock’s light weight
and the absence of, and inability to install, a comfortable set of grips. I know plastic is suppose to be recoil absorbing, but I haven’t really noticed this phenomena in handguns or synthetic rifle stocks. The grip angle made for an awkward hold. More precisely, the rear contour of the grip placed contact and pressure fully against the lower portion of my palm, but much less contact pressure toward the web of my hand. It’s hard to put a 1911 type wrist on a Glock and feel comfortable. I did not find the grip to be in the least bit oversized, as I’ve often seen as a criticism of this pistol, and I do not have particularly large hands. I like the hooked trigger guard, even though it is another point of frequent criticism, because it is comfortable in a two hand hold. The trigger pull felt spongy at 5 lbs 10 ounces and the pull was long…10, maybe 12 feet, really. It didn’t take a lot of rounds for the Glock to begin showing its personality.
On not leaving well enough alone…
If Glocks have a saving grace, its popularity means availability of lots of accessories and specialty parts; some useful, some not so much. There are also popular modifications; some useful, some not so much. My objective was to begin with the most basic changes, then if I didn’t screw that up too badly, progress on to modifications that are more specialized… perhaps even finding true purpose for that little mouse hole in the Glock’s grip. I selected parts I could install myself with relatively basic tools and access to quality retail technical support. I chose Brownells as the source for most of the material used in this series because they are in the business of servicing gunsmiths and firearm enthusiasts, including those with the occasional technical question. Their prices are good, I don’t get gouged on shipping and they don’t have minimum order requirements. More importantly, when I call or email for tech support, I find people who actually like guns, and use and understand the products they support. A far cry from calling some place halfway across the country only to reach Tiffani with an “i”, the after school “customer service associate” who needs me to spell the word b-a-r-r-e-l because she can’t find a listing of such a part on her computer.
What is an appropriate modification to a Glock ? My response to that question would be anything that improves the gun’s performance, its reliability or its appearance and does not work in opposition to the underlying design. I would also accept anything that attempts to do the same, even if the experiment fails, as long as the change doesn’t diminish safety or cause irreparable damage. After all, if there had been no one exploring possibilities there would never have been a junk food. If there is a limiting factor when it comes to modifications, it is probably a realistic budget, but then I have seen lots of $5,000 firearms that began life as $75 military surplus, although not in my collection. Working on firearms reminds me of an old auto racing adage. In paraphrase, “You can become rich racing, but only if you start out incredibly wealthy”. You build what you like and you owe nobody an explanation. So maybe the budget parameter should read, “A budget is one we can comfortably rationalize”.
First and most important of the accessories…
 I admire people who are “intuitive” and “at one” with their firearms, but that’s not me. I get on one side of the room, the gun and parts line up opposite, then we go at it Unlimited Fighting style until one of us gives up. Recognizing my lack of heavy Glock experience, and not wanting to rely on second, or third hand anonymous information to save me from the embarrassment and triggers that won’t reset or a gun that doubles, I began my project by invested in DVD copies of “Making Glocks Rock” Brownells # 050-000-026 and “Technical Manual and Armorer’s Course – Glock Pistols” Brownells # 050-000-032, both from the American Gunsmithing Institute training series. They are quality production, armorer level courses, each quite different in focus.
“Making Glocks Rock” is the most current and addresses, very specifically, textbook assembly, disassembly and maintenance, but also popular modifications that do not require machining operations or particularly specialized tools. The other DVD is a bit older, perhaps by a couple of years, but provides good theory of operation information as well as complete assembly and disassembly instructions. The latter DVD does not, however, cover any of the popular mods and work as common as sight changes is covered only in passing. Still, the importance of theory of operation is that it can keep you out of trouble where installation instructions provided with aftermarket accessories may lack specificity. Understanding the total function of a part within a system can provide a huge dose of common sense when thinking through what may, or may not, be a proper modification. Both DVDs include a parts schematic. In DVD form, the information is indexed and searchable. Each can be run as a sequential and contiguous training program or referenced directly for specific topics. If I were pressed to select only one, it would be “Making Glocks Rock” as it contains the most practical information for making typical modifications and installing accessories. Each title runs about $35, which is less than the price of parts that might be broken as the result of improper assembly, and it is much less than a gunsmith’s time required to remove the full auto capability you inadvertently created during a moment of creative genius.
Recoil Spring Guide Rods and Recoil Springs
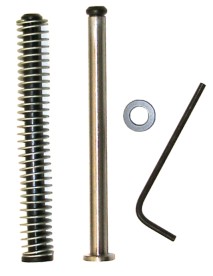 Installing a steel guide rod in a Glock, in place of the plastic factory piece, will result in increase assembly longevity and improved firearm reliability. The rear flange on the factory plastic rod will fracture with use and rods can become gouged along the shaft until they fail. Steel guide rods have also been credited with improved accuracy and more consistent lock up. As noted earlier, the Glock’s rail engagement surface area is nothing to get excited about, so a one piece steel rod may constitute a third rail that stabilizes slide travel. I do believe, however, that marginal lock up is probably more associated with a slide binding, a defective recoil spring or improper barrel fit than the use of a steel or plastic guide rod. A steel guide rod will also facilitate recoil spring changes. As a handloader, I wanted the option of changing spring rates commensurate with ammo; light springs for light practice loads, heavy springs for heavy loads. A steel guide rod, unlike the factory plastic rod can be disassembled for a recoil spring change, allowing the use of a range of flat wire springs from ISMI or traditional round wire springs from Wolff.
Pictured above, left to right – factory captive 17 lb flat wire spring assembly. Next to it is the Aro-Tek stainless steel solid guide rod, Brownells item # 066-000-007, that can be sprung in 9 rate increments ranging from 12 lbs to 24 lbs. The washer is used to cap and retain round wire springs at the top of the guide rod when they are used in place of flat wire, sort of a miniature valve spring retainer. Outside of this specific selection, there are captive and non-captive systems available. I selected captive because it was the most convenient for me when performing routine maintenance, the spring and rod remain together as a single assembly and I didn’t want to worry about the open loop of the recoil spring working its way through the slide’s guide rod opening and jamming the gun. Brownell’s tech support offered the perspective that non-captive is useful when frequent spring changes are anticipated as the cap on the captive is typically secured with Red LocTite. The price for the Aro-Tek piece is about $22, which is pretty cheap for improvements offered.
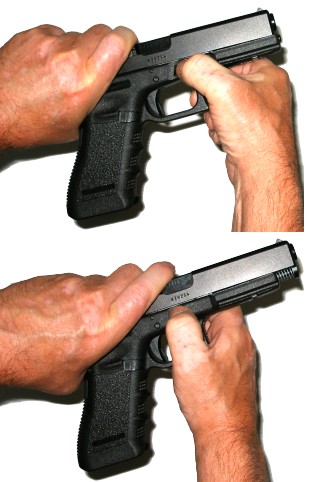 One accessory I did not install is an extended slide lock, as they are not needed for field stripping convenience. In fact, I don’t think there is an auto pistol easier to take down than the Glock. I know there is a “back of gun, wrap around hand hold” that is the recommended grip for disassembly, but I just hook my thumb on the grip just under the slide and pull back on the ejection port with my forefinger. With my free hand, thumb and forefinger pulling down on opposite sides of the slide lock lever, I ease the slide forward until the recoil spring is exposed and forward pressure is relieved. Then I grab the grip with my left hand and move the slide forward and off the gun’s frame.

The captive factory spring and guide rod lift out as a single assembly. The rod assembly and barrel lift up and out of the slide.
Ordinarily, the next step would be to cannibalize the spring from the factory recoil spring assembly for use on the new steel guide rod. The spring is compressed by holding the plastic captive spring assembly on a solid sturdy surface and pulling the spring down and away from the button on the end of the plastic rod. Then the end of the rod would be snipped off with a pair of cutting pliers and the spring would be eased off the rod until it was fully decompressed…or went zipping through the air. Since I was going to a slightly heavier recoil spring from Wolff, there was no need to destroy the factory part. I selected a Wolff 19 lb recoil spring for general use. The recoil spring is packaged with a replacement firing pin spring that is of standard rate. In ancient times, with series 70 and older 1911 type pistols, a heavier firing pin spring was required to resist the forward inertia caused by a heavier recoil spring. The Glock’s firing pin safety plunger eliminates this type of problem by holding the firing pin captive, subsequently, the firing pin spring packaged with the recoil spring is of standard rate and not a necessity if the gun’s original spring is in good shape. Where heavier firing pin spring rates are employed, it is to insure proper firing with hard primer standards with the consequence of an increase in trigger pull effort.
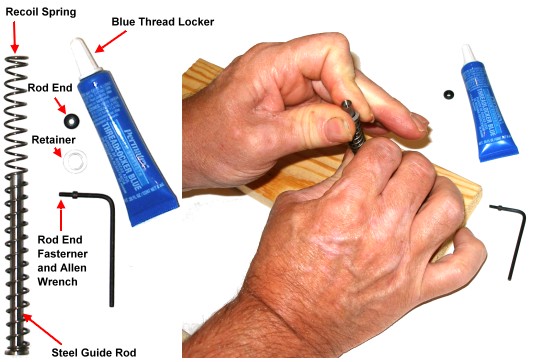
These are the parts that go into a captive steel guide rod that utilizes round wire springs. The spring retainer locates the spring end and prevent it from slipping past the rod end. The board pictured above provides a firm surface for assembly when the spring is compressed. Do not position your head over it when doing so, or at least don’t align any part of your face you consider important over the unsecured spring while working. Dab thread locker on the rod end fastener before compressing the assembly or you will run out of hands when you attempt it later. I used Blue locker with the intention the fastener would be removed at some point to facilitate spring changes.
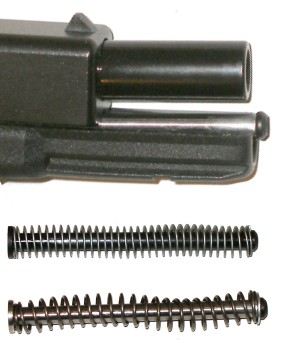 The guide rod change makes for a clean look and the stainless is an easy to clean proposition. The factory piece is above the Aro-Tek in the lower part of the picture. Assembled, the slide requires 18 ½ lbs of force to fully actuate with the factory spring in place and 20 ½ lbs with the new Aro-Tek assembly and Wolff spring combination. After the installation, I ran a box of Federal practice ammo through the gun with no feed or ejection failures. Hot handloads were handled better with brass not getting tossed into the next county. Unfortunately, I could now not get the gun to group better than 4″ and there was a definite increase in felt recoil and muzzle jump. The slide also became a bit of a resistance challenge when it was time to manually chamber a round. I went back and looked at the force required to actuate the slide, placing less emphasis on the individual spring’s rate, and installed first a standard 17 lb spring, then a light 16 lb spring. Group size shrank to between 2 and 2½”, recoil softened and manually chambering a round returned to normal effort. Force required for assembled slide actuation was 17½ lbs with the 16 lb spring in place.
The total cost of the guide rod/spring upgrade was $30 at retail prices; $22 for the Aro-Tek stainless captive guide rod assembly, Brownells # 066-000-007 and $8 for the Wolff recoil spring. The spring rate range in Brownells numbers are: #969-437-016 16 lb light weight, # 969-437-017 17 lb factory rate, # 969-437-019 19 lb, # 969-437-020 20 lb and # 969-437-022 for 22 lb. I think this rate range covers most circumstances. There are, of course, a number of other alternatives. Brownells carries ISMI, Lightening Strike and Wolff guide rod systems in their various configurations at similar cost. For those looking for a bit more from their Glock’s recoil spring system, there is the dual action buffer Sprinco or EFK Fire Dragon set up, similar to the type I use in my 1911 type 45 Super guns.

The guide rod offers staged resistance to slide travel; a conventional outside full length spring begins compression with initial rearward slide movement. As the slide travels farther, a short, small diameter inside rod spring joins in offering resistance to compression. The result is a slide that feels light during most of the actuation, but offers increased dampening of the slide as it nears full travel. The effect is reduced recoil and less wear and tear on reciprocating parts and contact surfaces. I decided to change from the captive spring steel guide rod assembly to the Sprinco part, Sprinco Recoil Management system, Brownells # 943-100-017 for $79. Alternatively, the EFK part run approximately $64 and there is a corresponding version for each Glock model. The Glock 22 takes Brownells # 503-416-022. Despite all of the verbiage, this is literally a ten minute part change with either assembly. The Sprinco felt soft in recoil, similar to the 16 lb spring, but was more positive in returning to battery when manually releasing the slide. Measured, slide resistance on the assembled gun was only 17 lbs for the first third of travel, where it increased to 19½ Lbs. Incidentally, the part is polished stainless and not plated where something might flake off.

 Is the Sprinco so much hype ? The little Amazon box perforating group was ½” with the balance of five three shot groups shots ranging from 1 to 1 ½” at 15 yards. I tried the factory spring checkout procedure on all of the aftermarket parts; check for empty, actuate slide, point the gun upward, pull trigger and keep depressed, pull back on slide ¾”, then ease forward under spring power. If the slide returns to battery, the spring is good. If the slide hangs or tends to not fully close, the recoil spring is bad. No spring or assembly referenced above demonstrated that problem.
My theory is that the Sprinco, and probably the EFK part, offer the best of both worlds. The spring rate is light in actuation, but still dampening at the end of slide travel without the use of a slide buffer or a compromised fixed rate spring. The recoil spring can still be changed for tuning; it uses a Wolff type round wire recoil spring. The rod is straight with no spring capturing oversize retainer to contact the guide rod hole in the slide. Only the spring is contacting the inside of the slide and can easily bend and align itself to follow the slides natural motion and alignment. The captured spring guide rod has a rigid bushing on its end to retain the spring and that is what contacts the slide when the gun cycles, and not necessarily as a totally flat surface.
Improved Sights
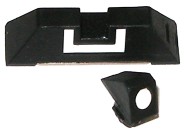 The factory white line sights, particularly when installed on a slide, are pretty good for recreational use, however, they may not be optimal for work where light conditions may be less than bright. There are lots of sight choices for the Glock, from the micro and fully adjustable, to Glock night sights, and just about everything in between. Much of the selection process is subjective, some application specific. These days there are combination Tritium and light pipe sets that are rugged, compact in form and still allow you to tell the story of “the magic little lights that don’t need batteries”…which goes something like this –
Besides its primary usage in the production of enhanced nuclear reaction for weapons and energy, electrons emitted by miniscule quantities of Tritium cause phosphors, zinc sulphide crystals, to glow. The result is a self-powered lighting device called a traser. Common applications are illuminated watch hands and gun sights. In the event you think those little lenses hold back gallons of the stuff, the total demand for Tritium for all consumer purposes is 400 grams per year. There are two problems associated with Tritium; Tritium has a half life of 10 – 12 years causing Tritium based night sights to diminish in glow over time and the mechanical assembly used to contain and mount trasers is relatively sensitive to heavy bashing or sight mover crushing. The watch industry has, to a large degree, shifted to Super-LumiNova, a non-radioactive pigment, which produces greater amounts of light and is easy to apply to surfaces with less expensive handling and equipment. The drawback of LumiNova is that it needs routine recharging with exposure to light to make it glow, which could make for an awkward moment or two when a home intruder is asked to wait in the living room while the home owner goes off to recharge his gun sights. Tritium emits light as a function of nuclear decay and does not require exposure to light, so Tritium it is.
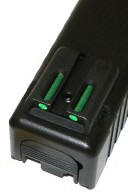
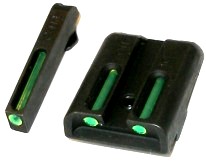 I selected a set of TruGlo Brite-Site front and rear sights, Brownells # 902-000-094, amazingly not because the manufacturer’s spelling wizardry, but because of the quality of the product. This particular model offers the best of both worlds with a combination of Tritium for self illumination and fiber optic light pipe for light gathering and amplification in low light situations. The targeting components are mounted in machined steel in a configuration that blocks unnecessary visibility; you get to see your target in low light, your target doesn’t get to see you waving sights that glow like railroad flares in the darkness. The sights are bright to the shooter.
In fact, they are brighter than they appear in this picture even in very low light. The rear sight has a conventional Glock type dovetail base, the front sight is keyed to match the Glock slide and secured with a small 3/16″ hex head screw. Both front and rear are contoured with corners rounded to minimize the chance of embarrassing and untimely snags. They retail for approximately $113. Not cheap, but not expensive either, especially when considering the application.
 A good alternative to the TruGlo Tritium sight is the Novak Tactical fiber optic set in green or red. The light pipe elements are similar in size and they are shielded just like the TruGlo. The Novak front sight only 0.135″ wide with a 0.120″ fiber element diameter. The do not provide the Tritium self illumination feature, but they do gather light to make them bright even in very low light situations. Front is Brownells # 662-000-051, rear is # 662-000-053, combined cost is approximately $80, about $33 less than the Tritium TruGlo sights.
Is there really a meaningful difference between Tritium, Tritium – fiber optic and fiber optic only ? The first time you need to do a darkened house and property check in the middle of the night you’ll understand the importance of Tritium. It is the difference between looking at your hand and seeing nothing, versus seeing the most important three dots you’ll need. In daylight, Tritium alone is no better than white line or three dot sights; visible but not exceptionally contrasting against a target. Fiber optics sights make a huge difference in low light situation, but they also make a huge difference in typical daylight. In my case the sights are going on a house and recreational target shooting firearm so, as noted earlier, I went with Tritium and fiber optic in combination. Capite?
Which sight pusher? Yeah, about that…
 A factory replacement rear sight cost $3, a dedicated sight pusher cost approx $125. Mathematically, I was left with no choice but to use a new combo tool, a Drift n’ Hammer® and Pe-Lairs® which did a commendable job on factory rear sight removal and installation. The yellow drift is a section of Styrene toothbrush shaft; solid but shock absorbing, and different size and shape at each end for flexibility of use. It also won’t damage Tritium sights if you don’t hit the trasers directly. The small plastic faced hammer was selected precisely because it is small plastic faced hammer; you can’t do big hammer damage or produce big hammer shock with a little hammer. Hammers and drifts are not tools for Neanderthals. They are, in fact, the tools every gunsmith used before tool manufacturers could think of something more expensive to sell.
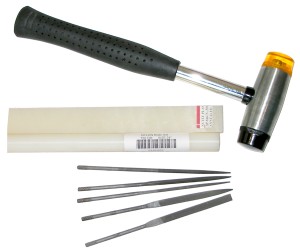 If you want to avoid sounding like a woodpecker, rapping away with that little hammer, and you will be working on a variety of guns but not a large number of the same type, you can always spring for some basic soft thumping tools.
I get a lot of small non-precision tools and material from Enco, a discount machine shop supply house. The plastic 1¼” 20 oz split head hammer, Enco Item # 800-0262 is $5.95. The 5 piece No. 2 cut file set, item # 382-0071, was $4.62. two foot lengths of annealed 6/6 nylon rod that will stand up to pounding and solvents, and can be cut to useful size and shape with wood working tools, were $3.57 for ¾” round rod and $8.87 for 1″x½” rectangular rod.
 I’m a sensitive guy, ask anyone, so I can put a slide in a vise to lock it up laterally and it will be anchored enough to hold on while I tap out the old rear sight and tap in the new – all without bending, crushing, cracking, peeling, or whacking the slide. I use a large wood working vise with nice soft wood padded jaws so the slide’s finish is protected. When a vise isn’t handy, or when a protective insert that I don’t have is required, I use a bench block that will steady and support the slide while I pound away at it. One of the training DVD’s suggest a roll of tape laying on its side. The important thing is to have support that won’t get into the way of parts and pins being pressed out.
Glock sights are pushed out and fed in from the right side of the slide. If you are mounting sights with a removable dovetail base fastened with hex screws, chances are, once you get past the initial dovetail pinch, the base will move freely before being tightened with the hex screws. The TruGlo rear sight dovetail is full size, as is the Novak fiber optics sight, and is a press fit on its own before the anchoring hex screw is tightened. These dovetails will be a tight fit all the way through, and will require the use of a hammer and drift or a sight pusher to locate the rear sight throughout the entire adjustment range. The reason I mention this is because the TruGlo is not a “slip in and tighten” sight so you will need some combination of tools for installation, or the services of someone who does.
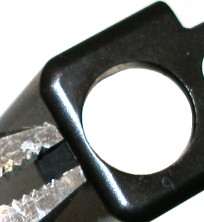 The factory front sight story, unfortunately, is one that didn’t end well. Pin staked into the slide, I grabbed it with a pair of flat nose lineman’s pliers, a struggle ensued, and the little guy expired before surrendering. There is no reasonable way to remove a factory front sight from a Glock that would make it reusable. Considering they sell for the price of…lint, I am not sure why anyone would want to recover the part. Incidentally, I know the pliers thing may seem like a crude way of working on a firearm, but this is the recommended method of removal. Just be sure the jaws are far enough up on the sight to not draw little circles on the slide’s finish. Where the factory part is held in place by a staked in plastic pin, most aftermarket sights are keyed to the slide top and secured with a very thin 3/16″ head fastener. Installed correctly, they tend to stay put.
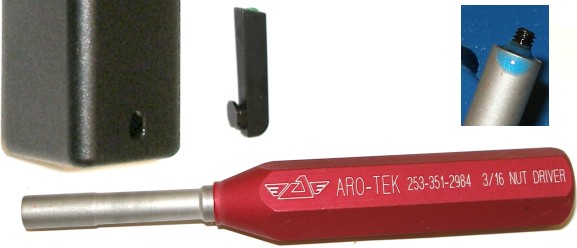
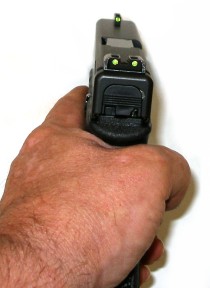 The front sight is a snap to install. It is keyed to the slide so the it is pretty much self aligning. I used a little dab of blue thread locker on the threads and not on the tip of the screw. The “Making Glock’s Rock” DVD suggests red thread locker and cautions against getting any on the screw tip because thread locker expands as it dries and the pressure may damage the sight. Red locker is too permanent for me so I opted for blue. I saw no need to put thread locker on the tip of a screw so it cost nothing to follow that suggestion. The Aro-Tek driver, Brownells # 066-800-300, is made specifically to install thin mounting screws used to secure most aftermarket front sights. It can be purchased alone for about $25, or as part of a $45 three piece set that includes a similarly mounted 0.050″ hex wrench sized for the set screws on Aro-Tek rear sights and a 3/32″ punch to knock out Glock take down pins. For under $20, Brownells sells a Glock specific driver set that covers complete pistol and magazine disassembly/assembly, including aftermarket sight fasteners. Item # 080-000-408. Tool selection can be very subjective, but there should be one to match your preferences.
Conclusion – I love these sights. The image is crisp and clear and well defined. At night they are visible, and in the day time, even in bright light they are illuminated well above ambient levels. Green is a good color, although I suspect red was do as good. I can off load a clip full of 40 S&W, in a meaningful way, much quicker with this simple sight change.
Next Part – Austrian Humor…
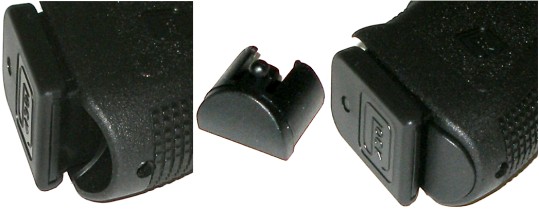
The hole in at the heel of a full size Glock’s grip is for a lanyard, one of the most useless of all pistol accessories. Unless you are appearing on one of those Discovery Channel “Deadliest Catch Guys” and always on the verge of being washed overboard off the coast of Alaska, or the use of a lanyard is agency mandated, I suspect that lanyard opening in your Glock will remain stoically, vacant, standing by. Considering so many people who carry Glocks will not hang a lanyard on it, it would have been nice if the factory would have covered the large hole in the base of the grip that looks as though a part had fallen off. Third party guys get pretty creative in filling this cavity, everything from mini tool kits to a compartment to hide…”secret things”. Apparently very small secret things. I picked up a Jentra piece, Brownells # 463-100-017 for under $7. Different Glock models require different plugs regardless the manufacturer of the plug. The Jentra piece has the right texture and color and looks like it belongs there. The Tac Rac Armorer’s tool kit, # 350-000-002, for $25 will fill the grip void and stow two disassembly punches. With the gap filled, I can now sleep at night.
Extended slide stop lever…
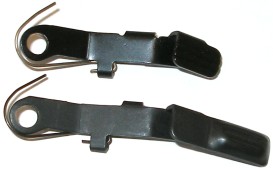 I had extended slide stops on all of my 1911 pistols, but eventually removed them all. Ultimately, they proved to be too much protruding hardware for too little gain. Glock controls are a little subtle for a defensive weapon, particularly if you are not a person who drills in the use of the gun in defensive circumstances with significant frequency. An extended slide stop lever, bottom, on a Glock is still a subtle control, but much more intuitively placed for the average person. Changeover is easy by any definition.
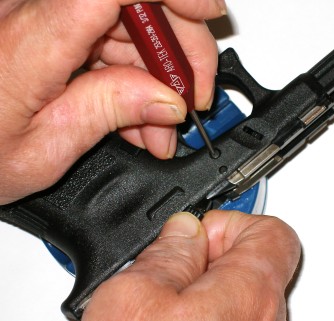 The slide is removed as described in earlier text. Then the frame is laid across a bench block or a roll of tape on its side so there is room for a pin to pass through. A 3/32″ punch is used to press out the locking block pin. The same size punch is then pressed against the trigger pin’s left side while the slide stop lever is wiggled until it is free from the pin’s groove. All Glock pins are removed left to right and installed in the opposite fashion. When free from the trigger pin, the slide lever is pulled straight back from it’s locating slot in the frame, the new extended lever is substituted, and the trigger pin is reinserted. Once started through the lever, the punch can be used with light pressure to bring pin flush. At that point, the slide stop lever is flicked through full travel to check for binding and security, then the punch is pressed against the right side of the pin until a distinct “click” is heard,
indicating it is locked in place by the spring loaded slide stop lever. The locking block pin is then reinstalled. I actually had better luck when I placed the lever in position, installed the locking block pin, then the trigger pin.
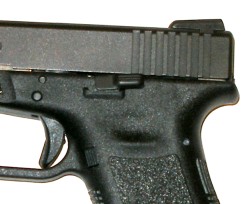 The finished product is pretty nice with the lever laying in the frame channel so it doesn’t look out of place. It is now directly above the thumb and easy to get at when desired, but not in the way for accidental engagement. In this example, I used an Aro-Tek part, Brownells # 066-100-300, which retails for approximately $36.
Glock makes an extended slide stop lever that sells for approximately $15, Brownells Item # 100-002-748 where the extension is back and tabbed outward from the frame. This is the piece that ultimately ended up on my gun. When I lightened the recoil spring further along in the project and installed a competition spring set change
as part of trigger work which is also described further on, the Aro-Tek part did not return with conviction. Not fast enough in returning to position, the slide began to occasionally stay open as though the magazine was empty. I swapped in the Glock piece indicated above and had no reoccurrences while firing several hundred rounds. In all fairness to Aro-Tek, I had the gun apart so many times I could have easily munged the return spring during a heavy handed reassembly.
Extended magazine catch…
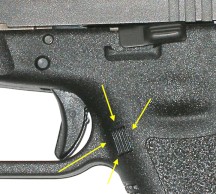 Ok, finding the magazine catch on a Glock is like playing Where’s Waldo. You just can’t get there from here without breaking your grip and rotating the gun in your hand, or using your other hand, or poking it with a pointed stick. There are a number of extended catches on the market, including one from the factory that is available to U.S. customers. A 1/8″ extension of the magazine catch can be achieved just by installing the part from a large frame Glock on a small frame; a model 20,21,29, or 30 part on an G22. This piece is factory installed on the competition G34 and G35 guns. For under $2 you can’t go wrong. See Brownells # 100-002-717. There are a number of manufacturers offering solutions that go a bit further and address the issue of reach.
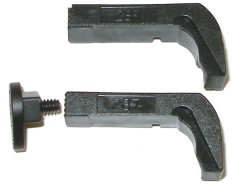 Ghost has a Low Pro model, which is still a thumb stretch. as well as their X-Mag with a larger button to accommodate thumb reach without breaking grip. Item # 100-002-951 for small frame guns. Based on my positive experience with AR-15 hardware and accessories, I selected a $25 J.P. Enterprises part, Brownells # 452-000-001, a plastic catch that will not wear the frame, with a machined aluminum pad that won’t wear out from thumb contact. The JP kit contains a standard Glock mag catch (above left) that has been face drilled and tapped for the supplied aluminum pad. The result is a 0.250″ protrusion above the grip which is about 0.125″ more than needed to release the magazine.
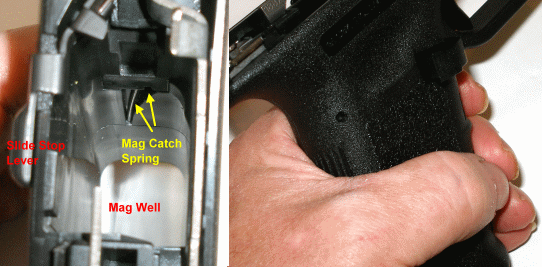
The installation is harder to illustrate than it is to accomplish. The magazine catch is retained by single leg magazine catch spring that engages the body of the catch. The picture above, left, is the gun with the slide and magazine removed, and looking down the magazine well. A long shaft, but small bladed, common screw driver is used to lift the spring leg out of the notch in the catch so the catch is free to slide to the right and out of the gun. The new part is pressed in, without the aluminum pad in place until it contacts and is blocked by the spring leg. The leg is then lifted again as the catch is slipped under the spring and into position. The spring is then lowered into the notch in the new catch, locking it in place.
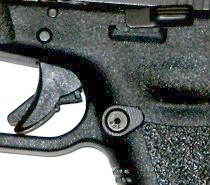 Once in place, the pad is installed on the catch. I know it sounds a little complicated, but if you pull the slide on a Glock and look down the empty magazine well you’ll see you are basically lifting a retaining spring out of the catch so it can slide free. Regardless which magazine catch extender you select, installation is the same. A great solution would be for Glock to make a tear drop shaped recess in the grip and change the catch to an tear drop shaped elongated button. It would only have to poke its head up 1/8″ and it could be contoured to look natural embedded in the grip. After a period of use, I pulled the J.P. Enterprises piece because it protruded too far and may lead to an accidental magazine release at a stressful time. Personal preference, the part may be fine for most folks.
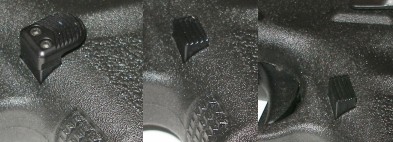 Three magazine releases for comparison. The first is a T.H.E. Accessories piece. Plastic shank, blackened aluminum button. $30, Brownells # 100-000-369. The second is the standard Glock small frame piece, the third a large frame piece in a small
frame Glock. The T.H.E. part is about the closest to OK as you can get with a rearward extended button. It releases cleanly, doesn’t look out of place like the J.P. Enterprises piece above, however, by design it comes back very close to the thumb while gripping the gun. I left all three parts in over the course of a few days while shooting and working with the Model 22. Eventually I left the extended Glock piece in as it protruded far enough to make mag release easier, but it didn’t get in the way of my thumb and accidentally drop a magazine. For me, if I needed to have a buttoned piece for competitions or I felt I was more sure handed in handling the gun, it would be the T.H.E. part. Where a button is not required, the large frame Glock piece works just fine.
Polygonal Rifling…a pathetic cry for attention ?
 Polygonal rifling (near) is frequently attributed to Glock, however, the use of the word “polygonal” is a misnomer. What they produce is six land symmetrical rifling with large radii, where conventional rifling has sharp angle cuts (far right). The Glock bore is circular, not hexagonal, its raised rounded lands a product of hammer forging. This is relatively common process for European rifles and handguns.
 An example of real polygon rifling can be found in the 1854 Whitworth rifle and the mid 1800’s under Whitworth’s development of the British Enfield musket, and to some examples of the similarly dated Danish Rolling blocks. Neither gun designer suggested originality when these firearms came into production. A true polygonal bore needs to be constructed of an intersecting straight line profile, typically forming six sides, cut in helical fashion around the barrel’s longitudinal axis. Not only is the bore Polygonal, more specifically hexagonal, but the projectile is of the same shape. Under pressure, the bullet is pressed outward to force materials into the corners, spun to the rate of the rifling and stabilized. See Story of the Guns – By Sir James Emerson Tennent. This rifling scheme actually never worked all that well, despite the same basic claims made today; reduced friction, less accumulation of bullet material, greater accuracy, and long wearing. I have no opinion in regard to these claims. I understand competitive shooters hold radiused rifling in total distain, however, I’ve not read where anyone did a factual head to head comparison. I don’t know if a lot of smaller barrel shops are stuck with angular cut rifling and are trying to suppress the eventual change over to radiused rifling, or if radiused rifling is the brain child of someone who chose difference, for the sake of difference. I don’t care…really.
It is common practice for Glock owners to install conventionally rifled replacement barrels. The usual reason offered is to allow the use of cast bullets, sometimes with description refined as soft cast bullets. The idea is that the soft shank of these bullets will not hold up to the rounded lands and the bullet will not take rifling cleanly. Yes, I am familiar with the words “Obtruate” and “Obturation” that people often use to describe the effects of rifling on a bullet. These words mean to close or obstruct, they are not the same as “obtrude” which means to extrude or thrust out, as in the deforming of a bullet as it is forced down the barrel of a firearm. Then there is the theory of soft lead build up in the grooves or at the rifling leade where it will become an obstruction and elevate chamber pressure. I think the point is moot because most people would be hard pressed to find a dead soft bullet, even my castings are on the 22 BHN end of the hardness spectrum and not at the 15 BHN level of #2 alloy or 9 BHN of wheel weights. I do know that whenever I shoot lead bullets, I eventually will have to deal with bore leading no matter what I shoot and no matter the type of rifling. Could it be the leading problem is more theoretical than real or the complaint is about typical bore leading all barrels experience ? I do know the conventional wisdom is that firearms are more accurate with conventional angular rifling than radiused rifling, and for this reason I thought a replacement barrel might improve lockup, offer better control of critical bore dimensions and result in improved accuracy, even if there is no actual lead to get out.
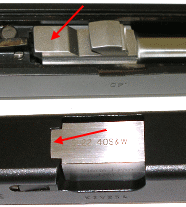 There are roughly three configurations of replacement barrels for the Glock; gunsmith fit and short chambered, gunsmith fit and fully chambered and drop in. I do have a 40 S&W reamer and headspace gauge, a file and set of ceramic stones so I suppose I could have gone ahead with any of the preceding, however, chamber cutting and the tedium of headspace setting held little appeal. Fitting could require adjusting the contact surface on the underside of the feed ramp where it rests on the gun’s locking block (upper) and the rear contact surface of the barrel hood (lower) where it keys to the slide and contacts the gun’s breech face. Some barrels are intentionally made oversized in these areas to permit precise fitting. What is precise fitting? Hard to say.
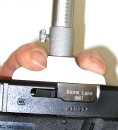 The following is a dimensional comparison between a pre-fit Storm Lake barrel and the standard Glock 22 barrel. The 40 S&W headspaces on the case mouth. Chamber depth measurement was taken with a depth micrometer resting on the breech face of the barrel hood, adjusted in until it contacted the headspace surface of the chamber. The slide to barrel gap measurement was taken by assembling a barrel in the slide, without recoil spring assembly, then assembling the slide to the frame. The slide was then pushed forward to lock up and a depth micrometer sitting on the top of the slide was adjusted until it contacted the tang on the barrel hood.
| Point of Comparison | Glock | Storm Lake |
| A) Chamber depth | 0.857″ | 0.851″ |
| Play – Slide to Barrel Gap | 0.013″ | 0.008″ |
| B) Thickness at feed ramp | 0.808″ | 0.814″ |
| Width of Barrel Hood | 0.428″ | 0.425″ |
| 15 Yard 5 Shot Groups | 0.8″ -1.4″ | 0.6″- 1.0″ |
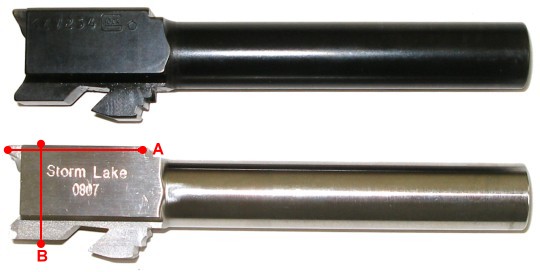
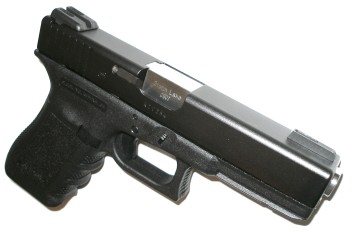 The Storm Lake barrel popped right in, worked just fine with the Sprinco recoil management systems and needed no rework at all. Head space at 0.851″ is at the low end of the 0.850″ – 0.862″ SAAMI chamber spec for the 40 S&W, and the increase in thickness under the feed ramp made for less vertical play between the barrel and slide. The gun fed reliably and there was a noticeable improvement in accuracy and consistency. I had changed out a SIG barrel not too long ago and used an EFK barrel that was labeled drop in. It required clearance work on the barrel hood sides before it would fit the slide and accuracy was less than impressive. The Storm Lake barrel was relatively inexpensive at $149.00, particularly in light of easy fit and improved performance. It is stainless steel, non-ported and features cut-broached rifling – Brownells item # 842-000-005. They also offer muzzle and compensator model ported versions for those applications.
If the desire is to seriously fit your own, there are the well known premium barrel makers providing a number of configurations. KKM offers a match grade barrel with slightly oversized headspace and lockup areas to allow for individual gun fitting. The basic model item # 836-060-422 sells for $231. They also have a full compensator barrel for the G22, item # 836-000-012 with a mounted 4 port comp that goes for about $368. Wilson Combat’s non-ported barrel in stainless is about $150, item # 965-380-022. Briley’s match barrel, gunsmith fit and short chambered for maximum custom fit, item # 129-117-040 is a $198 part. These are stainless steel and manufactured by Ed Shilen. Unlike the ultra hard Tenifer processed Glock barrel, the barrels noted are all 37- 45 Rockwell and can easily be filed and reamed for custom fitting.
Trigger Related Components
Unlike lots of other firearms, the trigger in the Glock is always working overtime. Where a 1911 type has the slide to cock the fire control system, the slide only takes the Glock half way, then the trigger pull has to do the rest before the gun is discharges. In addition to this additional effort, the trigger pull also has to overcome safety systems, when appropriate, by displacing a collection of springs and levers. I took a break here and went back and reviewed training material that covered underlying systems design and intent. Based on this review I would offer the general statement that trigger pull weight is determined by the gun’s connector and trigger spring. Trigger smoothness is influenced by the trigger draw bar and how well this stamping is finished.
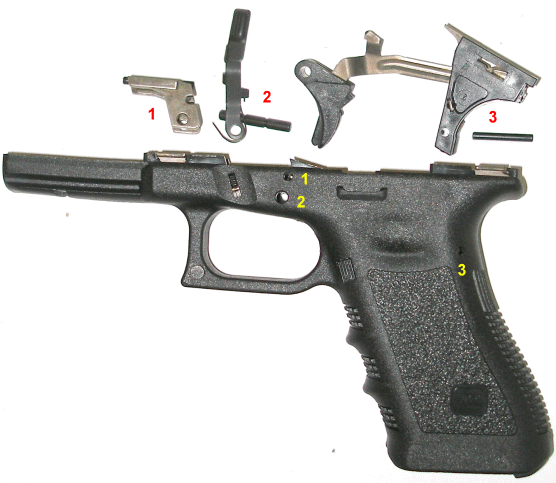
The Glock isn’t difficult to disassemble. The three pin frame has pins removed from left to right in the order noted on the frame above, but the locking block, #1 red, comes out after the slide stop lever assembly #2 red is removed. Trigger bar assembly and trigger housing assembly are lifted out last. All that is required is a 3/32″ punch or similar. No, I don’t know what is similar to a 3/32″ punch, other than another 3/32″, but you can always walk around your work area with a dial caliper, measuring things until you find something. Or, you can see the section above in tools for working on the Glock.
 To remove trigger draw bar from the trigger housing, rotate the bar so the wing of the cruciform sear plate rotates out of the slot in the housing (right), then lift out and detach
 from the trigger spring. The spring is indexed with the open end of the loops rolled opposite one another (left). If they get twisted up on reassembly so the open end on each loop is facing the same way, either the trigger won’t reset or the trigger spring may break. It was interesting to note that T.R. Graham, the trainer for the “Making Glocks Rock” video, stressed that when removing the connector (far right), push it out from the opposite side of the trigger housing with a small common screw driver. Do not pry from same side as connector or the trigger housing could be damaged. Of course Dunlap, trainer for the armorers’ course, while narrating disassembly, stuck a screw driver under the flat of the connecter and pried it out. A lot of technique while working on machines is philosophy and experience. It is worthwhile to be exposed to a variety of approaches to the same situation.
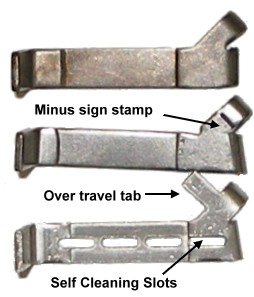 There are three trigger pull weight connectors available from Glock: unmarked 5.5 Lbs, 3.5 target connector marked with a small minus sign, and an 8Lb police only part marked with a plus sign. After market connectors are typically marked for identification the same way, like the second from top Scherer 3.5 lb piece marked with a minus sign. The bottom piece is a Ghost Rocket Practical and Tactical which is 3.5 lbs rated, unmarked, and has an additional tab intended to prevent trigger over-travel and open slots to allow debris to clean out. The last is a fitted part because the over travel tab needs to be trimmed to a specific gun.
Effort to fire is controlled by the front (right) tab angle of the connector. The 5.5 lb connector, top, is straight up and down, the lighter rated connectors are toed out. A heavy 8 lb connector is toed in. The greater the angle is toed out, the less effort required of the draw bar. I elected to go with the Scherer part because it was rated
in the range I wanted, it was finished cleanly at contact surfaces and it was a drop in part. I liked the idea of the Ghost piece, but I didn’t want to take on fitting the part. I was concerned my fitting skills, without a substantial degree of Glock experience, would determine the performance of the part, more than the design of the part. I will revisit this again because I like the idea of limited trigger over travel. The Scherer part is Brownells Item # 861-119-035, $18. The gunsmith fit Ghost Rocket piece is item # 100-000-631, $26.
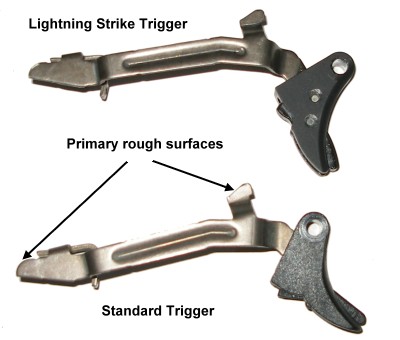 The trigger and draw bar assembly have a lot to do with how the trigger feels and pull length, but does not alter pull weight. The standard trigger below is a stamping with rough camming and bearing surfaces that can benefit from some careful stoning and/or gentle polishing of contact surfaces.
The Lightning Strike trigger comes with polished surfaces, reduces trigger pull length by 50% and it includes an aluminum trigger with wider trigger safety insert. Installation was a snap, the reverse of the disassembly steps noted above. The installation of the new trigger and new light pull weight connector resulted in a
4 lb 6 ounce pull, better than a pound less than the stock trigger, and a great feeling trigger with a 0.200″ stroke compared to the standard 0.300″ stroke. A lot of the sponginess was gone and a less exaggerated increase in effort as the firing pin spring began compression. The gun even began to look different and handle much different, and for the better. Oops, almost forgot. The Lightning Strike trigger is Brownells Item # 642-103-001, $108 and it is a drop in part.
 The Glock trigger, partly because of its safety systems, has a lot of extra work to perform. For about a third of the trigger stroke, the trigger pull is compressing the firing pin spring (1), then compressing the firing pin safety spring (2), all the while getting a little boost from the trigger spring (3). For defense and law enforcement application, almost universally, folks agree springs should be left alone. For recreational use, certain types of competition and if you are me, a competition spring set should be installed to further improve trigger pull and iron out the rest of the wrinkles, so to speak.
Wolff makes a Competition Pak Trigger Group spring set, Brownells Item # 969-100-177 that is a three spring set. The reduced power firing pin spring is rated at 4 lbs, 1.5 lbs less than the factory standard spring. Again, it is for competition only as a reduction in spring rate could lead to misfires and misfires can’t be all good when it comes to self defense unless you’re not holding the gun. The reduced power safety spring is lighter than standard. I do not know the exact rating, it isn’t published nor was Wolff willing to communicate on the issue, but I know the wire stock is about 0.012″ in diameter compared to the 0.014″ wire standard piece. The trigger spring is not a compression spring, but rather an extension spring that pulls in the direction of the trigger with varying degrees of assistance, based on the individual spring’s rating. I do not know the exact rating for this spring. Using a trigger pull gauge to extend it through its normal operating range seems to peg it at 16 – 18 ounces where the standard spring is approximately 13 – 16 ounces. I do know the standard spring wire diameter is 0.025″ and the extra power Wolff replacement is 0.026″ The Brownells Item number is 969-000-177, $9.
 Removal of the firing pin and safety spring is relatively straightforward. The same 2/32″ disassembly punch is poked into the a firing pin slot on the bottom side of the slide and the plastic firing pin spacer sleeve is pressed toward the front of the slide to offload the spring pressure
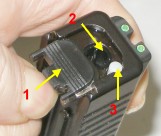 from the firing pin. With pressure applied, the slide cover plate is removed, exposing the back of the firing pin assembly and the end of the extractor plunger’s spring loaded bearing. Pressure is gradually relieved on the spacer sleeve and the firing pin is pulled out, followed by the extractor plunger. You really need to control the exit of the firing pin as it is removed from under load. It is not fun to catch with your forehead.
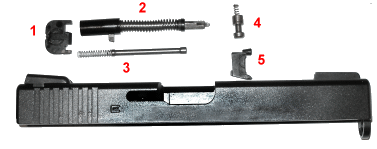 If you survive the removal of the firing pin, I’m sure you will, and you continue burping the slide the rest of these parts will eventually fall out. 1) slide cover plate, 2) firing pin assembly, 3) extractor plunger assembly, 4) firing pin safety and safety spring, 5) extractor. After the slide cover and firing pin assembly are removed as outlined above, the extractor plunger is pulled out of the slide as an assembly. The
 firing pin safety is depressed, the slide tipped ejector port down, and the ejector will fall out. Once the ejector is out, the firing pin safety and small firing pin safety spring will come out. Changing to the lighter spring is easy. Stand the firing pin assembly on its tail end, press the firing pin tab against your finger to keep the firing pin forward in the firing pin spacer sleeve, while compressing the firing pin spring between your thumb and forefinger. Once compressed, a split plastic keeper will be freed and you can separate the halves with your free hand – see inset. Then the firing pin spring is eased up to unload and removed from the firing pin. The replacement spring is installed and the firing pin parts reassembled. If you have a problem holding the firing pin up under compression, you might try supporting it on the edge of a bench block while compressing the spring. When installing the plastic spring cups, it is best to align them so the split does not line up with the end of a spring coil where is can hang or pop off. Substitute the new lighter firing pin safety spring and reassembly is the reverse of the above.
The springs really enhanced the trigger work. The gun now had a highly reliable and repeatable 3lb 2 oz short trigger pull. This is where I ran into a problem with the slide locking open, as though empty, with more rounds in the magazine. As noted previously in the extended slide stop lever section, the spring on this part was tweaked, causing it to randomly hang and lock the slide open. I replace it with the Glock factory extended slide stop lever and it worked like a champ. I fired another 200 rounds without a single hand, failure to eject, misfire, or any other mishap. The gun was rock solid.
Observations to this point…
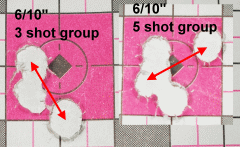 The Glock 22 at this point was quite different from the Glock I originally purchased. In degree of change, I would have to first point to the dramatic improvement in accuracy and consistency of group size. The gun went from a 3″ – 3½” 15 yard shooter to a sub ¾” shooter. It went from a sloppy long 5 lb 8 oz trigger, to a short pull and uniformly smooth 3 lb 3 oz trigger. Gone is the hand full of plastic stinging recoil, replaced by a dampened slide, balanced and solid gun feel that can easily put multiple shots on a reasonable target. The sights went from the compromised, basic white outlined, plastic factory pieces, to razor sharp fiber optic sights backed up by self illuminating Tritium. Closing the slide while chambering a round and dropping empty magazines, without shifting grip, are easy to accomplish thanks to modest changes in control pieces. None of the gun’s three primary safety features have been defeated and the gun is clearly still a Glock to the larger degree. I wouldn’t attempt some of the specialized drop tests, I can’t duck that fast in the event it didn’t work out, but slamming it down or hammering the grip results in nothing more than a dent, mostly in the surface it hits. If there are changes that push a Glock over the edge it might be those that follow politically correct law enforcement policy or those attempting to protect people who are inadequately trained or terminally unskilled.
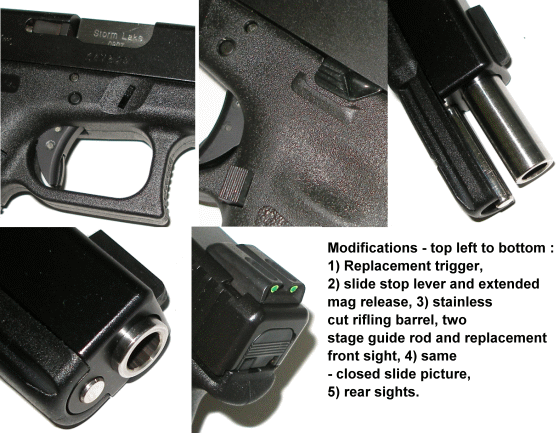
| Parts Summary | |||
| Manufacturer | Type Part | # | $ Price |
| TruGlo |
902-000-094 | 113 | |
| Jentra | Lanyard Mount Hole Filler | 463-100-017 | 7 |
| Glock | Extended Slide Stop Lever | 100-002-748 | 15 |
| Glock | Large Frame Magazine Catch | 100-002-717 | 2 |
| Storm Lake | Cut Rifling 416 Stainless Pre-fit Barrel | 842-000-005 | 149 |
| Sprinco | Recoil Management System | 943-100-017 | 80 |
| Scherer | 3.5 lb Trigger Connector | 861-119-035 | 18 |
| Lightning Strike | Short Pull Aluminum Trigger | 642-103-001 | 108 |
| Wolff | Competition Trigger Spring Pack | 969-000-177 | 9 |
| Total Cost | – | – | $ 501 |
Part I conclusion…
The cost of building Glockenstein so far is pretty reasonable. I purchased the basic Glock 22 from Cindy at the Real Guns store for, weirdly enough, the exact same amount as the modifications, $501 and got two magazines, loading tool, cleaning kit, etc. While each change on the table above enhanced the other, each could have been made independent of the other. Including mounting sights, the work represents less than an hour’s worth of work, which is why parts were selected that, at most, required very minor hand fitting. The changes resulted in a dramatic improvement in accuracy, handling and even improved appearance. As noted, and certainly listed on Brownells, there are lots of alternative parts to suit individual preferences and still get to the same place. Just enter “Glock” in their search engine and you’ll get approximately 28 pages of Glock and aftermarket parts, tools and accessories you can poke and pick from.
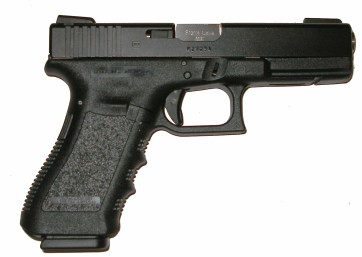 Is there a Glock downside after the modifications ? Sure. The frame is still poly and the firing pin spring depressing trigger will always make the trigger feel…springy. It is a large gun in terms of overall envelope, but then it holds a lot of ammo. Still, during this project I went from holding my nose before working with the gun to putting away my P229 SIG and replacing it with the G22. I believe there is one more level of modification the gun could stand without a lot of custom machining or permanent modification and that will be the focal point of the next part, which I will imaginatively call “Part II”.
Glockenstein…It’s Alive! Part I of II
Glockenstein…It’s Alive! Part II of II
Thanks,
Jo

Email Notification