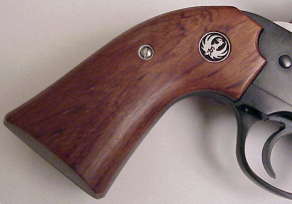
 The Ruger is a great gun, and made in the best tradition of the old west. No, not precisely made for Cowboy Action Shooting, but clearly a gun capable of doubling as a hammer if the need should arise. Everything about the Ruger tells you it’s not slick, but it’s durable, reliable and will just go on and on. That’s probably why I can’t leave mine alone, and apparently have set out to replace virtually every part of the gun, piece by piece, with something that probably won’t work any better, but will look a little more fancy. Why don’t I give it up and just by a Colt SA ? Because I don’t believe I can push 300 grains at almost 1400 fps through a Colt without experiencing automated, unintentional, rapid disassembly. Besides, most of the custom parts for a Ruger are inexpensive and easy to install. I’d already changed trigger group parts, ejectors, sights and base pin, so that pretty much led me to grips.
Rugers ship with very clean looking rosewood panels, little medallion, nice and uniform, nothing unexpected – pretty boring. My auto pistols all have grips made out of a variety of woods with names I can’t pronounce. I know they’re all exotic because they were grossly overpriced, and added no practical value to the gun whatsoever. It was time to provide the same empty gesture of personalization to the Ruger.
After searching around, I found that grips for the Ruger fell into a few categories. The quality, high priced stuff was all custom. Seemingly always made by some guy name Tex or Vern, who lives in New Jersey, and is the proud owner of a web site with a drop shadowed ranch fence running across the page, and an endless sound loop of the “Blazing Saddles” camp fire scene playing in the background. Price was stated as, “$300 for exotic, rosewood and walnut same as exotic”. There was clearly a price break at about half that cost, but a lot of this was for nondescript wood, buffalo horn, imitation ivory and similar substances. The other problem was these grips, as well as those noted above, required the gun be sent for proper fitting. Too tell you the truth, sending a gun anywhere these days is pretty much a last resort and, then, only for serious work and, then, never through UPS.
 I think I just kept running into the Cowboy Action Shooting phenomena. There is some absolutely beautiful work being done, very elaborate, maybe even a little theatrical in appearance. I was just looking for a better set of grips to put on a utility gun. I found a listing for Hogue Traditional Style Grips. This model is available for the Bisley’s grip frame in Pau Ferro, Cocobolo, black/white Pearlite, black/white Micarta – I ordered a set in Cocobolo, which I later leaned was Peruvian for “breaker of files” , with heavy black grain for $49. If you been looking for Bisley grips, you may have noticed they typically carry a 50% premium over Blackhawk part numbers, but these grips were less expensive than the small grips in the same wood I purchased for one of my .45 autos. The grips arrives in a couple of days from Brownells.
I pulled the original set, and of course the new grips didn’t drop into place. There was a information guide packed with the grips that listed a toll free number and the suggestion customers call for corrective action if the grips didn’t fit. The note went on to say Hogue would have the problem taken care of in a few minutes. No, I don’t know how they would take care of the problem over the phone, and no I didn’t call, and no I don’t stop to bother strangers and ask directions when I’ve personally misplaced myself. Sometimes you’ve just got to live for the adventure.
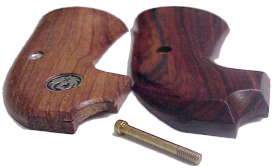 In studying the new versus the old parts, the new wood is slightly thicker in cross section in the area that would come in contact with the palm, about .100″ just above the cross screw hole. This dimension increases to about .250″ thicker at the top of the grip frame. If you do not like thick grips on your single action revolver, these would not be the grips for you.
The finish is probably closer to satin as opposed to an oil or gloss polyurethane finish. The hardware is brass rather than Ruger chrome, and the color of both the wood and hardware go well with the gun’s original bluing. Ruger grips locate to a roll pin at the bottom of the grip frame and press against the scalloped surface at the top. Then one screw passes through the two halves and secures the assembly. I noticed the lower portion of the grips lined up just fine between the pin and the lower, front, and rear grip frame surfaces. All of the non-fit interference was at the a couple of minor points at the top and the pin at the base of the grip frame.
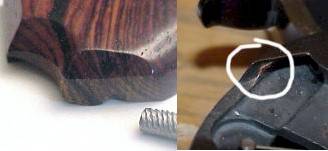
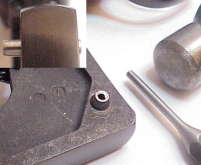 As can be seen in the insert in the picture on the right, the grip locating roll pin for the right grip (left in the picture) was too far offset to and prevented the grip panel from seating flush against the frame. A couple of taps with the wrong size punch corrected the problem and gave be yet another excuse to pick up some more tools. With the pin clearance problem resolved, I moved on to clean up at the top of the grip frame.
Initially, I resisted heading for the bench mounted belt or disk sander, but rather mounted a piece of 300 grit garnet paper on a hard rubber sanding block, laid it on its side perpendicular to the bench top and, resting the flat side of the grip on the bench, began slowly removing material at the contact points, frequently trying the fit to the grip frame. I just wanted to cut squarely and not roll over onto the grip’s exterior surface or round some of the angles cuts. It became apparent that A) This was some pretty hard wood B) I had plans for the coming week that would have been interrupted if I continued on in the vane. Only power tools could remedy this situation.
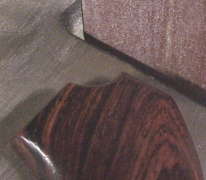 The grips had been milled with very clean, angular cuts, and I didn’t want to ruin them with sloppy hand sanded material reduction. The # 300 grit belt sander made a very clean cut and held the original angle.
 After getting the vertical clearance cleaned up and achieving a very close fit, the grip now rocked on the frame and still didn’t fit flush as illustrated on the right. The problem was traced to a casting parting line that ran under the grip and down the frame an inch or so. I had a choice of getting out the Dremel and going to work on the frame, or removing material from the grip to accommodate the parting line. If I was prepping the gun for refinishing, I would have cleaned up the gun, but I was, so I didn’t, and followed the rule “modify the least permanent part”.
 With the top of the panel already cut to the correct height, I hit the area where the parting line interference was occurring with a small rat tail file, just enough to allow the wood to sit flush on the metal frame and locate correctly.The amount of material removed was actually quite minor. Where finish had been removed, I touched up with a small about of water base satin polyurethane toblend in the work areas.
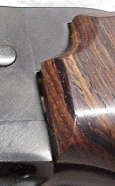
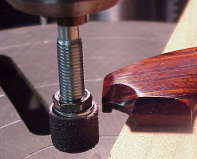 The left grip was the problem child. The roll pin location along the base of the grip frame was fine. The problem was the scalloped cut at the top of the frame was too shallow and didn’t permit the grip to rotate into position. In addition, the flat has to be cut at a slight angle so it would be flush when the scalloped relief was correctly located.
I chucked a small drum sander bit into the drill press and vary carefully and gradually began the process of material removal and trial fit. Of course, if you remove too much, there is no putting it back on.
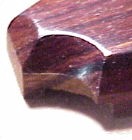
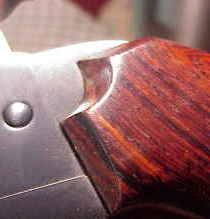 As you can see, the relief cut made by the drum sander is very minor, and pretty much follows the contours of the original cut. Ultimately, when the curved surface was correct, the shoulders at the top of the grip fit squarely and the curved cut should be tight to the metal parts.
Minimal damage was done to the factory wood finish and, as indicated earlier, touch up with water based polyurethane was a snap. The drill press and the belt sander could have just as easily been replaced with a little more persistence with the sanding block, or file, or even a carefully handled Dremel. The trick is to recognize the fit needs to be close to properly secure the grips to the frame or you might end up doing fancy gun handling tricks you weren’t even aware of knowing. Look out…oh….duck..geez, sorry…
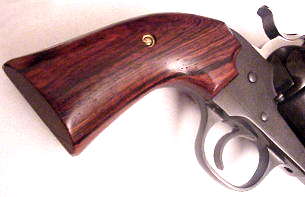 This is what they looked like after being buttoned up. They fit and they’re very comfortable when shooting even heavy .45 Colt loads. The Bisley grip angle already helped, but the wider grips spreads the recoil over a larger surface, but not so large that the gun feel awkward to grip.
$49 retail fro grips and it took me about half an hour to accomplish the minor fitting indicating. As you can probably tell, I’m not a wood crafter, and this is a project anyone can take on, with a little patience and a progressive approach.
Thanks
Joe

Email Notification