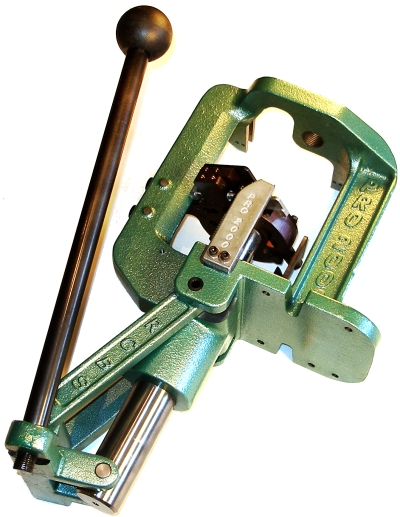
 The Real Guns’ shop is usually set up for short run load development and experimentation rather than for volume. It’s not that loads aren’t developed that serve a useful and volume demanding purpose, it’s more an issue of me getting bored after a lot of tedious short run reloading. I have little incentive to produce much more of the same loads beyond fifty optimized rounds for future reference.
Recently, I’ve been wringing out some interesting factory firearms and cartridges. The effort has required lots of standardized handloads to properly assess hardware, which made it apparent I needed a piece of production machinery to increase my normal one round per hour handload assembly rate. It would have to be equipment that would integrate well into my existing set up and would drive a requirement for tons of proprietary tools and accessories.
Evolutionary equipment design is generally a good place to begin when searching for new equipment, as “evolutionary” suggests an original product was solid enough to achieve commercial success. Hopefully, subsequent revisions and releases incorporate changes driven by carefully analyzed customer feedback and purposeful corporate innovation. The forerunner to the RCBS Pro 2000 was the original auto indexing RCBS Ammo Master; a good press in its own right that was durable, production volume worthy and it handled small or large cartridges with ease. The Pro 2000 and original Ammo Master share some common design concepts, but they differ significantly in others where practical improvements have been made.
The big frame up…
Unlike single stage or turret presses, progressive presses are designed to perform multiple operations, on multiple in-process cartridges, concurrently. Auto indexing versions of progressive presses further enhance the assembly process by automatically advancing cartridges through the various steps with each cycle of the operating handle. With each push of the handle a fresh cartridge case is introduced into the process and primed and a completed cartridge exits. With each pull of the handle: cartridge positions are advanced, a case is sized, a case mouth is expanded (if applicable), a case is powder charged and a case receives a bullet and is crimped.
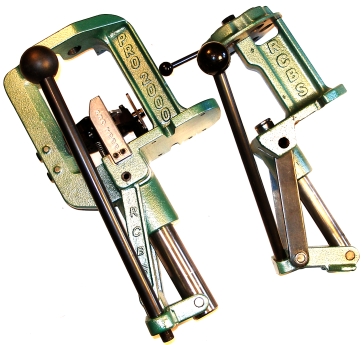
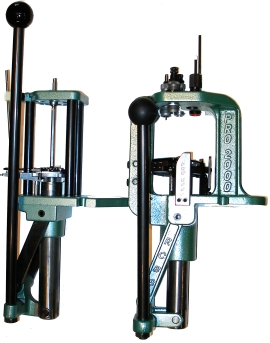 Progressive Press frames are made larger and stronger to withstand the load of all of these operations that occur with substantial frequency and over a protracted period of time. The RCBS Ammo Master (left) and RCBS Pro 2000 have bare weights of 17 lbs and 32 lbs respectively. The Pro 2000 is double hernia heavy, but the mass was added where it would do the most good rather than just for show.
The Ammo Master is comprised of a cast iron base and an overhead cast aluminum multi position die plate. The two principal parts are joined with three steel bars and countersunk cap screws. The 1.50″ diameter ram supports a shell plate holder with a steel five position radial shell plate. The newer Pro 2000 is upgraded to a major one piece cast iron “O” frame, with more than twice the ram support bearing surface. The Pro 2000’s increased mass makes for improved stability of operation, improved production dimensional control and reduced operator effort. Notice how short the operating lever is on the Pro 2000 without yielding mechanical advantage.
 The Pro 2000 accomplishes full length sizing, case forming and primer seating with little effort. However, the press does retain a sufficient feel to assure critical control. As part of my equipment assessment, I installed multi step forming dies to produce .17-357 RG cases, a Real Guns wildcat based on the 357 SIG case necked down to .172. The forming process was fast and without casualties. I hadn’t attempted this in a progressive press before, but the job proved to be a snap with the RCBS Pro 2000.
The Pro 2000’s frame clearance, between the shell plate and die plate, will accommodate a cartridge length of 4.50″. While less than the 5.25″ for the old Ammo Master, it is more than enough for any major cartridge below the 50 BMG length. As an example, the .500 Jeffery round (left) would clear with ease. The big 460 Weatherby and derivative cartridges, as well as the full length 375 H&H and Remington Ultra Mag cartridges, all have a maximum COL of only 3.6″. As a practical matter, the powder measure supplied with the press is limited to 99 grains as a maximum charge. Can the Pro 2000 be made to meter more than 99 grains? Yes it can, by using a higher capacity measure, something I may address in a future article. However, for the most part volume loading is reserved for cartridges fired in substantial quantity and that would not be the 500 Jeffery.
Enhanced die plate design…
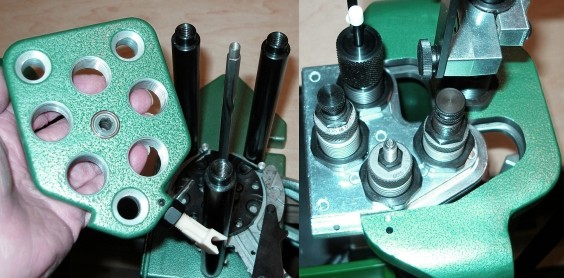
The original Ammo Master progressive, left, utilizes a five position 0.630″ aluminum die plate that is secured to the press with three large countersunk socket screws threaded into three 0.690″ diameter steel rods. The center of the plate houses a hex drive rod bushing and there are five tool positions, one of which is dedicated to a powder measure. The Pro 2000 also utilizes an aluminum die plate, however, the plate’s surface area was reduced through elimination of the hex drive rod bushing and the fifth tool position was eliminated by moving the powder measure more appropriately to the press frame. The Pro 2000 die plate has a perimeter flange that locks into a groove cut into the press casting. This approach stiffens the die plate and provides more than twice as much support surface. The powder measure, now secured to the solid mass of the press, meters more uniformly and requires a much simpler push actuation dispensing system rather than complicated compound linkage. I purchased a number of die plates for my old Ammo Master, but rarely used them preloaded with dies. It took too long to make the change, especially with the powder measure on the die plate and connected to press linkage. The die plate on the Pro 2000 is slipped in and secured with a couple of drop pins. As change time with this method is only a matter of a few seconds, it is reasonable to set up additional die plates with frequently used die sets.
Enhanced indexing…
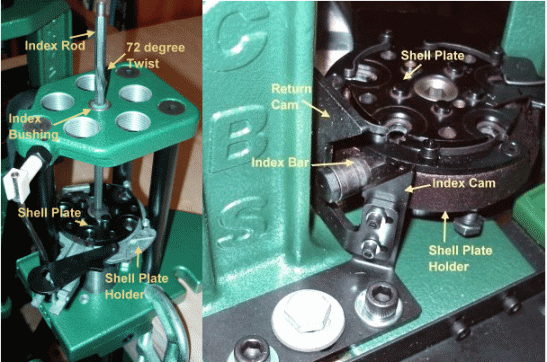
The auto indexing design of the Pro 2000 reflects a major and well thought out change to the original Ammo Master’s drive system. Where the older Ammo Master uses a twisted hex rod drive, the Pro 2000 (right) utilizes a more robust cam and pawl arrangement. The Ammo Master, left, has a five station radial shell holder that is connected to a twisted hex drive rod. The rod passes through a bushing located in the overhead die plate. When the shell plate is raised with the ram, the index bushing turns freely in the counterclockwise direction, allowing the twisted hex rod to pass through the die plate while retaining its original orientation. When the ram is lowered, and the twisted portion of the hex rod is pulled back through the index bushing, the index bushing now locks, forcing the drive rod and connected shell plate to rotate counterclockwise to the next indexed position. The only thing complicated is my description, the mechanics are the same as a child’s pump top that is driven on the down stroke of its handle and freewheels when the handle is pulled back up.
The problem with a hex drive rod system is that the shell holder is only locked in its orientation when the ram is raised and the cartridges engage the overhead dies or when it is lowered to within 0.625″ of bottoming out. In any position in-between, only a lightly sprung detent ball holds the shell plate in position. If the operator balks mid stroke, the inertia of 1000+ grains of partially assembled ammunition riding on a full shell plate can jump index and force the press out of phase. The result is a mess that required time to clear partially assembled rounds and to clean up powder spills.
As pictured above, the Pro 2000 eliminates the hex drive rod by substituting a simplified dual cam assembly that more positively drives and indexes the press’ shell plate. As the ram is lowered, the roller on the pivoting index bar contacts the index cam. The contact drives the roller rearward, causing a pawl (hook) on the other end of the index bar to catch the bottom side of the shell plate and rotates it forward. Raising the ram resets the position of the index arm, readying it for the next cycle. In this arrangement the shell plate’s motion is more directly controlled and, regardless speed of processing, the pawl appears to prevent the loaded shell plate from over-rotating. Additionally, removal of the drive rod from the scheme of things opens up the area above the shell plate to make it easier to keep an eye on the production process while working.
Overall, the assemblies and piece parts utilized on the Pro 2000 are much beefier and show a good deal more precision machine work. The shell plate holder in the Ammo Master is a light weight aluminum casting. The shell plate holder in the Pro 2000 is an oversized heavy ferrous casting. The presses do share a common steel shell plate design so an investment in the earlier press shell plates isn’t lost on the Pro 2000.
The Pro 2000 Priming System
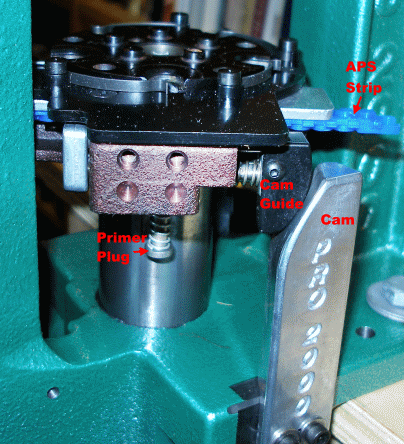 The Pro 2000 systems offers a lot of value. I am an APS priming system believer. I use APS strips with bench mounted, press mounted and handheld priming tools. Where the old Ammo Master utilized manually filled priming tubes and a mechanically complicated shuttle feed system, all of that was replaced with an APS priming system built right into the Pro 2000 shell plate holder.
The best feature of the APS system is that primers can be purchased prepackaged in plastic feed strips, which puts an end to manually loading loose primers into tubes or other types of feed reservoirs. As pictured, a strip is slipped into the shell plate holder and, as the ram is lowered, the cam depresses the cam guide and advances a primer under the press priming station. Both large and small primer plug assemblies are packaged with the press; change over time is less than a minute. Primer seating depth is controlled by adjustment of a mechanical stop screwed into the bottom of the shell plate holder or primers can easily be seated by feel if so desired.
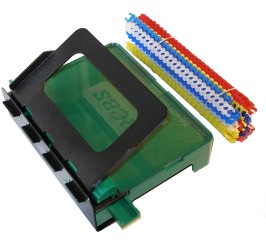 RCBS anticipated new press owners might not be using APS priming strips, so they included a strip loader and a variety of APS strips color coded for various primer types. I used the same type of tool when I initially made the change over to APS and still had a large inventory of traditionally boxed primers. The boxed primers are dumped into the loader’s reservoir, an empty plastic strip is put into place, the container is shaken to properly orient the primers, and the loader bar is pressed to load the primers into the strip. When boxed primer inventory is depleted, primers can then be purchased on strips for about the same price as boxed primers. In the event there is a specialty primer that is required from time to time, they can be loaded into strips as previously described.
Installation and set up… in very broad strokes…
 While much larger than the RCBS Turret press, the Pro 2000 mount holes locate dimensionally the same, so I was able to remove a turret press from the bench and drop the Pro 2000 into the same mount holes. The Pro 2000 mount pad, the portion of the casting that secures the press to the bench is 22.5 square inches compared to the turret’s 12.5 for much increased support.
The press was received with some parts that need to be installed; 20 minutes worth of work for an overly cautious assembler. It makes sense that this material would not be assembled because they all related to configuring and setting up for a specific cartridge. The included manual is complete and easy to follow even for a novice with a little patience.
 All of the parts noted in this section have a quality black oxide, blued, finish that will wear well and provide a level of protection against rust. As received, just like the press, they have a preservative on them that should be thoroughly cleaned off before put to use; oil and smokeless powder do not combine for a good result.
The powder measure included with the press is supplied with both large and small measuring cylinders and screws, the pieces that determine maximum charge volume. The small set throws 2 – 50 grains, the large set between 5-99 grains. There is a variety of powder bushings intended to accommodate cartridges of various calibers and lengths, the specific selection is determined by an application chart. The measure is pre-mounted with linkage for the press and assembly of the metering system and press installation takes only a few minutes.
 The powder measure set up was straight forward. Since it was adjusted to cycle full stroke with press handle actuation, I just made my adjustments, then placed a scale’s powder pan under the nozzle and manually actuated the measure by moving the micrometer adjustment screw full up and full down. Once adjusted, I scale checked a series of powder throws and found them to be within a 0.2 grains variance, all toward the upside of the baseline charge. As adjusted to meter 12.7 grains of AA 7, every charge ran 12.7 – 12.9, as verified with a calibrated RCBS Charge Master 1500.
During initial ammo production I checked the first 25 rounds individually, then spot checked every 20th round to make sure the measure wasn’t moving out of adjustment. During these checks I encountered no shifts in metering as the reservoir emptied, although I never let a reservoir get below 25% of its capacity. The consistency was actually a little surprising to me as I have done numerous evaluations of measures and found them to be mostly terrible in providing uniform charges. I’d guess being mounted in a heavy cast iron press and powder being uniformly compacted by press operating vibrations made for this improvement.
The radial shell holders are sized to the specific cartridge case type, just like individual shell holders, and they carry the same number designation as single station and trimmer shell holders. They pop in and out with the removal of a central Allen head screw. A modicum of care must be taken to not disturb a detent ball and spring that rides between the shell plate and shell plate holder and contributes to positive indexing.
 As noted earlier, the primer plug assembly comes in large and small primer diameter versions, so the appropriate size is selected and screwed into the bottom of the shell plate holder. The rest of the set up consists of adjusting the finished cartridge adjustment wire, or kicker, and adjusting the wire that retains a new case when introduced into the process.
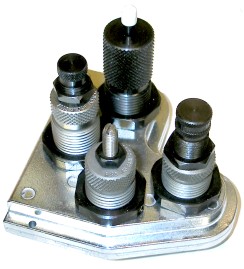
Die set up is the same as it would be with any press and best accomplished before the powder measure is filled or the primer track is loaded. There are five die positions that line up over the five shell holder positions; four on the die plate and one through the press frame. The first three are traditional die locations for rifle or handgun sets, the fourth is for the powder measure, the fifth is a great spot for a powder checker tool as seen in the picture, left. Unused locations are left empty.
I know the theory, Albert, but…a test drive
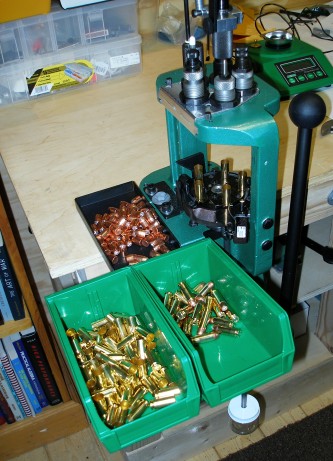 With the set up completed, I proceeded to crank out 25 of the butt ugliest handloads I’ve made in years. There was ammo without primers, charged and primed cases ejected without bullets and primers were popping up from the APS feed with no cartridge case in sight. I put bullets on the shell plate, cases on cases and I spilled powder all over the place. I paused to contemplate the situation, which must have appeared to be serious, as my wife baked some cookies to help me through the ordeal. Oatmeal. Nice lady.
I cleaned up the mess, rechecked adjustments and settings and found nothing wrong. I turned off the TV in the background, killed the ant that kept walking across the bench and sat down and tried it again. This time I was able to crank out a hundred rounds, all without incident or error. I pulled bullets from random selections to verify powder charges, I checked primers for proper seating, COL for uniformity and found I had a pile of good ammo. Some rounds over the chronograph from a really nice auto loader further confirmed my conclusions.
The real culprit at the root of the problem was my brain’s refusal to connect with my hands to find an operating rhythm. I would continue to apply forward pressure on the operating lever when in the up position after seating a primer, which would cause me to run out of hands before I could load an empty case and position a bullet for seating. I also needed to develop a little finesse so the shell plate full wouldn’t accelerate and stop so abruptly as to cause heavily charged straight wall cases to toss powder out on rotation. These were actually easy obstacles to overcome. It’s a little like learning to not overcompensate when piloting a boat across a channel…so you won’t run into an island and have to toss your buddy Carl over the side…and leave him there, because he was busting your chops for an extended period of time. Yup, just like that. The result of a little time spent practicing was a cycle rate of approximately 12-15 rounds per minute or 720-900 rounds per hour. I can’t even shoot that fast.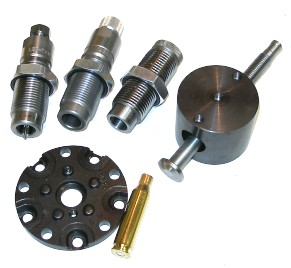
Yes, I am extrapolating. I had no cartridge to run in that quantity, but I did run a few hundred rounds of 10mm Auto ammo and a couple hundred rounds of 7mm-08 Remington. All I needed to do to run the rifle rounds was install set of rifle dies, change the shell plate and install the large capacity measuring cylinder and adjusting screw into the powder measure.
As I mentioned earlier, there was a need to have equipment that integrated well into the existing environment because the shop has so much tooling in place. In this case, I had a set of Lee Precision dies on hand for the 7mm-08 Remington and they popped right into the press and ran, including the Lee Factory crimp die, as intended. Changeover took about five minutes.
How fast can the press make good ammo? That will vary a lot as it depends on each operator’s dexterity and coordination and, to some degree, the cartridge being loaded. But as an old manufacturing guy who supervised a lot of assembly operations, I’d guess net output in the 500-600 round per hour range wouldn’t be a stretch. That isn’t slow by any stretch of the imagination. More than pick and place and machine cycle time, there are necessary spot checks of charge weights, operator balks, fatigue, lunch, etc.. Just as would be the case with any other press. Handloading might not be as much fun if it had to be a race, but the Pro 2000 provides the capability to make a lot of ammo quickly and with a high degree of confidence in quality.
Not cheap, but a lot of value…
The Pro 2000 is not a budget piece of equipment, it is made to last a long time and hold up to heavy use. It can be purchased in several packages and versions with a number of press accessories:
88875 – Pro 2000 Progressive Press; a manually indexed version of the product. MSRP is $616.95, typical retail price is $425.
88882 – Pro 2000 Automatic Indexing Progressive Press; the auto indexing press described in the article above. MSRP is $689.95, Typical retail price is $519. The package also includes the APS strip loader and the Uniflow Powder Measure.
88880 – Pro 2000 Deluxe Reloading Kit, about $1,100 MSRP and $849 through discount retailers. The kit includes the Pro 2000 manual indexing progressive press with Uniflow Powder Measure and APS priming system, Trim Pro Manual case trimmer kit, Speer Reloading Manual #13, RangeMaster 750 electronic scale, Stainless Steel Dial caliper, Case Lube kit, deburring tool and hex key set. All serious equipment that would provide years of service.
88883 – The Pro 2000 Auto Index Conversion Kit is available for folks who buy the manual index setup and wish to upgrade in the future. MSRP is approximately $100 and is available through retail for approximately $76.
Shell plate have an MSRP of approximately $35 and are available through retailers for about $28 bucks. Extra top die plates go for about $16.
Wish list?
It would be nice to see some additional automation accessories offered for the Pro 2000. Hopper fed cases and bullets would increase output and allow greater focus on the process at all stations. I would really like to see an improved powder measure with a hopper made of material that doesn’t react to smokeless powder when left in the hopper for an extended period of time. Actually, it would be nice to have a hopper that could be removed and emptied without disturbing the metering body secured to the press. It would be nice to have some detent button that cuts primer feed so the shell plate could be rotated and cleared without having to remove primer strips from the shell plate holder. That’s as far as I can stretch to think of something to change and none of this is more than finesse. The Pro 2000 is a well behaved auto indexer, ready to go to work as as received.
Conclusion
Comments appearing below are posted by individuals in a free exchange, not associated with Real Guns. Therefore RGI Media takes no responsibility for information appearing in the comments section. Reader judgement is essential.

Email Notification