 Well, the new year is here and I’m situated somewhere between family and friends in San Jose and Fremont California and the Shot Show in Los Vegas. If my T Shirt knows what it is talking about I am on the across the street from the beach at Santa Cruz and on the verge of buying a surf board.
In a couple of weeks I’ll be in Vegas with my lovely wife who will be having a vacation of her own while I troll the floor of Shot in search of something I don’t know, should be easy, and to get a better understanding of how Remington’s purchase or Barnes will impact the industry…more difficult.
Wild West Gun’s – Marlin upgrade bits and pieces…
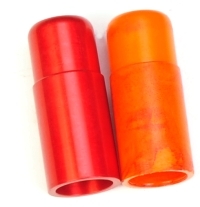
 Installing this part in a Marlin is a lot like putting nifty dress up items under the hood of a really nice car; it looks good and it can provide subtle functional improvement. The upgraded follower won’t make a gun shoot more accurately and it won’t make a gun safer, but it will enhance operation. The anodized aluminum piece is more durable than plastic and the slightly concave and smooth surface of this metal follower allows bullets to move across its face more easily when chambering a round. The aluminum part also removes the potential of a gouged piece of factory plastic hanging a cartridge on an attempted feed. Aesthetically, the new piece take one more step toward ridding a favored firearm of signs of nagging bean counting cost reduction.
Installing a magazine follower is easy for anyone with a little patience. No pry bars, hammers of any type or cutting torches are required to disassemble or assemble. In fact. other than removing screws, only modest hand effort is required. A few facts to keep in mind before starting – The magazine tube must be removed to replace the magazine tube follower. The forearm and magazine tube are removed together, the magazine tube cannot be removed without the forearm with any method that does not require a saw or cutting torch. The magazine tube plug will not come out until it is lifted to clear the magazine tube stud.
Installation

Check the gun’s chamber and magazine for empty and make sure there is no live ammo in the work area while working on the firearm. Make sure you’re not in an impatient of grumpy mood or otherwise distracted from the task at hand. I know, doesn’t sound like much of a consideration but, in my case, that grumpy deal can go on for days. The gun can be placed in a maintenance vise to prevent it from moving around while work in being performed or wood blocks can be placed under the slab sided receiver and barrel to lift it off the surface of the work bench.

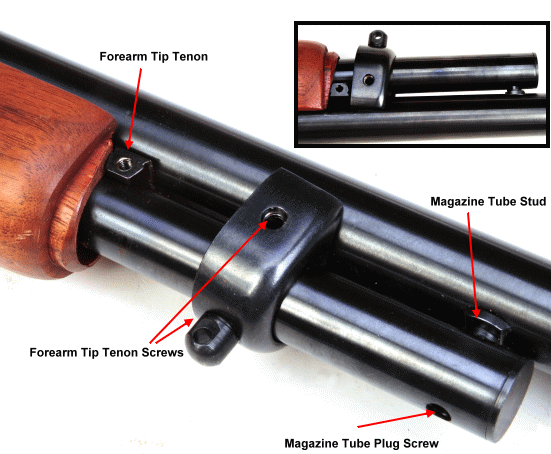
 The Magazine tube plug screw is removed. The two forearm tip tenon screws, one on either side are removed and the forearm tip is slipped forward to clear the tenon. The assembly can’t slip forward because the magazine tube stud would prevent forward motion. The forearm can’t slide forward on the magazine tube because the tenon prevents it’s movement. With a part of the hand securing the magazine tube plug so it will not pop out under magazine tube spring load, the magazine tube is pulled downward just enough to clear the magazine tube stud. The plug can then be eased out and the spring off loaded. At this point the whole forearm/magazine assembly is pulled forward and off the gun. The bright orange plastic follower should be hanging off the end end of the magazine spring.

Reassembly is just as easy…

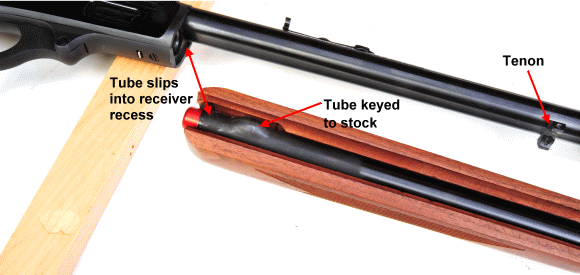
With the new follower in place, on reassembly, the magazine tube is oriented in the stock so the large bump in the magazine tube faces the cutaway in the stock. This will place the large hole at the forward end of the magazine tube in line with the magazine tube stud on the barrel. The tube and forearm are inserted into their locating recesses in the receiver; tipped into the receiver than rotated up into place behind the tip tenon on the barrel. It’s not unlike the motion used to snap a forearm into place on a double barrel shotgun. Again, no force is required.
 At the point of motion where the tube is going to fit over the stud, the magazine spring needs to be fed into the tube and secured with the magazine tube plug. Little effort should be required so, if the tube doesn’t slip right over the stud, chances are it is out of vertical alignment with the stud and needs to be jiggled into place. Once the stud is fully engaged, everything will stay in place while the screws are all reinstalled.
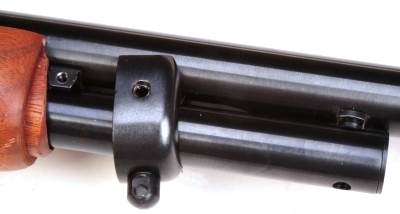
It is probably a good idea to slip the forearm tip in place, then install the plug screw to draw the magazine tube all the way into position, then go back and install the two tenon screw for the forearm tip. This sequence tends to simplify alignment. When completed, the gun should look a lot like this, or pretty much the way it started out. The whole process takes about ten minutes. The Brownells’ # for the follower is 981-000-009.


Email Notification