 In Maine we refer to this as a clearing and, frequently, a long shot opportunity. So when I hunt locally, the .257 Weatherby Magnum remains in the rack, while the Marlin Guide Gun gets a routine work out. Rugged, durable and accurate, for many hunters, the Marlin has become the iconic lever action rifle.
The .45-70 Gov’t chambered guns are particularly adaptive to many hunting environments and types of game. Light, compact and fast handling, they can be used with standard factory ammo for the novice hunter, or loaded full tilt for the experienced hunter and used confidently to down large and dangerous game at moderate ranges. In both applications the gun can be expected to function reliably even in harsh environments.
Of course, no gun is perfect in every respect but, fortunately, Brownells offers lots of accessories and upgrade parts to help optimize the gun to any hunter’s personal preferences. Installation of many of these enhancements are simple, requiring just basic mechanical skills and a relatively small dedication of cash, time and effort.
Front and center…
 A particularly popular upgrade for the Model 1895 addresses the gun’s factory sights. The stock pieces are are hard to see, they are also hard to see and, furthermore, they are hard to see. On current model Marlin’s, where a proud, bright gold bead once stood, now stands a matte brass beaded sight insert, surrounded by a sight hood that sometimes ejects under the recoil of heavy .45-70 Gov’t loads.
At the back end of the sighting system is a folding semi-buckhorn sight with a small U notch that get lost pretty quickly against dark and tangled backdrops. While both front and rear assemblies are very traditional on this type of rifle, there are a number of good sight options: FireSight, peep, ghost, buckhorn and bead that can provide much improved function. Some are sold in sets and some are sold as individual parts. Most mount low, easily clearing scope objective bells, ready for back up duty as conditions require.
Look before leaping…
The objective of a good non-optical sight installation is to end up with the rear sight adjusted upward to approximately 25% of its elevation range, the line of sight level with the front bead and all parallel to the gun bore’s centerline. This will provide the broadest range of adjustment to accommodate various bullet trajectories and to accommodate shift in point of impacts resulting from changes in pressure and bullet weights. Why not 50% of the adjustment range? Because with front and rear sights in this alignment most desired adjustment will be upward.

The sight height dimensions that are taken into consideration are from bore centerline to the center of the “U” notch in the rear sight and bore centerline to the center of the sight bead on the front sight. The diameter of the barrel at the plane of the rear sight is 0.936″, which means the radius is 0.468″ from bore center to barrel surface. The front barrel diameter is 0.790″ at the plane of the front sight bead, or 0.395″ bore centerline to top surface of the barrel.

The distance from the barrel surface to the center of the rear sight “U” notch measured 0.315″. Added to the 0.468″ bore centerline to barrel surface dimension, the rear sight height was 0.783″. The distance from the barrel surface to the front sight bead centerline measured 0.400″. Added to the 0.395″ bore centerline to barrel surface dimension, the front sight height was 0.795″. The 0.012″ difference from front to rear is well within vertical adjustment range, but these minor variations can’t be dismissed in initial planning. With the Guide Gun’s 14″ sight radius, a 0.012″ elevation adjustment equates to 3″ point of impact difference at 100 yards. My only point is that when picking sight components, it pays to be cognizant of height differences and to aim for a neutral sight alignment to assure maximum range of adjustment. If front and rear sight height isn’t monitored during installation, you can end up with a gun that can’t be zeroed on a distant target.
I know, pick up the pace…

One of the simplest ways to upgrade the sight system on a Marlin 1895, 336 or similar is with a Williams FireSight front/rear set. The set pictured left carries Brownells item # 962-602-170 with the nomenclature – Lever Action Dovetail Fire Sights. The price is $36 and includes a black anodized aluminum adjustable rear sight and a steel 3/8″ dovetail front sight.
The packaged Williams rear sight height measured 0.828″ with 25% up adjustment and 0.855″ for the front sight installed height. The 0.027″ differential is the equivalent to a 7″ vertical bias at 100 yards.
The Williams piece allows for 0.100″ of vertical adjustment at the rear sight, which equates to 26″ of vertical point of impact adjustment at 100 yards, so compensating for a 7″ shift is not major deal. On another note, the front insert included with the Williams kit is considerably wider than the Marlin’s front sight ramp. Nothing wrong with this, and it fits fine, it’s just that the kit is designated for all Winchester and Marlin lever action rifles with ramped front sights. That’s a lot of ground to cover, so a bit of fitting is to be expected, but it isn’t difficult to accomplish.

Removal of the Marlin’s factory front sight insert takes only a small amount of effort. The idea is to use a hammer weight adequate for the job and a tool to strike the insert that will not mar the finish on parts.
I used an inexpensive Lyman hammer and punch set, Brownells # 539-703-129. An alternative, similar set is Brownells # 555-500-000, Masen hammer and punch set. The Lyman includes steel punches and one brass drift. The Masen set contains two hammers, brass and nylon 2 ounce, and a greater number of brass punches. Brass is used to tap out sight inserts and similar parts to prevent surface damage.
The Marlin’s barrel was supported under the front sight and under the receiver to keep the gun level and steady. I used a bench block under the barrel, but even a block of hardwood or hardwood plywood would have sufficed. It’s just important not to have the barrel unsupported or supported with soft material as this will dampen the hammer strikes and you’ll be tapping away like a woodpecker to remove the insert.
The new Williams sight was tapped into place and centered in the ramp, then a scribe was used to mark the insert’s overhanging material. The marks served as a guide for material removal, however, 0.010″ more than the scribe lines needed to be removed from each side to allow for sight centering within the sight ramp.
If the sight insert loosens from multiple installs, its angled dovetail surfaces can be struck lightly with a punch to expand them back to a tight fit.

The picture, right, illustrates the variation within part dimensions and what needs to be removed to bring everything into proper form. The Williams front sight insert can be clamped in a vise and each side filed to the scribed line and a bit more. Something like a Brownells# 191-060-340 10″ smooth cut file will produce a clean edge. The inserts are made of soft ferrous material so they cut quickly. Lazy guy that I am, I relied on careful use of a fine grit belt sander for this rework.
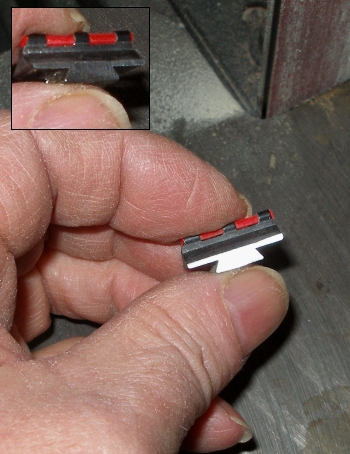
After belt sanding, the edges were dressed with a fine file and and an oil stone to give it a clean finish without making it glossy. The idea was to not create a light reflective surface on any part of the front sight. The length of the Williams insert is a better match to the ramp than the factory part.
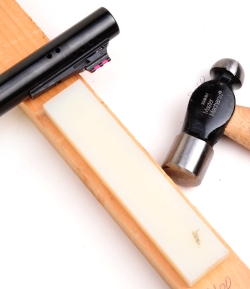 Gees Joe, what’s up with those finger nails? Since you asked, they really work well getting under small springs and clips, etc. A trick I learned from the movie Wolverine and the rough dry skin makes great small part sandpaper. One of these days I have to fabricate a universal sight installer. Yes, I know they are available pre-made, but sometimes it’s more important to invest $300 in materials and 40 hour in labor to make a tool that can be purchased for $100. In the interim, I keep some round and rectangular Nylon6/6 bar stock around. It makes terrific broad punches, it is non-marring and it can be refaced and shaped with a sander or machined.
I touched up the sanded sides of the sight insert with Brownells oven cure Teflon #083-048-801 using a small brush and without oven curing. The FireSight light pipe insert cannot handle the 300°F cure temp and it will shrink to about half its size. Yes, I do appreciate you not asking how I know that precise result.
Halfway home…

Now this is a front sight even I can see, and I can see it clearly against a dark backdrop. Swinging the muzzle across my field of view is like tracking a small light bulb on the end of a stick…although I am not quite sure why anyone would want to put a small light bulb on the end of a stick. Where would you put the batteries? For a basic installation, and about half an hour worth of hammering, machines making noises and hammering some more, the results are pretty good. If you prefer to skip the front sight insert sanding and touch up and you wish to alter the installed front height sight, for $16 Brownells lists # 962-564-xxx Red Fire Sight xxxN. They are 0.250″ wide, the same as the Marlin factory sight and available in a good variety of heights.
Not much point in having a nice front sight, unless…
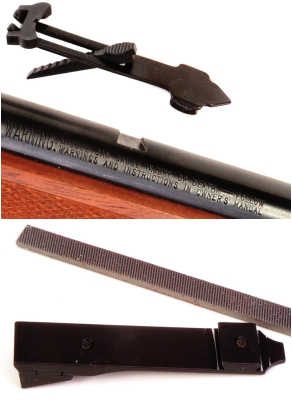 The front FireSight actually looks pretty good through the notch of the factory rear sight, but it doesn’t hurt to upgrade the rear sight also. The factory sight taps out, right to left with a brass drift and small hammer. You can even one ounce hammer woodpecker it to death or double that weight and it will knock right out.
The Williams rear site is made of black anodized aluminum with a wrap around green fiber optic insert that makes for a front/rear three dot sighting system. The dovetail is made to be a tight fit and it is further secured with a set screw. The fiber optic head is dovetail mounted as part of the rear sight assembly and secured with a set screw. This permits easy windage adjustment.
All sight dovetails tend to run a little oversized to assure they will have a tight fit on install. The William’s sight dovetail was a little too wide, front to rear, and wouldn’t start in the barrel cutout. A couple of stokes with a pillar file, Brownells # 191-400-760 set the right clearance without munging the sight. I think they look pretty….spiffy.

On not leaving well enough alone…
The FireSight thrives on ambient light. The more ambient light on the fiber optic tube, the more the bead illuminates against a background. Williams makes a circular FireSight hood with a cutaway, Brownells # 962-000-016, that sells for approximately $10, but I liked the idea of a skeletonized the Marlin hood which would be wider than the Williams part and offer better side protection. Additionally, while opening up the hood to allow in more light, I could also fit the sight ramp and hood with a cross pin that would keep the hood in place under heavy recoil.
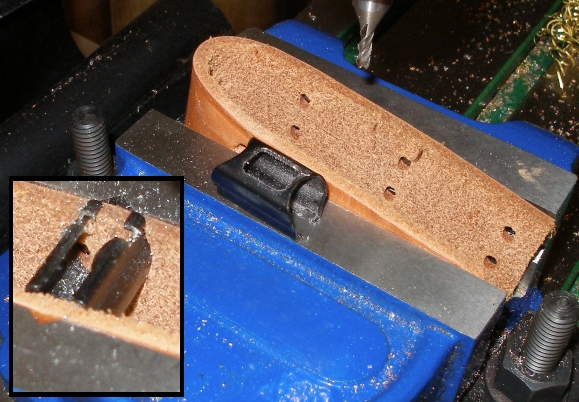
The hood was clamped in a machinist’s vise, end for end, cushioned with a piece of leather. Attempting to hold the part any other way could have collapsed or damaged the hood. A 1/16″ pilot hole was drilled in the top center of the hood, followed by a 1/4″ drill, then a 1/8″ end mill was used to freeform cut the hood’s top window. With that complete, the hood was flipped over and a cross cut was made on the bottom as a locating point for the planned cross pin.
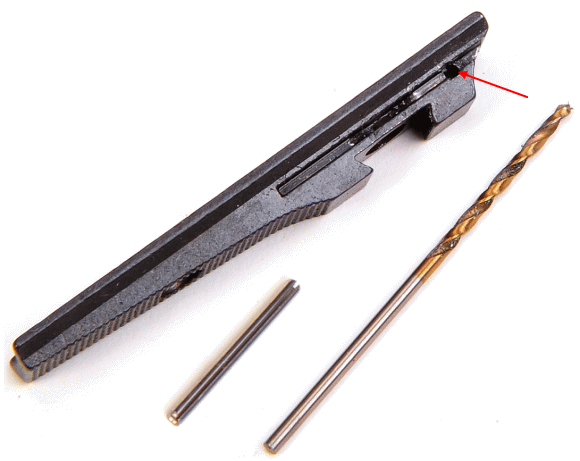
The cross pin mod was pretty straight forward…in a round about way. The FireSight insert was removed, as was the ramp from the barrel. The bottom side of the ramp is concave to fit to the barrel radius to the hole needs to be located high enough to not cut through and show up between the ramp and barrel. Care also must be taken to make sure the ramp is square to the drill or the opposite hole may come out some place unexpected. The roll pin is a stainless piece # 080-000-128 1/16×3/4″ that was finished trimmed to length. In this case 0.520″ long was enough to pass through the ramp and lock both sides of the hood in place. The drill size is 0.063″.
 The ramp, and hood were polished out with steel wool, degreased and sprayed with oven cure Teflon, Brownells #083-048-801. With the FireSight insert removed, the balance of the parts were over cured at 300°F for 30 minutes. The resulting finish blended in with the Marlin perfectly and it is extremely tough.
Separate issue – these little toaster ovens have excellent temp control and enough temp curing capacity for handguns and most rifle parts. They can be purchased at Wally World for under $40 and they are also great for making shop pizza. The only issue of concern when selecting an oven is that the unit is sufficiently insulated so it will not burn the bench or padding beneath the over. I went with a convection model, one with a rotisserie attachment. Between parts being rotated while being heated and the oven’s fan evenly circulating air, treated parts cure uniformly.

I know, not machinist’s art, but a lot of satisfaction in making the part myself. If the machine ate the original hood, no serious damage would have been done as Brownells sells the factory part for about 5 bucks. In fact, nothing is very expensive within the confines of this project. No small milling machine to cut the hole? Not a problem, I made a similar piece for another gun by drilling a 1/16″ pilot hole in the top of the hood, then a 1/4″ hole and squared it into a window with a pillar or Swiss file. It just takes a little patience to keep the sides square and the non cutting side of the pillar file will help minimize uneven edges. The ramp was cross drilled on the milling machine, but it can be carefully clamped in a vise and drilled with a drill press or a compact hand drill, or even a Dremel, if care is taken.
I originally picked up a micro mill and lathe for the shop because there was always a firearm part or piece of tooling to fix or slightly modify. The micro tooling was tough to work with, not very durable and not very precise. Not willing to take the leap to larger shop equipment and tired of rebuilding machines with small motors and plastic gears, I found an interim range of machinery that begins life in useful form and remains reliable over the long haul. I’m just mentioning this because the equipment is low cost and it really expands horizons when it comes to home shop work associated with firearms.
Finally! The conclusion. I thought he’d never stop…

I apologize for my somewhat limited photography skills, but I think the picture to the right shows a little bit of how much these sights are illuminated by collected ambient light. The green – red combination is probably the best for contrast, although there are green front site options.
Straight Installation of the front and rear sight set takes about fifteen minutes and requires only $38 worth of parts, a hammer and a non marring punch. If trimming the width of the front sight is desirable, add a fine flat file and a little flat black touch up paint. If you are trying to hide in your work area for the afternoon, hand working the front hood, cross pinning and a baked on Teflon finish can be added with tools and appliances as indicated.
If you’d like to upgrade, but are not sure if you want to change the gun’s factory rear sight, or you wish to use a receiver mounted ghost or peep sight, you can still install a fiber optic front sight and benefit from a bright bead .
A nice aspect of these type of modifications is that they provides significant enhancement to the firearm’s performance, but they doesn’t dramatically alter the gun’s appearance. The Model 1895 pictured below now has FireSights to improve sighting, and upgraded finger lever for gloved hand cold weather hunting, a trigger that gives the gun a crisp, short 3 lb trigger pull and a Decelerator recoil pad to make shooting heavy .45-70 loads a non-punishing experience. The gun is faster, easier to shoot and aesthetically almost as traditional as the original.


Email Notification