Putting together an LR-308 from parts and subassemblies purchased through Brownells is an excellent project for anyone who is handy with tools, who can read simple instructions and feels comfortable around mechanical things. There is a great feeling of personal satisfaction that comes with the first round fired and a lot of fun for all those that follow.
The only wart on my LR-308 “Mona Lisa”, so to speak, was the trigger function. Pull was almost seven and one-half pounds and single stage. Travel was long, there was a good deal of creep and hammer fall was… molasses like. It seemed only natural to upgrade the trigger function so it would be on par with the rest of this very nice AR.
Brownells is an AR toy store. If it’s a quality piece made for an AR, they carry it in stock. Triggers are no exception. Brownells offers forty-nine different of triggers for AR type rifles, seventeen are sprung for the AR/LR .308 Winchester type guns, nine of which apply to the 0.154″ small trigger and hammer cross pin guns like the LR-308.
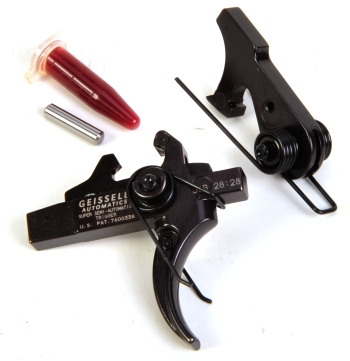
Geissele’s Hi-Speed SSA Trigger…
A trigger with a very light and adjustable pull was not quite right for my application. A trigger with more resistance, outside of competitive shooting, seemed as through it would be a little safer in rough handling. My objective was to get a good two stage trigger with four to four and one-half pounds of pull and minimal overtravel. In addition to improved trigger feel, cutting down on lock time with a lighter weight, heavier sprung hammer was high on my priority list. To that end, Brownells# 100-003-620, a Geissele’s Hi-Speed Super Semi-Automatic Trigger was selected, priced at $175. Fully adjustable service (Brownells# 100-003-614) and match (Brownells# 100-003-611) versions are also available for $279 when applicable.

The Geissele trigger has a number of useful features. The lightened hammer uses a full weight hammer spring, a combination that dramatically decreases lock time while assuring reliable ignition. The trigger incorporates a secondary or safety sear to trap the hammer in the event the primary sear releases due to harsh impact. If the trigger is not depressed the sear will not release the hammer. All contact surfaces are wire EDM cut, making them precise in dimension and tight in tolerance fit. All springs are prefit and captive for less small parts chasing during assembly/disassembly.
It looks good on the bench, but nicer in the rifle…
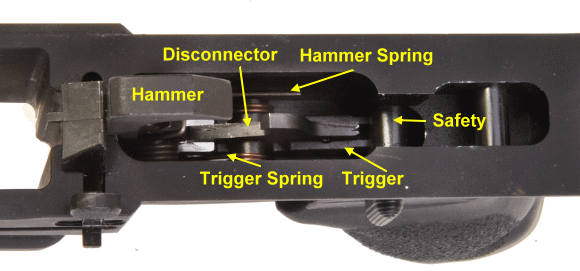
Despite my best efforts to make things look more complicated than they are, with the support of excessive labeling, changing out the trigger assembly in an AR is a simpler process than it is on most other types of firearms.
In preparation, a trigger change requires only separation of upper from lower receiver for parts access. Change out does not require removal of any other parts, including the safety. This trigger change was accomplished while the stock and extension tube were removed for other work. This disassembly was not required to facilitate the trigger change. That would be like removing an engine to facilitate and oil change.

The lower receiver is placed on its side on a fixture; in this case, a very expensive iWood #6. With a pin that is small enough to not eat the receiver around the pin hole, but not so small as to be bent into the letter “L” when struck, the hammer pin is wonked through the receiver with a tap-tap-tap size hammer. Next, the receiver is rotated up by the grip, as through looking into the mag well until a thunk is heard… which would be the hammer dropping out of the receiver and onto the bench. The same is repeated with the trigger pin, however it is a good idea to put a little thumb pressure on the disconnector so the parts will remain together as the assembly is removed from the receiver.

With the index finger placed at the back of the trigger and the thumb on the top of the trigger assembly, the trigger assembly is pulled forward and out from under the safety cross shaft and removed from the receiver.

The Geissele trigger has an integral secondary sear, protruding up from the trigger, pictured left. It is intended to trap the hammer in the event the gun is roughly handed or if the charging handle is released to follow the bolt while the trigger is depressed.
The Geissele trigger kit comes with parts preassembled and with a small vial of Mobile#28 aviation grease that is formulated for pressure contact surfaces. During assembly, the grease is used at the points indicated by red arrows and pin bores while pivot pins receive a light coat of gun oil.
The kit also includes a slave pin that is used to locate the disconnector to the trigger so both can be installed as an aligned assembly.
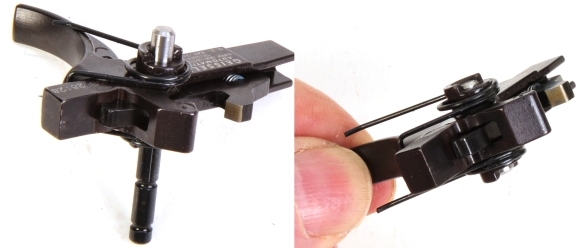
For installation of the trigger, the slave pin is pushed in, driving the longer trigger pin out. The slave pin is short enough to rest between the trigger’s pin bosses so the assembly can be dropped between the receiver’s rails.
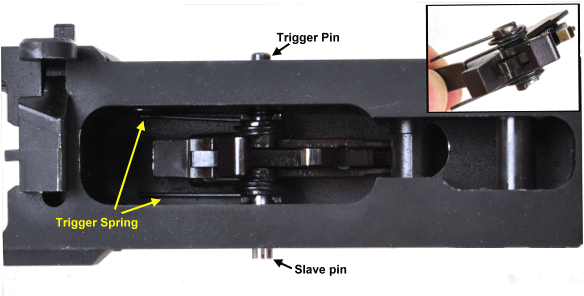
Inset – The trigger, with slave pin installed, is oriented with the spring cross loop under the sear and legs facing forward and lowered into the receiver with its aft end passing under the safety’s cross bar. Larger image – the trigger is wiggled around until the slave pin is visible through the pin hole in the side of the receiver, and then the trigger pin is pushed into place, non-grooved end first left to right, driving the slave pin out the other side. The trigger is ops checked by depressing the trigger and feeling/listening for any signs of binding.
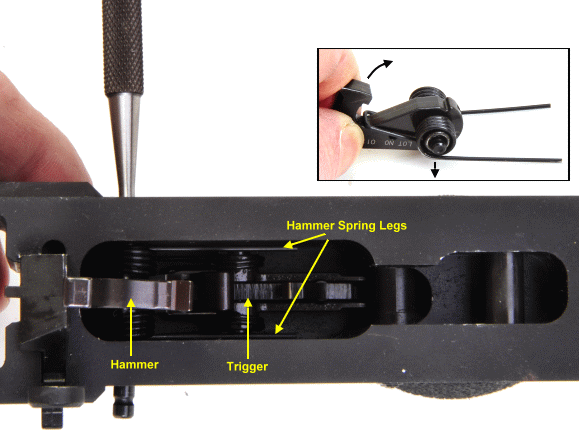
The hammer is an easy install if your thumb is in good shape. The hammer pin is removed from the new hammer prior to installation. No slave pin is required because the hammer pin passes through only one part. The hammer is oriented as it appears in the inset, with legs pointing aft. The legs are placed to overlap the trigger pin, then the hammer spring is deflected so the hammer can be pressed down between the receiver rails until a small punch can be inserted through the pin hole in the right side of the receiver and into the pin bore of the hammer.
The punch is used to move the hammer bore into alignment with the pin hole on the left side of the receiver, then the plain end of the hammer pin is fed through the left side of the receiver and into the hammer pin bore. When the punch is extracted to make way for the hammer pin, the hammer spring will torque the hammer pin bore upward out of alignment with the right side receiver pin hole. Usually, pushing the hammer to the right is enough to bring the pin into alignment with the receiver and the hammer pin can be pressed into place.

With the hammer springs properly oriented they will keep the trigger pin in place and the J Hook, the spring that passes through the center of the hammer and the hammer pin bore, will keep the hammer pin in place. The pins should be about flush on both sides of the receiver.
Finished… almost
Ops check is straight forward. The hammer is pushed aft until it engages the sear and locks in place. The safety is then switched on, the trigger is pulled and the hammer should not be released. The safety is switched off, a thumb is placed on the safety to dampen its movement to prevent damage to the frame, and the trigger is pulled. The hammer should release and rotate until the firing pin striking face is approximately perpendicular to the receiver. Finally, with the hammer still perpendicular, the safety off and the trigger depressed, the hammer is pushed aft into the cocked position. The trigger is then released and the hammer should be immediately captured by the secondary sear. With a thumb on the hammer to dampen its motion, the trigger is then depressed and this should release the hammer to the perpendicular position. If everything checks out, the upper receiver can be reinstalled and the gun manually cycled and dry fired to check completed gun actuation and to measure trigger pull.
My gun checked out with a 4.5 lb trigger pull, a very clean two stage with a crisp release. That shaved 3 lbs off of the original trigger assembly and all of the creep and virtually all of the over travel was gone. The LR-308 became easier to shoot at the range, but the difference was even more noticeable when doing some recreational shooting in a wooded area. The absence of a grating long pull was welcome. The first time done, this is a half hour to forty five minute job. After a couple of assembly cycles, it takes half that time.

Email Notification