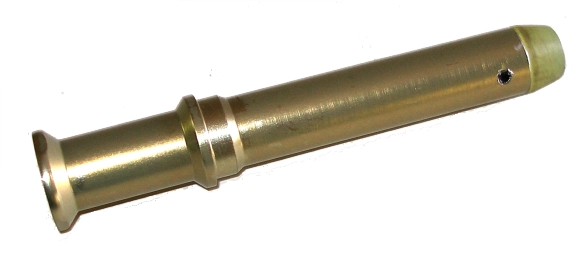
The first time I assembled an AR-10 from parts and subassemblies, I didn’t have a lot of AR-10 specific documentation and part and assembly descriptions didn’t provide all of the information required to make informed assembly decisions. When closing up, the A2 extension tube went on, as did the buffer retainer, buffer spring and buffer that were supplied as parts within an A2 completion kit. The Magpul stock went on without a hitch, the gun was looking pretty good, but it failed the mechanical ops check. The bolt carrier would not lock open, nor would it travel full open and pick up a round from the gun’s magazine. Never good signs.
A rookie mistake and it was then that I discovered an AR-15 .223 Remington type buffer is approximately 5 7/8″ (5.875″) long and weighs 5.2 ounces, while an AR-10 .308 Winchester type buffer is 5 3/16″ (5.188″) long and weighs 5.4 ounces… and I was not going to be able to put a 5.875″ peg into a 5.188″ hole. I had AR-15 buffers in the shop, no standard AR-10 buffers could be found in stock anywhere and, even if they were available, I didn’t want days to shoot the new rifle. so I decided to take a crack at making an AR-10 from the AR-15 part, or at least end up with a heck of a paperweight.
The inner workings of a buffer, or… What the heck is all this stuff?

The purpose of the buffer is to dampen the motion of the bolt carrier and to compress the recoil spring and load it for return. Knocking out the roll pin from the buffer liberates the plastic tip, the anodized aluminum spacer, five tungsten weights and the poly pads that separate each. The buffer itself is anodized aluminum with a main tube O.D. of 0.686″ with an I.D. of 0.569″. The weights and spacer have an O.D. of 0.547″, The spacer has an I.D. of 0.310″, the weights are solid, as are the between weight pads. Why tungsten and not lead? Because men are no longer men and, somehow, the idea of using lead and growing a third ear or letting a few surplus brain cells wander off is enough to put them in a tizzy… a 1937 Tizzy. A convertible I believe. Wasn’t there a window in this room?

After pulling the plastic end cap and emptying out the contents, approximately 0.687″ needs to be.. whacked from the end of the tube. I say “approximately, because a little more won’t hurt, however, a little less could lead to cycling problems. This buffer was chopped with a hacksaw, then face finished on a lathe. What can I say, when you have a lathe, you have to use it, or people ask why it’s so clean… and then they’ll snort, as though no one has ever asked the question before. The buffer was reassembled after that initial cut to show the resulting issues that need to be addressed after buffer length reduction. As an example, with the end cut off the buffer tube, the once recessed spacer can be seen peeking out of the end. The spacer needs to be trimmed back. Then there is the issue of the buffer beginning life at five and two tenths ounces, two tenths shy of the AR-10 part, then losing another tenth when it is trimmed to the shorter length, then losing another tenth when the spacer is proportionally trimmed back. Ultimately, four tenth ounces more weight must be packed into a smaller space.
Use whatever tools are available…

The first time I attempted this modification, I chucked the spacer into the lathe, removed material and filled the open space in the buffer tube with lead until I got to the correct weight. As a bullet caster, I have lead at the shop and some friends in local construction occasionally drop off old lead flashing collected during demolition. At 0.050″ thick, half inch slugs were cut out with a shim punch, each adding one tenth ounce of weight to the buffer assembly until the spacer was reduced to one half inch and the sum of all parts equaled five and four tenths ounces. The was lead dead soft so wouldn’t bounce around much in the assembly when the gun was fired and it was quiet in operation.

The final step was to center and cross drill the end of the buffer with a 0.120″ drill to accommodate the plastic tip’s locating roll pin and to clean up any remaining burrs. The finished length was 5.150″ overall, weight was five and four tenths ounces and it ops checked and fired without a problem.
Conclusion
This was, of course, actually the beginning of a series of projects. The first unit took four hours, much of which was head scratching. No, thinking, not psoriasis. The next took forty five minutes at a reasonable pace, but with a little more experience and knowledge. Several buffers have been constructed with varying weights and spring combinations to suit certain types of light and heavy handloads. Some with different fill substances have done a better job of dampening harmonics and recoil.
In subsequent efforts, I’ve taken both buffer tube and spacer down to correct dimensions with a belt sander, I’ve used .45 caliber bullets in place of tungsten and lead slugs and I have poured molten lead alloy directly into the tube for a tight fit in place of other multi part weights. All part of what makes working on firearms interesting and the source of ongoing education.

Email Notification