My personal theory, and I have lots of theories, is that firearms have filled the void for many automotive enthusiasts who can no longer participate in automotive racing. Even just a decade ago, a couple thousand dollars would be enough to put together a streetable bracket racer, with much of the labor supplied by the owner/driver. That’s what made some types of auto racing interesting; a test of technical skills, a fast car and a set of timing lights to objectively measure success, or the lack of the same. Recently, when I worked through the costs associated with building a big block late model Mustang bracket racer, just a rolling chassis worked out to about the cost of a new Shelby GT Mustang. Brownells will have to remain my favorite speed shop.
In order to get there, you need to know where’s… “here”
 It’s always a lot easier to improve firearm performance if no attempt is made to baseline its initial performance. Many a gun owner has torqued, tweaked and barrel channel shaved a gun to shoot 1″ groups, not knowing if the same gun might have shot ½” groups right out of the box.
The best way to navigate through change; find the good ones, and discard the bad before change gets too… wasteful, is to test the subject gun before it is modified. All that is needed is a method that will provide a basis for comparison after each firearm modification is performed. Apple to tangerine comparisons are probably good enough, apple to banana comparisons probably are not. So to begin at the proper beginning for this project…
| Brand | Type | Bullet Weight Grains |
Advertised Velocity FPS |
$’s per 100 Rds |
3Shot Group Inches |
| Remington | SubSonic | 38 | 1050 | 7.98 | 0.6 |
| Remington | Eley Target | 40 | 1085 | 17.98 | 0.2 |
| CCI | Mini Mag | 40 | 1235 | 6.99 | 0.9 |
| Federal | Game-Shok | 40 | 1240 | 6.99 | 0.3 |
| Peters* | Solid Point | 40 | 1255 | – | 0.4 |
| Winchester | SS Round Nose | 40 | 1300 | 6.99 | 0.4 |
| Remington | Yellow Jacket | 33 | 1500 | 7.99 | 0.8 |
| Winchester | TIN Hollow Point | 26 | 1650 | 7.99 | 1.0 |
| *New old stock | |||||
Eight types of .22 Long Rifle ammunition were selected, a 4.5-30×50 Bushnell Elite 6500 scope was mounted on the 10/22 and the range was set up for a continuous session 25 yard shoot. The distance was kept short to minimize outside influences like wind and terrain, or earth wind and fire… or my shooting skills. No attempt was made to interpret the results, as there was no understanding of the contributing factors. So not good or bad, just some controlled data for future reference.
I don’t know all sorts of things…
The days I shoot the best are the days when I am relaxed, the gun feels comfortable and the gun’s sights seems to naturally fall into place on the target. Makes sense. That’s why shooters routinely rework triggers, sights and grips. None of these areas need work to function, they need work to make the gun’s operation seem more natural… comfortable and controllable to the shooter. Modifications intended to enhance shooter comfort are typically the first accomplished with the goal of improving accuracy.
Two problem areas stood out during initial shooting sessions with the Ruger 10/22. There was an inability to position the scope along the Ruger supplied Picatinny rail for proper eye position when shooting from the bench. No matter how I adjusted scope and mount rings, it seemed I was either too far away or on top of the eye piece. The next issue was the height of the stock at the comb. Too much drop at the heel set a comb angle that left my head unsupported… which is a major problem, as I have a giant noggin which, when left unsupported, eventually begins to list to one side, taking bullet point of impact in the same general direction.
 Not knowing much… nothing, about the Ruger 10/22’s mechanical design, it seemed a good time to gain a little knowledge. Yes, the type that can be a dangerous thing.
Because the 10/22 has been out there for so long, and because a number of what were considered aftermarket enhancements have been incorporated into the factory gun over the years, many of the books available on the subject are essentially obsolete. Two of the best sources of useful information are Power Custom’s disassembly and reassembly guide, which includes part nomenclature and theory of operation detail – Brownells # 713-000-069 and James and Kathleen House’s 2006 revised edition of Customize the Ruger® 10/22 – Brownells # 491-000-020
Take a ride on the Picatinny Railroad. I think that’s in New Jersey

The scope positioning solution was technically simple, falling domino like in execution and packed full of mind numbing minutia in detail.
The original scope and Ruger mount set up, due to a low base height, limited number of base cross slot positions and short scope tube length, left the Ruger 10/22 with a scope mounted too low and too far forward.
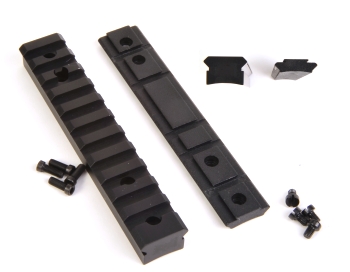
The ¼” high Ruger factory base was swapped for a ½” high Weigand Combat Tactical Picatinny Mount. (Brownells # 957-000-067 $19.95). The slot count went from five to twelve.
Unfortunately, the original scope I had selected has a relatively short tube, which limited fore and aft adjustment even with the additional base slots. I rummaged around in my… vintage scope inventory and found a longer tube Burris 4-16x44mm. Originally at home on a .257 Weatherby Ultra light, it is a very solid scope with ¼ MOA incremental adjustment, adjustable objective lens for parallax correction, Posi-Lock to assure settings stay put, and an aperture to control ambient light entering the scope. Yes, it has an electro dot reticle, but it hasn’t seen a battery in years.

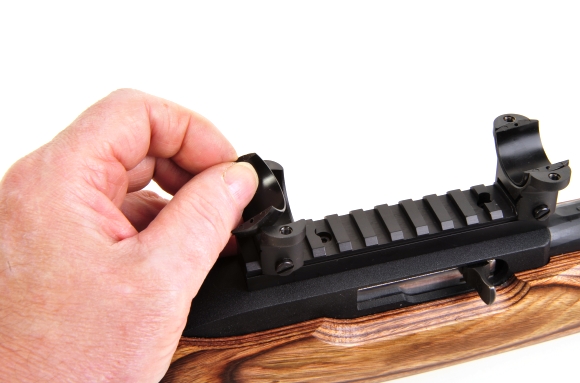
Scopes don’t always plop in place so that they are on target with windage and elevation settings in mechanically neutral positions. Consequently, when the scope is adjusted to print properly on target, there is a reduction in potential adjustment and, sometimes, shifts in point of impact get less predictable at the outer ranges of adjustment. Elevation is usually taken care of with minor shimming of bases, while windage adjustment usually requires a base with adjustment capabilities. Another solution is to use Burris Signature rings with Posi-Align inserts as they appear above. With offsets of +/- 0.005″, 0.010″ and 0.020″, with a little patience it is possible to line up a scope almost dead center with neutral mechanical scope adjustment. The degree of shift at 100 yards is the value of the offset expressed as whole inches (i.e. 0.005 shift results in a 5″ shift at 100 yards).

The combination of medium height Burris steel Signature Zee rings and Weigand base placed the centerline of the scope at 1.460″ above the Ruger’s receiver, compared to the 1.120″ height of the original setup.
Yeah, yeah. Blah, blah, blah… How did it shoot?

| Brand | Type | Bullet Weight Grains |
Advertised Velocity FPS |
$’s per 100 Rds |
3Shot Group Inches |
|
| Before | After | |||||
| Remington | SubSonic | 38 | 1050 | 7.98 | 0.6 | 0.2 |
| Remington | Eley Target | 40 | 1085 | 17.98 | 0.2 | 0.2 |
| CCI | Mini Mag | 40 | 1235 | 6.99 | 0.9 | 0.3 |
| Federal | Game-Shok | 40 | 1240 | 6.99 | 0.3 | 0.3 |
| Peters* | Solid Point | 40 | 1255 | – | 0.4 | 0.4 |
| Winchester | SS RN | 40 | 1300 | 6.99 | 0.4 | 0.3 |
| Remington | Yellow Jacket | 33 | 1500 | 7.99 | 0.8 | 0.3 |
| Winchester | TIN HP | 26 | 1650 | 7.99 | 1.0 | 0.4 |
| *New old stock | ||||||
The change at even twenty five yards was dramatic where large grouping ammo from the first shoot tightened up considerably. The only change made was done to make the rifle more comfortable to shoot. The balance of the ammo remained approximately the same in terms of group sizes.
While head and eye position was greatly improved, just by juggling mount and scope heights until the hold was much more natural, there remained the issue of the lack of support at the stock’s comb, which created more of a burden by forcing me to concentrate and focus more with each shot. My next step is to do some measuring, check the geometry of some popular stocks, and see if I can come up with a configuration that will provide better support.
It is also probably time to move out to fifty yards as with these smaller group sizes, twenty five yard improvements may be too small to be significant. When I shot the twenty five yard groups I also shot at fifty yards so all of the base data is there for future comparisons.

Email Notification