
My current long term project rifle, slated for major overhaul, is a Remington 799 Mini Mauser. The Models 798 and 799 were imported from the manufacturer in Serbia as barreled actions and fitted with a laminated stock by Remington in Mayfield, Kentucky. Remington offered this product from 2006-2008. Prior to Remington’s importation, the same basic hardware had been offered for an extended period of time under both the Interarms and the Charles Daly brand names.
One of the check list items for the Remington was to reduce its weight. At 6 ¾ pounds for this tiny Mauser, it was hardly a lightweight and my future goal was to have a gun in the mid 5 pound range, chambered for the .500 Jeffery. Yes, I am kidding. The goal was 5 ¾ pounds. I had considered gutting the laminated stock, but I didn’t like the aesthetics of the stock, or its geometry, or its algebra for that matter.
Bell & Carlson’s Carbelite Stock

Brownells lists a Bell & Carlson’s Carbelite synthetic stock for the Mini Mauser, # 137-000-004, with a price of approximately $209. The Carbelite construction is a hand-layered composition of Kevlar, fiberglass, and graphite that is high strength, light weight and unaffected by changes in weather and humidity. The Mini Mauser model is listed at 29 ounces. The example pictured weighed 28 ounces as received, compared to 44 ounces for the factory laminate stock, a full pound less, or 5 ¾ pounds compared to 6 ¾ pounds.
Remove and replace…
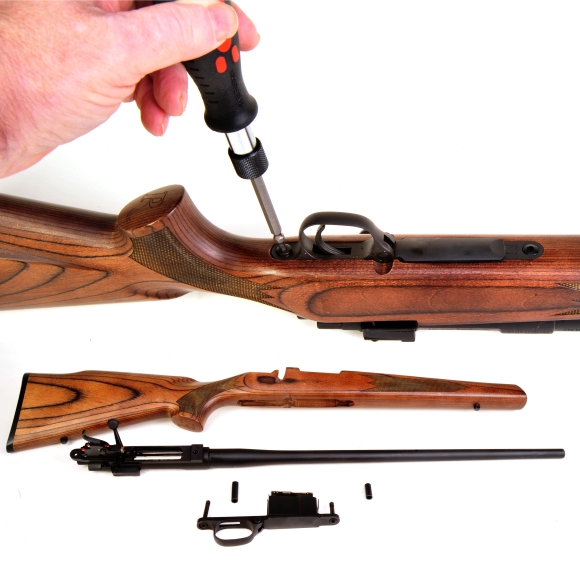
The Remington Model 799 is disassembled by checking for empty, then removing the two trigger guard assembly screws. The rifle breaks down to stock, barreled action trigger guard and magazine box and front and rear guard spacers.
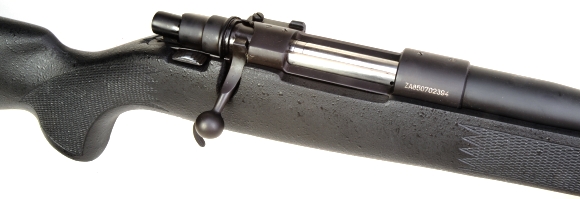
As a trial fit, the barreled action was eased into the stock with no signs of binding. The barrel channel seams were minimal and uniformly straight tracking well to the stock barrel’s contour. The safety and bolt handle both moved freely as did the bolt release latch. Again, this was a trial fit and the action was not drawn down with the trigger guard assembly. The bottom metal wasn’t quite as drop-in as the guard assembly and would not fit flush in the inletting. A little light thumb pressure marked the contact points on the stock as seen below.
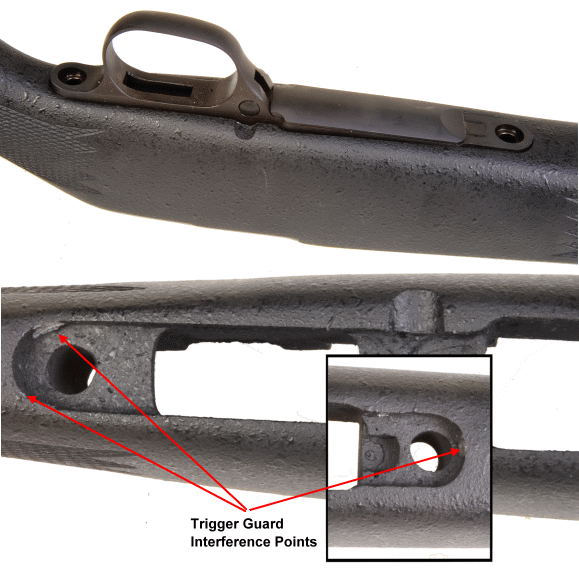
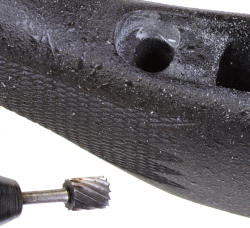
All that was required was to introduce the stock to Mr. Dremel and his associate Rotary File. While the stock’s material is very strong for its purpose, it is also easy to shape and finish with very little effort. Sort of like the glass bottom boat I unintentionally made one summer, that began as a straight forward fiberglass boat restoration project… another story, another time.
Using the flat bottom rotary file allowed me to get the right contour to conform with the trigger guard, and it also allowed me to take the cut down in a controlled fashion until it was level with the rest of the inletting. After this was done, the trigger guard assembly dropped right in, flush with the stock and tight all the way around the edges. Yes, I did have the RPM set to maximum. Thank you for asking.
Stuck on the thorns… No, make that “horns” of a dilemma…
This step isn’t required. The factory trigger guard assembly spacers were too long for the Bell & Carlson stock. Length is checked by installing the barreled action, holding it securely and level, then dropping in the spacers from the bottom of the stock and checked. The measurement cannot be taken without the action in place because the spacer actually sits higher than the stock on the top side, so it needs the action in place for proper orientation.
Measured with the depth gauge end of a digital caliper, the front spacer was 0.075″ too long, the rear 0.040″ too long. Additionally, the aft hole in the Carbelite stock was a tad egg shaped so the spacer, regardless length would not center over the hole in the action. The stock went on fine and without attention in this area as long as spacers were not installed.

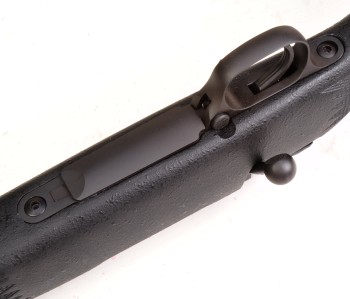 I checked in with Bell & Carlson and was told the spacers may be omitted as they were not required with the stock. Unfortunately, I am a bone head who doesn’t like the idea of tightening a trigger guard and action against relatively soft stock surfaces.
I chucked the spacers in the lathe, any excuse to use the lathe, and faced them to the proper length. I could have just as easily taken them down with a bent sander, but I look so incredibly skilled when I pretend to know how to use a lathe.
To clean up the out of round problem with the aft stock hole, I used a 6″x5/32″ round file, Brownells #191-000-004, removing very little and checking progress a lot. Personally, I like this step of including the spacers. The stock is secured without being overly compressed. The spacers set the vertical height and the trigger guard assembly and barreled action inletting control fore and aft movement. It all looked pretty clean and hinged floorplate and floorplate release latch worked properly.
This step was necessary…
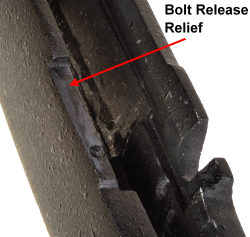
With the action and guard assembly installed and tightened down to 45 in/lbs, the forward end of the bolt release lever dragged on the stock. A little mill file work cleared the end and a drop of gun oil put the color back into the stock.
Finally, the gun was ops checked, including safety function, bolt release and floorplate operation. Because the trigger guard spacers were shortened, the fasteners were checked to make sure the front didn’t bottom out before the stock was clamped and the aft fastener didn’t protrude into the bolt track at the aft end of the action. All checked OK. The fit was at least as clean as the factory stock, the gun’s accuracy improved and it’s weight dropped to 5¾ pounds.
Finished product…

An hour well spent, including the optional spacer modification step. Fun project, easy to complete and the gun came out looking much better than it did going into the project. More modifications to this gun on the horizon.


Email Notification