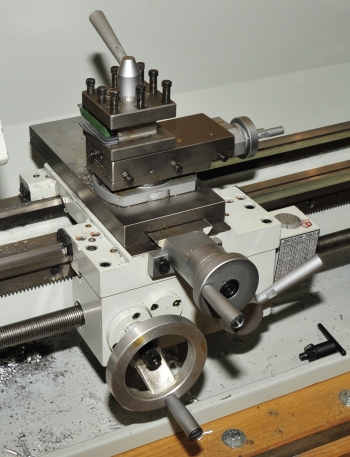
If you remain a firearm enthusiast for an extended period of time, you will eventually get to a point where you will want to fabricate parts. This conclusion will typically manifest itself in the form of a bench top lathe and/or milling machine.
As a proud owner of new machinery, you’ll get them cleaned up and bolted down in your shop. You’ll push the power control buttons on and off a few times then quickly realize that you may not know know how to do anything else. This will be a defining point in the man – machine relationship, as the next step will lead to either a quick resale of the equipment on eBay, at ten cents in revenue for ten dollars worth of expenditure, or it will mark the beginning of a long journey into darkness as you attempt to gain operator proficiency… or possibly find an ivory trader named Kurtz.My first fabricating equipment was comprised of a micro cast aluminum lathe and similar milling machine. They held a production tolerance of +/- one foot so I wasn’t able to make much of anything. Additionally, these little guys were always shredding plastic gears or popping their little 0.001 HP motors and controller boards. After eighteen months of constant cycles of failure and repair, waiting for parts, and only infrequently being able to work on an actual project, I dumped the machines. Fortunately, most of the supporting tools and accessories purchased for the small machines carried over to the
upgraded machinery, a
Lathemaster 9 x 30 Lathe and a Lathemaster MT25L bench top milling machine.
Weighing three hundred and thirty and two hundred and eighty pounds respectively, the cast iron frames on these machines stay put and the weight does a good job of dampening what is often accuracy robbing vibration. Both machines are capable of good precision and their larger tool and work capacities open the door to more advanced operations. The best part? They don’t break, at all, but if questions arise Lathemaster provides excellent customer service. I am a hack machinist, self taught and lacking in any real finesse. By taking machine deficiencies out of the operating equation, I’ve been able to learn more quickly, A great deal of satisfaction has been found in being able to design parts and tooling and then making them a reality.
Confessions of a quick change tool post…
Even with the new equipment, frequent tooling set ups were sometimes quite a chore, which discouraged me from taking on more complicated projects. Shimming in the factory tool head was imprecise and tools would move about. Occasionally I’d end up with a cutting edge above centerline with the eye tearing stench of burning cutting oil setting off the shop smoke alarm. I probably would have kept going and eventually mastered the tool set up process but, at the urging of everyone else who works with me, I decided to pop for a quick change tool post and simplify my life.
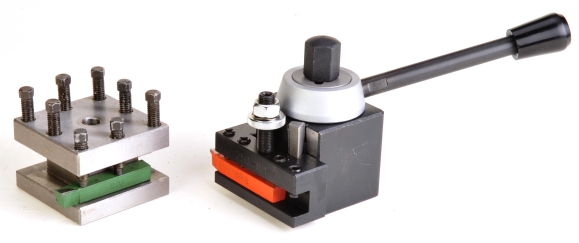
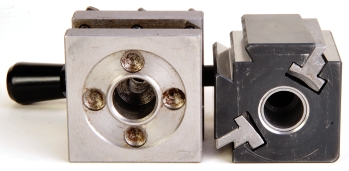
The standard tool post, left, has four tool positions, Vertical tool height is controlled through shimming. The wedge type quick change tool post has two tool positions, but an unlimited number of tool holders may be set up in advance and… quickly changed. Where tools are changed on the conventional tool head by loosening locking fasteners and setting up a new tool with shims, once a tool holder is set up for the quick change tool post, the post’s quick release lever is moved to relax the grip on the tool holder, the tool holder is slipped off and the new tool holder selection is slipped into location and locked in place with the . The quick release handle is moved to the locked position when . It took me approximately ten minutes to set up a tool or make a change with the conventional tool holder. It takes approximately ten seconds to make a change with the quick change tool post and I can have as many preconfigured tool holders staged as I choose.
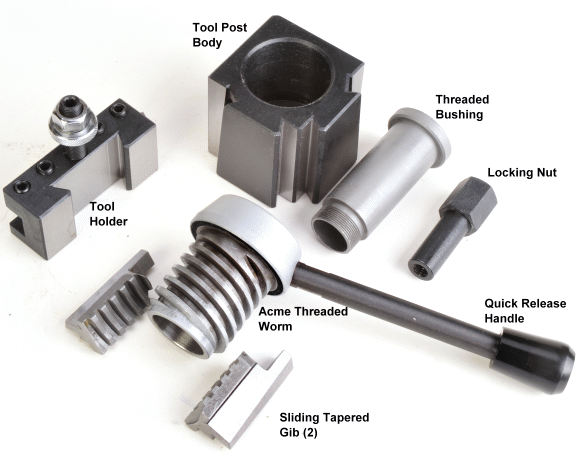
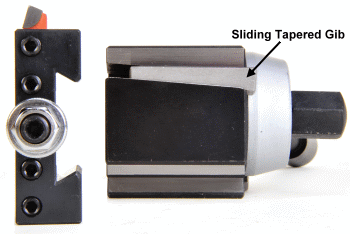
Just to make sure I really beat this horse into a pony, the quick release handle on the tool post moves the tapered gib up and down when mounted on the lathe (right and left in this picture). Moving left would cause the gib to climb the dovetail on the tool post body, expanding it inside of the dovetail slot in the tool holder and locking the tool holder in place.
This is an example of a wedge type quick change tool post, AXA size, which is applicable to lathes with approximately a 6″ – 12″ swing; tool holder range of travel must permit proper vertical tool placement.
Wedge, V and piston are the most popular types of quick change tool posts. All descriptions are a reference to how the tool holders are secured to the tool post body. Sizes run from micro lathe to those with greater than a 24″ swing with each increment in size getting more complicated and more expensive. The wedge type is the most common for micro and mini (bench top) equipment.
The Lathemaster quick change tool holder
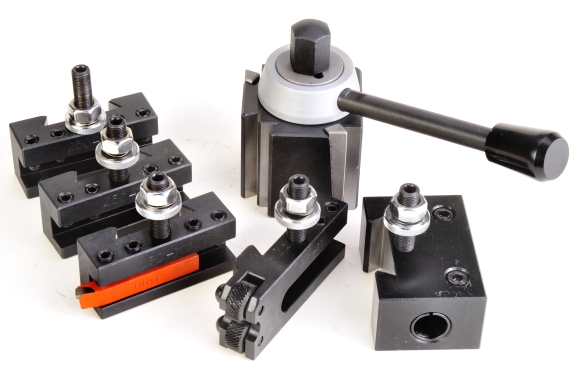
Priced at $169, Lathemaster #QC814 is more than competitive in price and backed by real customer service. The kit is listed as including two #101 tool holders, one #102 holder, a combination knurling tool and cut off tool holder, and a boring bar holder that is bushed to accept 5/8″ and 3/4″ boring tools. tool holder capacity for the #101 and #102 holders is 1/2″. The kit I received came with three #101 tool holders and no #102 tool holder which better suits my preferences, although I am sure I could have called Lathemaster and swapped the pieces out. A #102 holder is the same as a #101 holder, except the #102 has a “V” groove cut in the bottom of the tool slot so it could be used as a combo tool and accommodate a boring bar and other round profile tools. Since I do not use holders for these unique purposes, I preferred having an extra solid bottom holder. The kit also includes a mounting bolt and base to secure the quick change holder to a lathe with a T Slot type mounting.
The only hitch I encountered is common when working with imported micro and bench top equipment. Sometimes parts change on one piece of equipment and everyone else isn’t advised. Subsequently, when you read the description of quick change tool post on most sites you’ll find footnotes or annotation that advise to check the mount stud thread or slide boss for compatibility or rework..
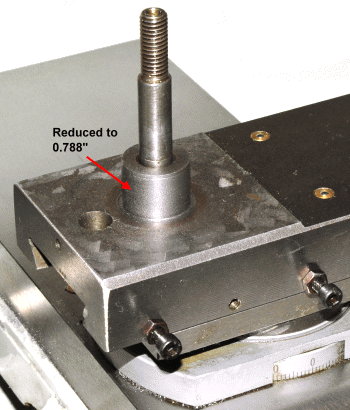
In the case of our shop lathe and the quick change tool post, the boss that locates the tool post to the lathe’s slide was oversize, approximately 0.860″ for the boss diameter and 0.790″ center hole on the tool post. Lathemaster customer service assisted in sorting this all out and getting me to the right match of boss and tool post. Again, one of the benefits of buying equipment from someone who has an operating machine shop and actually knows the equipment they are shipping to customers.
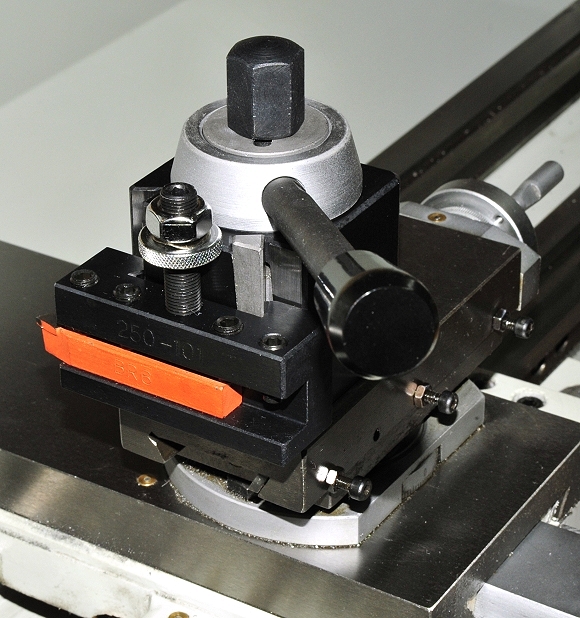
With the boss reduced 0.070″, the original tool post would no longer fit, which is not a problem as I could think of no occasion or task that would require its use. However, making a bushing to adapt it to the new boss dimension does seem like a good practice turning project, so that is now on the list of things to do. The quick change post dropped right in place.
Up and running…
The lathe is easier to use and the quick change accessory contributed to improving the quality of lathe output. I’m still a hack machinist, but this was a good learning experience. The quick change tool post was added in advance of a gunsmithing project that will require a little bit more in the way of finesse, so this change will definitely help. I guess the easiest was to tell if you’ve purchased the right equipment is if it sees constant use, or if it is gathering dust. No dust here.
 If you remain a firearm enthusiast for an extended period of time, you will eventually get to a point where you will want to fabricate parts. This conclusion will typically manifest itself in the form of a bench top lathe and/or milling machine.


 In the case of our shop lathe and the quick change tool post, the boss that locates the tool post to the lathe’s slide was oversize, approximately 0.860″ for the boss diameter and 0.790″ center hole on the tool post. Lathemaster customer service assisted in sorting this all out and getting me to the right match of boss and tool post. Again, one of the benefits of buying equipment from someone who has an operating machine shop and actually knows the equipment they are shipping to customers.

Email Notification