
My interest in a bolt action buildup project, based upon the Remington Model 700 action, came after reading related DIY articles on the Brownells web site. Authored by Brownell’s technical staff, the information is well written, detailed and illustrated.
Where some of DIY material references use of a lathe and machine tools appropriate for a commercial gunsmith, Brownells also offers low cost precision hand tools that will accomplish many of the same tasks. The first installment of this series addressed beginning prep of the Remington action, bolt lapping. This installment moves onto the second step in the preparation sequence, receiver facing, again, using precision, but low cost hand tools.
As a firearm enthusiast, this process is helping me to produce rifles to my preferences, creating an opportunity for me to learn how to assemble a rifle correctly from piece parts and to develop a better understanding of the firearm design’s causes and effects. In short, a learning opportunity for an amateur… like me. If nothing else, it helps reduce the number of times I have a puzzled look on my face when discussing firearms with a skilled gunsmith.
It’s sort of like making a recoil lug sandwich… but without mayo

Three parts that need to fit together properly when assembled, the receiver, the barrel lug or barrel bracket in Remington nomenclature and the barrel. Each part has a flat clamping surface that is intended to be parallel to the adjacent part. When surfaces are not parallel, and a barrel is torqued into place, stress or strain loading is not uniform. There is physical misalignment; the barrel’s bore, the cartridge and bolt face are not squared to the same centerline and disrupted patterns of vibration develop when the firearm is discharged. As a result, groups scatter and accuracy is generally poor.
Rather than make an unqualified attempt at explaining the underlying theory, I can say that whenever traditional inaccuracy quick fixes; cleaning up irregular stock contact, tightening loose fasteners, removing pressure spots in inletting don’t correct the problem, having the action trued by a gunsmith succeeded. Where there was no chronic inaccuracy problem, having the action trued still tightened groups and significantly improved long range accuracy. In this case, these finesse steps are being incorporated into the initial build. The objective of Part II of this project is to square and face the receiver to its barrel threads and centerline so that loading is uniform against the recoil lug and concentric to the barrel’s threads and bore.
Brownells… the home of nifty tools
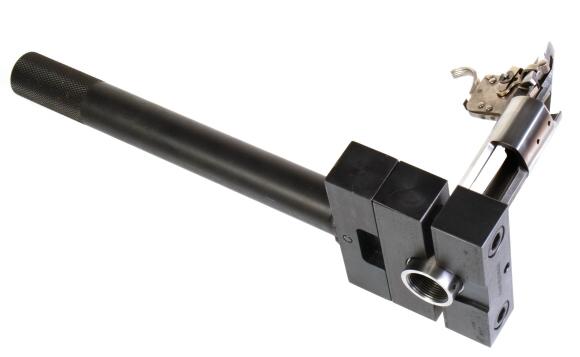
Rifle actions are fragile, regardless manufacturer. Unless the subject gun is intended to shoot cartridges with an oval profile, a safe means of securing the work piece is essential. Pictured above is a Brownells action wrench handle # 080-800-900. It is adapted to just about any type of action with interchangeable wrench heads; in this case # 080-801-700 for Remington Model 700 actions. This set ran about $150 complete. Other interchangeable heads run approximately $50 each. Since no major force is applied during this rework, a plumber’s vise with V set and protected jaws can also be used with care, but the cost of the two tools is very similar. I did try holding the action in one hand and operating the cutter with the other, but the result was chatter and uneven applied pressure.
Where there is access to a lathe, a mandrel like Brownells 080-098-700 “700” Facing Mandrel would typically be used to mount the receiver centered and squared in the lathe and the facing would be done with conventional lathe cutting tools. At approximately $86, it isn’t the cost of the mandrel that is prohibitive, but rather the $5,000 lathe and years of craft training required to make it useful. Brownells offers a manual face cutter that is centered to the receiver with a pilot. Available in a number of configurations to accommodate actions of different manufacture and design, the Model 700 Remington configuration is Brownells # 080-000-194 1½” face cutter, Brownells # 080-000-197 0.700″ Receiver Facing Pilot and Brownells # 080-589-000 1/4″-20 thread Facing & Chamfering Tool Handle. The total cost is approximately $110.
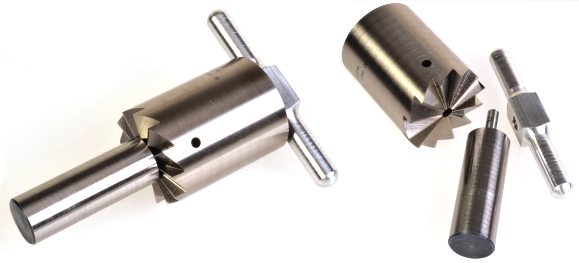
Nice tooling and very easy to use. It has twelve, 90° flutes for more uniform application of pressure and smooth cutting when driven with the T-Handle, shown above, or with an optional Drill Chuck Adapter, Brownells # 080-962-000. For the minor amount of material that needed to be removed, and at the peril of turning a short action into an incredibly short action, I went for the T Handle drive. I know where I get into trouble and too much horsepower will do it every time.
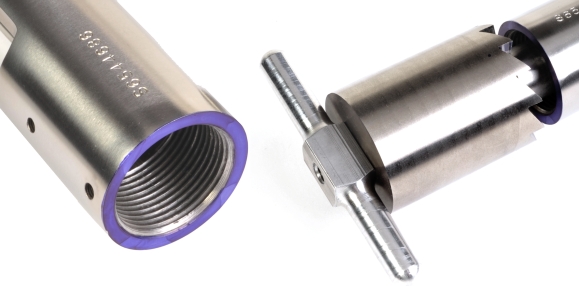
With all assemblies removed from the receiver, its face is coated with DYKEM layout fluid. The cutter pilot is then inserted into the receiver, very light pressure is applied and the T handle is rotated a few times before the cutter is withdrawn and the DYKEM is checked for contact patterns.
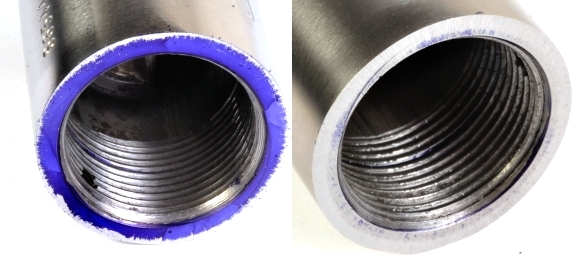
A few turns and it became obvious that the outside edge of the receiver’s face was high, to varying degrees, around the circumference. The pattern also suggested that the face was not square to the centerline of the action. After approximately ten turns of the cutter the DYKEM was mostly gone, however, some light tool marks remained. The marks were there before cutting began or they would not appear as DYKEM filled. The Brownells cutter was doing a proper job.
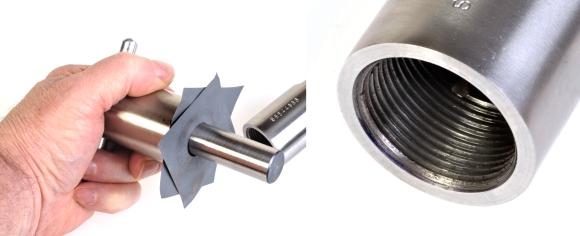
Approximately ten more turns later, the facing was done and a DYKEM check showed uniform contact, I hole punched a couple of squares of 400 grit wet or dry, slipped them over the facing cutter’s pilot and oil sanded the receiver face’s surface to remove any remaining minor tool marks. The cutter’s blades were pressed against the paper side so they were not exposed to abrasive compound and the thin sheets of wet or dry paper were held perfectly flat against the receiver’s face so there was no inadvertent contouring of surfaces. Finished product, above right.
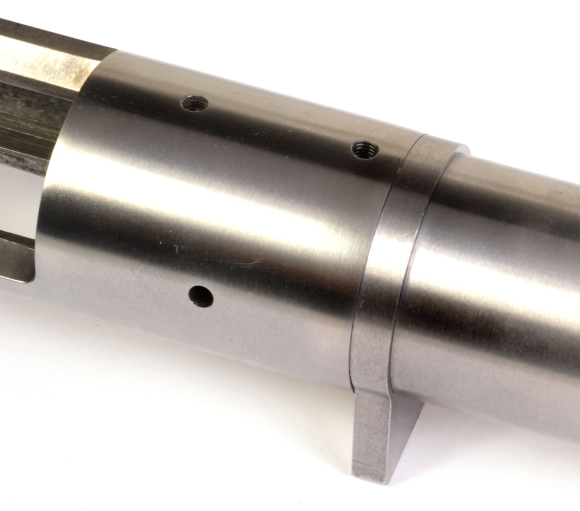
With the receiver, recoil lug and barrel trial assembled, the fit is pretty clean. I was a little surprised by the degree and location of material removed from the receiver’s face. Before cutting, I measured the span of the front receiver ring between the ejection port and the receiver face, in line with the scope base holes. A second measurement was also taken 180° from the first measurement, feed port to receiver face, at the receiver’s bottom fastener hole; 1.6115″ and 1.5890″ respectively. After facing, those measurements were, respectively 1.6110″ and 1.5860″ which put the original piece 0.003″ out of square with the receiver’s centerline. Seems like a small number but, at this location, this would impose an irregular load on the gun’s barrel and it might even cause some distortion of the action when the barrel was torqued into place.
Closing comment
This is a really enjoyable project. I’m learning a lot, gaining experience and the subject rifle already represents something special to me… because it is something I’m doing. The hand tools that are being accumulated will allow me to expand my work with other firearms and allow me to take on projects I couldn’t take on previously. Bolt face squaring is next up.
A Remington Rifle Build – Unplugged Part I
A Remington Rifle Build – Unplugged Part II
A Remington Rifle Build – Unplugged Part III
A Remington Rifle Build – Unplugged Part IV
A Remington Rifle Build – Unplugged Part V
A Remington Rifle Build – Unplugged Part VI

Email Notification