 This last step in the sequence of action truing with precision hand tools is bolt face truing; squaring and aligning the bolt face to the longitudinal axis of the receiver.
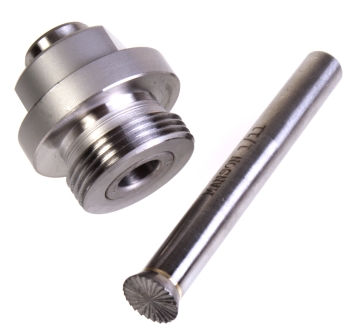
Pictured, far left, is a Dave Manson Precision tooling block that mounts in the barrel threads of the Remington Model 700 receiver. To its right, a bolt facing burr. The tooling block is fitted with a hardened drill bushing and the face burr is carbide. The Brownells #’s are, respectively, 513-000-008 and 513-000-011 (Burr for 308 Winchester case head size cartridges). In addition to these tools, a means to secure the work piece in a horizontal position is needed and an electric driver with a rotational speed of approximately 150 RPM to drive the burr.
In preparation for facing, the bolt must be disassembled. In this case, a Sinclair firing pin removal tool, Brownells #988-000-004, was used to remove the firing pin and mainspring, pictured below. Bottom left panel, the riveted extractor is left in place throughout the rework process, however, the pinned ejector plunger is removed.
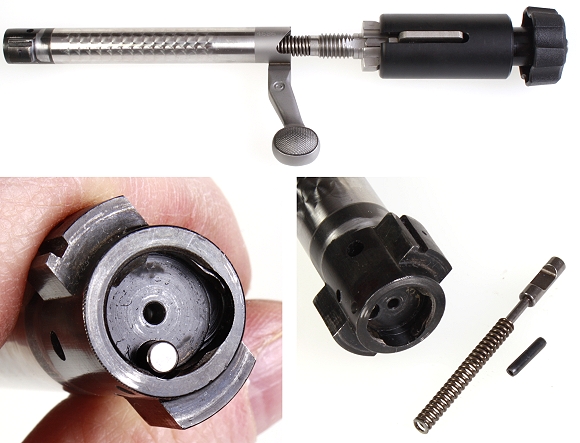
Basically, ejector removal requires the use of a Mithumb tool to depress the plunger and hold it in place while a small hammer is used to tap out the retaining roll pin with an appropriate size punch. For those who don’t enjoy crawling around under a work bench with a flashlight and magnet looking for errantly distributed spring loaded parts, Brownells # 988-000-005 Ejector Compressor Tool, might ease the pain.
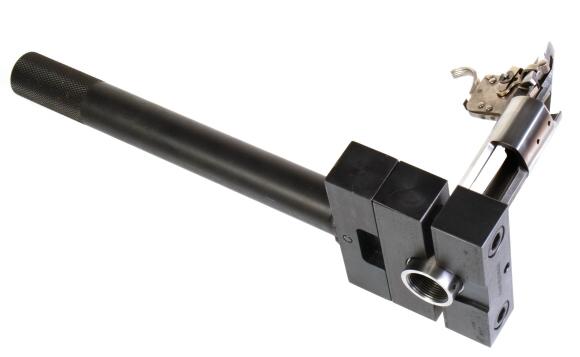
Rifle actions are fragile, regardless manufacturer. Unless the subject gun is intended to shoot cartridges with an oval profile, a safe means of securing the work piece is essential. Pictured above is a Brownells action wrench handle # 080-800-900. It is adapted to just about any type of action with interchangeable wrench heads; in this case # 080-801-700 for Remington Model 700 actions. This set ran about $150 complete. Other interchangeable heads run approximately $50 each.
Since no major force is applied during this rework, a plumber’s vise with V set and protected jaws or even a bench vise with protected jaws could be used with care, but the cost of any of these tools is similar. I did try holding the action in one hand and operating the cutter with the other, but the result was chatter and unevenly applied pressure.
Tool set up…
The bolt’s face is coated with DYKEM, coated with oil when the DYKEM dries, then the burr is slipped under the bolt’s extractor inserted into the bolt face. The idea is to get the burr’s cutting face against the bolt face, but under the extractor so the extractor won’t be harmed during the operation (Top frame). The receiver is secured and then the tooling block is screwed into the front of the receiver and the drill bushing is oiled (Second frame).
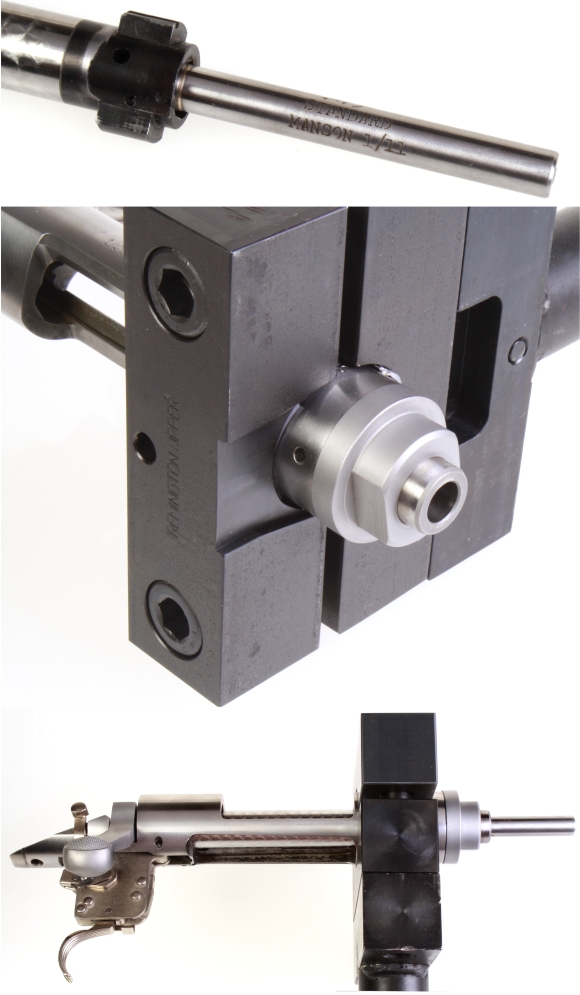
Almost ready to go, immediately above, the receiver is secured in an action wrench and the action wrench is secured in a vise. The shaft of the burr is extended through the tooling block. Before any cutting is done, the bolt must be in the closed and locked position with the bolt lugs pulled back against the lapped lug seats in the receiver, just as would be the case if the rifle were discharged.
The instructions offer a couple of ways to accomplish this preloading; shimming and set screws against the bolt. I found the easiest way to anchor the bolt is to remove the trigger assembly, which should not be in place in any event, then thread a very thick elastic band through the open slot in the receiver’s tang, secure it, then wrap it around the gun’s bolt handle. This will provide sufficient preload with the bolt in the correct position and the bolt won’t budge during the facing operation.
Simulation alert! Simulation alert!

OK, I really like you guys but not enough to have pulled the receiver out of the vise to take incremental progress pictures. However, I did note the size of the cut and uncut areas and marked up the photo above to coincide for the sake of illustration. The instructions indicate that the drill chuck is to be locked onto the burr’s shaft, firm pressure applied against the burr and a check of progress should be made after 5 – 10 second of cutting. Make that 5 seconds as cutting is quick. The first 5 second pass cut toward the outside of the bolt face and showed slight non-planar contact. The second 5 second more of the same an indication of a dished surface around the firing pin hole. The last cut was approximately 2 seconds and the job was done.
The surface really didn’t have discernible tool marks, but it was also not highly polished… nor has it become so since. The cut looks very clean as is and I didn’t want to run the risk of ruining the squared surface with a Dremel and polishing wheel. Before and after checks with a depth micrometer suggested 0.003″ was removed on the side of the ejector and about 0.001″ opposite.
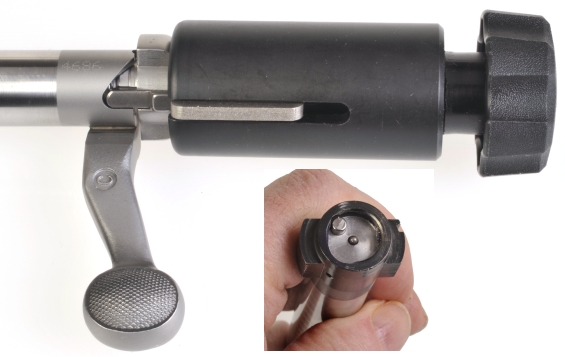
Firing pin protrusion is checked as the last step. The cocking piece is rotated to the uncocked position and the nose of the firing pin’s height above the bolt face is measured. An acceptable range for firing pin protrusion is approximately 0.500″ to 0.065″. Too short, there is a risk of insufficient primer strike and too long may result in a pierced primer. In this case the protrusion measured 0.056″ and well in range.
I checked protrusion with a depth micrometer and a digital caliper, measuring with the firing pin retracted and then again extended. The difference indicated protrusion. These really aren’t the best tools for this purpose as the firing pin is a hemisphere… yes, like an old 392 CI Hemi engine so contact with a measuring instrument may not be correct. Brownells makes a protrusion gauge that works with center and rim fire rifles #080-782-000 Firing Pin Gauge that is the right way to go when performing this task.
Terminus
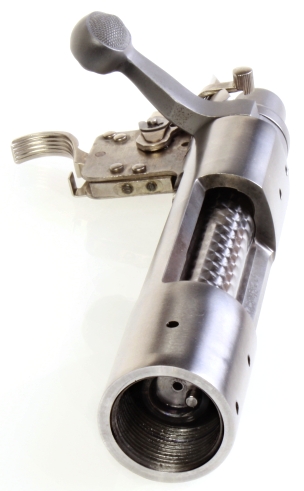 OK, done for now, with the exception of cleaning. The bolt lugs and seats are lapped, the receiver is squared and faced and the bolt face is a parallel breech face and ready for the next leg of the project, chambering and fitting a barrel.
The first step required Brownells # 080-097-701 One Gun Bolt Lapping Set fits Remington 700. The price tag was $52 and supporting # 988-000-004 Firing Pin Removal Tool was $27. Total $79.
The second phase, receiver facing, required # 080-000-194 Receiver Facing Cutter, $79, a pilot # 080-000-197 Receiver Facing Pilot $29, and T Handle 080-589-000 $15. Total $123.
The third and final phase, bolt face truing, required # 513-000-008 Tooling Block, $100, and # 513-000-011 .308 Facing Burr, $66. Total $166.
The typical cost of having a Remington 700 action blueprinted to this extent runs from $250 – $400, depending on the shop. In the course of this project, $368 was invested in tools, but these tools can be used over and over on Remington 700 type firearms and they are adaptable to other applications and for use with different receiver designs..
Next up, a break while I layout and plan the rest of the project. The next leg of the project requires barrel selection and chambering, then fitting the barrel to the blueprinted action. Firearms are incredibly interesting machines and there is always much to learn.
A Remington Rifle Build – Unplugged Part I
A Remington Rifle Build – Unplugged Part II
A Remington Rifle Build – Unplugged Part III
A Remington Rifle Build – Unplugged Part IV
A Remington Rifle Build – Unplugged Part V
A Remington Rifle Build – Unplugged Part VI

Email Notification