
The project hardware, as assembled throughout Parts I-IV, is in the form of a heavy barreled Remington Model 700 short action, all stainless, and chambered for the .22-250 Remington. The action was trued, the barrel was installed and its chambered was cut without the use of a lathe or other similar form of expensive machine shop equipment. Unfortunately, without a stock, the gun would not advance to the “Bang. Bang” stage without ventriloquistic assistance.

The intention is to use the finished rifle to develop and test heavy bullet 22-250 Remington handloads, so stability and shooting comfort, rather than light weight and ease of transport, are the primary considerations. To that end a Bell and Carlson Varmint/Tactical stock Brownells# 137-000-016 was selected. The stock is made of a composite; solid structural urethane with aramid, graphite and fiberglass fibers. A precision machined aluminum bedding block is integral to the stock which provides a metal to metal secure mounting. The stock is meant to be installed with no barrel contact; glass bedding is not required or recommended.
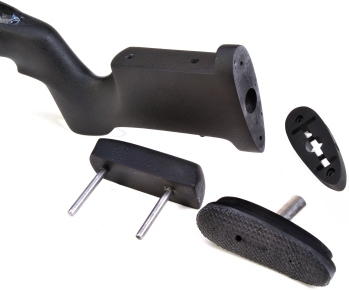
The V/T stock comes with an adjustable cheekpiece for proper cheek/eye placement for scoped applications. The butt assembly is three way adjustable for length of pull, cant (left/right) and height (up/down). The forend is tapered for minute elevation adjustments and comes with integral aluminum forearm rail for attachments such as bipods.
A light tactical version, Brownells# 137-000-019 is available for about half the price. Same study composite construction, but without the adjustable elements, which may not be required for a less critical accuracy applications.
The Varmint/Tactical version of this stock is near drop in fit for factory rifles of the VS and Sendero types that are chambered for calibers up to the .308 Winchester. The barrel channel can be reworked (opened up) to accommodate heavier barrel contours. Unfortunately, I would have to say that my legendary lack of free forming craft skills is only surpassed by my lack of patience – two conditions that ordinarily would not combine for a successful outcome when fitting a stock to a barreled action. Hand me some cutters, files and sandpaper and a piece of material that is to be formed into something other than a basis geometric shape… Let’s just say that special something, like hand – eye coordination, just doesn’t happen for me. But why describe my underdeveloped motor skills when I can illustrate.
It’s like a box, only completely different

I don’t like putting crushable items in a vise and I did not have a vise mounted in a location that would make for comfortable working positions, so I made a simple cradle to hold the subject stock. Made from a scrap piece of ⅝” A-A oak veneer plywood, material that would not abrade the stock’s finish, the base is 16″x16″, the sides are 6″ high. This height permits locating the stock parallel to the cradle’s base or angled upward to suit the work in process. The base is large enough to clamp to the bench so it will not move around in use. The pieces are butt joined, each held in place with 6 2″ long deck screws. This allows the side boards to flex inward when clamped to secure the stock without breaking the stock or the cradle. The gap between sides tapers from 2¼” to 2″ to follow the dimensions and contours of the stock. Yes, those are cross cut burns and, yes, those are residual pencil marks. In actual use, the clamp is located just below the bottom of the forearm and a second clamp is located at the back end to maximize cradle to stock contact.
Cut along the dotted… imprinted lines
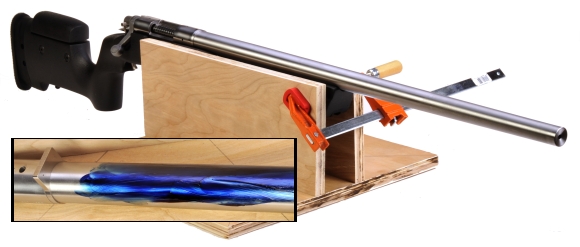
My first brilliant idea was that I would just lay the barreled action into the stock, trace along the barrel with a pencil, then widen the barrel channel accordingly. Might work if the barrel recessed into the stock to its major diameter and if the barrel were… flat. Neither is the case as less than 40% of the barrel’s circumference in enclosed by the stock and the barrel’s contour is that of a tapered cylinder. In this case, the barrel is twenty six inches long and straight tapers from a 1.225″ diameter at the receiver end, to 1.100″ at the tip of the forearm and 0.900″ in diameter at its target crowned muzzle. So I gave into a more established practice and transfer dye marked the bottom surfaces of the barreled action and removed material from the channel where barrel to stock contact was detected.
Ordinarily I use Jerrow’s inletting black or gold, Brownells # 457-001-050 & 457-002-050 respectively. The stuff covers a lot of ground and it cleans up easily, but this was initially such a rough effort, I used something with a bit more body, non-drying Prussian Blue, Brownells # 100-001-581. One application was enough to get me though the entire process because, where contact wiped a spot clean on the barreled action, I only had to smear it over when I pulled the barrel for a contact check. Dye was placed on the barrel underside for the length of the forearm, the underside of the action all the way to the tang and on the underside of the recoil lug. It makes fingers quite blue, but it quickly washes off of everything.
 There are a couple of cautions relating relating to reading impressions on contact surfaces. Because the barrel is tapered and cylindrical, the barreled action needs to be located to the final fore and aft position with the recoil lug pointing straight down. The easiest way to do this during the rough out phase is by installing inletting guide screws which are, basically, two 3″ long shank studs with ¼”x28 threads on one end.
I guess I could have made a set by threading pieces of rod or cutting the heads off of bolts. It just seemed much quicker to buy Forster Products stock inletting guide screws. This set is Brownells # 319-415-700 and fits the Remington Model 700, 721, 722, Savage 110, Weatherby Mark IV, and Dakota firearms.
When the dye marked assembly is lowered into the stock, it should be supported at the action and muzzle so that it is placed parallel to the stock’s bedding block and not allowed to tip down at the muzzle. The idea is to float the barrel, create a dollar bill’s width of airspace, 0.005″, between the barrel and stock from one end of the barrel to the other. Bell & Carlson designed this specific model stock to free float the gun’s barrel and it is designed to absorb recoil by flexing a minute amount. Glass bedding tends to impede this movement and works contrary to the products design.
Patience is a virtue… and a town in Pennsylvania
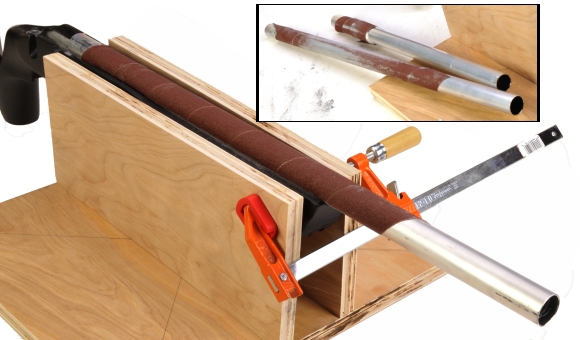
Bell & Carlson, the stock’s manufacturer, suggests fashioning a tool to remove channel material by wrapping sandpaper around a wooden dowel. As a firm believer in over engineering everything, I made mine from a length of 1″x0.050″x8′ aluminum tubing I picked up at Lowes. One was cut to 24″ so there was enough length to work the entire barrel channel and while providing a span to use as a handle. The tube was coated with rubber cement and wrapped with 80 grit abrasive roll. Brownells sells a variety of inexpensive abrasive rolls beginning with # 657-110-120. The combined diameter of paper and tube was 1.050″ so the tool made uniform cuts that, with a little guidance when applying pressure, held the shape of the barrel while cutting into the stock.
A shorter 18″ tool with only 6″ of abrasive wrap, pictured in the inset above, was also fashioned for working at the thick end of the barrel and around the radius section of the stock near the action. This time I wrapped the tubing with double faced tape before applying the abrasive roll for an overall diameter of 1.150″.
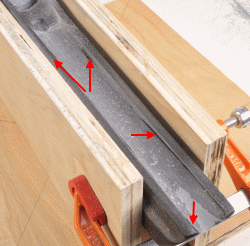
This is an example of the contact marking. The dye coated barreled action was plopped into place, then lifted out. The dark streaks, transferred Prussian Blue, highlight the high spots. The sanding bars shown above, are long stroked over the high spots until they are barely, but uniformly removed. As work progresses, the contact points will become longer and they will be located closer to the bottom of the channel.
The important thing is to use the rigid straight form of the tubing to keep the channel straight and avoid wavy lines or gouges. I paused often to check my work, after only a few strokes, as 80 grit quickly remove composite material. I was also careful to stay off the edges at the top of the channel so that the finished work would look neat and precise when completed.
Below, an example of the progression of dye checking and material removal. The bottom the beginning, the top at an advanced state. Notice how much more material is removed from the aft portion of the channel to follow the barrel progress to a larger diameter taper.
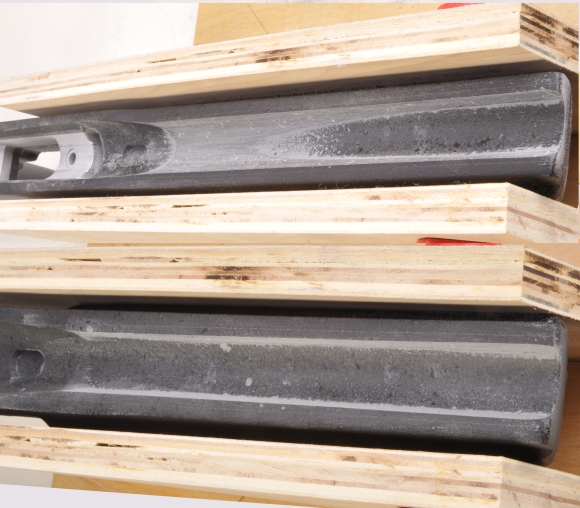
There is no free forming skill required during this process. All I had to do was follow the dye marks and remove just enough material to make them go away. Eventually, to get to 0.005″ barrel to barrel channel clearance, the entire channel was worked by abrasive paper, but more material was being removed from the aft portion of the channel.
In the early stages of rework, because the barrel channel is undersize, the barreled action will contact at the action’s tang and somewhere along the barrel channel toward the end of the forearm. There will be no contact with the front saddle (marked with Prussian Blue below) of the stock’s bedding block. When sufficient material has been removed, contact will be at the tang and front saddle of the bedding block only and the barrel will be cantilevered out over the channel.
Modeling clay, but no finger painting
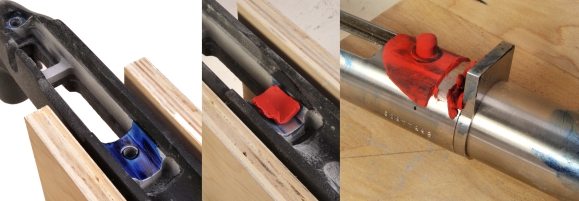
Modeling clay was used to keep an eye on the gap between the action and the saddle. A piece was squeezed between the two assemblies, then the flattened piece of clay was cutaway, allowing the remaining clay’s thickness to be measured.
As work nears completion, and the barrel settles further into the channel, contact at the action end of the stock may develop as seen here to the right of the bedding block. This was a minor amount and the larger diameter tube sander removed the material while holding the correct radius.
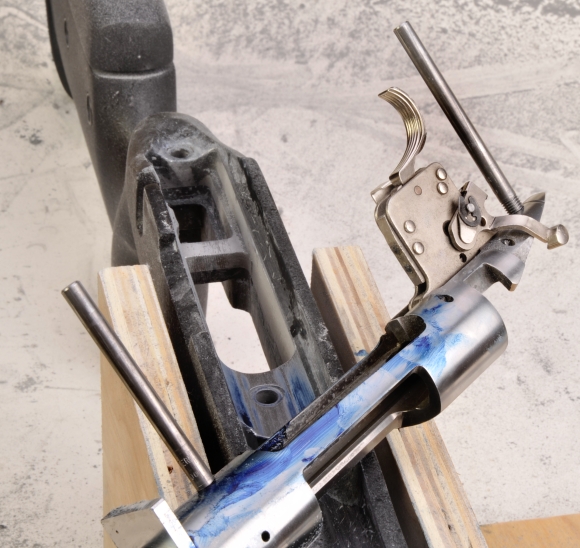
All of my initial barrel/action inletting was done without fitting the trigger guard to the stock. The weight of the barreled action, with a little hand pressure, was enough compression and the guide screws located the assembly in correct orientation within the stock. I was concerned that if I fit the new trigger guard before the barreled action was properly seated, the plane of the mount holes might move out of parallel to the action and odd pressure point would exist in the completed rifle. A trigger was left in place as a necessity for checking clearance with the bedding block and trigger guard. The entire assembly was scrubbed and thoroughly flushed when the job was completed.
Not exactly a plop in
 An H-S Precision Pro Series guard with a detachable four round magazine was selected to fill the bottom metal requirements. Available in a number of short and long action variations, the version for the Remington Model 700 SA is Brownells # 393-210-710.
The entire assembly is Teflon coating over stainless steel with inside the guard magazine box release. This should come in handy with lots of range time planned.
Just easing the assembly into place, it was obvious the magazine box was making contact on the rear sides and front of the stock’s bedding block and the magazine box release catch was bottoming out against the stock. The aft part of the guard hit the recess in the stock, which kept the guard about ¼” off the intended seating surface. I’m sure this sounds like a lot to correct, but each point only required very minor rework.
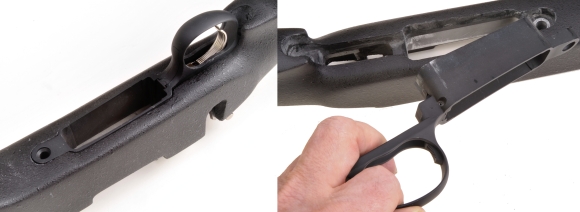
Because the fit between bottom metal and the stock’s bedding block was so close, Prussian Blue had too much viscosity; it would have rubbed onto all of the adjacent surfaces. Instead, I coated the stock’s bedding block where the magazine well would pass through with a thin coating of bright blue DYKEM layout fluid, Brownells # 262-100-004.

A small flat file was used to clean up the minor contact between the magazine box and the stock’s aluminum bedding block, a round file was used to clear some minor contact between the guard’s frame and the corners of the stock’s trigger guard recess.
A cameo appearance – the Dremel
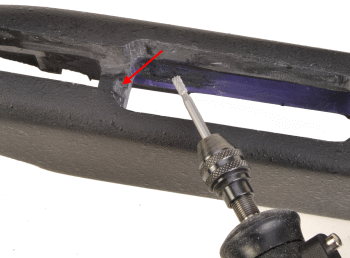 A Dremel is not a primary tool in the shop and this job did not make for an exception. For a guy like me, with little patience, using a Dremel makes it too easy to remove too much of everything and to make lots of wavy lines where straight lines are desired.
In this case, a rotary file cut a clean notch in the composite just beneath a bedding block cross brace. The cut provided necessary clearance for the magazine release catch and assured proper function. Any composite surfaces that were files or otherwise worked where finish sanded with 120 grit paper.
When the dust literally settled, the installed bottom metal looked as seen below. No material was removed from the recess behind the trigger guard, the fit was snug, but not so much that the assembly couldn’t be pulled from the stock with light finger pressure. An empty magazine, once released, fell free with no more than the force of gravity.

Something screwy always happens
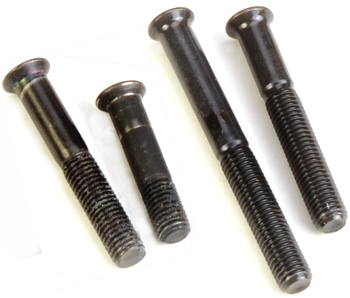 It was not lost on me that the original guard fasteners dropped into their respective holes, but only the rear fastener offered that satisfying sound of metal contacting metal, The front fastener was too short. Sendero have ¼”x28 threads, the aft 1.680″ in length, the front, 1.190″.
Bell and Carlson offers customer who purchases these stocks extended length fasters at no additional cost. As an alternative, Brownells # 084-272-710 is an extra length fastener set for the Model 700 Remington; 2.200″ aft and 1.700″ front with ¼”x28 threads. These are made longer than necessary with the understanding they may need to be trimmed to proper length.
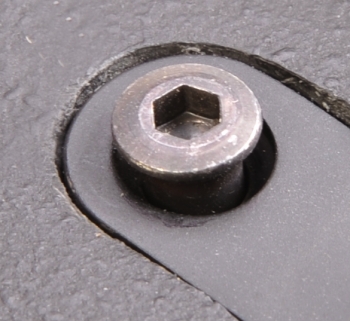 In the case of the project rifle, the aft screw in the Brownells set, and even the standard Remington fastener, were of proper length. The front screw from the Brownells set needed to be trimmed to 1.240″, 0.460″ shorter than as supplied and 0.050″ longer than standard Remington. That’s about five minutes in belt sander time.
Pictured, right, about the maximum amount of thread length that should engage the rifle’s action. A too long aft screw will project into the bolt track at the tang of the receiver and obstruct the bolt’s aft travel. Too long of a front fastener can pass into the front receiver ring, and interfere with bolt lug rotation. Thread engagement should fall between 3 and 6 threads.
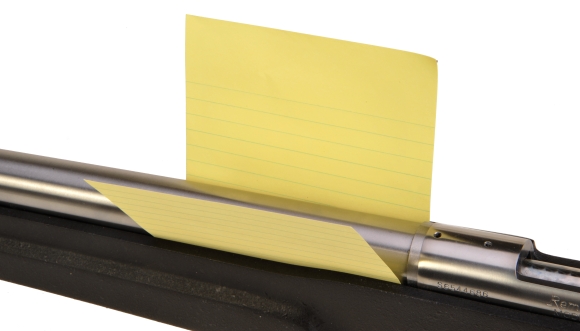
With the bottom metal fasteners torqued to 40 – 45 inch pounds, the spec for a Sendero and similar composite stocks, a piece of lined yellow paper could be slipped under the barrel and pulled with uniform and light effort from the recoil lug to the end of the forearm. The yellow paper is 0.0050″, 0.0055″ at the lines… at least the blue lines. A final dye check with the assembly properly tightened showed no contact other than at the bedding block.
What weighs 14 lbs, 4 oz and is waiting for a scope?

The break down on weight is 8 lbs 4 oz for the barreled action, 5 lbs 6 oz for the stock and 10 oz for the bottom metal, magazine and fasteners. Switching to the light tactical stock, Brownells #137-000-019 would shave 3 lbs. Switching to a Medalist Brownells #137-220-700 would shave a half pound more. So the gun could have been reduced in weight to 11 lbs just by juggling stocks. Over 2 lbs 8 oz could have been shaved my changing from a target/varmint profile to a standard. My only point is that the rifle’s weight isn’t an accident, it is in accordance with my objective of assembling a highly accurate, long range shooting, heavy bullet, 22 caliber centerfire rifle.
I’m really happy with the project to this point. The rifle is coming together well and it is a quality, precise build. More so, I feel pretty good about doing the work in house with hand tools and not having to settle for a crude result as a consequence. Now, if I want to rebarrel or install another stock, or put more high performance parts in the rifle, I know I can do it myself… and that’s a good feeling. I’m not suggesting this process is ideal or perfect, but I am suggesting that an average guy with average mechanical aptitude could easily do the same or better. Now I need to think through a scope and scope mount system and collect a little range data.
A Remington Rifle Build – Unplugged Part I
A Remington Rifle Build – Unplugged Part II
A Remington Rifle Build – Unplugged Part III
A Remington Rifle Build – Unplugged Part IV
A Remington Rifle Build – Unplugged Part V
A Remington Rifle Build – Unplugged Part VI

Email Notification