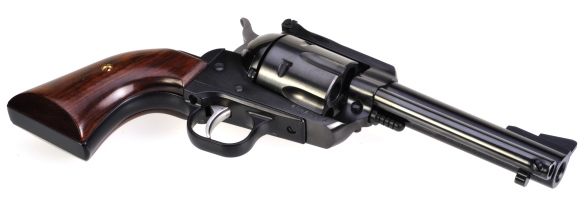
I actually own some firearms. Mostly the ones I don’t get to shoot often. The ones that serve as the centerpiece to my “I’ll never get a round to it” project list. This 41 Magnum Ruger Blackhawk was going to be my “I’m sending this to (insert expensive gunsmith/artist)” special gun. Nothing outrageous. Bisley grip frame, color case hardened frame, a little tune, a better set of sights. But I kept procrastinating, prices kept rising and lead time got longer… So I guess me and this 41 Mag are going to have to work the refinements out between us. It’s not like I’m not making progress. Its only been a year and I’ve already replaced the gun’s grips. Now it was time to take on the trigger.
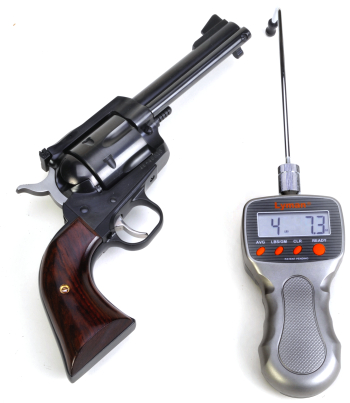 The Blackhawk’s trigger pull measured 4.7 lbs pull. Not terrible, but it could have been better, especially when taking into consideration my unique single action revolver abilities; I’m an absolutely lousy shot. I love these guns; the way they look, the power they produce and their excellent level of accuracy. Unfortunately, I can’t shoot them well and I suspect it has something to do with squeezing the trigger while keeping the gun motionless during the hammer’s one hour journey to firing pin strike.
With not a lot of time on my hands, Sunday afternoon with a 4 PM game scheduled, I decided a spring change might be a good place to start. I just had to be careful because this New Model Blackhawk has an internal lock, at least until I change the grip frame, so it does not take the same mainspring and hammer strut as Blackhawks without this factory lock.
Spring change in summary…
The Ruger manual provides good step by step instruction for complete disassembly of the New Model Single Action revolvers so I am not going to try to duplicate that information in detail. There are, however, some areas that warrant mention.
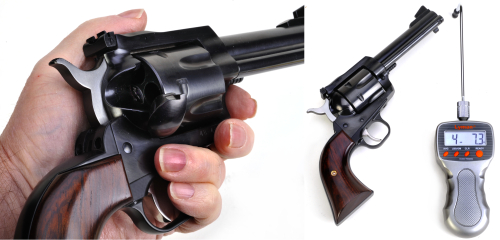
Check the each chamber for empty and take a baseline reading of trigger pull. Digital pull gauges like the Lyman unit pictures are a good tools – Brownells #539-000-005. It is about one third the cost of a certified static weight system and it reads in smaller increments. The Lyman unit, at approximately $70, isn’t much more expensive than a mechanical spring scale, but a whole lot more accurate. The Blackhawk’s baseline pull reading was 4 lbs 7 oz.

Actual disassembly begins by opening the loading gate, depressing base pin latch and pulling the base pin forward to release the gun’s cylinder is removed. The base pin is pushed back into place for safe keeping. With the grips removed the Ruger’s mainspring and internal lock are visible.

The flat hammer strut, wrapped within the coils of the mainspring, passes into a slot in the internal lock when the gun is cocked. For the sake of disassembly, the gun’s hammer is fully cocked, which exposes a hole in the strut at a point below the mainspring coils. A pin is inserted into the hole, the gun’s trigger is depressed and the hammer is lowered. With the pin in place the mainspring is held in a compressed state on the hammer strut, which will allow its safe removal from the grip frame at a later step in the process. Ruger packs a small disassembly pin with all new revolvers. In this case I used an Apex pin punch that wouldn’t drop through the hole during handling.

The next step, well detailed in the manual, is removal of the five screws that hold the grip frame to the cylinder frame. The screws, pictured above, are arranged as they are in the Blackhawk, oriented with the trigger guard facing up and the muzzle pointing north. A note of caution, the screws are recessed and near other surfaces. Just a slightly oversized screw driver is enough to carve bright spots on the trigger guard and back strap. The Blackhawk only has to be partially disassembled, so a little care in disassembly will ensure a hammer pivot pin or trigger pivot pin won’t slip out and create a lot of unnecessary work. If the gun is going back together soon, I usually just put an adhesive label or a piece of scotch tape over the pin ends to prevent them from dropping out.
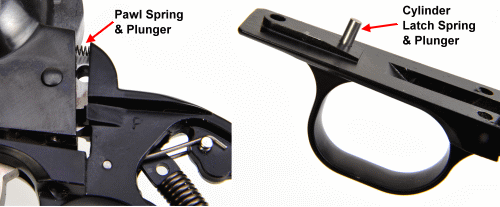
With the five screws removed, the grip frame is pulled back and down for removal. The hammer usually has to be pulled back just enough for the tab of the cylinder latch to drop out of its window in the frame and provide clearance. The Ruger manual cautions about loss of either of the two spring loaded plungers pictured above. Neither is heavily loaded, so they won’t go airborne if released, but they can drop onto the floor and roll into a different, but parallel universe.
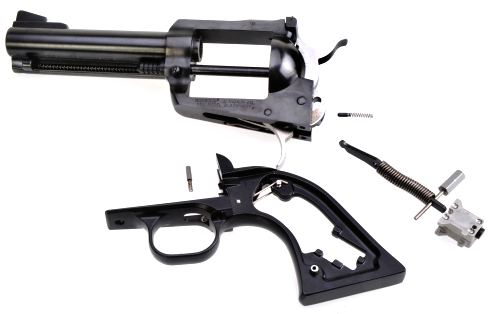
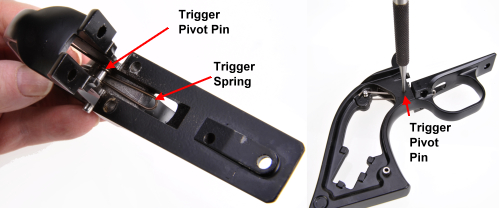
Once the grip frame is pulled, the hammer strut and mainspring assembly can easily be removed. The trigger spring is removed by tapping out the trigger pivot pin. It is easier to knock out the pin with the spring legs still in position over the trigger spring retaining pin, than to wrestle the factory spring legs over the retaining pin with the pivot in position.
Boing… All Blackhawks are not created equal

 Internal lock Blackhawks have a 25 coil mainspring rather than a 27 coil mainspring, as is the case with non-internal lock guns. The Wolff replacement spring sets for internal lock Blackhawks are Brownells #969-000-156 and 969-000-157, both include a 14 lb mainspring and, respectively, either a 30 or 40 ounce trigger spring. The Wolff 14 pound mainspring coils are 0.042″ in diameter compared to the factory spring at 0.046″. The factory mainspring rate for internal lock guns is 17 pounds. A stiffer base pin latch spring is also included in the set.
Brownells kit #080-665-106 is for the non-internal lock guns and includes a range of mainsprings. The factory mainspring has a 23 pound, the kit includes 17, 18 & 19 pound springs, a 30 ounce trigger spring and a stiffer base pin latch spring. Under $20 for any of these sets.
Trigger springs are common between internal lock and non-internal lock guns. The Wolff 30 oz trigger spring is made of significantly smaller diameter wire 0.035″ compared to the factory piece at 0.045″.
Ah yes, my nemesis, Sir Basepin Latchnut… of the Cambridge Latchnuts, I believe
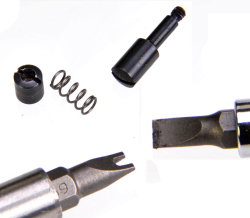 After years of chewing the finish off of base pin latch nuts by trying to follow the Ruger manual and grabbing the latch nut with a pair of protected jaw pliers, I decided to pop for $8 and buy an actual bit made for the process, Brownells # 080-432-001. Alternatively, a screw driver can be mauled into shape, but where is the special tool, pride of ownership in all of that?
 The extra power base pin latch spring helps hold the base pin latch assembly in position under recoil so it will maintain its grip on the gun’s base pin. The stiffer spring also cuts down on latch wear.
The mainspring needs to be swapped out for the Wolff piece on the Ruger’s hammer strut. The mainspring isn’t under great pressure, but it is always good to be careful when removing compressed springs. My “special” fixture was a vise and bench block sandwich. The vise jaws caught the spring and held it under pressure while I pulled the temporary retaining pin, the bench block held the end of the hammer strut so it was under my control and didn’t cut into my hand. The new spring was pressed into place by just reversing the process and reinserting the temporary retaining pin.
Reassembly
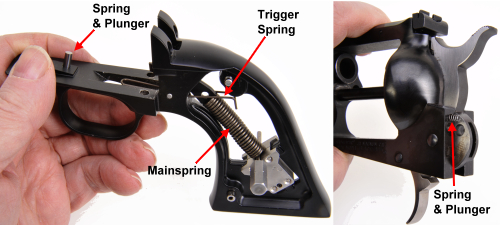
If the trigger and hammer were not removed during disassembly for this spring change, there are only a few steps in the Ruger manual that apply for reassembly. Basically the trigger spring is reinstalled, but not hooked over the trigger spring retaining pin. If the spring is in place and under tension, it is hard to manipulate the loop on the trigger side so it loads the trigger to the forward position. The grip frame is slipped into the frame, the front of the trigger spring is lifted to clear the trigger and everything should fit in place with barely any effort. As the frames are joining it’s good to check to ensure that the cylinder latch spring plunger is against the cylinder latch and not deflected to the side. The pawl spring has to push into the cylinder frame and not get caught between it and the grip frame.
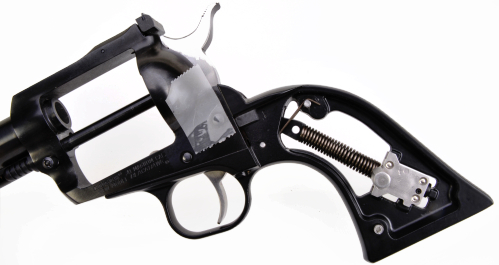
Should look something like this with the five screws reinstalled, the springs in place with the hammer strut properly seated in the hammer slot. My high roller pin retention system has yet to be removed from the frame sides. No Brownells Part Number yet. The rest is straight forward cylinder and grip reassembly, routine and well covered in the manual.
 The finished gun checked at a consistent 2 pounds 7 ounces trigger pull. Felt great, there was no problem with ignition or light primer strikes and the gun took on a more precise personality.
It isn’t necessary to go this low on pull. A 40 ounce spring could be substituted that would come in higher, Brownells # 969-000-162. Increasing the mainspring rate also contributes to pull. The factory internal lock gun mainspring is rated at 17 pounds. This spring kit comes with a 14 pound spring. Other weights available are 15 and 16 pound, Brownells #969-000-198 and 969-000-199, respectively, or in a three pack assortment for tuning, Brownells #969-000-200 – less than $5 for the singles and under $9 for the three pack.
Time? I know my long windedness makes it seem like this is a week long project, but it was more like half an hour, taking my time, and the effort resulted in a major improvement in the Blackhawk’s feel and my accuracy.

Email Notification