 My time in the United States Air Force, as a B52 Crew Chief assigned to the 28th Bomb Wing, was a lot like being in the military… but without the formalities and probably a lot more fun. When the wing wasn’t on Arc Light deployment, home base was Ellsworth AFB, adjacent to Rapid City, SD. Stateside, hunting the Black Hills presented a wonderful opportunity to enjoy the outdoors and a retired Senior Master Sergeant turned gunsmith kept us in sporterized Mausers.
I really admired the skill this guy demonstrated. How he was able to take a train wreck of mismatched numbers and turn them into a slick, nicely finished hunting rifle with exceptional accuracy. And it wasn’t just rebarreling. He did some nifty modernizing of ancient hardware, added some fancy touches and he did his own stock inletting, finishing and checkering. These days, even if the craft skills are present, the expensive of operating a shop makes extensive military to sporter conversion work mostly cost-prohibitive.
My expertise, downhill motorized grocery cart racing, doesn’t lend itself to accomplishing all of the Mauser modifications that are possible. However, Brownells carries virtually all of the tools and bits and pieces that are required to finesse a surplus clunker into a favorite firearm. I thought, if I took my time, planned the project thoroughly and researched credible instructional information, I might be able to accomplish at least some of the work myself. Yes, conclusions based on incomplete information and inexperience typically look best before the project begins.
Yugoslavian M24/47… The victim
*The M24/77 Mauser action, at 8.5″ in length, is 0.250″ shorter than the Model 98. It is classified as intermediate length. The receiver’s 1.410″ diameter front ring makes it a large ring Mauser. In most respects, the M24 is a shorter version of the Model 98. The “/47” is the start date of an arsenal refurbishing program; prewar hardware, post war rework. The example pictured left was purchased from a retail chain that listed the gun as being in “Very Good” condition. The numbers don’t match. In fact, even the struck fonts don’t match and I am pretty sure the some of the pieces came from a 1961 Ford station wagon. In short, there was no chance of a good Mauser being lost as a result of my handy work.
First on the agenda was to thoroughly clean and inspect the firearm to determine if it was salvageable as a shooter and what work was required to put the Mauser into good working order. This would help to see the rifle’s ultimate potential. Before starting, I rounded up some sources of information that I felt would offer some guidance.
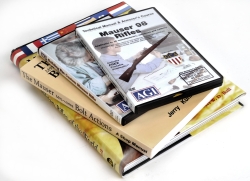
“Mauser 98 Rifles” – Brownells # 050-000-051, an AGI Armorer’s Rifle Course, is a quality production that covers history, design, function disassembly, reassembly, operational checks, tuning, and trouble shooting. It is a major time saver.
“Building the Custom Mauser” – Brownells #050-120-306 is another AGI product, but in the form of an eight hour, two DVD gunsmithing course that covers a myriad of hardware modification that turns a military Model 98 into am exceptionally slick classic hunting rifle. While a number of sub-projects require a milling machine and/or lathe, many major modifications were done with common hand tools. Because this DVD outlined an extensive number of changes that could be made during this type of conversion, and what tools and materials would be required, I was able to use this to plan my overall project, taking on what was possible within available resources and omitting those that were beyond resources or skills.
“Mauser: Military Rifles of the World 5TH Edition”, Brownells # 491-000-041, a hardcopy book provided good background on Mausers in general for strength and weakness model assessment and “The Mauser, M93 Through M98, Bolt Actions – A Shop Manual”, Brownells # 924-400-098 provides huge amounts of detail specification data, detail of model variations, theory of operation, repair, modification, and function and safety checks.
Disassembly with a putty knife
The first checks to be made were headspace and bore condition, both which require a clean firearm and a little disassembly. The bolt was as pictured below. The safety was inoperative and there was so much Cosmoline inside the bolt body that the firing pin was hung in the cocked position.
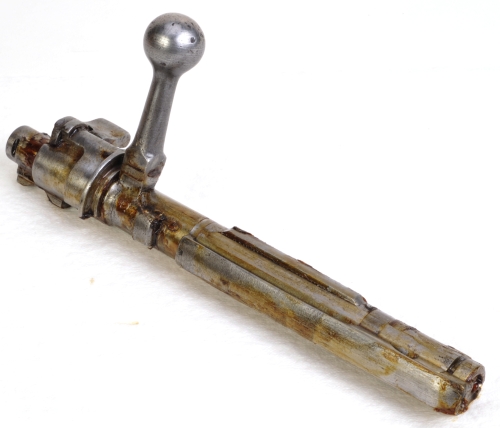
The bolt was disassembled and plopped in the ultrasonic tank with Safety Ultrasonic Weapon Cleaning Solution, Brownells # 515-000-004. The non-ammoniated 1:10 concentrate is odorless and biodegradable and it removes gunk, slime, grunge, small mammals, and light rust. When the parts were clean, about a half hour at 30°C, they were rinsed in water and sprayed with KwickSeal, a light preservative, Brownells #100-004-400.
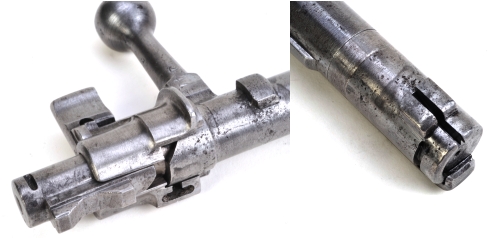
The good news was that once clean and reassembled the bolt and safety functioned properly. The bad news was that the assembly; body, breech face and lugs, was so badly pitted it looked like ocean salvage. Even if the bolt was structurally OK, aesthetically it wasn’t acceptable. This was not a matching serial number bolt, so locating a replacement seemed an OK approach as long as proper headspace could be achieved. My greater concern was that, once the gun’s stock was pulled, the receiver below the stock line would be in similar condition.
The thing about military Mausers is that no more than one rifle was built to the same configuration, or originated in the same country or was produced in the arsenal. Yes, that is sarcasm, but not a whole lot. Each model comes apart just a little bit differently. This particular rifle has a nice stock with matching handguard so I was eager not to break or damage it through impatient or improper disassembly. In the order of illustration below the text –
Stock Removal
1) The cleaning rod was unscrewed and set aside, the sight hood was removed. I use external lock ring pliers to spread the hood for easy removal.
2 & 3) A piece of 1″ x 2″ Nylon bar stock was used to depress the barrel band spring and to tap off the front barrel band. The material is non-marring and it is resilient.
4) When I ran out of hands, I used a small C Clamp to compress the rear band spring and the same Nylon bar stock to remove the rear band.
5) The four trigger guard screws were removed, small lock screws first, than the larger fasteners. Actually it was three. The aft lock screw was missing.
6) The large screw, inset, at the front of the rear sight was removed. The assembly was supported with a block of wood under the receiver, then the Nylon drift was used to tap the handguard spring retainer until it gave up and let go. I didn’t strike the handguard to free it as this could result in a broken handguard.
7) The rear sight is raised, the handguard is rotated so that the sight clears the window, and the handguard is removed.

Hardware Bits and Pieces
The bolt stop screw is removed and the bolt stop assembly is removed from the receiver.
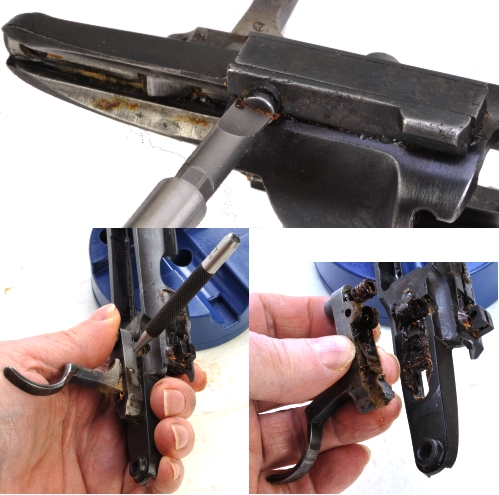
The sear pin is tapped out, left to right, freeing the trigger assembly and sear spring from the receiver. The sear spring is not captive, the Cosmoline is vintage.
The rear sight pin is driven out, left to right. The sight is located in a slot cut into the sight mount and it is under upward pressure from a leaf spring located beneath it. To remove the sight it must be pressed downward before it can be pulled rearward and out. Gunk has a way of getting under the sight at the slots, making it very difficult to push the sight downward. I put a Nylon bar under the rear of the sight to elevate it a bit then, using another Nylon drift, I give the sight a rap with a hammer to break it free before pulling it out.
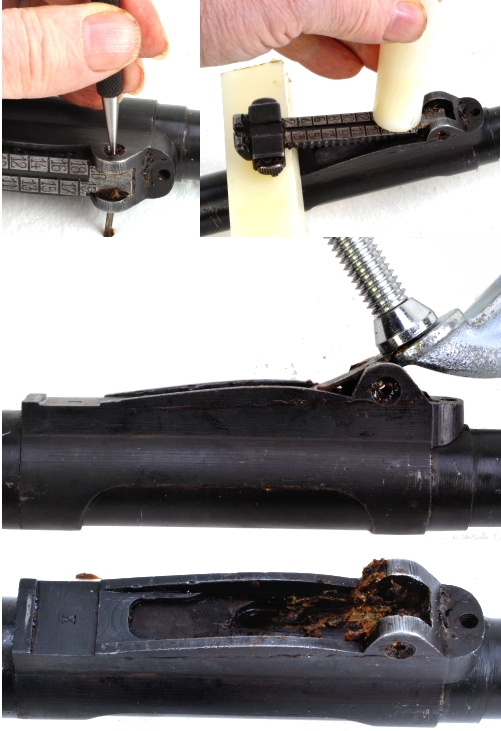
Once the sight is removed, the leaf spring can be removed from the sight mount by lifting the front and pulling forward. They are usually too slick to grab so I caught the end with a small C Clamp then tugged on the clamp and the springs came right out. I suspect a Vise Grip would do as well.
A little sunshine doesn’t hurt…
Couldn’t fit the barreled action in the ultrasonic cleaner, so I tanked it with some degreaser. About a hundred years ago I bought a black iron bluing tank, 40″x6″x6″, Brownells #082-003-664. Never was used for bluing, but it has been used for hot cleaning barreled actions and gunstocks quite successfully.

From a pitting and corrosion perspective the receiver was found to be flawless, even the bluing was in excellent shape. The exterior of the barrel was the same with one exception, a patch of corrosion at the aft barrel band. Not fatal, but definitely ugly. The bore was really slick; sharp rifling, bright, not a so much as a shadow the length of the bore.

In review – trash can quality bolt, great receiver, good barrel, excellent stock in need of refinishing. Decisions, decisions, decision.
If the replacement bold held headspace, I could clean up the rest of the gun, add a few shooter’s enhancements and put it together and keep the military Mauser appearance. If the new bolt didn’t hold headspace, I could pull the barrel and rework its fit to achieve correct headspace. If the replacement bolt didn’t hold headspace, I could pull the barrel, save the receiver and attempt to build a nifty sporter from that point.
A learning experience…
The thing I like about the culture of firearms is that it rewards independent thought. Perhaps not financially, but by acknowledgement and, certainly, self satisfaction. I get a little worried that these days anonymous sources reference hypothesis as theory and five people reaching public consensus of conjecture are enough to make theory scientific fact. My point is that it is sometimes good to start projects with fresh eyes and thoughts as there are more important things in life than rote compliance. This is a learning experience for me. Even if I performed a similar task a hundred times in the past, because there are new materials, tools and finishes, there is a lot more to learn. Next step – when the replacement bolt arrives.

Email Notification