
Projects based upon military surplus rifles are always an interesting challenge. Each type seems to ride a wave of popularity that begins with availability of low priced, best quality, all matching number guns and ends with higher priced, parts bin born Frankensteins. Tracking to that curve is the level of interest in discussing the subject firearm within Internet forums and the amount of good reference material available. The reference links listed within a forum today may take readers to some gems of valid information. Those posted in 2009 will now mostly lead readers to “Page Not Found” destinations.
When sifting through any forum information, conflicting statements are the norm, often caused by one person offering solid information, then others parroting the original comments elsewhere. Parrots, unfortunately, tend to leave out significant facts while introducing their own misunderstandings and interpretations. This makes it easy for topic neophytes, and sometimes experts, to get turned around when attempting to research and sort fact from fiction.
The M95 Mannlicher
I wanted to spend some time with the M95 because of its straight pull operation and because of its oddball chamber. After spending quite a bit of time shooting the Swiss K31, the idea of a straight pull rifle that weighs two pounds less was appealing and who wouldn’t like handloading a cartridge with a 0.329″ bullet? Besides, the M95 looks and feels like a nifty little cannon.
The M95, similar to the Turkish Mauser, is a type of firearm that has undergone multiple arsenal refurbishment and modifications. Some were just upgraded from the 8x50R to the 8x56R. Some were converted from rifles to carbines, some were reconfigured to meet police applications and recycled in different countries.
I ordered two from a popular supplier of military surplus firearms, paying an extra $10 for matching number selection. Received were two firearms that were both originally assembled during or near 1919 from parts that had been manufactured in prior years. Both had been modified to accommodate 8x56RS ammunition. One was an all matching number gun, in nice shape, with a better quality steel barrel. The other was a clean Frankenstein gun assembled from a hodgepodge of parts. Both guns were Austrian Steyr and mechanically sound. Neither included the stripper clips required for them to function as repeaters.
Below – The matching parts gun was converted to 8×56 RS in 1937. The gun has a banded sight, which suggests a military conversion from rifle to carbine, however, the barrel, receiver and carbine length stock all have matching stamped serial numbers. The rear sight is graduated in schritt increments rather than meters.
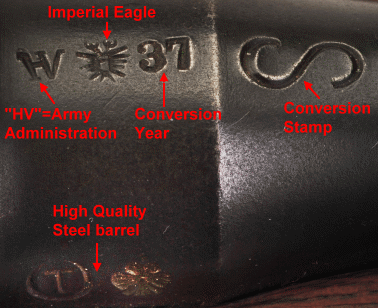
Since handloading and shooting was the more immediate goal, I put up the mixed part gun, ordered some associated reference books from Amazons, and a rear guard screw, stripper clips and period slings from Numrich Arms. Then I disassembled the rifle and checked components to make sure the gun was in functional condition.
The good, the bad and the sort of ugly…

The M95 is one of the easiest Milsurp rifles to disassemble.
- Check chamber and magazine for empty
- Push trigger forward, remove bolt
- Remove center screw from front stock band, remove band
- Remove center screw from aft stock band, remove band
- Slide handguard forward and off
- Remove front and rear trigger guard screws, remove trigger guard
- Lift barreled action from stock
- All done
Part of a pre-shooting check out is to see what lies “below the waterline”, or the area covered by the gun’s stock. These areas can become corroded and pitted in a couple of ways. Corrosive ammunition residue is easily wiped from a service firearm, but residue often builds up under the gun’s stock where it does not often see daylight. Sometimes a refurbishing process leaves moisture spots on stocks that are pressed against hardware on reassembly or acidic finger prints are left on areas covered by the gun’s stock. Stir in the ingredient of time, fifty years of inactivity or so, and hidden corrosion can be severe. In this case, it was not pretty, but it also wasn’t significant from safety standpoint, or even much of an aesthetics issue.

Parts were sprayed with Krud Buster… I love that name, and the glop was scrubbed off, and most of the surface rust, with a bronze brush. Then the parts were flooded with mineral spirits and bronze brushed some more until all of the pitting was clean of active oxidation. The insides the stock bands were scoured with a fine Scotch Brite pad until clear of oxidation and flushed with mineral spirits.
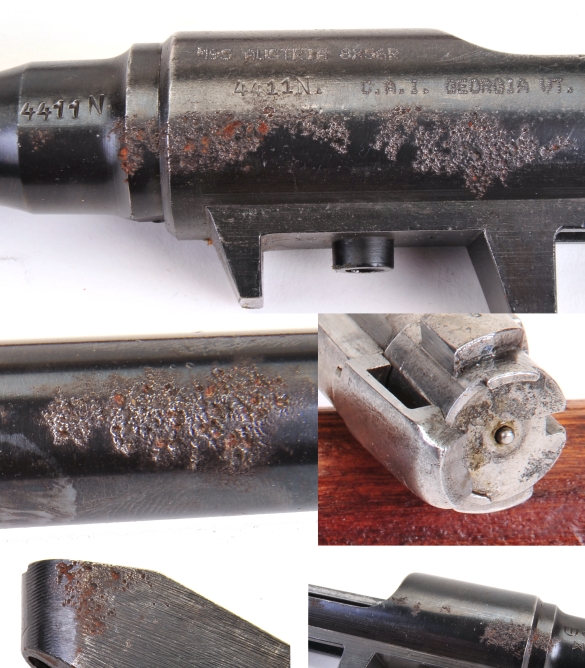
These are post Krud Buster, pre mineral spirits wash, corrosion. Top – Receiver, CL – Mid Barrel, CR – Bolt Face, BL – RH Tang, BR – RH Receiver. All of it looks terrible at this stage, none of it is a functional problem, all of the rust was gone after the mineral spirit wash and the rifle was reassembled. The result was an experience worn, old military firearm with a bright bore and sharp rifling that should make a good shooter.
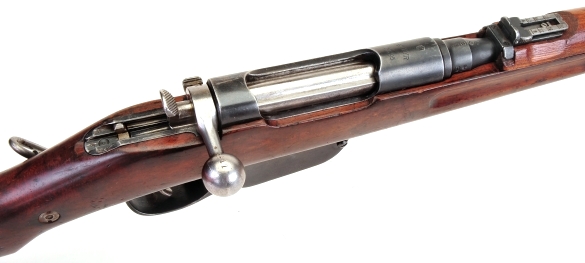
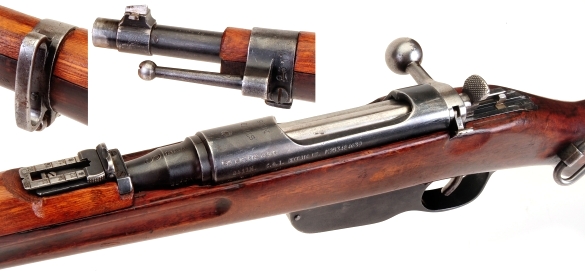
The star of the show. Ta Da….
Without the unique straight pull bolt design, the M95 Mannlicher would be just another old Austrian rifle with an oddball cartridge and of moderate historical significance. Yes, I do anticipate email that takes exception to my view of the world. The M95 straight pull design is almost elegant in its simplicity in comparison to the K31 Swiss rifle bolt pictured below.

Where the K31 uses the bolt handle as its cam follower and the bolt body carries the exposed helical that cams to the follower and opens and closes the bolt, the M95’s cams are internal to the M95’s bolt body and the helix is cut into the body of the bolt shaft. The bolt shaft also carries the firing pin and mainspring as well as the bolt head and twin locking lugs. The bolt is a relatively simple assembly that is easy to take apart and maintain.
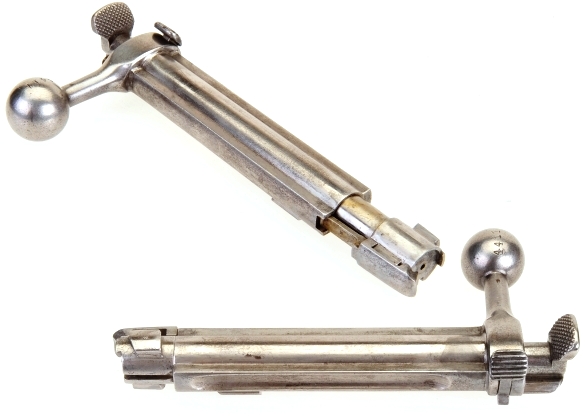
The gun is checked for empty, the trigger is pushed forward to allow the bolt to be removed from the receiver. Typically the bolt head will be extended when the bolt is removed and it needs to be collapsed against the bolt body. This is accomplished by tapping the bolt head with a plastic headed hammer.
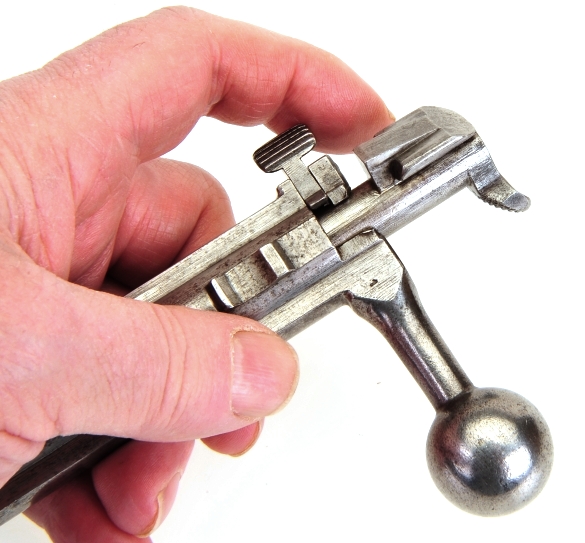
The safety is held out of the way and the central cocking piece is pulled rearward under tension, unscrewed and removed. Should look like, below.

The bolt head assembly, which includes the firing pin, will not come out without a fight, even if it is a small fight… which means a small, soft face hammer that won’t allow you to ball peen the end of the firing pin. Alternatively, you can use an oxy acetylene in stubborn cases. No, not really, that’s what I like to refer to as attempting to interject a little humor into a tragically boring scenario.

If you tapped correctly, the pile of parts on your bench should look like below, with the exception of the disassembled firing pin shown in the inset. You get to there by unscrewing the firing pin spring retainer from the bolt head assembly. The firing pin is under light load, but care must be taken to contain it when removed.

Fixed lugs inside the bolt body ride in the helix grooves cut into the bolt head assembly’s shaft. When the bolt is pushed forward, it does not rotate, which forced the bolt head assembly to turn in a timed fashion until its two locking lugs to engage the receiver and lock the gun’s breech.
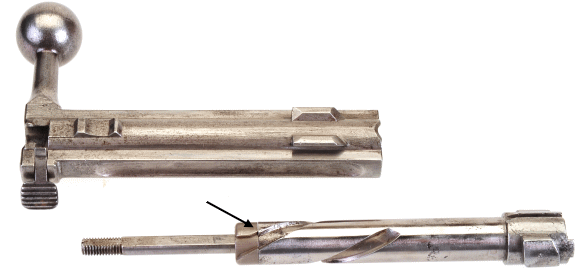
On reassembly, after installed in the firing pin, spring and retainer, the firing pin flat, the groove in the firing pin spring retainer and the bolt head are oriented as pictured above. The bolt head assembly is rotated until the firing pin flat faces the bolt handle, and the bolt head is inserted approximately two-thirds way into the bolt body.

The extractor is slipped between the bolt head and bolt body into its locating groove and then it is pushed over the locking lug,
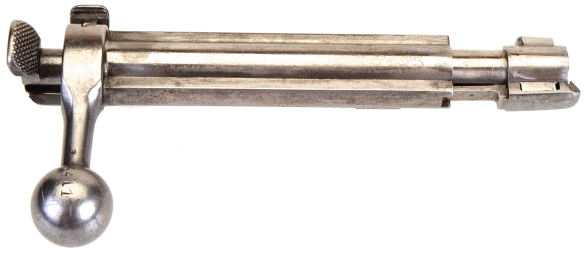
 Eventually it will look like above, if you play your cards right, except you will find that the bolt head is retracted and it needs to be extended prior to being installed in the rifle. Basically, you grab the lugs with a rag, pull as hard as you can and twist the bolt head into the locked position under the extractor. If you do it right, it isn’t much of a struggle. If you do it wrong, you’ll pull until your fingers fall off and you’ll bleed out before you ever get to shoot the rifle. Kidding… but not by much.
A short intermission
Probably a good place to break, prior to handloads, factory ammo live fire and accuracy testing. Or at least until I can stop laughing at this 22 Hornet on steroids. I’ve got one of the two bullets available for the round, the only readily available factory ammo and a gun that has been disassembled and reassembled by possibly dubious means.
Without being a smart ass with sore thumbs, this is actually a pretty decent gun. It feels a lot like an M38 Nagant in weight and balance and its operation is actually pretty slick not that it has been cleaned up. Looking forward to seeing how the rest of this plays out.
Straight Pull Rifles, Hold the Swiss… Part I
The Mannlicher M.95 – Straight Pull Rifle Part II

Email Notification