With a some imagination, and a few hand tools and fixtures, it is very possible for a person with reasonable mechanical aptitude to build a quality AR type firearm. Patience, good information and a willingness to learn can substantially improve the chances for a successful project.
Why bother with AR assembly when there are so many complete AR products on the market? Well, there might not be an AR that encompasses all of your personal preferences, which makes ground up building a way to go. Secondly, new features and accessories are constantly coming to market so there may be a desire to overhaul an existing AR. Finally, refinement of subsystems can greatly enhance an AR’s accuracy and reliability and provide a great deal of personal satisfaction.
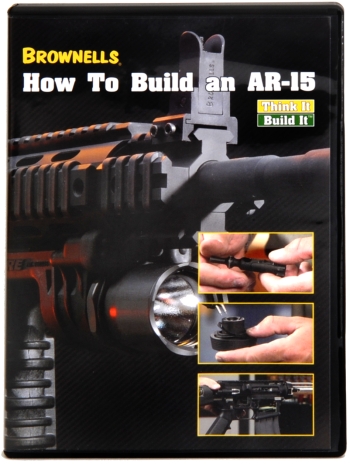
There are lots of quality and reasonably priced print and DVD based assembly guides to assist the home builder. Brownells “How to Build an AR-15” (Brownells 080-000-587WB $29) has excellent production quality and solid detail coverage. In overview, and for each subsystem of the AR15, instruction begins with function, project planning and part ordering, then methodically addresses every phase of assembly, utilizing proper nomenclature. Standard AR firearms are covered, as well as popular upgrade accessories (i.e. various handguard and barrel setups, a variety of trigger types, etc).
Another excellent guide is AGI’s “Building the AR-15” (Brownells 050-000-016WB $33). Gunsmith Robert Dunlap works through the assembly process including why and how specific tools are used, addresses areas that may need fitting and and concludes with final check out and tuning. Dunlap sometimes references parts by function rather than spec name, which perhaps helps the viewer to better understand a parts purpose, but this practice may drive purists crazy.
 For folks who like books they can reference at the workbench and tab to specific information, “The AR-15 Complete Owner’s Guide”, Walt Kuleck and Scott Duff (Brownells 261-000-001WB $23), and “The AR-15 Complete Assembly Guide”, Walt Kuleck and Clint McKee (Brownells 261-000-003WB $20). While coverage is different for each, they are quality productions with good detail photography and step by step instructions including useful technique for overcoming problem areas. Included are cautions and tips regarding critical steps in the process.
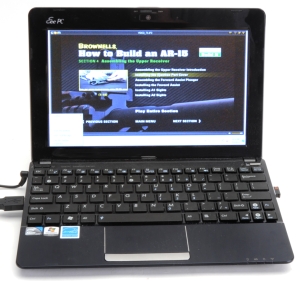
The book makes up for the use of stills in place of video with instructions of much greater detail. My personal preference is print, but then I am very old and don’t watch full length movies on the tiny screen of my cell phone. When I do want to work at the bench with video, I just use an old $250 netbook with a 10″ screen, WiFi and an external DVD drive. It only takes up a little space and I don’t have to keep running back and fourth between the bench and my desk. This also allows me to access Brownells and similar when I get to a step and realize I forgot to order a part. Would never have happened if I followed the instructions and laid out my parts order. Bad Joe! Bad!
In the beginning…
This is not a primary project, it is a background project. So it will appear as starts and stops based on available time and arrival of parts. My original intention was to build a 3 pound AR 15 by utilizing molded liquid. Unfortunately, the temperature in Maine has been 90+ºF which caused the liquid to covert to gas very quickly and everyone in the shop to speak with an odd, cartoonish voice. So I don’t really know how the weight issue will shake out until the end, when I toss it on a scale and find out for sure. Firearms can be an artful recreational endeavor, which means a project’s final objective may be no more than satisfying a desire to assemble a firearm. I think this project looks like this –
Our objective is to assemble a relatively light AR that will be accurate and reliable. It has to be comfortable to shoot with a variety of sighting systems and allows for easy mounting of accessories. It has to look good… At least to me. To that end, a J.P. Enterprises JP-15UR-H upper receiver was selected (Brownells 452-000-153WB $179). The part is a mil spec A3 receiver made from a 7075 T6 forging, finished in the mil-standard hard coat process, then coated with Black Teflon®. The JP Enterprises’ JPCTR02-UR, a flat top upper that omits the ejection port cover and the forward assist plunger and can utilize a low mass carrier was another possibility. However, the thought was that utility and possibly reliability might be compromised by going in that direction… North I believe. 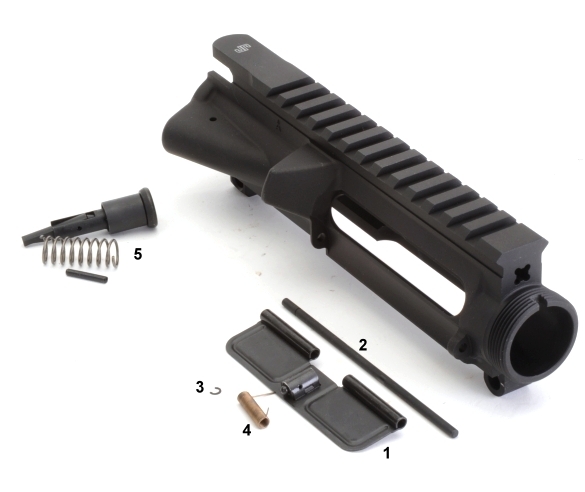
| Item # | Nomenclature | Brownells Part # | Units Per | Unit Price $ |
| 1 | Ejection Port Cover | 231-000-059WB | 1 | 5.99 |
| 2 | Ejection Port Cover Pin | 231-000-058WB | 1 | 1.99 |
| 3 | Ejection Cover Hinge Pin Clip | 430-000-500WB | 1 | 1.49 |
| 4 | AR-15 Ejection Port Cover Spring | 078-101-121WB | 1 | 0.99 |
| 5 | Forward Assist Assembly, Round | 231-000-063WB | 1 | 12.99 |
Generally speaking, the port cover must go on before the barrel or there will be no proper way to insert and retain the cover pin. A pair of needle nose pliers will hold the clip while it is snapped into the groove in the pin. The pin is started through the hinge boss on the receiver and the cover, the spring is slipped in place and the pin is fed the rest of the way through the aft pin boss. A spring leg is wound 180 degrees to preload the cover to the open position. If I try to wide the spring with the receiver right side up I will fumble for ten minutes. If I invert the receiver, it is easy to wind to preload and it pops right into place. No, I don’t know why.
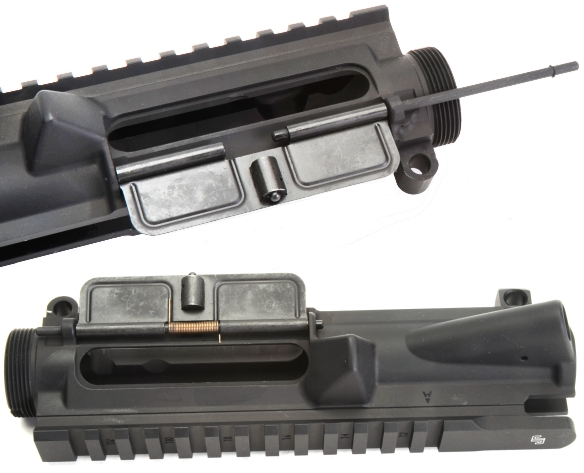
While it is typically a positive to leave a good impression, leaving them on an aluminum receiver tends to be the exception. A Brownells Part Number 080-000-661WB Upper Receiver Action Block $59.99 wraps around and secures and protects the upper receiver while mounted in a vise and you are busy tapping in pins like a woodpecker with a 4 ounce hammer.
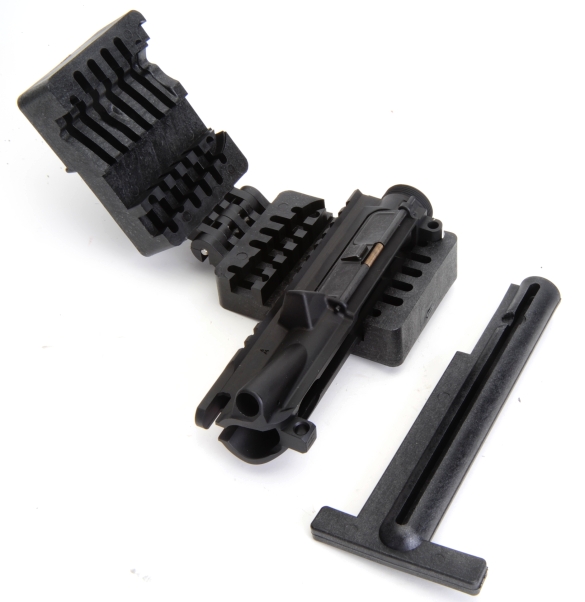
The forward assist is an easy install. The button is pressed in, a punch is fed into the retainer pin hole in the receiver to trap the forward assist assembly, then a retainer pin is driven in to make the installation permanent. In addition to the action block preserving the form and finish of the receiver, use of hollow point roll pin starter and roll pin punches will serve to install pins correctly and protect the finish on parts while you are working.
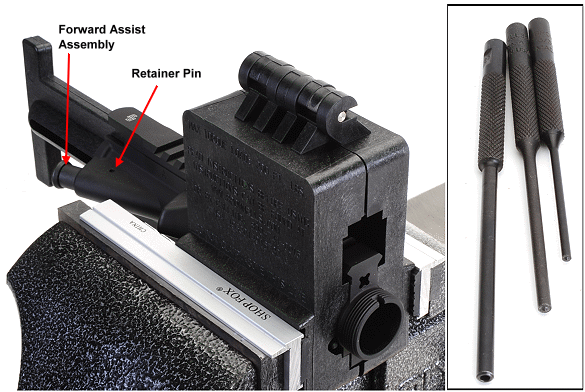
With the block out of the vise for the sake of illustration… and so I don’t have to bend myself into the form of a pretzel to get a proper shot, you can see where the forward assist was pressed in and retained with the solid punch of the bottom, while the roll pin holder is used to start the pin into the receiver from the bottom.

Good a place as any to stop…
Well, a couple of parts installed, no harm done and a floating handguard in transit. A good place to take a break and work some other projects until I can move ahead with further assembly.

Your Perfect Rifle… Some Assembly Required Part 1
Your Perfect Rifle… Some Assembly Required Part 2
Your Perfect Rifle… Some Assembly Required Part 3
Your Perfect Rifle… Some Assembly Required Part 4
Your Perfect Rifle… Some Assembly Required Part 5
Your Perfect Rifle… Some Assembly Required Part 6
Your Perfect Rifle… Some Assembly Required Part 7
Your Perfect Rifle… Some Assembly Required Part 8

Email Notification