
I bought an EAA Witness when I wanted a 10mm for projects because it is steel, it has decent barrel length, it seems to function reliably as a standard firearm, and because it is a good looking gun. I shot it for a couple of weeks and began to notice why it is priced lower than competing products. The trigger pull was heavy and gritty with lots of pre and over travel. The casting were rough; edges, hole location and finish under the chrome. The sights were/are less than exciting. The rear is a nice micro adjustable piece, but the front is a plain blade and there is little to distinguish one from the other while aiming. Read that, “No fiber optic sights”. In short, the perfect project firearm.
Factory, aftermarket parts and supporting services…
The Tanfoglio Witness may hold a record for the fewest sources of aftermarket and factory parts. Henning Wallgren’s site offers mostly performance parts and a limited number of factory parts. Eric Grauffel’s French based site offers performance and factory parts, but they transact in Euros so there is an unfavorable exchange rate and exceptional shipping costs. Tanfoglio’s factory site in Italy does not sell into the United States, no doubt in deference to EAA Corp., Tanfoglio’s U.S. importer. The EAA site, offers all factory parts and assemblies, including caliber conversion kits and, for most folks repairing and replacing parts, a primary source. How good are they? I’ll let you know when I receive a part just ordered… $4 part and $10 postal shipping.
Henning Wallgren’s site is a good informational resource, offering assembly and disassembly videos as well as installation videos for his flat trigger kits. The videos are not big screen high resolution productions, but the lighting is adequate, the audio is good and the video coverage of steps and narration are detailed and easy to follow. To his credit, he covered some of the variables that might be encountered by someone installing his flat trigger system, like an obstructing offset trigger pivot pin hole in the frame. It would have been useful if he had covered some basic trouble shooting like a trigger not resetting as a result of insufficient pretravel, too light of a trigger spring, etc. His installation video concludes with “Call if you run into a problem”. Four attempts to reach him or his shop with no return calls or email to a very basic flat trigger compatibility question. Oddly enough, it was no problem getting a response when we ordered material.
Forum support… brianenos.com seems to be the most active, however, it appears to be a combination of experienced people with good firearms and competitive shooting knowledge and a lot of software engineers who think they are mechanical engineers and machinists. Some of the comments are very helpful and credible. Some comments are frightening. Most comments simply don’t address the original question they follow. The most frequently asked questions are “Is Henning Wallgren still in business?”, “Has anyone been able to reach Henning?” and “Why won’t my Witness’s hammer drop since an attempted a trigger job?”. brianenos.com is the best of the top 3 or 4 Tanfoglio forums with the others comprised mostly of people swapping pictures of $3,000 custom Tanfoglio pistols and comparing who owns the largest collection.
AGI offers a CZ-75 & E.A.A. Witness technical manual and armorer’s course on DVD… which actually is neither. The production is ancient and the chances of it covering a current model with specificity are slim to none. It is OK for theory of operation. It is OK for developing a general understanding of how the Tanfoglio differs from the CZ-75. Usually Dunlap’s video’s are good and I keep a library for reference, but not this one is not.
Tanfoglio’s crescent trigger…
The opening photograph shows the trigger with the action decocked and poised in double action mode. Below, the trigger position when cocked in single action mode. As received, measured pull was approximately 10.9 lbs and 4.9 lbs respectively. More so, it wobbled side to side, had large amounts of creep, let off was more like bending than snapping glass and it made my finger… claustrophobic.
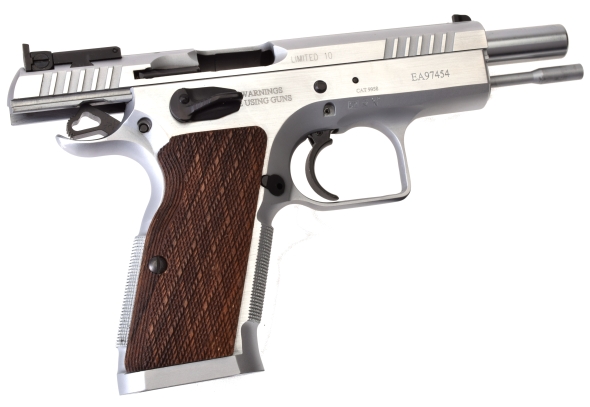
Normally I would think, “Joe, you’re not that good of a shot anyway, why not leave it alone?” and then I’d move on, but this time I thought, “This pistol was purchased solely to indulge my irrational affinity for the 10mm Auto. My pistol shooting skills may suck, but I’m at least going to enjoy pulling the trigger”. So I went for a single action flat trigger because I’ve shot them on several CZ 75s and they all had a great feel. I don’t use the double action feature of an autoloader, I like to pick and choose where along the trigger I place my finger and I like being able to adjust pre and over travel.
Enter the Henning Wallgren flat trigger kit
Above, a $125 Henning Professional Flat Trigger System. A nice aftermarket flat trigger with pretravel and overtravel adjustments for a CZ-75 is a $40 part at retail. A stainless shoulder screw and nut of comparable size runs approximately $6, quality compression springs are $1/per… $48 at retail. So a $77 hex wrench?
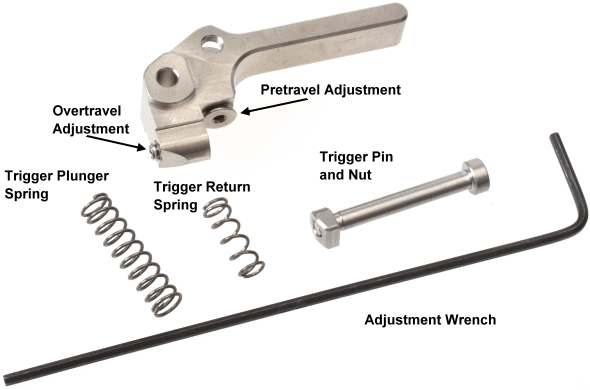
The Henning trigger offers a number of improvements beyond the comfort of flat contact surface. Overtravel adjustment is easy, the pretravel adjustment contact surface is large for full frame contact, the stock torsion spring is replaced with a small compression spring which eases installation and spring tension selection. The shoulder screw offers a good deal of friction reduction over the factory roll pin. The full length but lighter gauge trigger plunger spring assures full plunger travel with reduced resistance.
Highlights of disassembly and trigger installation
Honestly, the Henning videos do a much better job than I could with stills and 8,000 words of descriptive text, but it is probably worthwhile to point out a few things. Everything always starts with a safety check with magazine removal, racking the slide and checking for a clear chamber.
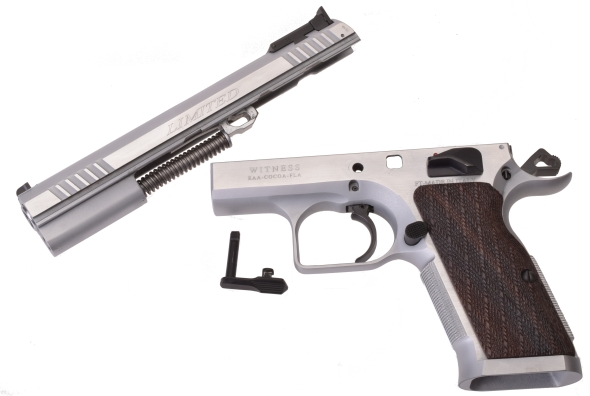
The magazine is pulled, the slide is aligned to the disassembly index marks and the slide stop is popped out… or tapped out of seated position with a nylon mallet and pulled out with finger tips. Unless you are me and lazy, this is also probably a good time to pull those checkered grips, before they are inadvertently struck with something heavy. I removed these later in the process, but still BBS.
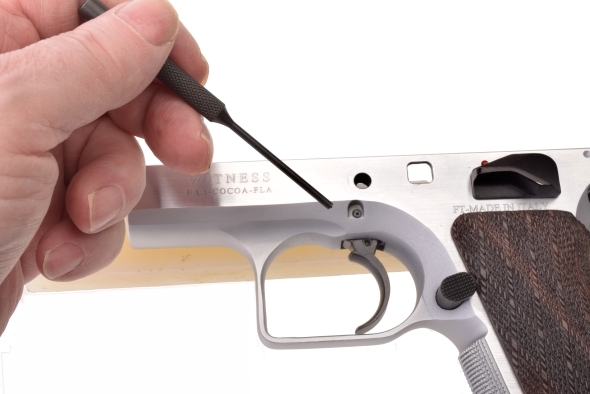
Using a roll pin punch, little nub on the end, the trigger pivot pin is tapped out. Sometimes pins are driven in at the factory in a manner that flares the struck end. They are set flush on the struck side and are recessed on the other and undisturbed. Rather than drive the flared end through the frame’s pin holes and loosed then, the frame was flipped over and the pin was driven out from the other side.
Once the trigger pivot pin is removed, in single action pistols with a nearly flat trigger, it can easily be pulled without removing the sear assembly. I was unable to pull the sharp radius double action trigger in the same fashion. Didn’t really matter as the sear assembly and hammer assembly were going to be pulled to change the Witness over to single action.
The grips were pulled and the frame was taped up to protect it from punch rubs and Bill Bergen like hammer swings. The Nylon block was placed on the near side frame rail to provide support while clearing the projecting ejector. Incidentally, if you are shopping for Nylon 6/6 round and rectangular stock, try eBay or MSC Direct. You’ll be able to 12″ length of 1/2″x1″ for $5 to $7, enough for two good support blocks or punches or long runs if preferred, but still at half the prices of other sources.
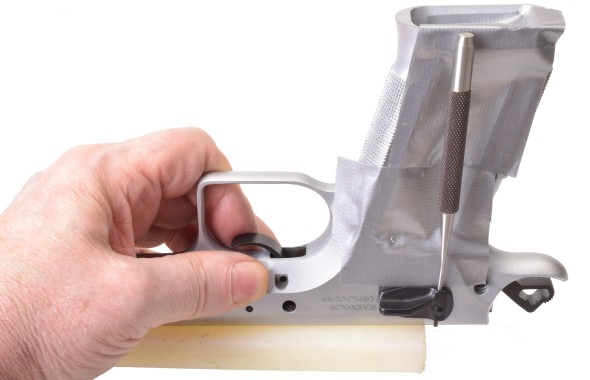
The thumb safety is retained by the sear spring resting in a notch in the thumb safety’s shaft. The right side thumb piece on an ambidextrous safety is retained with a roll pin. The roll pin is tapped out, a pick or small screw driver is used to lift the leg of the sear spring out of the notch in the thumb safety’s shaft and the thumb safety is pulled from the left side of the frame.
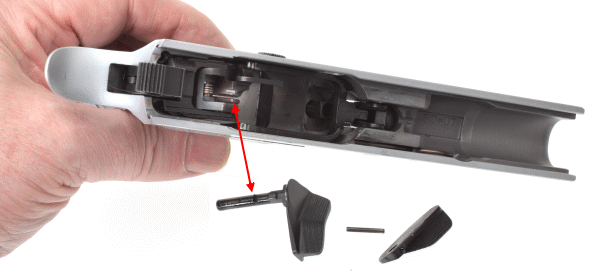
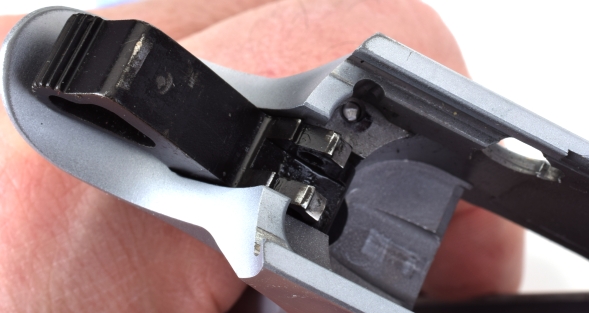
With the safety removed, the sear assembly is grasped by the ejector and wiggles forward and out. Below, with the sear assembly removed, the interaction of the interrupter and trigger bar is visible. In double action mode, pulling the trigger drives the trigger bar aft against the interrupter. The interrupter, pinned to the hammer, drives the hammer back and cocks the pistol.
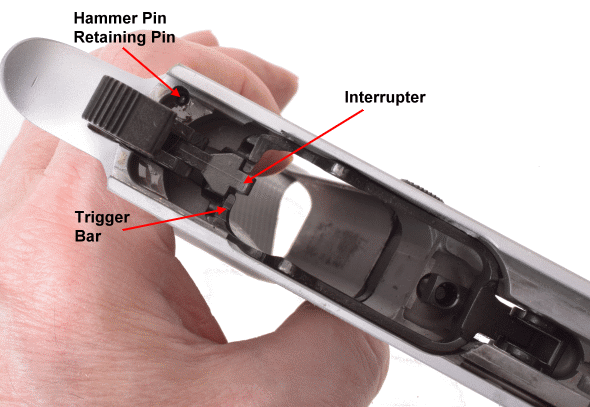
The hammer pin retaining pin is in the picture to flag a caution. That little pin floats in a hole in the frame and is held captive by the sear assembly. About the time you begin to celebrate removal of most of the fire control pieces, you will wave the frame in the air and the retaining pin will fly through the air and land in a parallel dimensional portal… at least that is my explanation of where it could of gone to not be found. Later I will explain how to make an even better pin from drill stock.
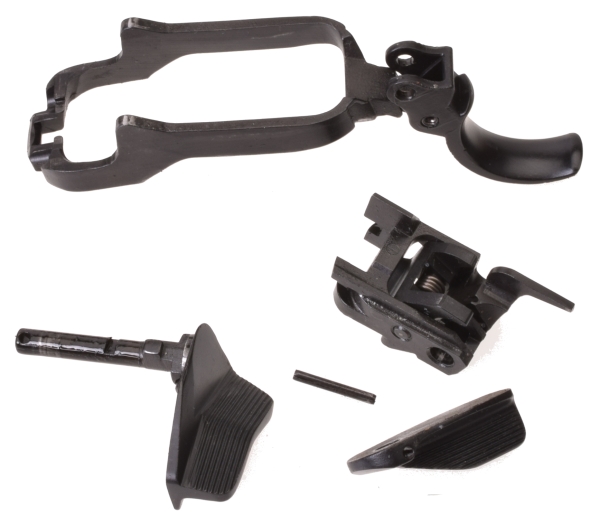
So at this stage, I had a small pile of parts like this, top to bottom and left to right, trigger and trigger bar, sear assembly, left thumb safety and shaft, right thumb piece with retaining roll pin. To convert the Witness Limited Pro 10 to single action, the trigger is replaced by the Henning part and the interrupter is removed from the hammer.
Why I am so slow…
Working on firearms is just another way to enjoy them. They are interesting and intricate machines, precise in parts fit and timed in movement. They are the mechanical version of a digital adventure game. Lots of puzzles to unravel and solve, each a small challenge, each resolution a small triumph. When not done in slow motion this work, through to hammer removal, takes about 5 minutes. The rest of the time goes to peeking and poking until the interaction of the parts becomes clear. When all becomes clear, it is time to set it aside and pick up another.
The retaining pin is a slip fit in its frame channel. A micro screw driver blade or pick can be used to catch it at its base and lift it up so it will clear the hammer pin and allow it to be driven out. Again, with the sear assembly removed, the pin is free to fall out of the channel if the frame is inverted.
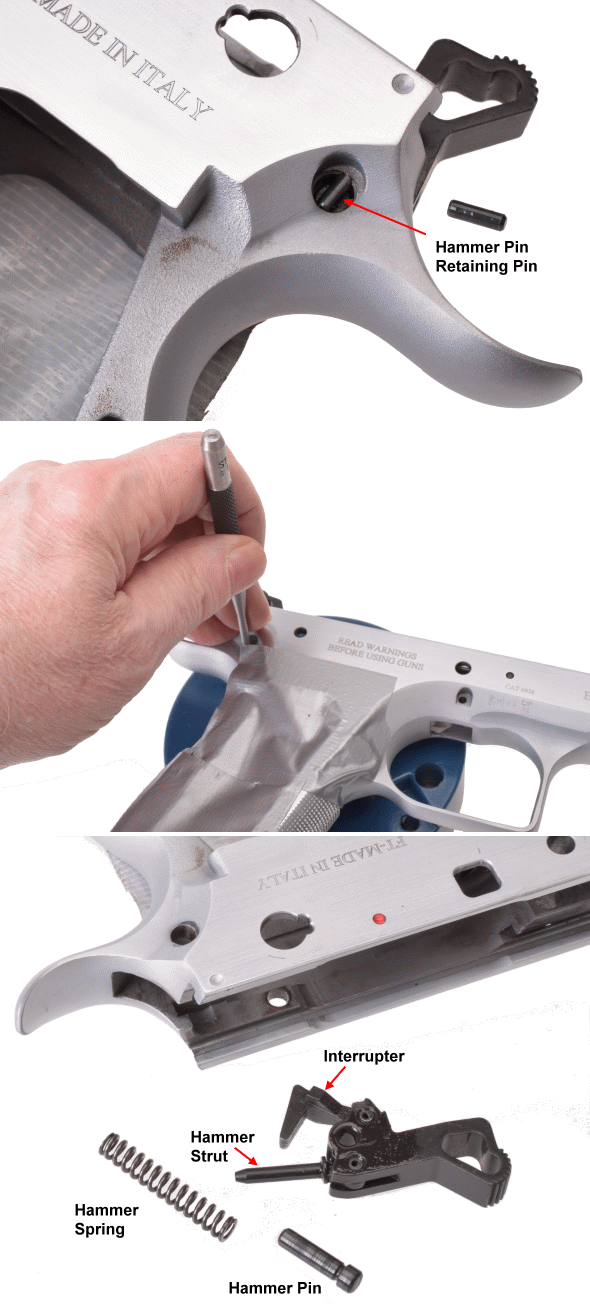
The hammer pin is solid pivot pin. Subsequently, a flat face punch is used to drive it out. Very lightly held in the frame, only a tap and not a TAP is required for its removal. Because the hammer is spring loaded atop the hammer spring, as the pin is driven out the punch will be held in the pin bore by the spring pressure. Pushing down on the top of the hammer with a thumb will relieve the spring pressure, allow the punch to be withdrawn and the hammer eased out of the frame. The strut and interrupter are held by tensioned roll pins so these pieces will not fall off.
The interrupter is removed from the hammer by supporting the hammer on a bench block and driving out its roll pin. Installation of the hammer is just a reverse; plopping the spring in the spring well in the frame, inserting the hammer strut, applying pressure to align the hammer picot hole with the frame and pressing in the pin. Tapping it into final position comes next with the retaining pin dropped into position to keep everything in place as seen above, hammer sans interrupter. A small piece of tape kept the retainer in place while I went on to work on other assemblies.
Again, I would defer to the detail of Henning’s videos for disassembly and assembly, these are only highlights of the process. Below left, the magazine catch assembly above the trigger bar guide plunger assembly. It is removed by slightly depressing the catch while pulling up on the plunger. Good to keep a finger over the plunger hole on the left side of the catch so that it does not go into low orbit when the plunger is pulled.
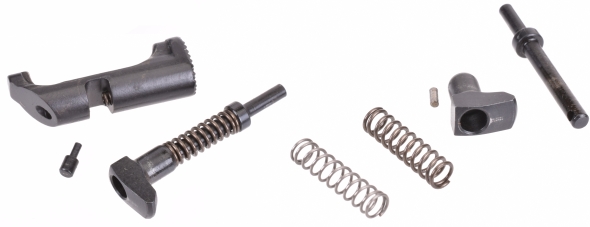
The plunger is disassembled by bearing down on the guide and using a small punch to push out the plunger bar retaining pin. Why would you disassemble the plunger? To change to a lighter spring that is supplied with Henning’s flat trigger kit. The trigger bar rides over the plunger when the trigger is depressed, reducing spring tension reduces friction which reduces pull resistance. Clipping the spring would reduce compressed spring rate, but it would also shortens the stroke and introduce the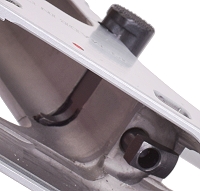 possibility of it not lifting the trigger bar fully into position. The stock plunger spring is made from 0.023″ wire, the Henning supplied piece is 0.017″ as both measured.
When the magazine catch and plunger are reinstalled it is good to keep in mind that the magazine catch plunger has a domed face. You want to make sure to use a punch much smaller than the plunger to hold it in place while the trigger bar plunger is being pushed into the groove on the magazine catch. If a punch is used that is the same size as the catch plunger bore, the trigger bar plunger will just ride on the punch or the side of the catch plunger and not work itself into place. The Witness magazine catch can be installed left or right side operation.
Finally!…Well, maybe not so much
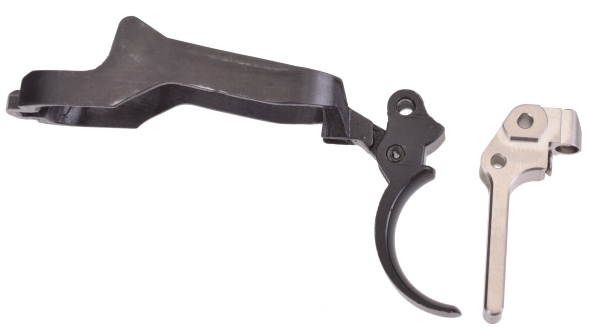
The new straight trigger replaces the original, utilizing the same trigger bar as well as the roll pin that holds the part together. Notice the trigger bar has not been polished, nor have any other parts. Our objective was to install the new trigger, making the DA to SA conversion and measure the change in single action trigger pull. Compared to a 1911 trigger bow, the Witness trigger bar is a major heavy duty piece.
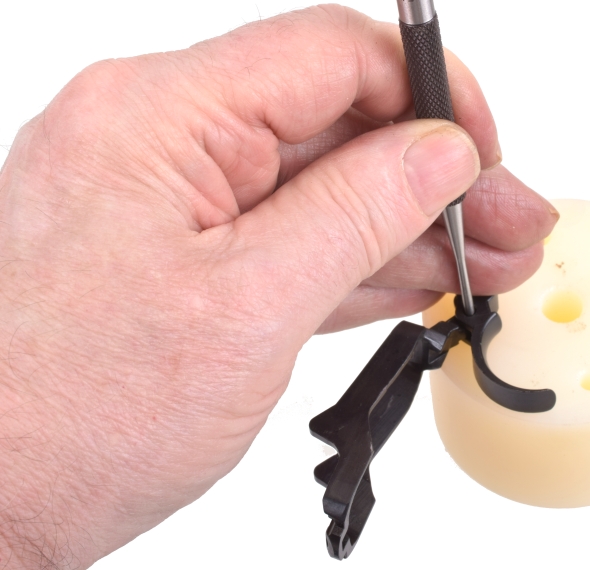
Knocking out the roll pin that holds the factory trigger to the trigger bar only requires supporting the trigger on a bench block so that the bar doesn’t take the shock of the blow. A flat punch was used rather than a pin punch because the pin was recessed deeply in its bore.
As seen below, the Henning trigger is the same width as the factory piece where it is linked to the pistol’s frame, but considerably more narrow where it links to the trigger bar. A proper replacement roll pin is not included in the kit, so the original pin must be ground to a length of 0.250″ and chamfered for insertion. A new pin should have been included.
A piece of tape was placed at the trim to line, the roll pin was placed in a starter punch, hollow tip, to hold the small piece while belt sanding it to length. Then it was started in the trigger and the trigger was used to hold the pin while the pin was chamfered.
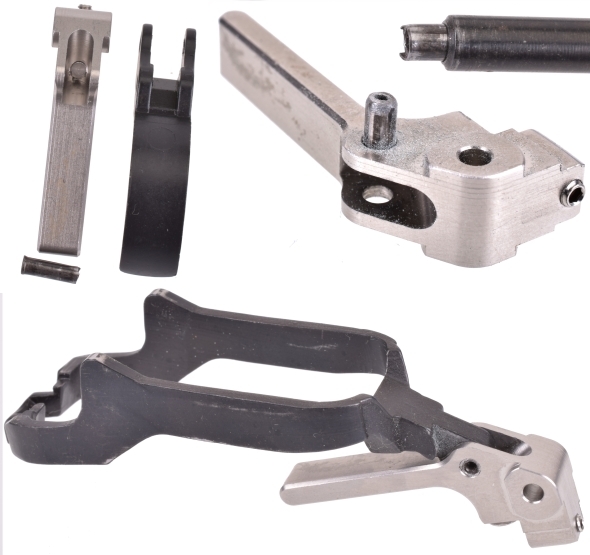
The part of the trigger bar that fits into the trigger yoke was rough, as was the inside of the new trigger yoke. The surfaces were cleaned up before assembly. Rather than pound away on the pin, trigger and trigger bar with a hammer and punch and risk damage, an arbor press was used to seat the roll pin. The trigger moved freely after assembly.
On trial fit, the the trigger pin would not pass through the trigger pivot bore, nor would it pass through the pin holes in the frame even without the trigger in place. The trigger pin measured 0.099″, a 0.099″ pin gauge entered both side of the trigger pivot pin bore, but would not pass through the center. The largest gauge that would pass was 0.096″ with some sort of metallic gunk in the middle. A drill in a pin vice cleared the obstruction.
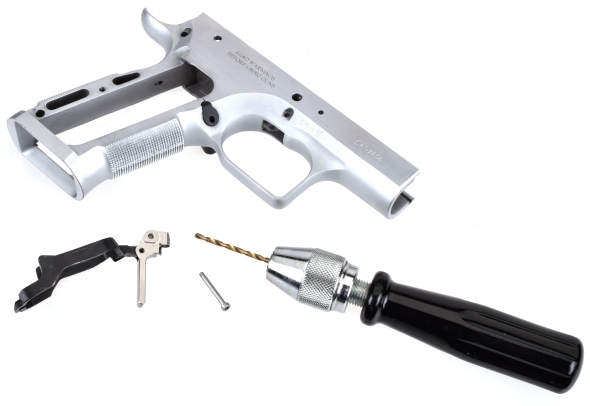
An 0.099″ pin gauge passed through each side of the frame, but would not pass through one side and out the other. The same drill was passed through the frame and the trigger pin would then pass through the frame and trigger. However, the pin hole in the frame was substantially offset in its recess, which prevented the trigger pin from seating in the recess.
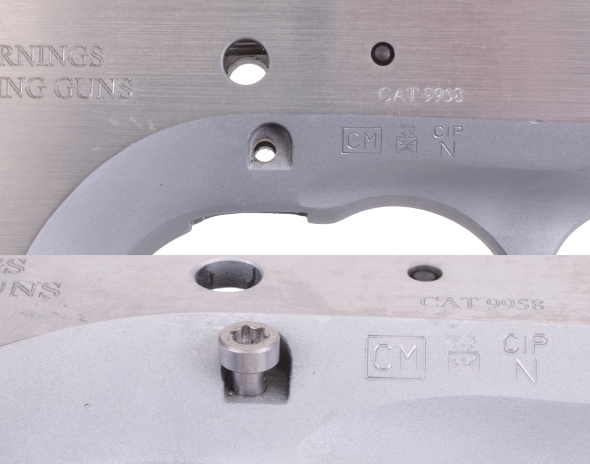
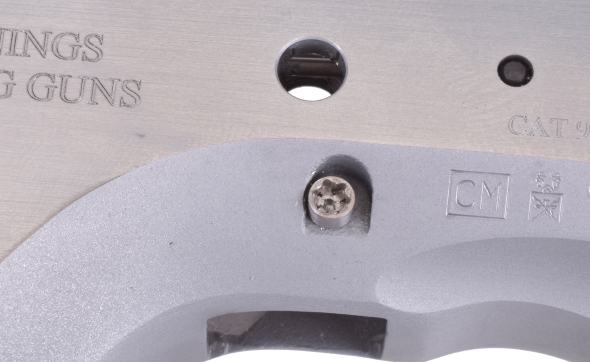
The frame is chrome plated so grinding or milling the recess to accommodate the hole shift wasn’t in the cards, so the shoulder screw was chucked in the lathe and the head was turned from 0.175″ to 0.135″. The Torx socket remained intact and the head cleared. The eccentric nut on the opposite side was ground for side clearance..
With the trigger in place, there was some rough contact between the trigger boss and the sides of the frame. A little blue Dykem identified the high spots and a fine stone took them out in a few strokes.
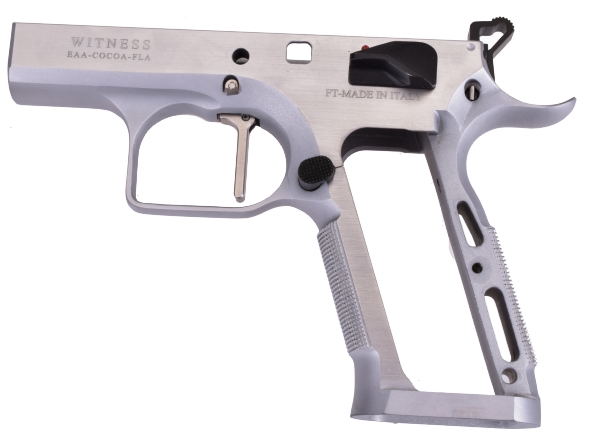
Time to take a break and work on several other pressing projects, but we’ll get back on this one shortly. So far, I’m underwhelmed. After spending a good deal of time on 1911 types and CZ-75 types I have to say I’m a little disappointed by the quality of these aftermarket parts and limited selection of parts available for the Witness. Again, I understand that Tanfoglio does terrific in competitive shooting and the folks who are prototyping and experimenting with these parts are world class. I just wish that the pieces being sold were a little more finessed when packaged for the general public, especially at these prices.

Email Notification