Before moving on with this installment, I thought it might be a good time to comment on the use of hand tools of this type, versus use of a more elaborate set of tools that require the use of a lathe; both types intended for the same purposes. Both approaches are very much operator dependent. Assuming both are being done by skilled people, the more elaborate tool / lathe approach will achieve more precise results. The benefit of the more elaborate approach is that it established the bolt-way as the point of reference for all truing, squaring and alignment and it corrects areas not addressed by the more simple manual tool set.
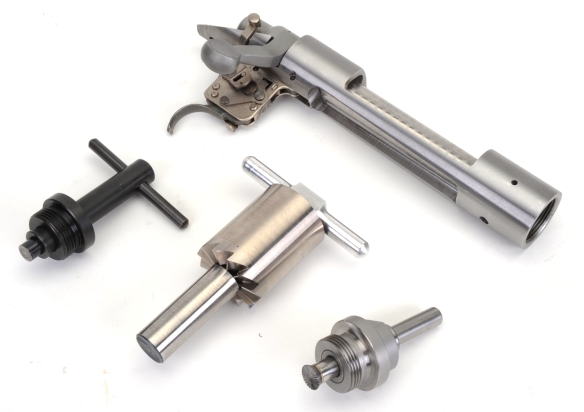
The three tools below the Remington action in the picture above represent the manual action clean up approach. They are, left to right:
Bolt Lug Lapping Tool – Brownells 080-097-701WB One Gun Bolt Lapping Set fits Remington 700. $52.99. It is adaptable to other firearms.
Receiver Facing Cutter – Brownells 080-000-194WB Receiver Facing Cutter $70.50, 080-000-197WB .700″ Receiver Facing Pilot $28.99, 080-589-000WB
Facing & Chamfering Tool Handle, 1/4″-20 thread $14.99. $114.48 combined. Other pilots available.Bolt Face Truing Tool – Brownells 513-000-008WB Tooling Block $100, 513-000-012WB Magnum Facing Burr $84.99. $184.99. Other burrs available.
The total cost for the three tool sets noted is $353.45. Not inexpensive, but long lasting and adaptable to other actions for approximately $100 per change over. By comparison, a Manson Precision Receiver Accurizing System, Brownells 513-000-050WB Standard Receiver Accurizing Kit cost $500 and is used in concert with a lathe. The Manson System locates to the bolt raceway, does what the manual kits does and also properly aligns the receiver’s barrel threads to the bolt raceway, squares the receiver’s lug seats and face to the same… as long as a lathe is available and a competent enough machinist to set up and hold a decent tolerance.
The problem with both the lathe based version and the manual version of these tools is the diameter of a production action’s bolt-way. As an example, the bolt-way in the project’s action measures 0.703″, the facing cutter’s pilot measures 0.700″, the bolt measures 0.695″ so there is room for the cutter to rock in the bolt-way when facing the action which means care must be taken when cutting. I know, no kidding! The mandrel used in the machinist’s version uses tapered bushings for centering. So all of the cuts taken will be properly aligned. Still, when the work is done, the rifle will have a bolt that can float around laterally by 0.005″. When an action is to be trued to critical dimensions, this type of dimensional… slop is typically taken out by boring or reaming the bolt-way oversize by perhaps 0.010″ and then sleeving the bolt within 0.001″ of the bolt-way diameter. A less expensive and tidier solution would be to buy a spiffy one piece oversize bolt from a company like Pacific Tool & Gauge.
In any event, I am very old and may not live long enough to finish a precise, multifaceted project and, because I can usually get a rifle based on a manually blueprinted action to at/near or slightly under 1/2 MOA, the manual tool approach works for me; hold the lathe, sleeves and bolts.
Colonel Cutter and his pilot to try to get a handle on the situation….
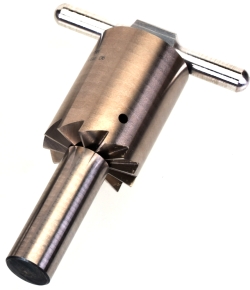
The bolt lugs were lapped in Part 1, so it was time to move on to facing the receiver. Below, the face cutter tool described above. The cutter is 1 1/2″ in diameter with 12 90º flutes. The pictured pilot is 0.700″ in diameter for use with a Remington Model 700 action. The T handle threads to the back of the cutter for manual cutting. For folks in a hurry, Brownells 080-962-000WB Drill Chuck Adapter $12.99 permits the use of a drill to drive the cutter. Brownells 080-000-195WB 1″ Receiver Facing Pilot $28.99 is used for AR15 action facing.

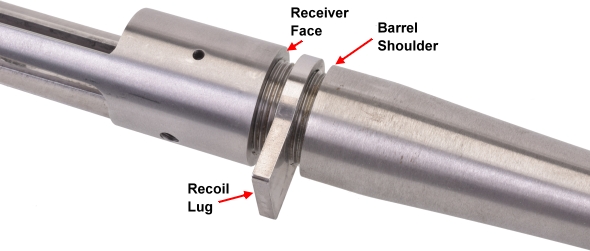
The objective of receiver face cutting is to give the recoil lug, compressed by the barrel shoulder, a flat surface to seat against that is perpendicular to the bolt-ways and parallel with the bolt face. The recoil lug is a flat, surface ground piece as received and the barrel shoulder cut at the top of the threads is supplied lathe squared.

It takes awhile…

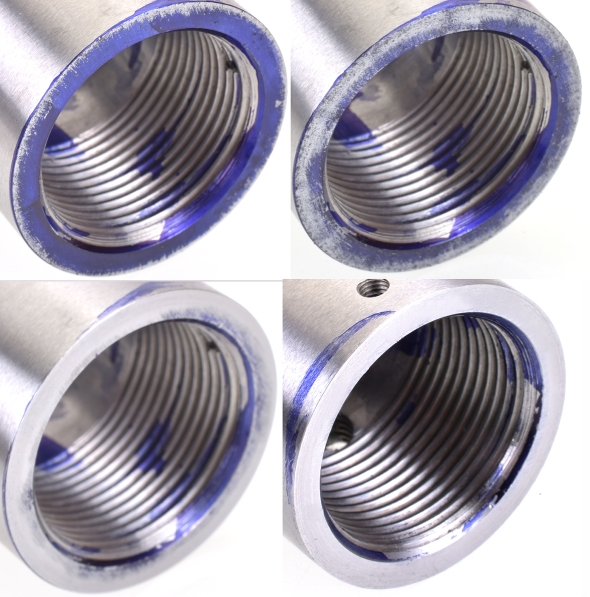
The process is simple; a little Dykem layout fluid is brushed onto the face of the receiver, the tool is inserted, a little cutting oil is applied and the tool is turned a couple of times. The tool is pulled and the high and low areas are obvious. In this case, the only contact surfaces were around the perimeter. Done manually, it took perhaps 300 rotations to get from the top right condition to the bottom left where the face is flat over the entire surface.

For all of the turning, the actual amount of material removed was 0.002″. Doesn’t seem like much, but that inconsistency would makes for uneven stress on the barrel and that would effect accuracy.
 With bolt lugs and action lug seats lapped, and now with the action faced, the next step is bolt face truing. We’ll get to that next time and probably final chamber cutting and headspacing.
Working on firearms falls into at least a couple of categories; repairing or modifying a firearm to get it ready for hunting or competitive shooting, or repairing and modifying for the enjoyment of… repairing and modifying. There may be a third… as a method of learning.
The more time spent with drawings and tooling and understanding how and firearm is assembled and why, the more that will carry over to handloading and squeezing the potential out of a firearm. What is learned is why two examples of the same model firearm can shoot so differently, and perhaps how to get the under performer up to snuff.
Either a 338 Ultra Mag… or a Nifty Paperweight Part 1
Either a 338 Ultra Mag… or a Nifty Paperweight Part 2
Either a 338 Ultra Mag… or a Nifty Paperweight Part 3
Either a 338 Ultra Mag… or a Nifty Paperweight Part 4

Email Notification