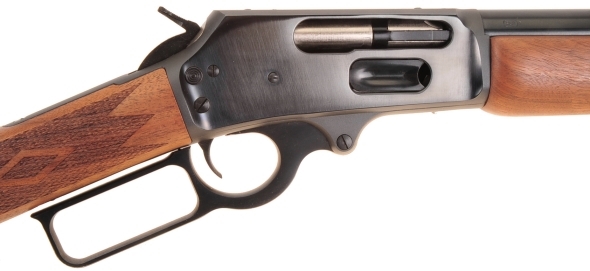
Made by Marlin or made by Remington, the Marlin closed top Model 336 has been with us since 1948. With numerous variants added along the way, the compact, quick handling lever action has been chambered in everything from varmint intended small bore cartridges to big bore cartridges powerful enough for the largest and most dangerous North American game. Marlin firearms maintain a significant presence wherever woodland or difficult terrain keep shooting distances moderate. Pictured above is a Model 1895 Guide Gun, the Model 336 adapted to the large 45-70 Gov’t cartridge.
In general, the Marlin Model 1895 requires no work to prepare it for hunting. Fit and finish is good and they are actually quite accurate and reliable. That said, there are many refinements that can be made, even if just to finesse it to personal taste. One of the areas that can be slicked up a bit is the rifle’s trigger pull. Marlin triggers are typically creep free and break cleanly, but they tend to have a pull that is a bit on the heavy side, somewhere between 5.5 and 6.5 lbs.
There are three basic approaches to reducing Marlin 336 trigger pull: install a reduced power hammer spring, install an aftermarket trigger, rework the existing trigger. Each presents a different result, each carries a different cost. The following steps are required to accomplish each task on Models 336, 1894 and 1895 with modification notations as they apply.
Reduced power hammer spring….
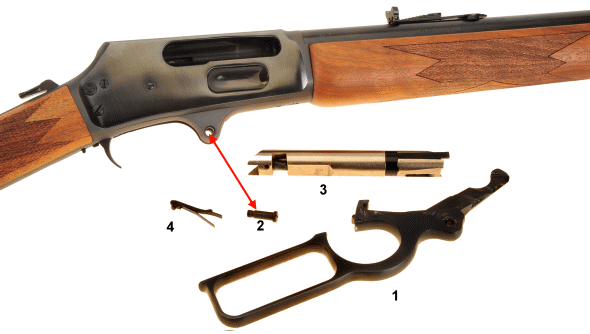
After checking the rifle for empty, magazine and chamber, the finger lever (1) is rotated forward perpendicular to the receiver and the finger lever screw (2) is removed and the finger lever is set aside. Use a driver with a parallel ground bit of the proper size to avoid chewed up screw heads, bluing scraped from recessed holes and other professions suggesting an amateur has been working on your rifle. Pull the breech bolt (3) from the rear of the receiver. The ejector assembly (4) is nested in a groove on the left inside wall of the receiver, anchored in place with a pin that is part of the ejector body and the rifle’s bolt. Rotate the receiver ejection port side down and the ejector will fall out.
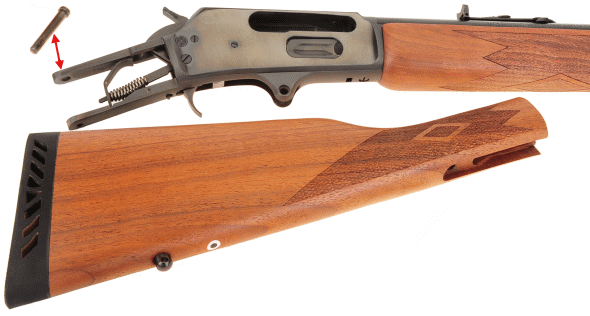
The tang screw (arrow) is removed and the butt stock is pulled back and off, then set aside. If you have not already done so, the hammer should be lowered to off load the hammer spring in preparation for removal. With the lever removed the trigger safety block (1 Below) must be depressed for the trigger to function.
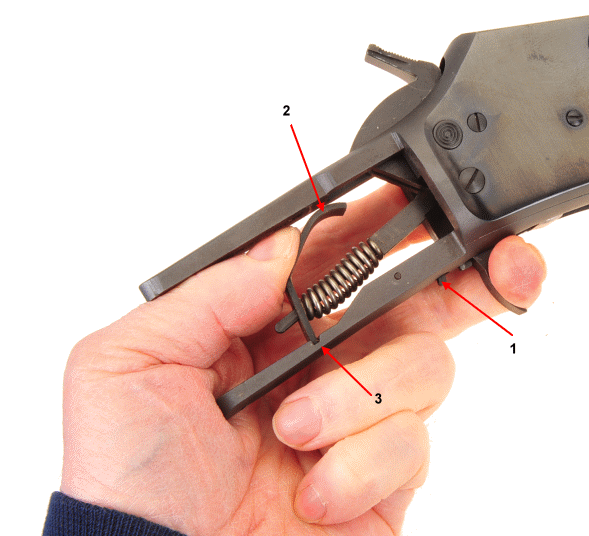
The hammer spring adjusting plate (2) is pressed forward to slightly compressed the hammer spring, then lifted from the slot in the tang (3). At this point the standard weight spring can be replaced with a reduced power spring and finessed by contouring the upper part of the hammer spring adjusting plate. Wolffe makes a reduced power barrel spring as PN 32501, Cost is under $8. If this gets you to your trigger pull goal, swap in the new spring, reverse the disassembly steps and verify the new trigger pull.
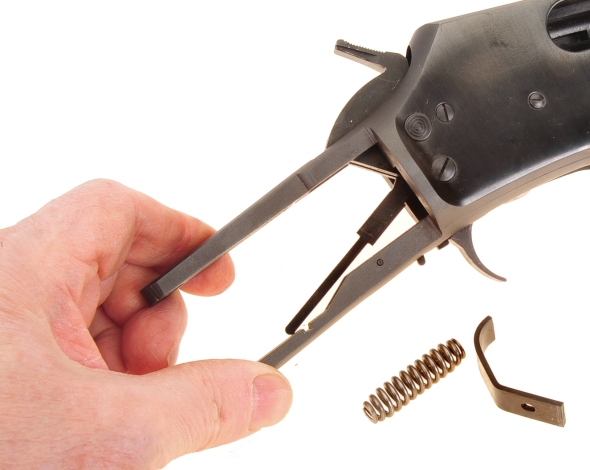
Reduced power springs are often used for firearms set up for cowboy action shooting. The notion has been advanced in hammer spring discourse that a reduced power hammer spring will result in unreliable ignition. This has not been my experience after installing reduced power springs in numerous Model 336 rifles, even with a broad selection of primer types and brands, including large and small primer brass. Perhaps this might occur when drastic reductions in trigger pull, below 3 lbs, are the goal. A spring change will typically bring a 6 lb trigger down to 4.5 lbs.
Trigger change
Wild West Guns in Anchorage, Alaska produces an aftermarket two piece trigger for Marlin 336. The Wild West piece features a beefed up, compression sprung preloaded sear that take most of the free movement out of the assembly. Revised geometry and contact surfaces, and a bronze insert that provides a reduced friction bearing surface for the trigger & sear pin, combine to reduce pull.
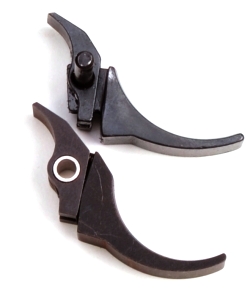 Available in blue or stainless steel, Wild West bills the Trigger Happy Kit as providing a nominal 4 lb pull and eliminating the “dreaded Marlin Flop”. I can attest to the trigger pull reduction, however the “Marlin Flop” as a crisis deficiency is the gunk gun related social media is made of. The two piece trigger is necessary for lever safety block function and I am not sure why free travel in non-active pull makes some folks so crazy.
In times past, a reference part number and price would be cited for one of the gunsmith supply houses. Unfortunately, as has become common place, the trigger is actually lower in cost at full MSRP when purchased directly from the manufacturer. What was $89 through Brownells a few years ago is now $100 purchased directly from Wild West Guns and $119 from both Brownells and MidwayUSA.
The same prior disassembly steps, and a few additional, are required for a trigger change. The Wild West Trigger Happy piece is marked gunsmith install, which is not the same as “requires fitting”. In my experience, the trigger is a drop in fit, however, a sear should be checked for sufficient hammer engagement, uniform contact and safe operation. That, I believe, is the basis for “gunsmith install”.
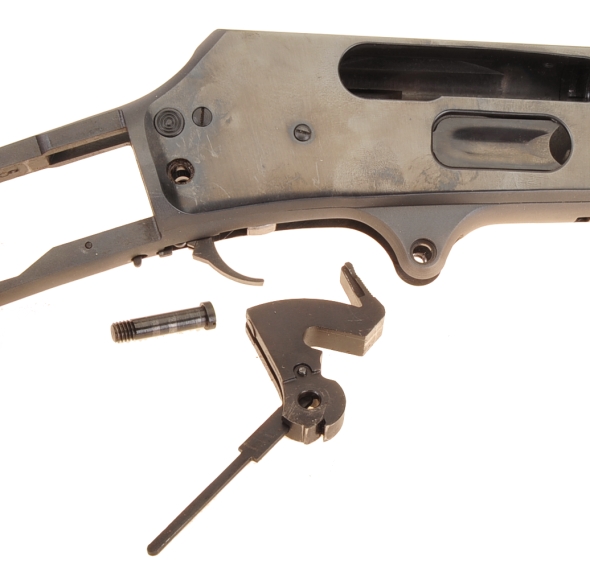
Above left, the hammer screw is removed and the hammer is pulled upward and out. The hammer and strut are pinned together and can remain so for this project. Depressing the trigger safety block and holding the trigger back eases hammer removal.
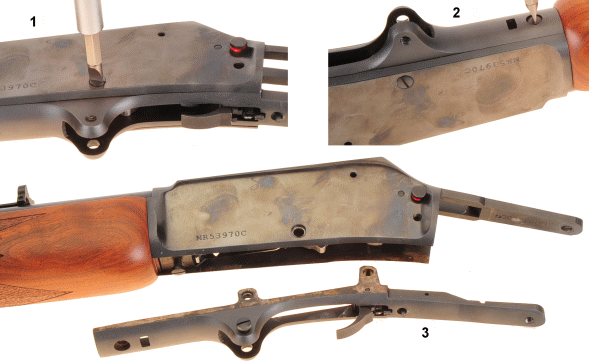
Above, the trigger guard plate support screw (1) is removed, followed by the trigger guard plate screw (2). With those fasteners removed, the trigger guard plate (3) drops out, complete with trigger. A note for reinstallation; it is best to start the hammer screw before tightening the trigger guard plate plate screw or the hammer screw may be forced out of alignment.
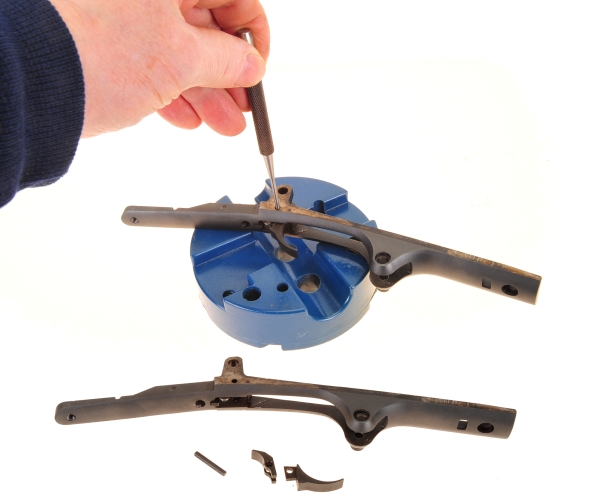
Top, the trigger and sear pin is tapped out from the trigger guard plate. Pictured bottom, left to right, trigger and sear pin, sear and trigger. The trigger safety block and safety block spring remain in place in the trigger guard plate. At this point, if installing a Wild West Trigger Happy kit is the plan, the new trigger would be installed, proper surface contact verified and rifle would be reassembled.
Refining the Marlin factory trigger
There are so many ways to screw up a trigger, to make it too light, to make it uneven, to make it unsafe. Which just means that taking your firearm apart and modifying the work of a designer is not a casual undertaking. You cannot lighten and smooth out trigger function by holding a sear in your hand and working it over with a stone, sandpaper or a file. Face angles and relief angles have to be precise and surfaces need to be parallel to the sear pin bore and final pull resistance must be sufficient to prevent unplanned or accidental discharge.
There are many fixtures available for trigger work. Some good, some not, some easy to use, some so complicated it is enough to make a person lose interest in related projects. The Power Custom Series 1 Universal Sear Stoning Fixture is one of the better tools and reasonable in price. The basic tool runs $159.99 from Power Custom with one adapter of a customer’s choosing. Purchased separately, adapters cost $25.99 each and typically service multiple firearm types. As an example, the 336 adapter works with Marlin 336, 1894 and 1895 and all other modern Marlin lever action centerfire rifles. The RH adapter works with Ruger Super Redhawks, Redhawks and GP100 models.
Above: Power Custom Sear Stoning Fixture (1), Vertical Guide Pins (2), Guide Roller (3), Adapter (4), Elevation Wheel (5), Machinist Clamp (6), Medium India Stone (7), Fine India Stone (8). A near finished sear (9).
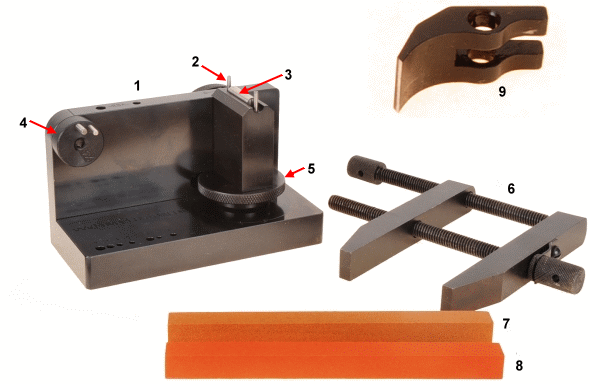
With very specific and detailed instructions, the adapter is installed and aligned to an index mark as instructed for each to cut face and relief angles. The elevation wheel is first bottomed, then adjusted upward the number of clicks instructed. The indexing and elevating establish the correct cutting angle. The appropriate stone is rested on the Guide Roller and sear surface and one inch light strokes are used to remove and true material. I finish… polish, with a white ceramic wet stone – not pictured.
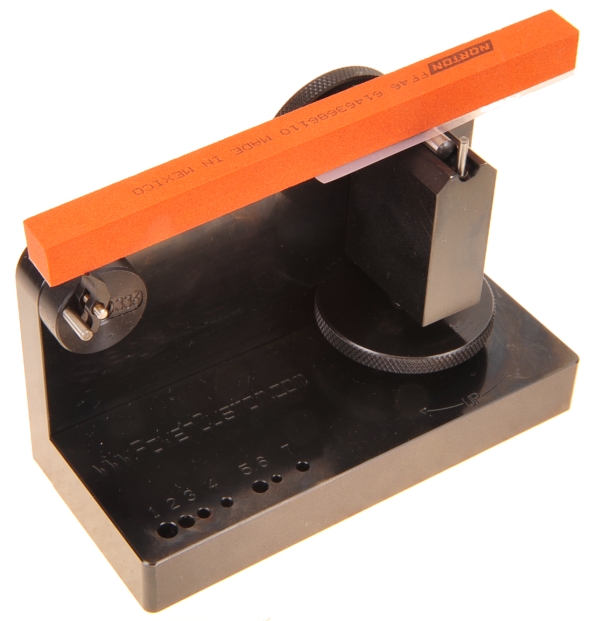
Raising the elevation wheel causes the stone to contact the sear from a higher angle, shortening the contact area and reducing trigger pull. Lowering makes for a heavier pull. Very little should be removed before putting the pieces back into the rifle and checked and a coat of Dykem should be applied before each stoning. Instructions suggest placing shim stock under the back of the stone to protect the guide pins and rollers. I found a sheet of paper wrapped around the stone has less effect on angles and it is easy to keep n place, or even a strip of scotch tape as shown.
Below, set up for a face cut, the adapter is indexed to the “0” , contact surface up (1), bottom against the locator pin. Notice how uneven the contact surface was at the beginning of the operation. The relief cut is made by rotating the adapter so that the small pin lines up with the frame index mark, flipping over the sear so the burr edge is facing up and making a light pass or two with the stone. All of this is covered in easy to follow instructions packaged with the stoning fixture.
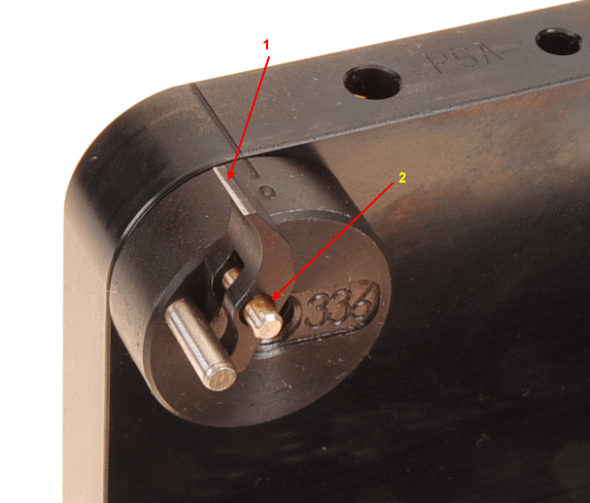
It is recommended that the sear is held in place on the adapter with a #10 Machinist Parallel Clamp with 3″ jaws. Pictured is a 5″ clamp. It is necessary to drill a hole through the clamp to clear the pins on the adapter. I found it easier to go to a larger clamp and place small machinist parallels between the adapter, sears and the clamp. The thing is, the sear needs to be clamped flat against the adapter. Held by hand, the sear could wobble on the pivot pin (2), causing uneven cutting, or it could rotate away from the locator pin and cut an incorrect angle.
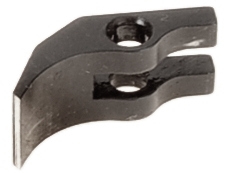
The finished sear; face and relief cut and polished. This is an approximately half hour job, including disassembly and assembly in concert with the Power Custom fixture.
The Model 1895 Marlin began with a 6 lb 3 oz pull and ended with a very smooth, clean breaking 3 lb 10 oz pull. The contact surface could have been more narrow which would have been lighter, but the trigger would require increased maintenance and it would have be lighter than preferred. A good project for personalizing a rifle.

Email Notification