 I know this sounds odd, but I think I’ve just found the most cost effective way to improve the quality of my reloads – I put a new top on my reloading bench. I began noticing that simple operations like removing spent primers, or taper crimping assembled rounds was getting more difficult with each session. I also noticed I was getting greater inconsistencies in virtually any operation that required close control of press handle pressure.
I stuck a small table next to, and level with, the bench, and put a dial indicator on the table, with the indicator tip on the base of the press. I measured over a quarter of an inch in movement, up or down in bench top flex, before any real force was actually transferred to the press operation. So my efforts were being wasted on bending boards. Unfortunately, the pressure required to flex the surface was about the same required to seat a primer and, frequently, what I thought was the final seating motion of the primer, was actually the bench top hitting its travel limit. Duh..
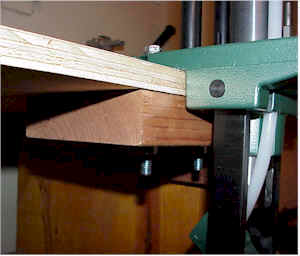 I picked up a piece of 3/4″ exterior plywood, A/C surface graded, 90″L X 24″W and suspended it over two wide base units, leaving a 28″ wide leg well. Then I screwed the top to the base 2×4 frames at over 30 locations with deck screws, and reinforced beneath the press mount locations with a piece of 2 x 6 heartwood grade redwood. Yes, I know it’s not oak, but it looks really impressive. I can now operate my press easily and accurately or, alternatively, do pull ups on the press handle without flexing the bench.
I also took a few minutes to make templates from my case trimmer, APL press, and several other small bench mount tools, and drilled these patterns into the bench in one small area above the leg well. Then I picked up an assortment of cross slot screws and washers/wing nuts so I can quick change tools, and not tie up valuable bench space with unnecessary equipment. Yes I know RCBS makes a fixture for this purpose, but I didn’t want to pay $30 for holes and I wanted to accommodate other non-RCBS tools.
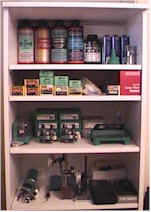 Then things really turned bad. My wife saw the bench top change as a sign of weakness in my war against being organized and picked up this little hard plastic laminate cabinet and organized all of the stuff that use to bounce off the bench when I was trying to resize Weatherby cases.
Sold in discount lumber stores, the material is anti-stat, fire retardant and optionally comes with solid doors and adjustable shelving. It cost just a little bit more than that 3″x6″ universal mounting fixture from RCBS, and it holds a whole lot more. It does, however, sort of takes the fun out of playing, “Wonder where the hell I put that, the last time I used it”.
Bushnell Trophy 20-50MM Spotting Scope
I’ve put off getting a spotting scope because I just don’t want to carry anything else. Seems like going to the range these days, requires a large truck and half an hour of set up time before the first shot is fired. Unfortunately, it’s also a pain to have to crank up rifle scope magnification just to locate bullet holes, then back down to shoot.
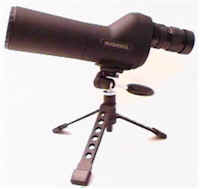 A very recent birthday gift solved the problem. If you haven’t tried one, the Bushnell Trophy is the smallest quality spotting scope I’ve ever used. With magnification from 20 – 50x the range is perfect, the 50MM objective offers an excellent field of view and the images are bright and clear. I can now spot lint at a couple hundred yards.
Best part is, it’s small, around 12″ long and light at 17 oz. The collapsible tripod is very sturdy, the scope is very stable, and it fits on the bench with the rifle, a shooting rest and chronograph.
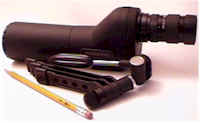 This comparison may offer a better perspective on the size of the package, the scope next to a standard #2 pencil. The tripod folds up and everything fits into a neat little carry case. Thanks guys, much appreciated. The scope will take the surprise out of walking up on a distant target to see where all those shots landed, but sometimes that’s a good thing.
Making a throat clearance gauge
Reloading manuals provide us with a safe measurement for overall cartridge length. This measurement should assure us that the rounds we assemble will feed and cycle through our production rifles. In addition, holding this dimension should also assure us that bullet tips will not sit up against rifling when we close the breech behind a loaded round. The first case prevents untimely jams, the second prevents potentially dangerous chamber pressure spikes.
Unfortunately, custom rifles incorporate the individual gunsmith’s dimensional variations, thinly documented wildcat cartridges may establish no standard for overall cartridge length, and new bullet designs with varying profiles (particularly at the high end of the sectional density scale), all place a question mark next to the overall cartridge length dimension. So what is there to gain or lose in this area ?
One theory is, long freebore dimensions tend to elevate muzzle velocity and diminish accuracy, shorter throat dimensions have the inverse effect. Long leads provide a running start with maximum pressure and little resistance, short leads stabilize the bullet sooner. I used the word “theory” only because I have never seen a controlled experiment, working with reasonable variations in freebore, that illustrated this cause and effect. My own experience seems to indicate the degree of freebore in production rifles has an insignificant impact on accuracy and velocity. I’m sure there are a few people out there with .22-250’s that punch holes inside of other holes that may differ with this opinion.
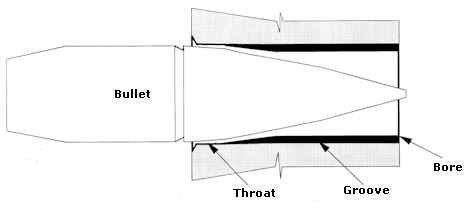 I believe the significant problem, and one that is easy to demonstrate, is one of chamber pressure variations. The difference between two identical loads, with only variations in overall cartridge length, can fall into the range of safe pressure to excessive pressure. When closing the breech on a round presses the bullet up against rifling, max or near max loads spike to unsafe pressure levels. So the issue becomes, how to seat bullets so the overall cartridge length will: permit feeding from magazine wells, clear receivers on extraction and ejection, position the chambered round so the bullet is between approximately .030″ – .100″ away from making contact with the rifling.
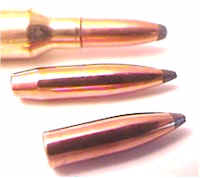 The feed part is pretty easy to accomplish and verify, the second part is a little more difficult. Even if we account for overall length, there is just no way to account for every type of bullet profile, and optimize bullet seating for the greatest accuracy, if you can’t tell where an overall cartridge length will locate a specific type bullet, relative to the rifling in a specific gun.
Different bullets hold their initial diameter further out towards the tip of the bullet, so the overall allowable length will vary from one bullet type to another.
I can never get the “seat bullet a little at a time, close the bolt and check for contact marks” method to work for me, or the “cleaning rod down the barrel” routine, or the “turn the bullet around on an empty case and close bolt” approach. Gauges made for this process seem inaccurate, overly expensive, or as difficult to use as the other methods I’ve indicated. So I make my own gauges for each round I reload. The process is quick, and the measurements are acceptably accurate.
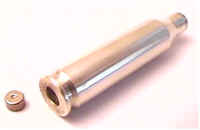 I start with a cleaned, once fired, decapped, empty case from the rifle I’ll be reloading ammo for. I use either a decapping die, or screw out the decapping rod in my resizing die so the case isn’t resized when the spent primer is removed. I want to get a case that most closely conforms to the actual chamber size, and one that has a neck opened to the maximum the chamber will allow.
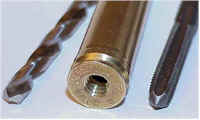 Next, for cases using large rifle size primers, I run a number 7, or a 13/64″ drill through the primer pocket and follow up with a 1/4″x20 tap. The size can vary, depending on primer size and what tool you have handy, but the important part is that the tap diameter is large enough to cut full threads into the walls of the primer pocket, yielding the longest possible threaded area.
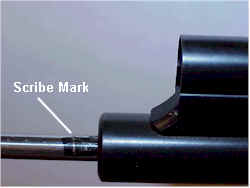 After the case is threaded and all of the major handling is out of the way, I chamber it with finger pressure. Then I insert a blue dye marked cleaning rod down the bore until it seats against the back of the case. I scribe a small mark on the rod where it enters the muzzle.
Next I close the bolt on the case and mark the rod again. Finally, I measure the difference between the two scribe marks to see how much the case is advanced toward the bore from the camming action of the bolt. Probably because all of the cases I’m working with headspace on the shoulder, I haven’t had any that changed by more than .002″ – .004″, which is negligible with bullet to rifling clearance set at .050″.
 To form the adjusting rod for the gauge, I either trim the head off of a bolt with the correct thread size, or fabricate one from a piece of threaded rod. The length only needs to be as long as the case, plus a little left over so I can grab on and turn turn the rod when the gauge is seated in the rifle’s chamber.
In typical use, there will be a need to place a variety of bullets into the gauge, so the case neck will have to be opened enough to provide a moderate friction fit. Not loose enough for the bullet to wobble in the neck, but not so tight the bullet can’t be seated with moderate finger pressure.
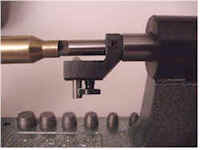 I used my case trimmer, which was set up for inside/outside neck turning, to open up the case and get it close to a friction fit. Then I rolled a small piece of very find sandpaper into a tube shape and finished working the neck open to the correct size and fit. I’ve also used a Dremel with a stone or bur in place of the cutter in the hand trimmer.
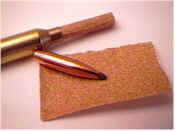 Probably not necessary to say, but… make sure the case is cleaned of all grit and trim material when the process is completed. You just want to make sure none of this grit and gunk finds it’s way into the gun’s chamber or bore.
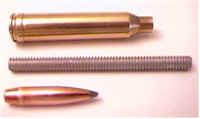 When you’re done with these little fabricating chores, you should have: one case, with a 1/4″x20 thread at the primer opening with a neck that will hold a bullet with a light friction fit, a 1/4″x20 threaded rod that can screw into and through the primer hole, and the bullet type you want to check for throat clearance.
 The bullet is inserted deeper into the case than it would normally be seated in a loaded round. The rod is inserted and tightened until it contacts the base of the bullet. Then the whole assembly is pressed and held in the rifle chamber, while the rod is tightened until the bullet is first felt making contact with the rifling in the bore. The gauge is extracted, the rod withdraw so it will be out of the way, and an overall cartridge measurement is taken.
That measurement, minus another .030″ – .100″ safety margin, should serve as a maximum overall length for that cartridge, with that specific bullet, in that specific rifle. This is assuming that the round in this configuration will also extract and eject correctly and isn’t a problem loading through a clip or magazine. When I start loading a new cartridge/bullet combination, I always fabricate a dummy cartridge, or two – no primer or powder – that I use to confirm proper cycling before actually producing any reloads.
Couple of suggestions for improvements to the gauge I may eventually get around to making, but you may want to keep in mind if you try making your own gauges. Cartridge brass is soft and threads cut into the case won’t hold up well. A Helicoil insert can be installed to improve the threaded portion of the case. Helicoils are available in these sizes and thread depths. You may also want to use a 1/4″x28 pr 1/4″x40 thread for finer adjustment and a little more mechanical advantage when setting the gauge.
When I get a chance I’ll probably make a version with a “c” clipped adjusting rod and a traveling nut that will allow me to close the bolt as I make minor adjustments. Then I’ll bore a hole in one of the bullets, run a fiber optic through the center and bounce a pulsing laser off the bore for a time distance reference, then travel through space and…….
Thanks
Joe

Email Notification