
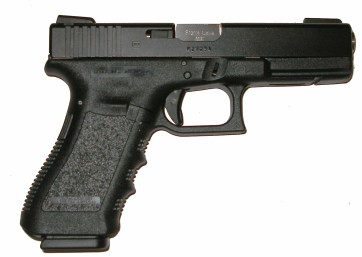
Whenever a brain transplant occurs on the Sci-Fi channel, we are forced to consider the deep philosophical question, “Which determines the identity of the newly assembled being, the original car accident decapitated cadaver or the brilliant, but quite evil, scientist who lost his body in a lab accident and had been surviving as a brain in a pickle jar ?”. With all of the accessories and modifications available for the Glock, there is a point where this question, at least in adaptive form, becomes pertinent.
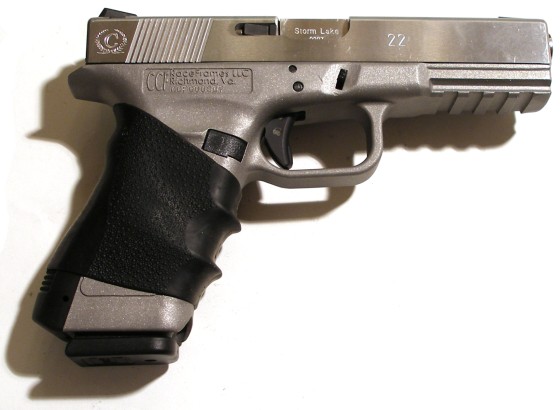
 In the first installment of “Glockenstein”, a diverse collection of substitute parts had been assembled, and a relatively spiffy piece of small machinery was the result; a “Hose it down and keep on shooting” utility finish, a little stainless bright work poking out of the muzzle end of the slide and the ejection port, Tritium over fiber optic sights, and a semi excellent trigger. Best of all, the gun was a real hitter, had more capacity than the great state of California would allow and it put lots of tight groups on paper. It was truly a Glock to be proud of and the cost was sub orbital. Neat.
Replacement of a factory barrel with one conventionally rifled and with more precise fit, installation of a revised recoil spring system, upgraded sights, short stroke trigger, revised and enhanced lock work, enhanced controls all contributed to much improved operation. Gains were measureable, traceable and repeatable. The remaining potential, or at least unanswered questions regarding the Glock’s potential, seemed to center around the degree of rigidity and the mass of the Glock’s polymer frame and many, many…many Internet rumors spreading, essentially, bad information and of dubious origin. The poly frame material is not as passive in the gun’s operation as a more rigid metal frame. Poly absorbs and reacts, compresses and rebounds, yielding and hopefully recovering dimension in response to operation. However, it was not clear if this dynamic was a plus or minus in its influence on the Glock’s operation, or if the use of poly was merely a cavalier step forward in one manufacturer’s quest for cost reduction.
If it’s shinny, it must be good…
If you have no intention of modifying a slide for your Glock, you aren’t particularly interested in superfluous change and you have no need to be different for the sake of being different, you can skip this section as a stainless steel replacement slide is probably not for you. However, if you’ve attempted to physically alter a Glock slide you already know one reason why stainless replacement slides make sense over the factory piece. The Tenifer process that surface hardens the factory piece to 64 Rockwell as a protection against wear and tear also eats machine tools, stones, files and free time. Stainless slides, with a Rockwell hardness in the 37 – 41 range, make it easier for competitive shooters and other Glock owners to shape a slide to personal preferences, especially those slides of dimensional ambiguity. Why would anyone want to alter a Glock slide ? Installation of an ejection obstructing optical sight might benefit from lowering the ejection port, some folks who shoot competitively may want to reduce slide mass, other may want to run a non-standard ported barrel, some people like more or relocated cocking serrations. A stainless slide not precut for a dovetail and tenon mount can be configured to suit virtually any preferred sight set up and, of course, some people are Italian and try to turn everything into qualcosa di bellezza.
Even if physical alteration of a Glock slide isn’t the goal, you still might need a second slide. Target and competition slides are set up quite differently than carry guns. Three pound trigger pull target guns get tighter fitting barrels, minimal chambers and lighter striker and firing pin safety springs, things that are great for punching holes in paper but tend to be unreliable in critical situations. With a second slide, each can be set up for their assignment and swapped as required.
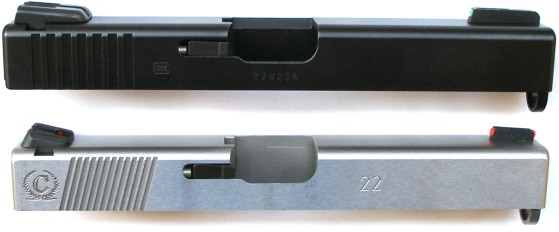
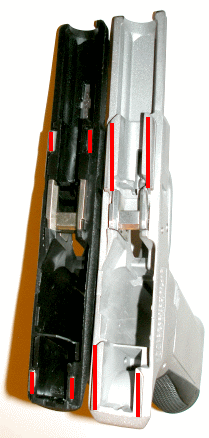
Both Caspian Arms and Lone Wolf make stainless slides for a variety of Glock models. I elected to go with the Caspian slide because the Lone Wolf piece, even though priced at only $175, was already modified to what someone else thought was appropriate. I wanted something closer to the factory part, maybe a little oversized in some areas, so I could pick and choose how it would be altered. Priced at $238, Brownells‘ Caspian Arms item # 168-000-078, is machined from a 416 stainless forging and then heat treated to 37 – 41 Rockwell. Weight is 13.6 ounces for the Caspian,14.2 ounces for the Glock. Both brands suffer from logo crazy manufacturers. Lone Wolf feels a need to put a cartoon caricature of a wolf on all of their parts and Caspian stamps and scripts their name all over their parts…like a fifth graders doodling on a notebook when stuck in detention.
The Caspian part is listed as requiring some fitting. I found several area that were measurably different from a factory slide. The Glock 22 slide is 1.013″ wide, the Caspian piece is 0.985″, The top side of the ejection port on the Glock side is bevel cut to the left and 1.080″ long, the Caspian has no bevel and is 1.090″ long. The Caspian slide ejection port is actually 0.005″ higher than the Glock piece at 0.380″. The grooves in the Glock slide rails are 0.909″ apart, the Caspian rails 0.890″. The hood notch at the breech end of the Glock slide measured 0.431″, the Caspian notch measured 0.426″. The Caspian cocking serrations are angled as seen in the picture above and the front tab that carries the guide rod has a more gentle radius. The last difference is the only one that required alteration before the slide would work on a Glock or aftermarket frame, and the narrow hood notch made for some additional barrel fitting.
 I apologize for the fractional radius gauge, but it should serve the purpose. The Glock has a 3/64″ radius, while the Caspian part has a 3/32″ radius. The result the extra bit of material at these points prevented the slide from clearing the frame’s dust cover. The gap at the tip of the arrow represents the amount of material that needed to be removed from the Caspian part.
![]()
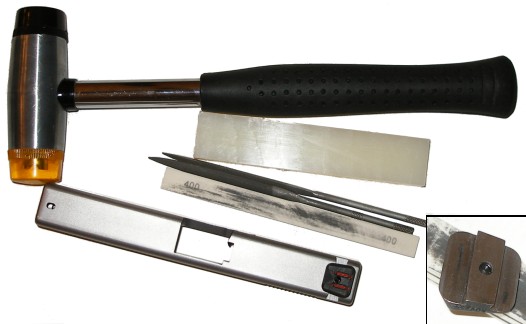
My high buck reworking set up (right). Out of Dykem, I dabbed Magic Marker at the front of the slide were it appeared to be contacting the frame (arrows). Then I pulled the slide back as far as it would go without forcing it and checked for rub marks on the surface of the Magic Marker spots. The contact was right in the corner of the guide rod tab radius, as marked with arrows. I took very light cuts with a #2 round needle file, reapplying Magic Marker as needed. I stayed in the radius, careful not to cut into the vertical or horizontal flat surfaces. When there was marginal clearance, the surfaces were hit with a 400 grit oil stone, then buffed out to a luster finish with #421 Dremel polish. The result was good, the slide fit was close and there were no scratches or bright spots on the exposed surfaces.
I buy stones in boxes containing 1/2″x1/4″x6″ stones in 150, 220, 240, 320, 400 grits, dry and wet construction for under $50 or $2.50 per stone from Enco item #399-6640. Each grit comes in hard and semi-hard oil-filled aluminum oxide, and medium soft and hard silicon carbide. These are not great stones, but good enough for this type of work and I don’t sweat misplacing or damaging them.
Assembling the slide
The Glock slide’s internal parts may be transferred to the stainless slide or the original slide can be left intact and a second set of parts purchased for the new slide. Why would the latter be a reasonable thing to do? The original Glock barrel hood did not fit this specific stainless slide and I didn’t want to grind or stone the barrel to fit. I also wanted to use a different recoil spring and guide set up as an accommodation to some other parts changes. So it was easier for me to pick up the rest of the piece parts and have two complete slides I could switch at will.
Caspian Slide Assembly
#
Nomenclature*
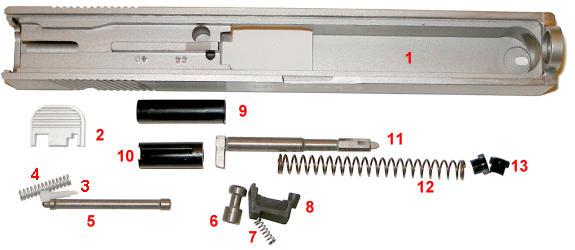
Price** 1 Slide 238.75 2 Slide cover plate*** 3.97 3 Spring loaded bearing 1.97 4 Extractor depressor plunger spring 1.97 5 Extractor depressor plunger 3.97 6 Firing pin safety 1.97 7 Firing pin safety spring 1.97 8 Extractor 19.97 9 Channel liner 1.97 10 Spacer sleeve 1.97 11 Firing pin 49.97 12 Firing pin spring 1.97 13 Spring cups 1.97 Total Cost 332.39 * Nomenclature as per Glock documentation
** Brownells retail prices as of 10/07
*** Part pictures is a Lightning Strike aluminum replacement piece
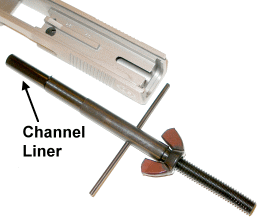
All that is needed to disassemble the slide for any typical service or parts replacement is a 3/32″ punch, the same type used to push out cross pins when disassembling the pistol, and a thumb nail. My only concession to tool shopping for the slide assembly process was the pictured channel liner tool. It carries Brownells item # 777-100-017 and sells for approximately $26. Glock slides and aftermarket versions have a firing pin channel liner that provides a smooth friction reduced surface for striker assembly travel. The liner can be installed with a punch or length of dowel rod, but then the liner’s center would not be supported/protected as it is with the channel liner tool. An old liner can be removed when worn out, or to facilitate slide refinishing, with a bolt of approximate liner diameter thread size. The liner ID is 0.275″ and the plastic piece wall thickness is 0.025″ so something that would grab the liner, but not damage the slide’s channel would set the dimension and thread type. I’ve seen suggestions of using a lag bolt, however, this could result in damage to the slide channel when the bolt is wiggled to pull the liner out. The liner tool works like a bushing puller. The threaded end is passed through a large flat washer then passed into the slide’s striker channel.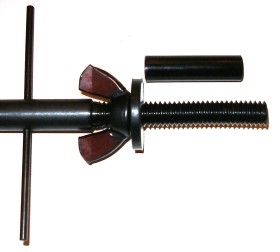 The tool is screwed into the liner a couple of turns, enough to grab the plastic liner, the wing nut is tightened down until the liner begins to pull out of the channel, then the “T” handle is pulled straight back until the liner is free of the slide. Liners, regardless method of removal, should not be reused.
Alternatively, the head could be cut off of a long 7mm thread metric bolt, the shank cross drilled and a piece of rod put through it, a wing nut added with a fiber washer and the result would basically be the same tool…without the installation mandrel and with the additional time it takes to round up and rework the parts. I often go to extremes to fabricate my own tools and fixtures but, at $26 including a new liner, the liner removal tool is a cost effective and worthwhile convenience.

There are a couple of areas in the slide assembly that are worth special attention because they effect reliability and safety. As an example – The firing pin safety, when at rest, obstructs the passage of the firing pin so it can’t be driven forward by inertia and strike a live cartridge primer without the trigger being squeezed. When the trigger is squeezed on a Glock, the forward camming surface of the trigger bar climbs in excess of 0.050″ to depress the firing pin safety and allow the firing pin to move fully forward when it is released by the sear. The firing pin safety return spring is very light, so it is critical that the firing pin safety moves freely in its bore, dropping easily with nothing more than the force of gravity. If there is roughness, polishing the safety’s surface is appropriate. Not only will this rework result in a safer gun, it will also reduce trigger pull effort.
I noted earlier than I could not close the stainless slide on the Glock factory barrel. The hood was too wide and wouldn’t clear the notch in the slide. Since I have an appreciation for the files and stones I own, and would rather not subject them to Tenifer hardness, I elected to use the softer Storm Lake stainless barrel that performed so well with the standard Glock slide. I took a couple of small cuts using a #2 flat file with one non-cutting surface to protect against a wandering file, then I cleaned up the file marks with a stone, then buffed it all out with the Dremel. I ended up with a hairline gap between slide and barrel hood, but with enough of a relief angle and broken sharp edge for the barrel to come up into the slide without hanging or sticking. The angled slot on the right side of the inset isn’t me with bad aim, it is the relief angle in the slide for ejection. I did not have to take anything off the breech face of the hood, there was ample, but not excessive, lug clearance.
Sights ? Sure. Why not?…
 I selected a set of Novak 0.040″ red fiber optic sights for the Caspian slide. They are steel, contoured and shielded so they are high visible to the shooter, not the target. The fiber optics light pipes create an extremely bright three dot system. The rear sight is Brownells item # 662-000-049 $44.95, the tactical front sight is item # 662-000-047 $34.95. The rear sight has an interference fit dovetail with a small vertical set screw, the front utilizes the standard Glock tenon configuration. In this case, the front sight tenon was 0.010″ under the slide’s hole size and the fastener that secured the sight to frame would not fit in a 3/16″ driver.
The rear sight dovetail would not fit the Caspian dovetail slot, both the sight and slide claim Glock standard, or diplomatic immunity. With the slide solidly locked up in a vise and braced, a couple of solid strikes with a hard nylon drift told me a little sight reshaping was required. The job wasn’t labor intensive, but it was finesse work which requires concentration. I used a triangular #2 needle file to remove a little material where the dovetail met the sight body and a flat stone to work down a couple of thousandths of the sights underside that contacted the flat of the slide. When I got distracted, or found myself losing patience, I stopped and worked on something else, like eating lunch, then returned and did some more work. With each minor material removal, I’d try starting the sight in the slide and checking progress. Eventually, the sight could be drifted in with an appropriately heavy resistance. The hammer I used is plastic faced, the drift is made of tough 6/6 Nylon and the sight was not marred or damaged on installation. I would have to say, after installation and use, the Novak sights are OK, but I much prefer the TruGlo Brite-Site front and rear sights, Brownells # 902-000-094, even at the higher price of $113. They seem better made, they add the dimension of self illuminating Tritium and the fit and finish is of better quality. I also didn’t need a shop full of tools to beat them into submission before they could be installed.
Recoil system selection and rapid barrel disassembly…
If you dislike mind numbing tedium, and consider the minutes and seconds that comprise your life to be precious, please skip this section. Working with a combination of guide rods and spring configurations was interesting…at least for me, but then I don’t get out very much. I can’t think of one other single component that had such a significant impact on the Glock’s performance. At one point I had the four types of spring set ups spread out on the shooting bench and in several varieties of spring rates. Just a simple spring change was enough to walk point of impact all the way around the bullseye in a 3″ circle and open and close groups by inches.
With the slide closed and barrel locked up, there is nominally 3.094″ of space inside the slide to contain the guide rod and recoil spring assembly. The Glock’s slide travels a maximum of 1.615″ to reach full open position. The space available to contain the guide rod and recoil spring assembly on full open is reduced to 1.479″. Any guide rod / recoil spring assembly has to, as a minimum, collapse to a dimension less than this open slide minimum or it will cause guide rod or spring coil bind. In effect, the lug on the gun’s barrel will be stuck with a solid steel bar every time the slide cycles. Secondly, the spring rate applied should be enough to dampen slide motion, but not enough to inhibit reliable feed and ejection.
|
Recoil Spring – Guide Rod Systems |
||||
|
Proportional Image |
Manufacturer |
Compressed Length |
Remaining Beyond |
Spring Rate |
| Glock | 0.875″ | 0.604″ | 14.3 | |
| Aro-Tek | 1.128″ | 0.351″ | 15.6 | |
| Fire dragon | 1.196″ | 0.283″ | 12.5 / 16.5* | |
| Sprinco | 1.100″ | 0.379″ | 14.5 / 29.5* | |
| * Two stage guide rods. Rates indicated are mainspring – internal spring rates respectively. | ||||
A typical 180 grain 40 S&W load generates approximately 26 fps of slide velocity. At 17.6 ounces in assembly weight, when the slide begins its journey, it will generate approximately 12 ft/lbs of rearward directed force. It does not take long for that level of energy to be absorbed as recoil spring coils are deflected and spring resistance increases. The Glock captive guide rod – recoil spring assembly is 1.160″, measured from compression surfaces. It is preloaded to approximately 5 lbs and the samples I measured offered 14 lbs of resistance when compressed to 1″, suggesting the additive resistance is 4.4 lbs per inch of compression. Yes, I know the factory spring is tagged as 17 lbs, but at what length? Using the measured rate and calculated slide energy, the slide and spring should reach a state of equilibrium at approximately 1.590″ of slide travel or very near the maximum slide travel of 1.615″ and well beyond the 1.375″ of slide travel needed to chamber a round, eject and empty and hold the slide open on empty. The actual distance the slide travels is less than the 1.590″ because there is other resistance encountered by the slide; extraction, ejection and friction come to mind.

The best accuracy and group size performance I was able to achieve with the Glock in the first installment was with a Sprinco unit designated for the G22. In use, it even reduced recoil sharpness which may have contributed to improved performance. When I was testing springs and experimenting with a steel alloy aftermarket frame, the gun sheared a barrel lug when the third shot was fired with the combination. My conclusion was the staged springing was so heavy, and the slide braking so abrupt, most of the energy from the recoiling slide was transmitted directly to the barrel lug. Without the poly frame to dampen the shock, the lug sheared off ad the slide fell off.
I need to interject that CCF Raceframe’s (the producer of the alloy frame) instructions specifically and emphatically advise against the use of anything other than a standard plastic Glock guide rod and they don’t mind taking the time to explain exactly why. I wasn’t ignoring CCF, rarely will an outsider know a product better than the manufacturer who controls a design and is in the middle of product feedback. I was trying to better understand the dynamics of the related parts and I was willing to risk the failure of some parts. I break parts all of the time in the name of exploration, but I don’t blame the manufacturer or the supplier when I wander off course and experiment in contradiction to instructions.
I discontinued use in of the Sprinco part as it was inappropriately sprung for the task assigned and too abusive of both poly and steel frames. I substituted the EFK Fire Dragon part, Brownells # 503-416-022, which seemed to work fine, didn’t shear lugs and produced good accuracy and tight groups with the Glock poly frame. I did not carry over the use of this assembly to the CCF frame. The Fire Dragon’s primary spring is light, about 12.5 lbs at 1.490″ and preload is about the same as the Glock. After 1.490″ of travel, the slide picks up the guide rod’s secondary spring and the rate increases to 16.5 lbs at the point the Glock’s slide would be fully opened. Standard 40 S&W loads would never see the second stage of the guide rod, only heavy leads, which would coincidentally need the compounded spring rate. Fire Dragon. F-i-r-e D-r-a-g-o-n. Sort of makes you tingle all over, doesn’t it? Leave me alone. I have the flu and it’s all legal medication.
Steel versus plastic guide rods…
The Glock frame and slide rails permit a maximum of only 0.020″ vertical movement along the entire reciprocating path of the slide. The guide rod is loosely sandwiched between the barrel lug and the frame on the back side and located by oversized hole on the front side. There is so much slop at the tail end of the rod and the muzzle end of the rod, there is nowhere within the slide’s 0.020″ vertical movement that the rod could anchor the position of the slide. A steel rod could keep the spring orderly and aligned as it functions, but then so could the plastic rod. I did not select the Fire Dragon steel guide rod to better anchor the slide. I selected it for the relatively light two stage spring loading and the ability for the two piece rod to flex just about 0.050″ at the union of the top and bottom halves and never bind the slide or eat the frame. Personally, I think those are noble goals.
And now for something not really completely different…
The last big part change was the frame. I wanted to try one of CCF Raceframes cast stainless steel pieces. Brownells item #100-003-152 $349.95. These frames have a very good competition reputation and eliminate the issue of Glock plastic as an influence on performance.
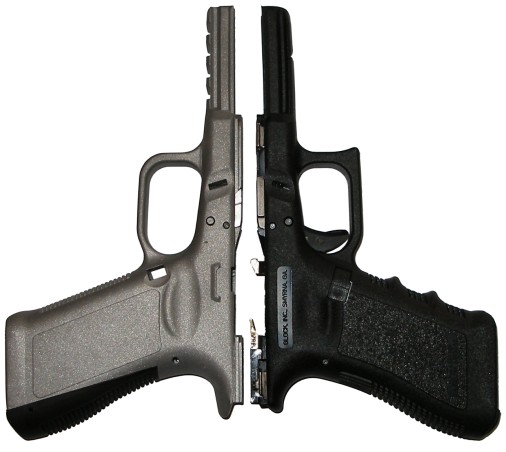
I know some Glock owners whine about losing a Glock’s identity, but I don’t see anything particularly odd about an aftermarket frame for Glocks, as 1911 pistol owners have had this option for a very long time. Replacement frames typically incorporate a number of popular enhancements that have appeared on quality custom firearms and the CCF product, beyond using aluminum or stainless steel in its castings, doesn’t break with that tradition.
-
No trigger guard hook, the rounded and the opening enlarged, the front strap is cut higher for increased knuckle clearance.
-
Checkered front grip and finger grooves omitted and interchangeable back straps are available; Glock original or 1911 profiles.
-
Enlarged magazine well, extended swept beaver tail, more defined thumb and mag release relief areas.
-
Picatinny rail integrated into the frame to mount compatible accessories.
-
Frame rail engagement increased by 500% over the standard Glock.
-
Lock block permanently bonded to frame and oversized cross pins.
 Where a benefits of a number of form revisions are somewhat subjective, I believe the increased rail bearing surface has to be a good thing and possibly improve accuracy and functional reliability. Overall frame rigidity would seem another plus; it is always nice when internal parts stay put and function in a consistent, repetitive fashion, and don’t wander around out of alignment while following a flexing frame. That said, I don’t know the dynamics of the Glock poly frame and I would be remiss in assuming sub standard performance on that count.
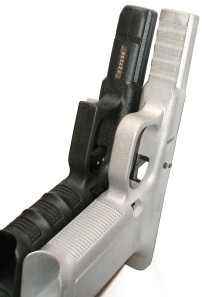 125,000 PSI. Nylon 6/6, sometimes used as a base material in polymer frames, has a yield strength of 6,500 PSI and ultimate strength of 11,000 PSI. These are not absolute reference numbers as this is not the specific material utilized in either the CCF frame or the standard Glock piece. However, I believe these numbers offer a reasonable proportional strength comparison. The question then becomes, “How much, and of what type, strength does a non-pressure containing component of a firearm need to exhibit ?” I’m really not angry at punctuation and the English language, it just comes out that way.
 CCF indicates their frame accepts standard Glock parts and some third party material. Noted exclusions are some aftermarket barrels and steel guide rods. The CCF Raceframe piece has a lock block that is permanently bonded into the frame and dimensionally taller than the standard part. The intention of the increased height is to locate the breech end of factory barrel closer to the slide on lock up. When the lock block is installed at the factory, the cross pin holes are drilled for best fit and alignment, which results in slightly oversize pins at both the locking block pin and trigger pin locations; +0.007″ and +0.002″ respectively. The trigger housing pin remains a standard part. Other than the slide lock spring and a shock buffer that is packaged with the CCF component, all of the standard Glock piece parts and assemblies installed without special effort and, later, all of the aftermarket parts I had installed in Glockenstein transferred over to the new frame without a hitch. I did have the optional 1911 profile backstrap I could have installed, however, I did not install it as I also had a perfectly good selection of 1911 pistols on hand if I needed to satisfy that fantasy. Beside, the Glock grip angle and shape are beginning to grow on me.
 With stock parts, not surprisingly, I got pretty much factory performance. Back was the long heavy and now gritty 4.9 lb trigger pull. Back were less than exciting 1 1/2″ to 2″ range groups, even though the gun was easier to shoot. I swapped in the Lightning Strike short stroke trigger, 3.5 pound connector and Wolff competition spring kit. Trigger pull dropped to 3.1 lbs and a little cleaning up of the casting surface where the trigger bar made contact got rid of the grittiness. 15 yard group size dropped to closer to an 1″ and I noticed the gun settling down quickly after each shot. Considering this was with the factory barrel, there isn’t much to complain about. I may take some time to tinker further with configurations using this frame, however the aftermarket parts restrictions are a little limiting for a guy who doesn’t want to pay a gunsmith for a grip change. We’ll see. In there something extraordinary here ? Sure.
Think how many simple stampings and small castings you’ve attempted to install, only to find a punch and ball pein hammer were required to: set elevation, or remove a stamped steel magazine, or open the lock on a gun case. Let’s face it, we live in an era of crap for the most part, items are produced someplace else, beyond the control of all company management other than a CFO and a company king of marketing. This Glock type aftermarket piece is a work of art, coming from a very complicated piece of tooling and process and able to suck in stock factory parts as through they belong there. That is precision and manufacturing control. The fact my diverse shooting activity, and under developed competitive skill level, cause me to come up short in utilizing the potential of the product, does not make the product any less than excellent. It was a good experience for me. I may even smoke.
So where does it all end?…
The stainless gun was a lot of fun to assemble, and I’d be lying if I didn’t say I like the looks of the finished product. The gun is a handful, and it is a pleasure to shoot, but I keep thinking I want to skeletonize the slide, cut the recoil spring rate and shoot loaded down wad cutters for fun and accuracy. I do think it was a lot of work and a large expense for not a lot of personal gain. These folks have championship level shooters using their product, so I am sure the product is great in its respective applications, however, I don’t believe “A gun to screw around with when I have time” is one of those applications. I can see it catching on with AR 15 fervor as people can basically build their own “Glock” from scratch and have exactly the gun they want for about 50% more than a factory Glock economy model.
So what is wrong with a basic Glock? Perhaps I just don’t have enough experience with factory configured Glocks to be disappointed in their performance. I have collected and dissected lots of opinion, most philosophical at the core, some anecdotal, some theoretical, none quantifiably scientific. I can group reported Glock problems into two categories; those related to burst barrels, more specifically chambers, and then issues regarding accelerated wear and then group both of these groups under the heading of unsupported claims. The burst chambers, at least in my little universe, always seem to track back to double charges of smokeless powder and 40,000+ PSI 45 ACP pressures, substantiated by a credible independent lab such as the H. P. White Laboratory. The rumors that don’t progress even that far eventually evaporate into conjecture. I am not sure why a person would have an explosive failure using a box of before unheard of ammunition, and immediately assume the gun is the problem. This seems to happens a lot. There are a lot of Glocks out there, a lot of Glock customers and lots of shooting going on. Eventually something is going to fail, and some folks want to fan the flames of these incidences until they are inflated to full scale and frequent catastrophes.
Component accelerated wear and tear is a different issue. Cause and effect is pretty easy to check; rounds between failures are easily counted, deteriorating state of parts is relatively easy to observe. I can’t take reports of shock buffers wearing out excessively fast when the factory does not ship a gun with a shock buffer and a buffer reduces space inside a slide allocated to spring compression. I can get a Glock to discharge when the slide is not fully in battery, but not one that is clearly unlocked. Do a Google search on 45 Super + Glock and count the pin heads who don’t understand the Glock doesn’t lock up like a 1911 and won’t sustain 45 Super pressures. Every one of those folks will potentially end up as a the source of unexplained burst chamber story.
Working on a handgun can be a lot like getting a tattoo. The changes may be minor, the results my be hidden, but they are still there and someone will eventually see it. I have established a rule for myself of avoiding trend modification for at least two years. If it is good and worthwhile, the parts and modification will be more refined when I get around to it, and I won’t have a gun that is out of step as a disco ball six month after I shell out the cash for the work or parts. That’s why I never permanently altered my 70 Series Gold Cup and it is shot in stock form right down the the skinny walnut grips, Elliason rear sight and perfect glass breaking trigger. That’s why I have every factory part I removed from the Glock bagged and tagged for future reconstruction.
 What is a good Glock ? One that stops consuming money when it reaches a peak of reliability and performance. So I’d have to go with the result of Part I. I think, in order of contribution to performance; the trigger work had the greatest impact on accuracy and group side improvements. The staged guide rod came in next, followed closely by the TruGlo sights. The conventionally rifled barrel probably came in next and the rest, extended controls, were mostly fluff. I can put this into better perspective. I began with a $500 Glock that shot 3″ groups. I added $500 worth of parts and accessories and ended up with an autoloader that could shoot 3/4″ 15 yard groups most of the day. I added another $600 and got…3/4″ groups. Just before I wrapped up at the range the other day, I unpacked a brand new CZ 75 SP-01, loaded it with Remington practice ammo and shot a 3/4″ group. I can do better with the Glock, but I’d need to move closer to the target.
Glockenstein…It’s Alive! Part I of II
Glockenstein…It’s Alive! Part II of II
Thanks,
Joe
Email Notification