
 At the conclusion of Part II, the High Standard GI 1911 had been fitted with a lightweight trigger and upgraded with a new disconnector, hammer and sear. A light mainspring had also been installed. The end result was a clean, light trigger pull and greatly reduced trigger bounce. Five shot groups were tightening through improved shooter control and the gun was taking on a more substantial personality.
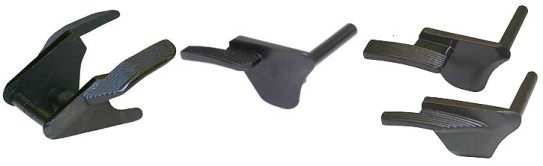
Next up is an upgraded thumb safety. Why change a thumb safety? Pictured, top, is a standard safety and, lower, a tactical style extended safety. The extended safety is much easier to operate without disturbing the shooting grip and, in a high hold, it makes a nifty place to rest a thumb. Some safeties are wider than other and some are set at different angles. There are, of course, ambidextrous versions of the same safeties that permit operation from either side. I selected the Ed Brown tactical style safety, Brownells 087-245-890, which is designed for concealed carry, $29.95.
The Ed Brown tactical is also available in stainless for $2 more and in ambidextrous models for approximately $55. Below, left to right, are some other alternative available through Brownells. Wilson Combat High-Ride Ambi Safety $58 blued, $59 stainless. Nighthawk Custom Extended Thumb Safety $43.95. Wilson Combat Extended Wide and Narrow thumb safety $31.50 either model in blue or stainless.
Disassembly in Summary Form
![]()
Regardless which specific type of thumb safety selected, the fitting work is minor, but critical, and essentially the same for all. If you are unfamiliar with disassembly of the 1911, I suggest picking up a copy of The Colt .45 Auto Automatic shop manual by Jerry Kuhnhausen from Brownells. $28 and saving yourself a lot of grief. The 1911 is easy to disassemble, but it is pretty picky about the sequence followed. It is possible to disassemble incorrectly so the thumb safety can’t be removed.
If you fly, or if you spend much time around aircraft, you’re familiar with check lists for even simple tasks. The concept is that people can make mistakes in completing simple and routine tasks through mental lapses. Following a step by step check list in a disciplined fashion minimizes that problem. You might want to make a critical check list to keep on your bench. You can begin with, “Pull the magazine and check the chamber for empty befor attempting any service on any gun”.
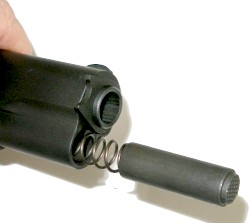
The slide assembly can be removed either under load or with the recoil spring unloaded. I prefer the latter. The recoil spring plug is depressed and held in place as it is under load. The bushing is rotated clockwise to clear the plug, then the plug is eased forward until it is no longer under load. The recoil spring is removed. It is easier to remove if rotated clockwise while being lightly pulled forward from the recoil spring guide inside the gun. With the plug and spring removed, the barrel bushing can be rotated counter clockwise, unlocked and removed from the gun.
With the slide unloaded, the hammer is cocked and the slide pulled back until the curved notch in the slide, arrow, is aligned with the vertical tab on the right side of the slide stop. The slide stop is pushed out of the gun by depressing the slide stop pin from the opposite side of the gun. With the barrel no longer connected to the frame by the slide stop and barrel link, the slide can be moved forward and off of the frame.
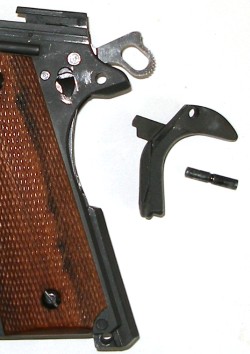 Make sure to remove the safety before removing or unloading the mainspring housing. The thumb safety is removed by cocking the hammer, and pulling upward on the safety while turning it clockwise. Once freed, the slide stop plunger assembly may pop out, so be careful to track fast moving small parts. The long pin on the thumb safety, the safety pivot pin, retains the safety and the grip safety. The grip safety will come back out of position, but it will not fall out of the frame as it is also being retained my the gun’s mainspring housing.
The grip safety should be removed to allow viewing the new thumb safety sear lug from the back of the frame when it is being fitted. The mainspring housing must be lowered from its installed position to clear the lower locating tab on the grip safety. It is good to keep in mind the mainspring housing in under load from the mainspring when disassembling. The mainspring pin is pushed out left to right; cupped side to the left. Once the housing is lowered and the grip safety is removed, the housing is pushed back into position and retained with a punch of a size similar to the pin.
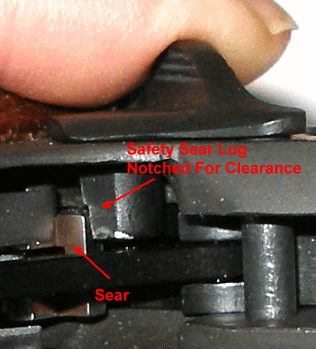
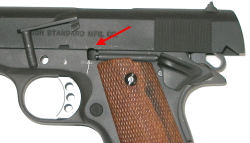
This is a shot of the original thumb safety in place in the frame and some rather sloppy file work from when I reworked it to clear the new sear that was installed during the last segment. The sear lug serves two purposes; it has a shoulder recess that locates it to the frame so it doesn’t fall out and, when rotated to the “on” position with the hammer back, it blocks rearward movement of the sear. Rotated to the “off” position, there is sufficient clearance for the sear to rotate rearward and release the hammer.
Whenever a trigger job has been done, or any of the related parts have been changed, it is important to ops check the thumb safety to make sure it is doing more than filling the holes in the side of the frame. It is possible for a thumb safety to fit the frame holes and rotate normally, including detent lock up, without restraining the sear when it is positioned to do so. That sounds a little Shakespearian.
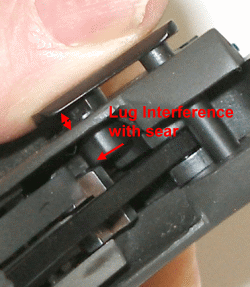
As received, new thumb safety sear lugs are not cut for clearance. They are oversize to permit fitting to a specific gun. You can see the notch in the lug on the right hand safety above, the original. When an attempt is made to insert the new safety, it bumps into the sear and cannot be fully installed. The safety’s sear lug must be notched the depth of the interference and for a length consistent with the space under the safety as indicated by the double arrow.
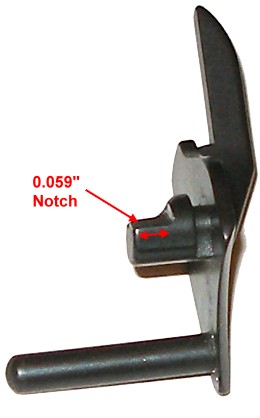
With the safety flipped over on its back. I cut a 0.059″ notch in the flat that faced the sear. This is not a place for a Dremel as too much off means throwing the piece away and starting over. I used an 8″ smooth mill file and held the part in my hand when removing material. I would make about 3 or 4 cuts, then install the safety and try it for clearance. The idea is not to progress so much on each cutting cycle, that an overrun by that increment would destroy the safety.
It is possible to install the safety and over-rotate it so that the file cut will not be square to the sear when engaged. The easiest way to avert this problem is to install the slide and rack it back into position to the safety “V” notch in the slide. This will keep the safety correctly positioned. The cut should be uniform and as parallel to the lug axis as possible, which is another reason to use a larger file. Going at it with a needle or Swiss file or a Dremel would tend to make for an irregular surface.
I also keep a can of compressed air on the bench so I can blow off metal filings before trying the part for fit. This way I don’t have to worry about loose metal particles getting into the trigger mechanism and I don’t have to listen to a compressor filling its tank.

The safety lock detent on the Ed Brown piece was perfect as received, locking into on or off positions with a positive snap. If the locking is too heavy, the edge of the detent can be hit with a Dremel polishing wheel; fixing the problem and giving you justification for the $26,000 master Dremel kit that’s sitting on your bench. If the detent is too shallow, Brownells can supply you with a detent spotting hand drill, 492-002-000, that makes deepening the detent recess an easy deal for less than $25.

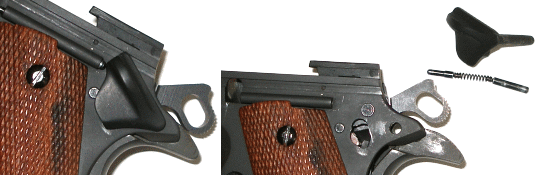
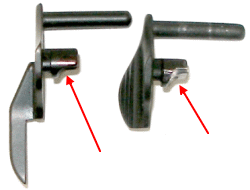
Pictured left is the finished fit. The safety has enough clearance so it won’t drag on the side of the sear, but close enough on sear back surface contact to ensure it will not move when the safety is on. There really is very little latitude for slop in the fit. In this case the sear / hammer engagement is only a little over 0.020″. That doesn’t leave much to work with in keeping the safety close to the sear.
Reassembly
Reassembly of the gun is pretty much the reverse of disassembly already covered above, including slide alignments and hammer cocked position as required. It is good to have at least one thumb nail to facilitate working on the 1911, the one that compresses the safety lock plunger when twisting the thumb safety back into position.
Is it worth the time and effort?
 From a functional standpoint, the upgraded piece makes the gun safer and more positive in use. It also facilitates a better shooting hold. From a monetary perspective, a gunsmith charges between $70 and $120 to install a thumb safety, depending on the shop and the parts being installed. This is a low buck build up. As far as intangibles go, there is a lot of satisfaction is accomplishing this work correctly on your own gun. The tools required are minimal and simple hand tools, so the biggest ingredient is patience.
Throughout the process I’ve referenced Brownells. For anyone attempting this type of work for the first time, or for anyone who is attempting more complex projects, beyond the seemingly endless supply of parts and variations of parts Brownell technical support is invaluable. If you have questions about part selection, application or installation, you can give them a call or email and you’ll get a complete and accurate response. That experience can save a lot of time, money and aggravation and it is a resource there for the asking.
Next
I believe my next step is to upgrade sights. I’d like to do this without slide replacement of cutting a front dovetail. We’ll see…
Building a Low Buck Shooter – Part I
Building a Low Buck Shooter – Part II
Building a Low Buck Shooter – Part III
Building a Low Buck Shooter – Part IV
Email Notification