 When I first picked up the High Standard 1911 GI, the one that has served as the mugging victim for a series of low buck upgrade projects, I couldn’t help but wonder why any company would sell a gun with a minor speed bump for a front sight. Of course, there is nothing wrong with the product, it is intended to replicate a military M1911 sort of A1.
Perhaps a hundred years ago when men were men and had the eyes of an eagle, the nose of a beagle and would engage the enemy with a sharp toothpick, they didn’t need anything as frivolous as visible sights.
 Yes, there is an alternative theory circulating for those lacking in imagination. It suggests the 1911 sidearm was originally intended to be used in close quarters defensive situations, a weapon of last resort, where a “point in the general direction and shoot” approach would suffice. As most handguns of the day had very similar sight system designs, I guess I can go with this explanation.
The rear sight is a functional plain black 0.090″ notch type, dovetail mounted, windage adjustable by drifting. No, not the kind of drifting that requires a car and slick tires, but rather the kind that requires breaking out a punch and hammer to optimize horizontal point of impact for a favorite load. An observation from beneath this pile of sight directed criticism, when I first shot the gun, my best was 3″ at 15 yards; no trophy to follow. It became obvious a sight change was in order.
In the event an intruder refuses to be well lit…
 With the exception of a couple of target guns, all of my handguns have Tritium based sights. They provide good illumination in low light situations and they make it easy to locate a firearm on a night stand in total darkness and know which way it is pointing. Night sights typically are white outlined for work in brighter ambient light, making practice and recreational target shooting confidence building endeavors.
The 1911 GI requires a little extra consideration when selecting sights. Unlike more modern versions of the 1911 type firearm where front sights are secured with a dovetail, the M1911 GI retains the original staked on front sight design. Colt 1911 guns and government models made before 1988 utilize a narrow tenon front site, 0.058″ +/-0.003″. Post 1988 Colt guns, pre dovetail mount, have a wide tenon, 0.125″ +/- 0.003″. The 1911 GI, as a government issue replica, utilize the narrow tenon. Accordingly, I picked up a set of Trijicon sights from Brownells with narrow front sight tenon. The part number is 892-101-002, which includes both front and rear sights. The price was $99.
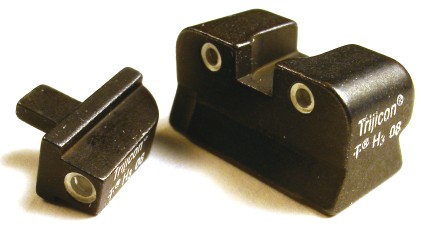
The front sight blade above the shoulder is 0.125″ wide and 0.185″ high. The original sight width is 0.085″ with a height of 0.091″. The rear sight height is 0.185″, the notch aperture is 0.125″ wide and 0.095″ deep. The original rear sight is 0.150″ high and the aperture is 0.070″ wide and 0.055″ deep. The durable sights are steel and the Tritium tubes are silicon rubber mounted with sapphire lenses.
A good excuse to buy some tools…
 A standard brass drift and hammer are the only tools required to remove and reinstall the 1911 GI’s rear sight. The Trijicon product is slightly oversized and malleable at the dovetail so it will fit tightly to a side without damaging a slide’s dovetail. Consequently, once installed, the sight should not be transferred to another slide.
Removal of the front sight requires a Dremel, armed with a small cutting or grinding bit, and some specialized tooling to stake the new front sight in place. All forms of front sights, night or conventional, require a staking tool. Night sights with Tritium tube inserts additionally require a mounting fixture to protect the tube from being crushed during installation. The mounting fixture supports the sight being installed by its shoulders, keeping direct pressure away from the top of the fragile blade that contains the tubes as the installer bangs away at the gun with what is probably an oversized hammer.
For as often as I hear myself thinking, “Joe, you have way too much money, just buy the most expensive tools “…and, yes, that is most definitely sarcasm, I passed on the selection of a $300 Trijicon installation tool and went for the real world Brownells solution; staking tool (pictured foreground), part number 080-817-000 $39 and Night Sight Staking Tool part number 080-000-454 $46. They are well made, well finished and will work with any similar type firearm.
As a note – In times past, tenon-secured front sights were often brazed on to keep them in place. Other than the damaging effect brazing would have on Tritium sights, brazing also isn’t good for slides. Stress relieving of steel is done in the 800°F – 1200°F range and heat treating is done in the 1,200°F – 1,300°F range. Brazing temperatures are in the 1150°F to 1600°F range. The braze might hold the sight on, but the process could cause damage to the heat treat of the slide and perhaps cause it to twist and walk in a way that is not conducive to reinstallation. While there was a time when most of my experiments ended as decorative ashtrays, I don’t smoke anymore and a slide is too small to make into much of a lamp. So cold staking was the only way to go.
Books…not the kind you make, the kind you read
At the conclusion of H.G. Well’s Time Machine, the time traveler returns from the future to grab an essential volume from his bookcase to carry back to the future. My guess is that it was Jerry Kuhnhausen’s The Colt Automatic – Volume I M1911 Shop Manual and The U.S. M1911/M1911A1 Pistols & Commercial M1911 type Pistols – Volume II M1911 Shop Manual. There are lots of good learning and reference tools out there for the 1911, but I can’t think of any that contain information in a more organized and useful form than these two manuals. Brownells #924-200-045 $28 and 924-800-245 $30. If you work on 1911’s or want to know more about their history and design, these volumes will get a workout.
A trip to the dentist…
I’ve seen a number of procedures that basically suggest twisting off the front sight with vice grips without first weakening the tenon stake. If this approach doesn’t damage the slide’s finish or tenon slot, there is a good chance damage will occur while trying to remove the swaged material and the remains of the tenon stuck in the slide. There is no need to pull a front sight off this way; it isn’t easier, faster, nor will it result in a cleaner installation.
 Removal of the front sight, without damaging the slide is easy. The effort just requires a little patience and finesse. If you lack both, pick up your gun and new set of sights and drive them over to your local gunsmith. If you’re heavy handed with the installation there is a chance the slide, or at least the slide’s finish will be damaged. If you’re ready to tackle the project…
Pull the slide and remove the barrel bushing, exposing the original sight’s swaged tenon inside the slide. Using a small cutter, carefully remove the swaged material. Use a dental pick to remove pieces of flaking metal as the work progresses.
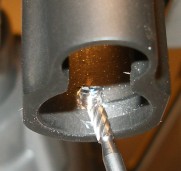
The reason for using the dental pick is that as the swage material is thinned, it can be carefully and continually lifted to separate it from the base material of the slide. If you just power in with the Dremel, you will cut through the swaged material and into the slide and damage the underlying material. In a very short period of time you will begin to see the shape of the recess in the slide as it appears above the tip of the bit in the picture to the right. The recess serves as a counter sink to hold the swaged material so it will not come in contact with the barrel bushing when it is installed. If you are a little unsteady, you can put a piece of duct tape at the muzzle end of the slide to protect it from incidental contact…as I should have done.
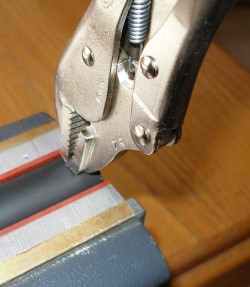 The idea is not to cut out the tenon, as this poses too great of a risk of the slide being damaged, but rather to weaken the swage that holds the tenon in place. About the time the outline of the recess is visible, you can stop, flip the slide over and clamp a pair of heavy vice grips onto the front sight. The sight has a shoulder that projects outward from the blade that serves as the resting surface for the vide grip.
The clamped vice grip is rocked gently, side to side, carefully so as not to let the jaws of the vice grip come in contact with the slides finish. If you’ve removed enough of the swaged material on the inside of the slide, metal fatigue should cause you to feel the sight tenon’s grip weakening and it will fracture in a few rocks of the vice grip. If this is not the case, just flip the slide over and file or grind off a little more of the material to weaken it further. Repeat until the front sight pulls free of the slide.
I have seen suggestions of placing a block of wood on top of the vise jaws to shield the slide from the jaws of the vise grips while wiggling the front sight free and to act as a fulcrum and provide some leverage. My personal opinion is that if it is necessary to use this type of leverage, the sight tenon has not been sufficiently weakened. Being able to extract the sight with minimal effort and movement is a good check on adequate swage material removal.
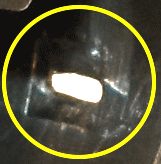 When the sight blade is removed, the dental pick can be used to clean out any residual material. It is OK to poke through the slide slot that located the tenon, but care is required to not open the slot further as this will make it difficult to get the new sight tenon firmly anchored. Even a 1/16″ punch is too large for the task. The slot in the 1911 GI is not square and sharp, even cleaned the ends have a radius.
Before moving on read both sets of instructions for the Brownells tooling, again. The information for both is required, however, the second set of instructions will modify how the first set is carried out. Both tools are very easy to use, instructions are simple and the end results are very professional looking even for a hack like me.
Someone hand me the big mallet, or… The installation
A couple of comments. Lead shim stock will help hold the slide in a flat faced machinist vise without deforming or marring the part’s surface. However, if the part moves around, at least in the case of an inexpensive gun with a finish of dubious origins, the lead will transfer to the surface of the slide and it will appear the finish has been rubbed off the slide. Before jumping up and down and swearing a blue streak, try using a little solvent and wiping down the slide to remove the lead. Better yet, save yourself some aggravation and put a couple of layers of duct tape or similar between the part and the lead shims so you won’t have to deal with the drama.

A machine vise (1) is handy, but if you are using the Night Sight Mounting Fixture any solid vise will do. Lead shim stock #084-010-424 (2) is useful, Brownells Night Sight Mounting Fixture #080-000-454 (3) is essential as is Brownells 1911 Auto front sight staker #080-817-000 (4). Also helpful, but not pictured, Loctite 271 #532-271-006 can be used to further anchor the sight when swaged and a nylon drift is great for driving out the old rear sight and seating the new. I buy bar and round nylon stock and cut off pieces as needed for the task on hand. A roll of duct tape comes in handy for protecting surfaces from fixture contact and incidental tool contact.
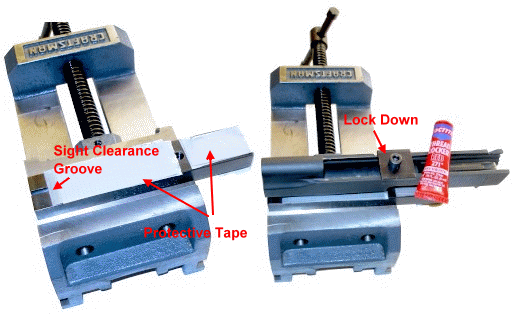
The Night Sight Mounting Fixture is locked in the vise with the jig’s shoulders resting on the vise jaws. Tape is laid down on the face of the fixture to prevent the slide from directly contacting the jig. The end of the groove should be aligned with the edge of the vise to insure this will receive maximum support when swaging. The slide is laid on the fixture, the muzzle end should not protrude beyond the edge of the vise and the tapered lock down is secured with a bolt passing through the slide’s ejection port. Red Loctite is used to help tighten up the swage, however, care must be taken that it does not dribble into the barrel bushing grooves in the slide or leak through to the outside surface of the slide. The vise should be on a substantial surface so the hammer strikes to the staker won’t be dampened. It is imperative that the front sight remain seated flush on the slide when the slide is locked down in the fixture and ready to be swaged. The staking operation will not draw un unseated sight into place, so if the sight is raised out of position above the slides surface, that is where it will be when the swaging steps are completed. Yes, all of your friends will laugh at you and strangers will point out your error at the range.
 This is how the tools are put to work. The Night Sight Mounting Fixture provides a secure surface and supports the front sight while keeping contact away from the fragile Tritium tube, see inset. The “C” shaped sight staker sits on the sight’s tenon inside the slide while clearing the outside of the slide so it can be struck, force directly downward, to swage the sight’s tenon.

The business end of the staking tool has a chisel tip. The set screw can be loosened and the tip rotated to suit the surface being worked.
 The staking tool is tapped, with the tip continually moved over the tenon until the until all of the material is swaged or piened flat into the rectangular recess inside the slide. The operation is very similar to forming a rivet. I tapped the staking tool along the longitudinal axis of the tenon in a couple of passes, then rotated the staking tool tip and flattened this material into the recess. It takes very little striking effort with a 6 oz. hammer, 4 oz is a little light for the job.
If there is excess material that might interfere with the barrel bushing fitting properly, it can be removed with a Dremel after the Red Loctite has dried, about 24 hours later. In this case, no further finishing was required and I think it best if metal isn’t removed if at all possible as I believe this would weaken the joint.
The barrel bushing dropped right in and rotated without binding. The front sight was flush up against the slide and properly aligned and the slide did not sustain damage when the work was performed. The next step was to remove the old rear sight and install the new Trijicon rear sight.
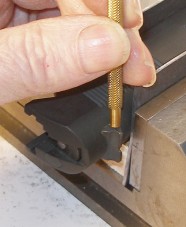
Rear sight removal from the slide’s dovetail is pretty straight forward. Lay the slide in the machinist’s vise, clamp it with lead shim stock to prevent damage to the slide’s finish. The sight is placed as close to the supported edge of the vise as possible to maximize support.
 I used a brass punch to remove the old sight, pushing the sight from left to right, but switched to a block of Nylon when I tapped in the new Trijicon sight so I wouldn’t discolor it with brass residue. I installed the new piece, centered right down the middle of the slide, saving final windage adjustment for later when I had a standardized load.
Is this spiffy or what?
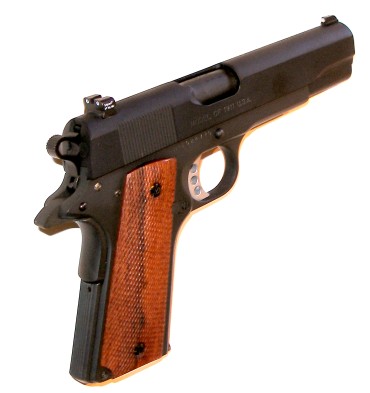
Not bad looking, or shooting for what began as a $300 low buck 1911 Government model. The addition of decent sights to the earlier upgrades has made this into something I enjoy shooting. The gun now has…personality.
The Trijicon night sight set was $99, installation tools were $85, so the total cost was $184 and an hour of my time. If I try different sights in the future, I of course would already have the required tooling. The cost is less than having a gunsmith install the same set of sights.
Of course there is more to it than the money. Safely modifying firearms, or safely experimenting to enhance their performance, offers a great sense of satisfaction in knowing you were directly responsible for improving a personal firearm’s performance or its aesthetics.
It’s unfortunate to see so many people who buy firearms these days note they have a personal “smith” to perform the most trivial work on their firearms. Beyond the air of pretentiousness the comment projects, I don’t think these folks realize how much enjoyment they are missing as firearm enthusiasts. Firearms are about innovation and inventiveness, competitiveness and an artful expression of personal likes and dislikes. Attempting and succeeding with little projects of this type is very rewarding. I am not suggesting an enthusiast should work beyond competency, but lots of folks have craft skills that carry over to an interest in firearms: metal working, wood working, model making, automotive or aircraft mechanic, engineer, science and math professor… The closer you get to the machinery, the more it has to offer.
Building a Low Buck Shooter – Part I
Building a Low Buck Shooter – Part II
Building a Low Buck Shooter – Part III
Building a Low Buck Shooter – Part IV

Email Notification