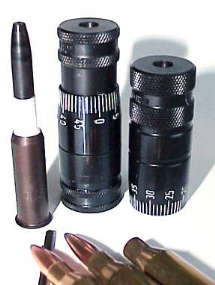
 First of all, I’d like to apologize for any oddly placed images or text. I have switched over to a Logitech ergonomic trackball…ergo, I frequently switch off my PC accidentally where the actual intent was to copy and paste. I have great confidence, however, that I can stick with it for another day or two before I rip the whole deal out of my computer and toss it out my very close yet open window.
The more time you spend reloading, the more you learn and the more you strive for better product and better results. The RCBS Precision Mic Set, or a similar product from another company will eventually jump out at you from the pages of a shooter’s retail catalog.
The Precision Mic actually accomplishes several key and related tasks: determines your gun’s headspace, assists in properly setting your sizing die and, finally, helps you find the best bullet seating depth for your rifle. All of these areas can greatly impact shooting accuracy and safety.
Determining your gun’s headspace and setting sizing dies
For reference, Headspace is the distance between the surface of the chamber or barrel that prevents forward movement of the cartridge and the bolt or breech face. The locating surface varies by cartridge type; datum point in the shoulder of a bottle neck cartridge, case mouth on a straight walled pistol case, might be belt on a belted case, or the rim of a rimmed cartridge. A handloading manual can be referenced for specifics. To make it easier to explain the process, I’m using a .243 that headspaced on a datum line at the shoulder.
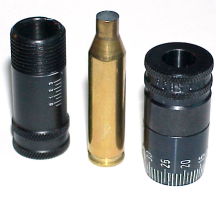 There are three components necessary to determine your rifles headspace (L-R): mic body, empty cases fired in your rifle and a headspace nut. As you can see, or almost see, from the photo, the body and headspace nut are indexed very similar to a micrometer.
I have three rifles chambered for the .243 which would generate three variations of fired cartridges so, for the sake of simplicity, I went which cases from a Remington 700.
Prior to this exercise, I’ve been small base resizing all of my .243 ammo to accommodate a Browning lever action rifle chambered for this cartridge. Lever actions have very little mechanical advantage when cycling cartridges. Small base dies insure there will be enough room in the chamber to accept reloaded cartridges easily, but they “work” the brass a good deal and reduce case capacity. With two bolt action rifles in the fold, I thought I’d start concentrating on handload development for these rifles, separate from the Browning, perhaps eventually moving up to competition or neck size only dies.
 Statistics are based on some method of sampling of a population. I don’t know what the degree of accuracy is on following the RCBS instruction, but this process only requires 5 empty cases from the same gun. Based on what I found, there are probably few surprises after the first couple of reading
You stand the mic body on end, drop in an empty case, then screw on the headspace nut at a pressure not to exceed 2 lbs. I don’t know how to tell if I’m exerting 2 lbs of pressure unless I have a torque wrench, but RCBS suggest very light pressure and make sure no ring appears on the shoulder surface of the cartridge as a result of excess pressure.
You do want to make sure you are using the headspace nut and not the land nut, two very similar looking gauge parts that come with the set. The headspace nut is shorter than the land nut and has a “#” stamped between the knurled surfaces with a number from 1 – 6. In difference, the land nut has a caliber stamped at the same location.
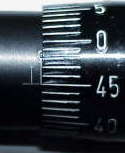
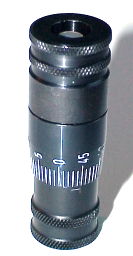 The Precision Mic set instruction booklet includes a chart that covers all cartridge gauge sets and lists the SAMMI specifications, minimum and maximum for each. The gauge is constructed so that a zero reading on the gauge is the minimum headspace specification.
The Remington came in a -.005″ under spec; the gun has a tight chamber. The instruction booklet goes on to say that if an empty is -.002″ or more, there is no need to resize for use in any rifle. They recommend the gauge not be used where a full length sizing die or small base sizing die are required; lever action and some auto loaders.
Where it is used, there would have to be a positive headspace reading and you could use the mic to check cases as you adjusted your sizing die until the sized cases read .002″ less than your fired cases. This .002″ difference is to allow for brass spring back and to make sure the handloads will chamber in the gun under less than sterile conditions. I think my situation is typical for the use of the gauge. I won’t use it for the lever gun, because it requires a small base full length sizing die to assure reliable operation. I won’t use it for the Remington, because I could not set the sizing die down far enough to move the neck .002″ back from it’s already below minimum headspace reading. But I can use the gauge to check out the gun and make sure it didn’t relocate bolt lugs or any other part that would increase headspace.
I will use the Precision Mic in conjunction with my Model 70 .243. Empty fired cases read +.006″, so I can set my sizing die to +.004″ and not overwork the brass with unnecessary sizing. Neat.
Finding the best bullet seating depth
 Okay, experts agree it is important to seat the bullet so it ends up very close to your rifle’s rifling, unless of course you’re one of the other guys who believes that you freebore and let the bullet and rifling sort it all out. The Precision Mic will not help you choose sides, but it will provide good information so you will be able to follow the course you decide to take.
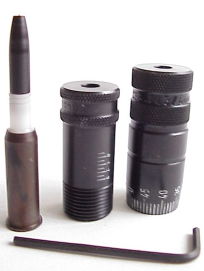
The bullet seating mic part of the RCBS set is comprised of 4 major parts: a freebore tool, the mic body, a land nut. and a Hex wrench. The freebore tool assembly is made up of 3 small piece parts, but work as a single assembly.
As noted earlier, the land nut is differentiated from the headspace nut by being longer in length and marked with a cartridge designation rather than a number. Oh yes, eventually you will need a gun to work with, a dummy round with the bullet you’ll be using, and 9 test handloads for final assessments.

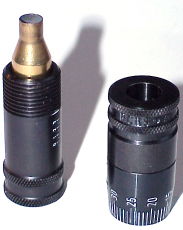
![]() The first key component in this Precision Mic function is the freebore tool. From left to right we have the adjusting hex key, the expander screw, the connector and tip and the base. When assembled they appear as the assembly to the right. The freebore tool serves as a simulated round, with a slip fit bullet that approximates the ogive profile of a typical bullet.
The first key component in this Precision Mic function is the freebore tool. From left to right we have the adjusting hex key, the expander screw, the connector and tip and the base. When assembled they appear as the assembly to the right. The freebore tool serves as a simulated round, with a slip fit bullet that approximates the ogive profile of a typical bullet.
When received, the screw is started into the connector, the connector is inserted 1/4″ into the base, then the expander screw is adjusted in to force the connector out to grip the base.
 The overall length should be adjusted to approximately .300″ by inserting the freebore tool into the base then screwing down the land nut until it crosses at the “3” reading. The result is a simulated cartridge with a rim the size of the .243 case to support the rear portion of the freebore tool in the chamber, and dummy bullet that probably comes very close to a spitzer or flat nose profile at bore diameter, held in place with a tight friction fit to the base.
The freebore tool will be much longer than any anticipated overall cartridge length, which is done to ensure the tool will be compressed by the closing of t he bolt.The RCBS notes that the expander screw should be driven in fairly tightly so the connector and dummy bullet do not pull forward from the base when cycled with the bolt.
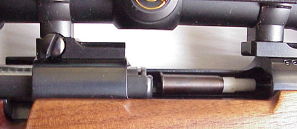 At this point the freebore tool is loaded into the rifle as though chambering a round, and bolt is rotated fully closed. This motion moves the freebore tool forward until the dummy bullet profile contacts the rifling, the dummy bullet cannot proceed further, causing the base to slide up over the plastic connector. The freebore tool has now become an example of the optimal size for a loaded cartridge.
 After removal from the rifle, the freebore tool is placed back in the base and land nut assembly, and turned down until contact is made. Then the reading is taken from the land nut; in this case .067″. Earlier I referenced a .300″ setting, now a .067″ reading – these are free bore readings, the measurement of the unrifled area which resides between the chamber and the barrel’s rifling. RCBS suggest taking a few readings to make sure it is possible to repeat within .002″.
In some cases, will all of the Weatherby owners stand up please, the tool will not compress because it is not possible to seat a bullet out far enough to reach the rifling. Bullets must be seated a minimum of one bore diameter. The next step is to follow a procedure that will help assess how much space to maintain ahead of the rifling in an individual rifle, and to measure the effects of assembling ammo with these types of considerations.
 The idea is to load 9 rounds, 3 each with varying degrees of set back from the readings taken from the freebore tool : .010″, .020″: and .030″. This is done by adjusting the bullet seating die and checking the result in the Precision Mic. Then a little range time to test which performs the best will allow you to come up with a standard setting.
The Precision Mic worked well with all bullets I tried and I believe there was an degree of improved accuracy. Probably more important, I was able to determine factory loads were marginal in one of my rifles and the bullets were probably slightly touching the rifling. Now when I handload for this gun, I back off by .010″ for a little margin of safety. This is definitely a tool I will keep out on my bench.
Precision Mics are available from many sources. Midway USA and Lock Stock & Barrel are two operations that usually have stock and a selection of brands to chose from, or contact RCBS for further details.
Thanks,
Joe

Email Notification