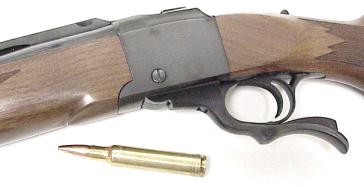
 Yesterday was a big day at Real Guns. UPS delivered the completed project rifle, with “.358-378 Real Guns” engraved on the barrel.
If you haven’t been following this project, the original intent was to have a less than expert firearm enthusiast, that would be me, walk through the process of developing a moderate wildcat cartridge, for a moderate custom rifle, then go on and complete the steps necessary to make the combination a reality. If you have an interest in reviewing the background on the effort, you may want to read earlier installments at –
Selecting a Gunsmith
Many years ago, my wife and I, with our gaggle of kids, would trailer a race car to the track every weekend. The time between those weekends was spent under the hood of the car, looking for a horsepower or two that might offer a competitive edge, or picking up modified components from a machine shop. The good shops were clean, they were operated by reliable people who would lend a good deal of knowledge and experience to the process, and they could deliver work on time, and at reasonable prices. The not so good shops typically featured operators who were unpleasant to deal with, were always well off schedule on delivery, and maintained a mystery price list that seemed to change with the shop manager’s mood. Surprisingly, both types of shops seemed to stay in operation forever. The first group prospered through customer referrals and repeat business, the second survived on the premise, “There’s a sucker born every minute”. Selecting a gunsmith is easy, selecting a good gunsmith is a little harder.
I believe the process requires work on both sides of the customer-shop equation. The customer should define and understand his own objectives, and do some research before contacting any gunsmith. A good gunsmith could then review those objectives, confirm the choices, or offer intelligent alternatives as supported by reasonable explanation. Resulting from this meeting-of-the-minds discussion should be: a clear statement of work, an itemized and specific list of charges and a specific time table for completion.
In the case of the .358-378RG, I wanted to get the work done outside of my geographic area. Lately, I’ve found very high prices for below average work, as a function of the area’s economy and generally anti-gun climate. Not wanting to rely on ads appearing in magazines and/or web site information alone as the basis for selecting a shop, I asked for recommendations from vendors I hold in high regard. From the list of recommended gunsmiths, I contacted three – The first could fit a barrel, but didn’t know how to carry over the quarter rib and front sight from the Ruger to the new barrel contour. The second shop’s operator couldn’t be pinned down on price and seemed excessively critical of any thought that wasn’t his own. I selected the third shop, Dennis Olson Gunsmithing, located in Plains Montana.
I reviewed my preliminary work list with Dennis, he offered a couple of suggestions on the muzzle brake selection and refitting the quarter rib, and within a couple of minutes we were able to reach an agreement on the work that would be done. Dennis provided a specific price for each item, and committed to a completion schedule of a few weeks. I shipped the rifle to him, the work was done as defined, the price was as originally stated and the job was completed on time. As a retail customer, warranting no special treatment, I couldn’t think of a better experience with a service. Dennis was always thorough in answering questions, as well as courteous, although it was obvious he was working to a very busy schedule.
Dennis made one recommendation I unfortunately couldn’t follow, only because I had already taken delivery on the gun’s barrel. Anyone building a Ruger No.1 based on .416 Rigby diameter cases, and slated for use with very hot handloads, may want to have the receiver opened up to take a 1.250″ barrel, rather than the 1.000″ factory thread diameter. This will put a little more strength in the chamber wall, and prevent it from bowing with loads Dennis referred to as, “loaded up until the primers fall out”.
Work Accomplished
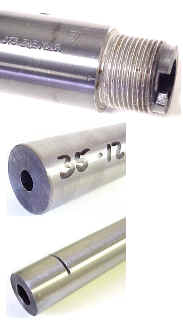 I had elected to go with a carbon steel barrel from Lilja because I like traditional blue finishes, and this is not the type of rifle that would be taken out for high volume prairie dog shoots. The take off barrel was returned in great shape, with no barrel vice scratches or gouges where sight, quarter rib and the barrel band had been removed.
The center picture is the new barrel before chamber, extractor groove and threads were cut. The bore is .358″, the rifling twist selected was 1-12. I arrived at the twist rate by measuring the longest bullets the gun would see, and using the Real Guns’ twist rate calculator.
The bottom photo is the muzzle end of the barrel, complete with a saw cut Lilja uses to mark the end of the useful barrel length. In this case, I selected a 26″ barrel, 2″ longer than the standard .375 H&H Ruger barrel, to take advantage of the increased .358-378RG case capacity. The barrel required trimming, crowning and threading for a brake.
I have removable muzzle brakes on most of my heavier cartridge rifles. They go on at the range when I’m burning through boxes of ammo during load development, and come off in the field. Since the .358-378 RG will produce 75+ ft.lbs of recoil, I thought the gun qualified for the brake program. The fact the gun could generate in excess of 130 db of muzzle blast, with the brake in place, dictated the brake be removable in the field where the use of double ear protection wouldn’t be practical.
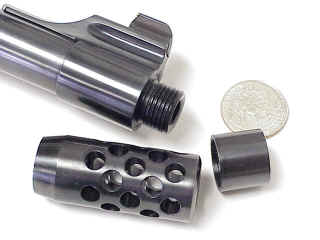 The original Ruger barrel protruded beyond the front sight band by approximately .250″. Dennis increased the protrusion to .500″ when he carried the Ruger sight over to the new barrel. He threaded this extended portion of the barrel to hold the muzzle brake or a thread cap. The work was very clean, all of the parts fit tightly and without gaps, and the finish was flawless. That silver colored circular object is what Dennis patiently explained as the government issued tool that should be used to remove the thread cap when the brake is to be installed.
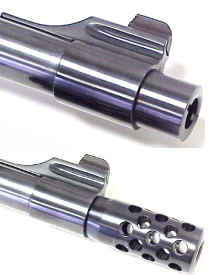 I did a quick dimensional comparison between the brake on the Ruger and the brake supplied with my .416 WM. The Ruger brake at 2″ is .250″ shorter, but it’s about .100″ larger in diameter. The vent hole diameter is the same for both at .250″, but the passage length is quite different at .250″ for the Ruger and only .165″ for the Weatherby. I’ll be happy if the Ruger brake is as effective as the Weatherby, but I suspect it will be an improvement. I do have a series of calculation that can be applied to arrive at felt recoil reduction, based on brake design. Maybe when I can see a little schedule daylight, I’ll try them out.
When I was researching the project, a gunsmith of some celebrity reprimand me for suggesting a removable brake, advising they frequently fall off in use. After putting many, many rounds though these brakes, I never encountered this problem.
By keeping the factory barrel contour, Dennis was able to save me a significant amount of money, which would have gone for modification of factory sights, or fitting expensive replacement parts. I ordered the barrel from Lilja with a Ruger contour, but I selected the Ruger muzzle diameter on an extended length barrel. The result was the barrel, as received from Lilja, had a slightly different taper than the original. In retrospect, it would have been more cost effective to have skipped the Lilja contour work, and let the gunsmith do the work in preparation for fitting the barrel hardware.
 A third transferred component was the barrel band. To put the value of all of this carryover of hardware to new assemblies in context; the barrel contour work that permitted the transfer ran $20, a replacement permanent steel barrel band would have run $45, a front banded ramp sight would have cost about $60 and a decent quarter rib set up would have gone for about $100. New or original parts both require installation, so the drilling, thread tapping and silver solder expense would be a wash. With the factory matching contour, the factory wood fit without modification; yet another labor savings.
 The finished product, at this stage, appears exactly as intended: a standard Ruger No. 1 Tropical, devoid of factory imperfections, chambered for what should be a flat shooting powerful cartridge, a 2″ longer barrel, and a recoil reducing muzzle brake. I’m happy.
|
Work Completed |
$ Cost |
| Fit and chamber barrel | 125 |
| Extractor cut | 15 |
| Duplicate Ruger barrel contour | 20 |
| Drill & tap for quarter rib | 25 |
| R&R band and front sight | 15 |
| Install brake, parts & labor | 150 |
| Engrave .358-378 on barrel | 10 |
| Finish & blue barrel to match | 40 |
| Postage & insurance | 20 |
| Total cost | $420 |
If you’re in the market for a gunsmith that can produce excellent results, at very competitive prices, who will not make you wait months to get your gun back, you may want to get in contact with Dennis, he runs an excellent shop –
Dennis Olson – Gunsmithing
P.O. Box 337
500 First Street
Plains, Montana 59859
406-826-3790
The total cost of the project to date looks like this:
|
Cost |
$ |
| Ruger No.1 Tropical | 680 |
| Clymer custom chamber reamer | 140 |
| CH4D custom loading die set | 160 |
| Lilja 26″ barrel | 230 |
| Gunsmith Services | 420 |
| Total cost to date | $1630 |
That’s not bad, especially since this included one time expenditures for a chamber reamer and loading die set. If I had gone for the 7mm UM, as an example, there would have been no reamer cost, dies would have been less than half the cost. I could also have found a used Ruger for a couple hundred dollars less, and I could have made a more utility barrel selection and saved $100, which would have brought the cost down in the $1,100 range; not bad for a custom rifle and a lot of enjoyment.
The final step
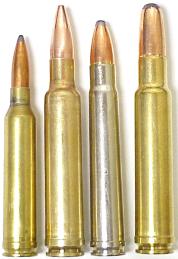 In comparison, left to right, 7mm Remington Magnum, .358-378RG, .375 H&H Magnum, .416 Weatherby Magnum. I believe the .358-378RG will handle heavy bullet weights I normally select for the .338 bore, as well as weights that cover whatever the .375 H&H has to offer, only at higher velocity.
My handload goals at the moment are:
310 grains@2800 fps 5400 ft/lbs
280 grains@3100 fps 6000 ft/lbs
250 grains@3200 fps 5700 ft/lbs
200 grains@3500 fps 5450 ft/lbs
The range time will be scheduled as soon as I wrap up the work on the current .257″ bore project. Who knows, if the gun shoots straight and the barrel doesn’t fall off, I may be able to extend the project to include a nice stock, and a scope not borrowed from one of my other rifles.
Thanks,
Joe

Email Notification