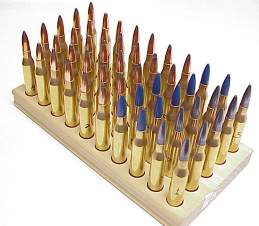
 One of the reasons so many people confine their handloading efforts to a limited number of cartridges, is because it is difficult and time consuming to optimize cartridge component and rifle combinations. This time around, I spent hours researching and analyzing existing published handload data for the .25-06Remington and .257 Weatherby. I was trying to get a basic understanding of the personality of these two cartridges, before getting close to the loading bench, or making a final component selection. I’m not done with this series, but I thought I had collected enough information to warrant an update.
The effects of bullet seating on pressure
While analyzing a 100 grain bullet loads across numerous data sources, I found the top listed velocities for the .25-06 ranged from 3154 fps to 3362 fps. All loads were based on a 24″ barrel, and all loads utilized a large rifle primer. Within that performance spread, specific powder types did not maintain consistent performance across all publications; what was fast in one manual, might have been the low end performer in another. I thought it might be worthwhile to cover some of the factors that contribute to these differences other than temperature, humidity and mechanical variations in the test rifles; more specifically the effects of bullet length and seating depth variations within a given bullet weight, on chamber pressure and velocity.
 One factor that contributes to altering burn characteristics of smokeless powder, is the amount of space the powder is confined within when ignited. A Barnes 100 grain XLC boat tail is 1.100″ long, a GS Custom is 1.190″ long. A fixed overall cartridge length would cause the bullet length variance of .090″ to alter net case capacity, pressure and resulting external ballistic performance.
The SAAMI maximum cartridge length for the .25-06 is 3.250″. Ammunition assembled at or below this dimension is assured of clearing the ejection port of any rifle when a loaded round is extracted and ejected. The purpose of this specification is quite different than the overall cartridge length specification given in a bullet manufacturer’s handloading manual, which achieves the same result as the SAAMI spec, but also insures enough of the bullet shank will reside within the case neck for proper grip, and the bullet protruding into the case will set a consistent powder chamber volume for listed load data.
I constructed a table that illustrates the effects of seating bullets out beyond specification, and perhaps provide an example of what is in store for folks who take data from one manual, then freely substitute bullets of the same weight, but with different design and dimension. The following reflects a .25-06 cartridge with a capacity of 62.8 grains of water, a case length of 2.494″and an overall length of 3.250″. The barrel length is 22″ and the bullet weight is a consistent 100 grains. Since there are obviously loads that far exceed safe pressure, I did not indicate the power type or other component details.
| Bullet Length |
C.O.L | Seating Depth |
Effective Barrel Length |
Net Case Capacity Grains |
Powder Charge Grains |
C.U.P | P.S.I | Velocity | Velocity Per Grain |
| 1.000 | 3.250 | .244 | 19.750 | 58.1 | 54.0 | 49219 | 60207 | 3199 | 59 |
| 1.000 | 3.170 | .324 | 19.830 | 57.1 | 54.0 | 50935 | 63187 | 3244 | 60 |
| 1.000 | 3.090 | .496 | 20.002 | 54.8 | 54.0 | 55830 | 73347 | 3340 | 62 |
| 1.100 | 3.250 | .344 | 19.850 | 56.8 | 54.0 | 51139 | 63562 | 3244 | 60 |
| 1.100 | 3.170 | .424 | 19.930 | 55.8 | 54.0 | 52855 | 66957 | 3284 | 61 |
| 1.100 | 3.090 | .596 | 20.102 | 53.5 | 54.0 | 56632 | 74408 | 3364 | 62 |
| 1.190 | 3.250 | .434 | 19.940 | 55.6 | 54.0 | 52872 | 66993 | 3280 | 61 |
| 1.190 | 3.170 | .514 | 20.020 | 54.6 | 54.0 | 55970 | 73463 | 3344 | 62 |
| 1.190 | 3.090 | .686 | 20.192 | 52.4 | 54.0 | 58334 | 76646 | 3459 | 64 |
A uniform 54 grain powder charge resulted in a range of over 9,000 C.U.P and 16,000 P.S.I, just by varying the amount of bullet protrusion into the case. The .25-06 Remington maximum chamber pressure spec is 53,000 C.U.P., which means at least 4 of these loads exceeded that limit. I think I will add C.O.L. listings for each bullet I utilize in the handload work up, as well as the case protrusion figure, or at least bullet overall length. I am not suggesting these are the only variables to be concerned with, but I do think they are significant. Other areas influencing charges and pressure are coatings; Barnes XLC bullets do not share load data with the corresponding uncoated Barnes X bullets, and GS Custom HV bullets are loaded a little bit like cast bullets – more on this later. Is there a point to all of this ? Yes, and thanks for asking. The data appearing in the balance of this series is very specific to the components I selected, and does not lend itself to substitution.
Production experience with the RCBS Turret Press
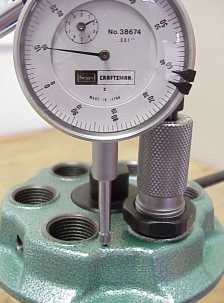 I have been using the new RCBS Turret Press quite a bit lately, and I’ve run across a few items probably worth mentioning. I noted in a recent article that the RCBS Turret Press turret head rocked a bit under load. Using the Turret Pin for leverage, I was able to get an up/down swing at the die location of approximately .008″. With a full length sizing die installed, during normal operation, the upward movement increased to .010″. Watching the turret head bounce around during a sizing run is a little disconcerting, but the movement is on absolutely no consequence. I ran a concentricity check on all cases while assembling for this project, and the readings are consistent with my Rick Chucker, Ammo Master and basically any other press I’ve used, .001″-.005″, mostly .002″.
The press is beefy and looks as though it would have a great deal of leverage, but it seems to require more effort than the Rock Chucker for the same operations. I assume this is a penalty for an increased stroke; a loss of mechanical advantage compared to the short stroke Rock Chucker. The ram on the Turret Press is located 3/4″ farther from the handle pivot point. This isn’t a big deal, but after 100 or so brass forming passes, I became conscious of every point of die – case forced contact. In addition, the press just feels a little clunky. So there is this bumping, or thumping sensation coming through the handle, the turret bounced around, all which left me thinking something was going to work loose and fall off the press. Of course, the press is actually well designed, the chance of breakage is zip, and absolutely nothing went wrong in operation. The Turret Press is very comfortable to work with after a brief period of familiarization, and it has become my favorite piece of loading equipment. As a bonus, an empty turret head will hold a cup of coffee and any whole sandwich.
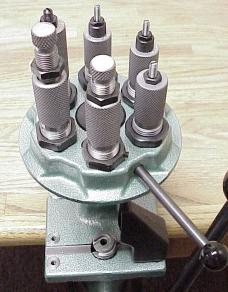 This is the turret head when it’s loaded with three sets of bottle neck cartridge dies. Very impressive, until reality set in and I realized there were no positions left over for a universal decapping die, or lube die or any other form of accessory. I could have left out one set of rifle dies, and replaced them with specialized tools, but then what? Set up a second turret and buy second set of special purpose dies? Nope, I don’t think so. My solution was to leave my Rock Chucker on the bench for these side operations, utilizing the Lock-N-Load quick change inserts for these special tools.
With more dies, there is a need for more turret heads, and it seems these are getting more expensive each month. What began at $25 is now $35, no doubt as a result of the firearms industries’ pricing, which always seems to run in an inverse relationship to the stock market and the world economy. I bought two more castings, which I’m sure will eventually join my pile of Ammo Master die and sell plates in finding a useful purpose as a doorstop. I calculated I would need 12 turret heads to mount my active dies sets, but further analysis indicated I would be wise to sell my centerfire guns, and take up archery before making this purchase.
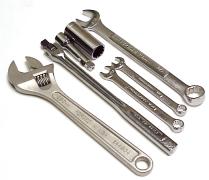 That handle sticking out from the turret head in the photo above is the “turret rotating lever”, and is suppose serve secondary duty as a turret quick change wrench, fitting through a hole drilled in the head of the nut hiding in the middle of all of the dies. Unfortunately, the wrench does not work once the dies are installed, and it doesn’t seem reasonable to remove all of the dies before using the quick change tool. I decided I needed a tool set dedicated to the service of this press that would stop me from grabbing dies with a Robo Grip: 10″ Crescent for press handles and lock nuts, a breaker bar with 2″ extension and a 3/4″ socket for turret nuts, a 3/4″ open end/box end combo for big seater plugs and decapping rod retainers, 3/8″ and 7/16″ open/box end for standard die decapping rod lock nuts. Any excuse to buy more tools…
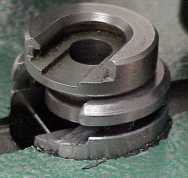 The shell holder to ram union doesn’t look good, but it works just fine. The slotted section of the ram that retains the shell holder has been cut away, but the standard shell holder pops right in and actually feels more secure than it does on earlier style rams with a narrow slot. I was so concerned the assembly wouldn’t hold alignment with the die, I began guiding the case mouth over the decapping pin and expander ball. Then I realized, all I needed to do was position the case in the shell holder and leave it alone. The press has no problem aligning the case with the die without extra manual steps, or overly cautious handling.
Powder additions
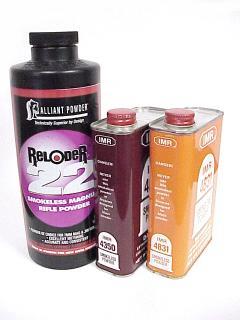 Normally I snooze at this point. I’ve standardized on Re25, IMR 7828 and Re19, and everything I shoot on a regular basis seems to work with the stuff…just not always to a degree of excellence. Since Re22 made for compressed charges at light bullet weights, there was literally no room for Re25. The more I read, and the more notes I reviewed on components, the more I accepted I would have to take a different approach, a non-lazy approach. Life isn’t always fair.
I decided I would make RL22, IMR 4350 and IMR4831 the core powder selections, for the lighter bullets, then move on to H1000, Re22 and IMR7828 for the heavier weights. Since the core powders are on either side of Re19 in burn rate, I couldn’t quite figure out why Re19 was so conspicuously absent from several manuals. I currently hold the world’s supply of Re19 in reloading bench inventory, so I could only assume the publishers of these manuals thought there was no Re19 left.
I know some of these selections are quite controversial because of their newness; H1000 is 12 years old, Re22 is 13 years old and IMR7828 has been around for approximately 16 years. That secret weapon IMR4350 is 61 years old. It’s interesting how the firearm related industries develop, and how there is a product life cycle that would be the envy of every other industry. Could you image using the same microprocessor for 61 years, or even 13 years?
I don’t like to buy powder in small qualities from local supply, it’s too expensive. IMR at local retail was $18/lb, Re was $19/lb. Actually, one store was selling each at $24/lb. There are much better deals to be had through catalog sales operations, and there appears to be more of these springing up each day. My personal favorite is Lock Stock & Barrel on price, service and delivery.
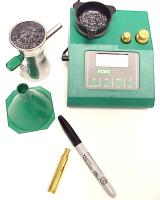 I set up my highly automated powder dispensing system as pictured to the right. The felt tip is essential, as every cartridge is marked and logged, so each can be tracked through every step of the process. If I had large quantities of the same powder type to meter in varying charges, I would have dragged out my scale linked RCBS PowderMaster Dispenser.
I calibrate my scale every time I put it into service. There are two calibration methods noted my RCBS; one covers the scales entire range, the other a low range calibration method – up to a little over 300 grains. By using the low range calibration, the scale will hold to 1/10th grain accuracy, whole scale range tolerance is 2/10ths.
Assembling .25-06 Remington ammo
 The GS Custom #257100HV required handling that was a slight departure from more conventional bullets. Fortunately, GS Custom is very helpful in the area of product support. In general, the driving bands on the bullet require a lot less pressure to overcome rifling resistance than a bullet with a plain shank.
Per GS Custom, bullets seated with light contact with rifling, would show no pressure increase over a bullet seated 3mm from the rifling. When used with a charge that fills the case, pressure from the primer against the powder charge is enough to drive the bullet forward. This movement results in more space for the powder charge to burn within, which reduces chamber pressure compared to a similar bullet of a more traditional design. This bullet uses a slightly heavier powder charge than most bullets of a similar weight.
There was a recommendation that the bullet be seated with only the first two driving band in the case, but this left me with an overall cartridge length that exceeded maximum .25-06 case length by almost .200″. I finally settled on four bands into the case and a 3.250″ overall cartridge length. I believe this additional extension into the case actually helped with the faster IMR powders, which did not reach a full case with maximum loads.
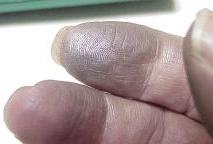 I’m not a moly fan. I’ve yet to see conclusive evidence there is a potential for increased speed, there is some evidence moly combines to form a corrosive residue in a gun barrel, and the crap gets all over your hands. If it sounds as though I am whining about nothing, think about this, 40 years ago few people wore ear protection at an outdoor rifle range…I SAID, 40 YEARS AGO….. I can also remember using mercury to remove lead from gun barrels. It’s probably time to wear rubber gloves when handling components.
Assembly of the GS Custom loads were straight forward. The bullets had no perceptible run- out, the cartridges all came in within .001″ of intended C.O.L. and concentricity was good for me, none over .004″, most .002″ or better. I have people tell me they always expect .001″ – .002″ or they start looking for the cause of the problem. I begin by assuming the problem is me, but I have dragged virtually perfectly concentric ammo, and .007″ not so perfect ammo, to the range and they were both capable of the same excellent groups. I have a sneaking suspicion that the .001″ bullet throat clearance most modern rifles sport, and that cranking shut of the bolt with all of it’s leverage, tend to straighten those little concentricity problems right out. I know, blasphemy.
The bullet length for the GC Custom is 1.190″, which led to the bullet protruding into the case by .434″ for a net case capacity of 55.6 grains.
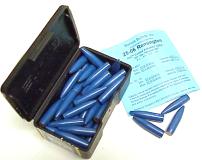 I like Barnes bullets for a lot of reasons; one reason is that they always pack extra stuff in the box. Maybe that’s why they cost so much? I have been using their dry film coated X bullets for a while now, and they’ve worked out well in everything from 7mm to .416 bore sizes. The data packed with this product offers loads above the standard X Bullet, some guidance in getting the most from the coating.
Like the GS Custom, there was no perceptible out of round condition, they were uniform in weight and they went together without a fuss, and no silver fingers when I was done. Almost proportional to the comparative reduction in length, overall cartridge length was dropped to 3.200″. Concentricity run-out ran from .001″ – .005″, mostly in the .002″ – .003″ range. One complaint, after running a bunch of these zippy blue deals through the press, I had to pull the seater plug to get rid of the blobs of blue that kept sticking to subsequent bullet selections. The Barnes XLC’s are 1.090″ long, leaving .384″ in the case and 56.3 grains of capacity.
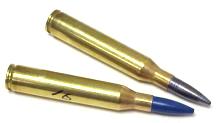 This is pretty much where I left it with 100 grain loads. I really don’t like light bullets, and there was no temptation to load up some 75 grain wonders to see of I break Mach 5.5555….. Both the GS Custom and Barnes bullets are of a construction that suite antelope, large deer, and other similar size game.
From here I moved on to the heavier weight bullets, which were actually of primary interest and the reason for my selecting these high capacity .257 bore cartridges. Everything is in the range of 117 to 120 grains, all proven reliable game bullets.
 The Hornady 117 Interlock Boat Tail Spire Point is a controlled expansion bullet with a one piece jacket. Rings formed in the inside of the jacket, including the cannelure, hold the rear portion of the bullet together while the more fragile front portion mushrooms.
The Interlocks are approximately 1.135″ long, and listed in the Hornady reloading manual with a C.O.L. of 3.170″. The result is .459″ protrusion into the case for a net capacity of approximately 55.3 grains of water, and the edge of the case mouth midway into the cannelure. I like Hornady bullets, they are inexpensive, reliable and from an organization that is helpful and very active in the industry.
 The Nosler 120 grain Partition is long at 1.170″. The Nosler manual references only the maximum C.O.L. spec of 3.250″ rather than specific lengths for each bullet, so I set them to maximum length is deference to their length. The Nosler’s protruded into the case by .414″, leaving a net case capacity of 55.9 grains.
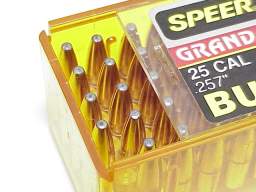 I selected Speer Grand Slam bullets at the last minute, and I’m glad I did. Some time ago I had purchased a box for use with the .338-378 and they were terrible. They varied a great deal in weight, they looked as though someone chewed on them and they were pricey. The .257″ bore product, I purchased for this project, was very uniform, the protected points in good shape, and they were in the most elaborate damage protection packaging.
They look a little bit like Woodleigh protected points or Swift A Frames, and the construction in general is not unlike the Hornady Interlock. The Grand Slams are only 1.080″ long as a result of the truncated tip, a 3.090″ C.O.L. is called out in the Speer Reloading Manual, leaving a .484″ protrusion into the case and 55 grains of capacity.
 I did one quick go at Sierra 117 grain Game King Boat Tail bullets, only because I own so many I figured this would be a good place to start using them up. They are 1.115″ long and were seated to 3.250″ C.O.L. for .359″ protrusion into the case; 56.6 grains of net capacity. I’m not sure what’s going on with Sierra. This is the third time I’ve tried to get some very basic bullet information, and was greeted with raging paranoia. I asked for bullet length specs to use in calculations and was told this is proprietary information. I guess they haven’t heard of people taking measurements from bullets. In any case, I’ll take the long way around to get the data, but I’m not going to work that hard to buy anyone’s product. Bye Sierra.

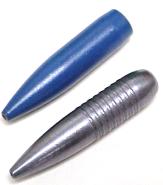
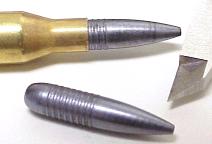
 It use to drive me crazy, when I’d set up my bullet seating die for the proper C.O.L., and the very next cartridge would be long and out of spec. Then I remembered lead is soft, calipers are hard and bullets get shorter when you squash them. Fortunately, the seater plug (left) in the die ignores the tip and locates further down the nose of the bullet (right), where there is no chance of a distorted tip varying the position of the bullet heal within the case, or locating a cannelure in the wrong position. If you’re taking C.O.L. measurements and you see this wandering around, pull a few bullets out of the bullet box, and measure tip to heal to get an ideal of the type of spread you might expect in C.O.L. readings based on variations in bullet length.
The Stoney Point Cartridge Headspace Gauge
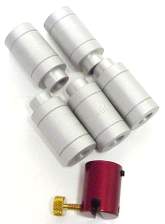 I think this is one of the most worthwhile purchases I’ve made in recent times. The Stoney Point Cartridge Headspace gauge ran $32.50 for the 5 bushing set and comparator body, from the nice folks at Sinclair International. In this configuration the gauge will check all cartridges from .17 Remington to the belted magnums based on the .375 H&H cartridge.
The parts are attractively anodized aluminum with brass hardware and clipped on to any of the calipers I own. The Stoney Point package seems to promote this as a low cost solution for people who want to measure cartridge headspace, but I compared readings to my RCBS Precision Mics that sell for $39 per cartridge, and the readings were exactly the same. Even the Wilson drop gauges that won’t direct read cost $22 per cartridge.
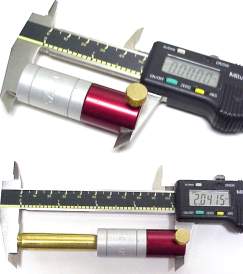 One of the benefits of a digital caliper – I clamped the comparator body, the part that holds the cartridge bushing to the lower jaw of the caliper, then I installed the correct bushing for the .25-06 Remington cartridge and locked it in place with the small set screw. I closed the jaws of the caliper on that assembly, and set the display to zero. Then when I inserted a cartridge between the top jaw and bushing, I could directly read headspace.
SAAMI Specification for the .25-06 is 2.048″ ~2.058″. The reading of 2.0415″ for the new Remington brass, fresh from a full length sizing die matches the RCBS Precision Mic exactly. That’s good enough for me. Stoney Point also offers undersized bushings so customers can make their own for cartridges not covered. Nice stuff.
Conclusion
I have recorded all of the pertinent data from the .25-05 assembled cartridges and will go on and do the same for the .257 Weatherby this week. I’m looking forward to getting up to the range, collecting the results, and seeing how much the brass crawls around in each respective chamber. I also took the liberty of loading up the first box of .358-378RG ammo, so the trip should be interesting. Until next time…..
More “Quarter Inch Solutions”
Quarter Inch Solutions Part I
Quarter Inch Solutions Part II
Quarter Inch Solution III – Handload Development
Handload Data 25-06 Remington
Handload Data 257 Weatherby Magnum
Thanks,
Joe

Email Notification