I wrapped up the previous installment with the heading “No pain, no gain”; I wasn’t joking. Fitting a firearm for a strain gage takes care, if the resulting reading as are to be credible. I’m not suggesting this is a difficult process, it just isn’t a casual process and instructions need to be followed. In short, the procedure and process are as Oehler represents them to be.
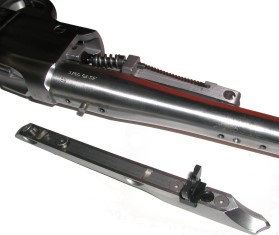
The first critical step in setting up a firearm, is picking a location to mount the strain gage on the barrel. Ideally, halfway up the chamber from the breech to the case mouth for straight wall cartridges, or halfway to the case shoulder for bottle necked cartridges. Pressure estimating is more accurate for straight wall cases. Some action types are a problem; covered barrel or rotating cylinder pistols, bolt action rifles, and rifles with particularly short cases where the chamber barely clears the receiver ring. Remember, the strain gage measure how much the surface of the barrel stretches (stains) under pressure, so too much reinforcement around the barrel would reduce barrel strain, yielding an erroneous reading. Break open firearms, rifles, shotguns and single shot pistols are the easiest to adapt, unless a rear sight or ramp gets in the way. The Ruger No.1 worked out just fine from a receiver ring standpoint, but I needed to temporarily remove the quarter ramp to mount the gage. I also pencil scribed the top edge of the forearm so I would know how high on the barrel the gage needed to be mounted to not interfer when the forearm was reinstalled.
In addition to critical placement, strain gages need to mounted on a perfectly oil and wax free surface, preferably sanded, oxidation free and etched to provide some tooth for the gage mounting adhesive. Stainless steel barrel rifles may actually take more special care in preparation than carbon steel rifles as a function of surface sheen and embedded polish and oil used in the firearm’s finishing process. Amongst a host of cleaning and prep products, Oehler includes an aerosol can of M-Line chlorinated hydrocarbon degreaser in their gage mounting kit. M-Line, Micro Measurements, is aVishay product, a supplier of every imaginable component related to strain gage and other similar and related technologies. In fact, their site has a great deal of very useful information regarding the installation and use of strain gage products.
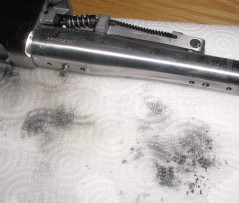
Prior to this project, the stainless Ruger No. 1 had been cleaned before range use, then another thorough cleaning after shooting. The picture to the left is an example of what can come out of a well cleaned gun when some small hardware is removed to uncover what has accumulated underneath.
A problem with this level of cleaning prep is that, after one swipe, the material used to wipe is contaminated. The procedure is two wipe downs with chemical degreaser soaked paper towels, then one spray left to air dry with no further contact. When all of this is done correctly, there is still a long way to go before mounting the gage.
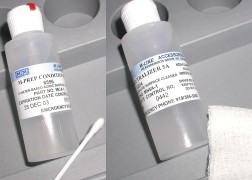
I mentioned stainless steel barrels are a bit more difficult to prep – all barrels require an acid etch and the use of a neutralizer. Stainless barrels may also need to be oven or hairdryer heated, only to the limits of comfortable handling, and sanded with 220 grit silicon carbide paper, while the barrel surface is wet with M-Prep Conditioner A. M-Prep, a mild phosphoric acid compound acid wash, when applied correctly, will leave the metal clean and slightly etched. The acid wash/wet sand is quickly followed with a neutralizer, M-Prep Neutralizer 5A to halt further chemical reaction. None of this is major, but it becomes obvious why this isn’t a casual process to be applied to a favorite firearm.
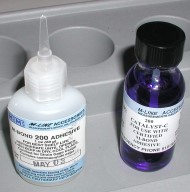
From the time the barrel is cleaned and surface etched, until the strain gage is installed and sealed, time becomes a factor. You can’t leave a raw metal surface exposed to the environment very long before some imperceptible film begins to form that will impair an adhesive bond. So you have to sort of move it along from here.
Because the strain gage is small and should not be contaminated by touching, a strip of special low grip cellophane tape is pressed to what will be it’s exposed side to act as a larger carrier for the gage. A catalyst is applied to the barrel side contact face of the gage, glue is applied to the barrel’s surface, and the gage and tape are rolled onto the barrel in an even swipe pressure swipe.
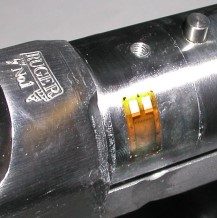
You can pretty much tell if you did this step correctly right away. Tip offs to an error – the gage comes off when you lift the tape, at least two of your fingers are glued to the barrel, or if you actually had time to photograph the entire sequence from start to finish that is suppose to take no more than 5 seconds. What you see here is the gage glued to the barrel, and the surface adhesive of the cellophane tape that has already been removed. Notice my fingers are nowhere is sight.
It took me two shots to place the gage. Oehler did their part, unfortunately I sometimes disbelieve simple instructions, and convert them into a more complicated, convoluted and less rewarding process. On my second attempt I followed the instructions exactly, and everything went on as it should. The first gage made it to the trash, they can not be reapplied.
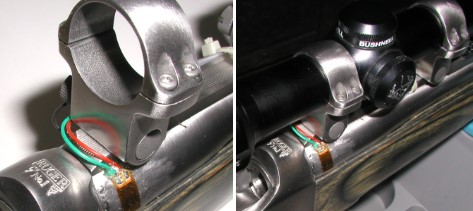
There are a few more steps that need to be taken after the gage has been properly affixed to the barrel, mostly centered around connecting a 4′ long piece of phone cable, complete with modular connector, to the gage solder pads. Oehler, again anticipating requirements, includes several precut and assembled 4′ pieces, in addition to piece parts and wire that may be needed for future requirements. Essentially, the gage’s solder pads are tinned and receive either a green or red wire, the cable’s remaining stripped black wire is attached to a screw on the rifle, and acts as a ground for the circuit. After soldering, the gage and exposed leads are covered with a two part epoxy that is intended to protect the assembly, and assist in holding the gage in place when the cable is moved around in use. Above, the cable has been routed along the quarter ramp and tie wrapped to the same to keep the load off of the cable solder connections. Beyond the sanding scuffs on the barrel, the installation isn’t too messy. At this point the gage installation is complete and the cable that connects the gage to the Oehler M43 is in place.
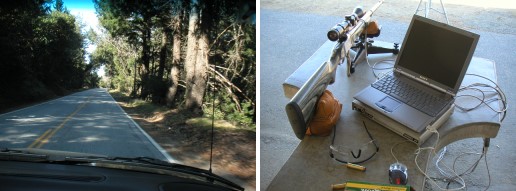
The picture only illustrate there is life after shop work, a nice ride to the range, and a really messy bench set up. At least none of the other kids made fun of me over wires hanging out of my rifle. I’m going to take a break while I struggle with the shooting bench to get room and keep the computer away from muzzle blast and my elbow, and collect some base data.
So Far
Within this strain gage method of estimating pressure, I believe Oehler did a great job of providing a useful and well thought out kit, clear and concise instruction and a tech explanation comparable to the folk who make all of this strain gage and strain gage attaching gunk. Oehler expresses their equipment’s capability in conservative terms, and this is carried forward in documentation for the M43; most steps are easier than cautioned, but I like the approach. From the bench, the strain gage checked in place and functioning when the Oehler M43 software came up, so…
More “Tools for .45-70 handload development”:
Ruger No. 1 .45-70 Test Mule Part 1
Tools for .45-70 handload development – Part I
Tools for .45-70 handload development – Part II
Thanks
Joe

Email Notification