 At a time when new firearm, cartridge and new component information is flooding firearm publications in an endless stream, all with an interest holding shelf life of about 15 seconds, I can’t help but wonder if the most enjoyable part of handloading is falling by the wayside. I’m sure handloading can be reduced to a money saving venture for folks who consume very large quantities of ammo; handloading is a necessary evil that resides between a pile of empty brass on the range floor and the next shooting event. However, to others handloading activity may be a major enjoyment within the process; controlled analysis and experimentation, leading to improved firearm performance. I apologize for the sometimes snail racing pace of the work, but these are the parts of handloading I enjoy – taking a closer look at the process and, hopefully, developing a better understanding. The following is just a description of me wandering through the process of handloading a cartridge that is new to me, and confirming or discarding information I have been exposed to previously.
Examining the case design…again…and again..and
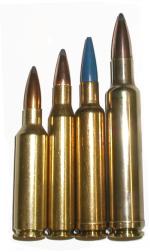
When Winchester and Remington introduced the Ultra, Short Action Ultra, Winchester Short Magnum and, finally, the Super Short Magnum, they directed a lot of ridicule at the belt that is integral to .375 H&H based products. They questioned the use of the word “Magnum” in association with some of these cartridges, and pronounced the belt of no value and the cartridges obsolete. Winchester and Remington were doing nothing more than conditioning market place perception to gain acceptance of their own new products. I’m sure this worked, if you poll a bunch of shooters, particularly the frequent factory gun buyers, I am quite certain they would tell you belted magnums are obsolete, and are outperformed by more modern and efficient short magnums. BS, BS….
Pictured right to left: .270 Winchester Short Magnum, .270 Winchester, .270 Weatherby, .338-378 Weatherby. To put my prior comments into perspective, the factory guys who produce that little thing on the left, are suggesting the guys who produce the cartridge on the opposite end have little basis for referring to their cartridge as a magnum. The Weatherby products are the belt wearers in the group. The presence of a belt on the .270 and smaller Weatherby Magnums has been called into question as to whether or not it is necessary. Well, it wasn’t engineered into the product, it was left over from the existing .375 H&H parent case. Nothing remotely uncommon here; the 30-06 spawned the .280 Remington, the .270 Winchester and the .25-06. the .308 is parent to the .243 Winchester, the .260 Remington and 7mm-08. Weatherby took advantage of the .375 H&H standard, as did Remington and Winchester, by producing proprietary product based on the same parent cartridge. The more original .378 Weatherby based cartridge was released with a belt as this would be the only way for Weatherby to remain true to its historical marketing message, a message that suggests 1) Weatherby cartridges are the most powerful in the world, 2) Historically Weatherby cartridges all have belts, 3) Therefore, belts are required on powerful cartridges. Works for me…except for that 220 Arrow deal. This isn’t to say the belt does not serve a variety of valid purposes.
There is a theory that has been extended where the original .375 H&H and later .300 H&H have very shallow sloping shoulders, and the belt was intended to more positively locate or headspace the cartridge. In reality, for every .001″ in ID diameter a chamber is increased in the shoulder area of either the .300 H&H with its drooping shoulder angle of 8° 30′, or the .270 WSM with its 35° sharp shoulder, both cartridges locate forward an additional .0008″. Consequently, the beltless .270 WSM design offers no real improvement in this area that would warrant removal of the belt. The belt is a much safer locator when establishing headspace. The case head is located and trapped between the bolt and chamber entrance through simple surfaces and small dimensions. Forward of the belt, the soft, thin portion of the cartridge case neck and shoulders are free to form and comply to the chamber wall under pressure, and seal against the rearward flow of gases. In addition, the belt also provides increased raw case strength. .45-70 and 45 Long Colt shooter will routinely reference the dark days of balloon head case construction, when cartridges would only function at low pressure without fracturing. +P .45 ACP and .45 Super cases and many other cases seeing higher than originally intended pressure are designed with thicker webs that are superior to the standard version of the same cartridges. I’m not suggesting that belts should make a comeback. I am stating that belts are missing from modern magnums, not as an improvement to case performance or safety, but rather as a manufacturing cost consideration, and a shift to a different existing parent cartridge that do not incorporate a belt.
In regard to case shape/aspect ratio providing greater levels of accuracy and consistency. I read a related article this past evening, it was over 40 years old, and it described the .222 Remington in the context of benchrest shooting. Apparently a long neck, moderate capacity and more gentle shoulder angle were key to making cartridges inherently accurate, design traits shared amongst the .222 Remington, the .30-06 Springfield and the 50 BMG designs….at least until the .223 Remington became commercially popular, then it was tagged as the optimal design. Short magnums are the best because they are new and therefore easier to promote, and the least costly to produce; less brass, less powder, less steel required in firearms. Sporting rifles gain little in the way of accuracy or shot placement consistency through finesse design issues. I wouldn’t argue the point with a competitive benchrest shooter, that equipment is good enough to evaluate miniscule gains in performance. I’m also not condemning factories for introducing new cartridges. The exercise is at least as valid as the handloaders obsession with producing wildcat or improved versions of existing cartridges. We’re all having fun here, it doesn’t have to make a lot of sense.
Case capacity and bullet displacement.
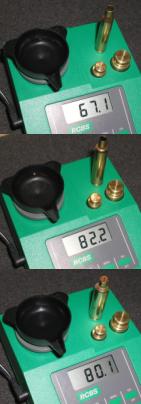
I scale checked capacity for the .270 Winchester, .270 Weatherby and .270 WSM. Pictured right, 67.1 grains 270 Winchester, 82.2 grains 270 Weatherby and 80.1 grains 270 WSM. This is a full case, including neck.
I also did some capacity checking with bullets seated to a proper cartridge overall length. A 130 grain Hornady bullet yielded net capacities of 63 grains Winchester, 76 grains Weatherby and 75 grains WSM; a negligible difference between the Weatherby and WSM case. I spent some time reviewing sources of load data and, with the exception of powder that is probably too slow for use with the WSM, there were virtually none that were compressed loads, making the 1 grain capacity difference irrelevant.
A longer and heavier 150 grain Partition yielded net case capacities of: 61 grains Winchester, 76 grains Weatherby and 72.5 WSM. The difference is more substantial, however, still below case capacity. The reason longer bullets have more of an impact on WSM case capacity is that the Weatherby has a longer COL and more latitude for seating longer bullets out farther. The WSM is already at maximum cartridge overall length with lighter bullets, so any increase in bullet length protrudes further into the case, displacing ever increasing amounts of powder….maybe. I remembered somewhere, in some magazine stack, there was an explanation of the WSM being longer than the SAUM because the Winchester short action could handle a longer cartridge than the short Remington action. How much longer? I didn’t know, but it seemed there might be a potential for seating the WSM bullet far enough out to gain some additional powder capacity.
New cartridge loading preparation
I began with new Winchester brass; great stuff, but a little nonspecific in length. Over a sample of 50 pieces, cases ran 2.095″~2.099″. Maximum length spec is 2.100″, trim to length is 2.090″. For practical control purposes, all cases needed to be equalized by trimming after sizing. Measured at the datum line for headspace, all cases ran 1.750″~1.755″.
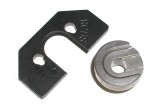 Newer and popular cartridges sometimes pose a problem with tool and accessories availability. I had no problem locating loading dies and press shell holders, but I couldn’t located a shell holder for my RCBS Trim Pro. I finally ordered one through RCBS when their web site indicated its status as “in stock”, then found it was backordered indefinitely. I then ordered a Hornady Cam Lock Case Trimmer, as this trimmer required only the standard Hornady press shell holder that I already had in my possession. Of course, the next morning RCBS contacted me to tell me the trimmer shell holder had become available and shipped. I immediately attempted to cancel the Hornady trimmer, but found it had also already shipped, so a couple of days later I had two useable case trimmers, $10 worth of holders and about 2 grand in freight bills.
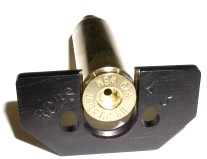 What you see in the photo to the right is the age old problem of two forms of matter attempting to occupy the same space at the same time. Either the trimmer shell holder slot is undersized, or the case extractor groove is too shallow, but in either case this was not a workable situation. When I receive my case drawings I will check further. Regardless the cause, the situation gave me the opportunity to work with the Hornady trimmer. I’ve been ragging on Hornady equipment for the past few weeks, so I was pleasantly surprised to find their trimmer was easy to use and very well made.
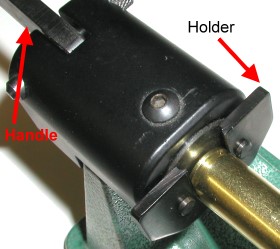
To those unfamiliar with the green brand trimmer, it uses a flat shell holder that is located on two keyed pins and is spring loaded against the cartridge rim. Depressing the handle moves the shell holder forward, releasing the case rim.
The trimmer also takes up a lot of bench space as the release lever, when in the working position, is about 10″ long and takes up a lot of bench area. The trimmer also requires an inventory of unique shell holders to match every reloading press shell holder or shell plate in the handloader’s inventory. Finally, it sits low on the bench and is good for taking skin off of knuckles when used in manual operating configuration. I made a spacer block to raise mine off the bench.
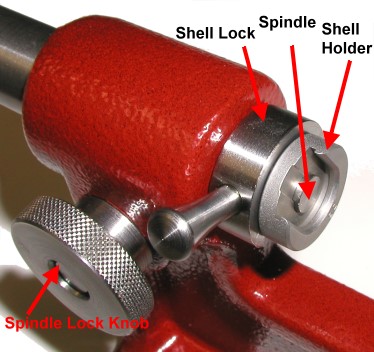 The Hornady Cam Lock Trimmer set up is pretty neat. The shell holder is the same part used in the Hornady reloading press, so there are no additional parts to buy. Rotating the shell lock handle either releases or locks the cartridge case in place, depending on direction of rotation; the spindle protruding though the center of the shell holder locks the cartridge case in place.
The shell holder, as with the RCBS unit, is open on one side, but the Hornady unit gripped more tightly than the RCBS holder and seemed to better center the case. The spindle lock and sliding shell holder spindle was a nice touch for case length set up adjustments. The Hornady trimmer was of heavier construction than the RCBS unit.
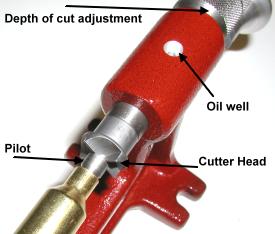
The cutter end of the trimmer is very well done. Because the shell holder end spindle is adjustable, the moving cutter spindle has to be extended less, providing more support on the moving assembly side. The cutter spindle depth of cut adjustment is more closely controlled on the Hornady product. An oil well is a nice touch as the spindle and frame are appropriately steel on steel, no bronze bushing as trimming is low speed and short cycle operation.
The cutter head is about the same type found on any trimmer, the pilot aligns the case mouth so it is perpendicular to the cutter blades, the shell holder side spindle fixes the case to prevent it from rotating while the cutter is working.
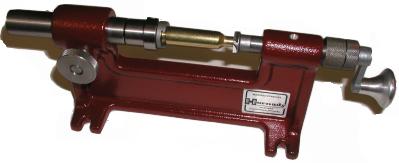
The Hornady trimmer is a well made accessory tool. There are a couple of minor points of criticism. A power drive attachment would be helpful for long runs; this model is manual only. It would also be helpful if a caliber number were stamped on each pilot, rather than a reference number, which requires a chart look up to ascertain applicable bore size.
Other simple but useful tools
As indicated previously, maximizing COL could increase useful case capacity and resulting performance, particularly with longer bullets. No, I’m not trying to extract full length case performance out of a short case compromised magnum, but I do want to extract the most from the potential. To accomplish that goal, I need to seat out the bullet as far as I can, without creating an unsafe condition, or without creating a firearm that would not eject loaded cartridges reliably. There are lots of ways of determining this COL measurement for a particular rifle / cartridge combination. Direct measurement methods are the most accurate. A quality O.A.L. gauge from Stoney Point Products run about $35, plus another $5 for each gauge cartridge adapter, less through discounters, and most carry these products.
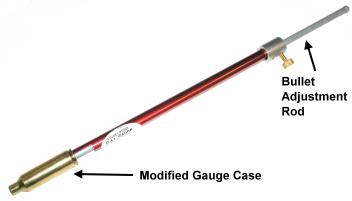
The gauge cartridge adapter is no more than a sample of the applicable cartridge case with a drilled out and tapped primer pocket. The cartridge adapter threaded to the end of the gauge, the bullet of choice in inserted into the case, then the assembly is inserted into the rifle’s chamber. A movable plastic rod passes through the gauge and cartridge, resting on the heel of the bullet. The adjustment rod is pushed forward until the bullet contacts the rifling lands and locked.
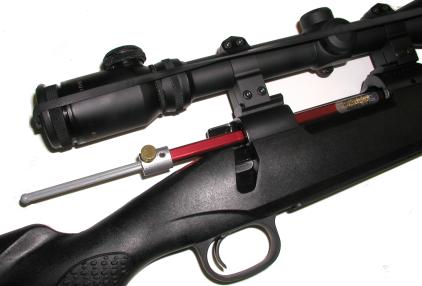 This is what the gauge looks like when installed in the rifle and locked up, just before removal. It is a very simple process and very quick; I measured 7 bullet configurations in about 5 minutes.
In a pinch, I am sure it would take very little effort to drill out and tap a standard cartridge primer pocket to convert it for use with the gauge. My .270 gauge cartridge carried a Norma headstamp identification.
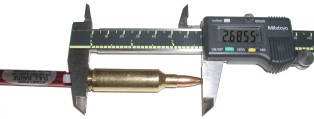
Once extracted from the rifle, it becomes a simple matter of measuring the mock case and bullet assembly length. The gauge is notched to make room for the caliper jaw and allow it to line up on the centerline of the cartridge. Add a safety margin for rifling clearance of .020″ – .030″ and you have your COL for your specific combination.
| Bullet | Weight Grains | Bullet Length | Max COL | +.030″ Safety Margin | Bullet Mfg COL | Net Capacity | |
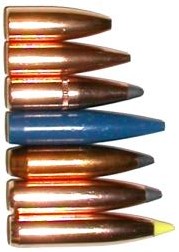 |
Sierra HP | 90 | .855 | 2.685 | 2.655 | 2.700 | 76.4 |
| Hornady HP | 110 | 1.014 | 2.765 | 2.735 | 2.720 | 75.2 | |
| Hornady Interlock | 130 | 1.112 | 2.750 | 2.720 | 2.785 | 73.5 | |
| Barnes XLC XBT | 130 | 1.281 | 2.827 | 2.797 | NA | 72.3 | |
| Sierra Spitzer | 140 | 1.190 | 2.776 | 2.746 | 2.785 | 72.0 | |
| Nosler Partition | 150 | 1.255 | 2.803 | 2.773 | NA | 73.2 | |
| Nosler Ballistic Tip | 150 | 1.355 | 2.853 | 2.823 | NA | 72.0 | |
SAAMI maximum length specification for the .270 WSM is 2.860″; under no circumstance should an assembled cartridge exceed this specification. In review of data appearing on the table, particularly the measured maximum cartridge length for each bullet and the bullet manufacturers’ recommended COL, I encountered an interesting situation. Following referenced assembly dimensions in established handloading manuals, staying well within SAAMI guidelines, and even after adding .030″ more safety clearance, in three of four configurations the bullet would be in contact with the rifle’s lands. The probable result would be high or excessive pressure with less than maximum loads.
And just when you though my explanation couldn’t be more confusing…
The Stoney Point OAL Gauge allowed me to take measurements from the specific bullets I had selected, and my own firearm. Adding .030″ to this gauge measurement located the point on the ogive as illustrated below “.030″ forward on ogive” which left me with the situation defined by the bore/bullet cross section illustration. When I closed the bolt on my rifle with this bullet, there will be approximately .005″ clearance between the bullet and rifling, but in reality, that would only apply to the single bullet I measures. The OAL Gauge is only one third of a set of required tools for more dimensionally controlled cartridge assembly.
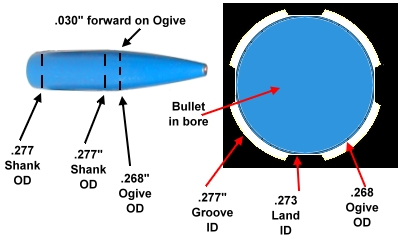
Bullets are manufactured to a very tight weight specification, most within 1 tenth of a grain. Because cores and jackets may vary in density by a very small amount, the bullet’s tip length may be adjusted by a very small amount, a few thousandths, to achieve a weight spec. In addition, soft lead bullet tips are easily deformed on contact and a drop to the floor beneath the reloading bench could easily make a bullet .010″ shorter. What I am inferring is that using the very tip of the bullet for a dimensional reference point is unreliable, so it becomes necessary to base dimensions on a more stable reference point, and then check all ammunition produced to that point. Where the tip may vary a significant amount the transition shape, dimension and location of the ogive relative to the shank is very consistent. Enter the second half of the team, the bullet comparator.
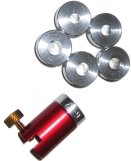 The Bullet Comparator permits reference measurement from the OAL Gauge cartridge Adapter in a manner that circumvents the problem of deformed bullet tips or manufacturing tip length variation.
The Stoney Point Comparator set B234-678 comes with a set of 6 bushings to cover popular bore sizes: .224″, .243″, .257″, .277″, .284″, and .308″. The spiffy set B 13 additionally includes: .264″, .338″, .358″, .375″, .458″, and .416″. The Basic set runs $29.95, the full set runs $49.95, and you can purchase smaller bushing sets to fill in if you select the Basic set and later want to expand to cover some new boomer.
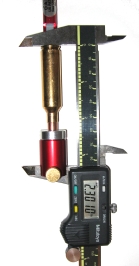 Pictured right, the properly adjusted Cartridge Adapter is still secured to the OAL Gauge, and the Bullet Comparator Gauge is being used to take a measurement from the flat of the cartridge case head to the beginning of the bullet’s ogive. The 2.301″ reading is an indication I should check each loaded round to make sure it measures no more than .2.301″+.030″ for safety clearance, for a combined length of 2.331″. If this wasn’t the weekend, and my head wasn’t still foggy from work week wind down, with the caliper jaws closed down on the empty gauge I would have set the dial caliper to +.030″ rather than zero. This way the additional .030″ safety margin would have been incorporated into the direct reading; I’ll use the approach during production.
So now we are in pretty good shape with two reference points for setting cartridge length, overall as well as to the very reliable point on the bullet’s ogive. This gets the assembly closer in proper dimension, but none of these measurements are of use unless the cartridge case is located consistently in the gun’s chamber. referenced as headspace. The .270 WSM forward motion in a firearms chamber is halted at the imaginary datum line point running midway and perpendicular through the case shoulder. This step takes us to the use of a third related tool, the headspace gauge.
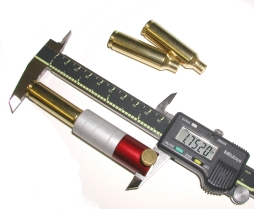
The Stoney Point headspace gage is comprised of a the red gauge body that clamps to the lower jaw of the caliper, just as the others, and a bushing with an opening to match cartridge case diameter at the datum line. There is a selection of bushings to fit most popular cases, and blank bushings that can be drilled and reamed for non-standard applications. The .270 WSM utilizes the standard D 400 bushing. The MSRP for the Headspace Gauge and bushing set is $39.95.
When working with once fired brass, the headspace gauge can be used to set up the sizing die. Since brass springs, or recovers to some degree from pressure expansion, the shoulder of once fired brass is bumped back only perhaps .002″ if it is to be used in the same firearm. This mostly saves wear and tear on the brass and reduced the amount of work hardening that occurs when resizing the material. If brass is to be used in other firearms, the case is normally resized to the SAAMI spec for headspace. I believe I know the correct headspace length for the .270 WSM, but until I have a copy of the cartridge drawing in my hands I’d rather not post the information.
When you see the disclaimer, “Work up all new loads starting 10% below the recommended charge weight….” next to reloading data or components, this isn’t CYA, it’s good advice. It is common to have variations in components, enough to make the difference between bullets having clearance from the rifling and coming in contact with rifling even when following manufacturers’ assembly instructions. Beginning 10% shy of maximum loads with a new combination provides the opportunity to progressively look for developing signs of excessive pressure before the condition becomes serious.
Summary
In the event you might have nodded off while reading, I know I did while writing, the picture below illustrates the dimensions that will be controlled during the handloading process, and generally the tool/tools that will be used to measure and monitor the process as indicated in green type.
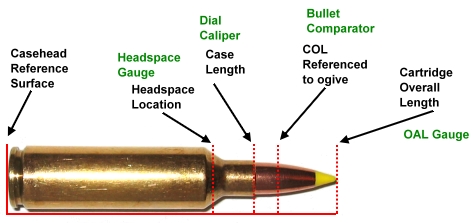
The plan is clean and run all new brass through a full length sizing die and trim them to uniform length. Then I will run each bullet type through the OAL Gauge and establish the proper COL, then measure each assembly with the bullet comparator. Hopefully, by next installment I will have a table of recorded critical data including some post firing case dimensions and performance data. Any excuse to get to the range.
More on the 270 WSM:
The .270 WSM – In pursuit of stubby cartridges
The .270 WSM – In pursuit of stubby cartridges Part 2
The .270 WSM – In pursuit of stubby cartridges – Part 3 – Conclusion
Handload Data – 270 WSM
Thanks
Joe

Email Notification