I arrived at a point in the project were things didn’t work and the problems and correctives actions were not obvious. I had to decide if all would end up in a box at the back of a shop cabinet or if I had enough retained enthusiasm to see it through. I finally decided there was too much of a potential upside to ignore, the NY Giants hit a bye week on the schedule, so I dug in for another assault on technical issues.
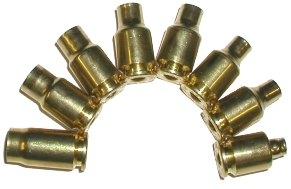
The mostly gratuitous array, upper left, is the progression of sizing steps in case forming the 17-357 RG. If you look closely, you will see all was moving along well, until the last step where the case shoulders collapsed; good for an accordion, not good for cartridge brass. Oddly enough, I once knew a guy named Frank who played the accordion, but probably knew little about handloading. So rather than call Frank, I contacted CH4D the die maker, politely described the symptoms, in hopes of drawing upon their experience and getting a point in the right direction. I probably would have been better off if I had called Frank, as CH4D collected the information I sent and never followed up with a reply. Clearly an Interesting and cost effective approach to customer service and, unfortunately, an all too familiar practice. Left to my own devices, I spread all of the material out on the bench and began picking though it – CSI Sunnyvale.
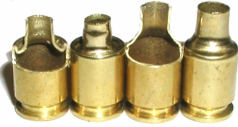
I checked for a typical forming problem; a build up of displaced material at the interior neck/shoulder intersection – a “donut”. :My initial thought was the expander in the full length resizing die was entering the case mouth and hitting this obstruction at the shoulder intersection. Continued application of expander pressure on this obstruction was causing the case to collapse. However, as cutaways next to their whole counterparts show, there was no such obstruction. The appearance of the case mouth suggested it might be getting jammed against the interior of the die.
For all the machinist’s art references to tooling, and tooling parameters, reloading and forming dies are not complex. The material they work is soft, interior geometry is simple, tolerances are generous, their usage is low speed, and the environment for use is very stable. In short, they should work pretty well out of the box, unless something is dirty, defective or there are basic tool design problems. So I made sure the dies were scrubbed out clean, I checked for obvious defects under a magnifying lamp, found none, then began carefully measuring them inside and out.
Sometimes It’s Better Not to Know
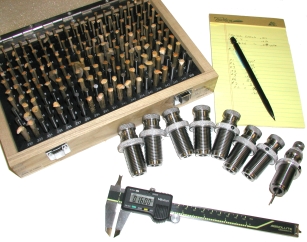
I grabbed a pin gauge set, a dial caliper and a diet Coke, and began checking tooling and brass dimensions. The process would take only a few minutes, and was a better preliminary step than jumping in with a hammer and chisel, and going to work on the tooling.
Incidentally, If you find yourself in need of inexpensive precision measuring or checking tools you might try Enco. I picked up the 190 piece pin gauge set on sale for $33. The set is certified and covers .061″~.250″, .001″ increments. Enco also sells premium name brand precision tools, but this set was more than enough for my purposes. Customer service is great, even when there is a problem.
I measured the inside neck diameter of the CH4D forming dies; checking for any larger or irregular increments. Across the seven forming and one full length sizer the neck dimensions were:
|
Die Neck Reduction Surface |
|||
| Die | Diameter | ∆” | ∆% |
| 1 | .347″ | -010″ | -03% |
| 2 | .328″ | -.019″ | -05% |
| 3 | .294″ | – .034″ | -10% |
| 4 | .271″ | -.023″ | -08% |
| 5 | .251″ | -.020″ | -07% |
| 6 | .237″ | -.014″ | -06% |
| 7 | .219″ | -.018″ | -08% |
| FL | .197″ | -.022″ | -11% |
| Total Reduction .158″ | |||
| Expander Diameter .160″ | |||
I was pretty disappointed. The degree of magnitude of reduction with each die had no logical progression and the most severe was the last step when material was as maximum thickness and most work hardened. There should have been some linear progression, if not progressively diminishing reduction as the material hardened and diameters grew smaller. However, since I was able to successfully form a case through 7 steps before running into the sizer die problem, I went with the assumption the steps were not more critical that the dies provided, and there was no greater problem here than sloppy workmanship. I think next time I will attempt to make my own set from die blanks; I’m good at sloppy workmanship and I work for a lot less money.
Case neck wall thickness predictably increased throughout the forming steps; new 357 SIG brass was 0.013″, by step 4 this had grown to 0.016″ and by the time the case was run through the #7 forming die it was 0.019″~0.020″ thick, or almost double the original thickness.
Even a Slow Guy Will Eventually Figure It Out
 The collapsing case problem appeared to be associated with process timing. In a typical arrangement, as the reloading press handle is pulled, the sizer die expander is passed into the case mouth, through the case neck and into the case body, in advance of the sizer die making pressure contact and forming the case neck. After the neck is sized, press handle is lifted, retracting the die from the case and, finally, pulling the expander back through the case neck, setting a neck diameter large enough to hold the bullet while maintaining sufficient tension. The die and expander move in a sequence and would not be in contact with the case neck at the same time.
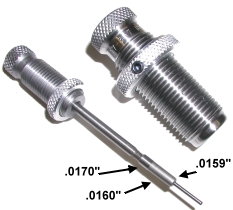
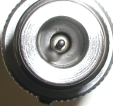 The CH4D expander rod was made too long, as was the body of the expander. With insufficient range of adjustment, the choices were either to extend the expander out from the die, causing it to bottom inside the case head, or adjust it into the die causing both the expander and die to contact the case neck at the same time. The expander was made 0.160″ in diameter, increasing to 0.170″ at its trailing shoulder. Consequently, there was only 0.018″ or 0.008″ for case material thickness between the expander and die body, depending on where the expander was positioned. The case, with material thickness of 0.020″, would start over the expander, then wedge between the expander and the die. The case would collapsing under continued pressure. The problem condition was compounded a bit, as tightening the lock ring on the expander adjuster lock ring pulled the expander to one side of the die, closing one side completely and leaving the other side with a gap, so the expander rod lock ring had to be left loose to let the expander float and center in the die.
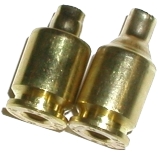
To validate my conclusions, sometimes my theories get the better of me, I removed the expander from the full length sizer die and ran a few more pieces of fresh 357 SIG brass through. Unlike the case on the far left, the brass formed correctly, so the collapse of the case was indeed caused by the case mouth being trapped between the die body and the expander. The case still needed to be trimmed to length and fire formed, but at least the neck didn’t collapse and the case body did not bulge. I concluded I would have to substitute an expander that was shorter than the CH4D part to establish proper forming and expanding timing. Along the way, I also discovered another problem.
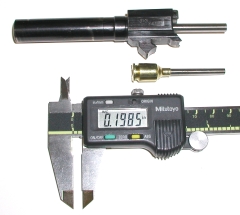 I originally intended to neck turn the cases; I’m not in a rush and I liked the idea of standard case neck thickness. During the pre-project planning, it was suggested I have the chamber reamer made for a .206″ neck diameter to eliminate the need for neck turning. Apparently, at that time, I lost my mind and my ability to do simple arithmetic because, in retrospect, the mod made no sense at all. The neck area of the gun’s chamber checked 0.206″ in diameter. The case neck coming out of the sizer die was 0.198″ in diameter, which was in spec, but pretty much irrelevant. The sized case material was 0.020″ thick, wrapping that around a 0.172″ bullet would yield a neck diameter of 0.212″, or 0.006″ larger than the chamber. It became obvious that neck turning would be necessary. The 17-357 RG neck diameter spec is 0.199″ which means a 0.013″~0.014″ goal for post turning material thickness.
I Think I Broke It
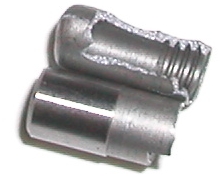 I decided to start by correcting the expander plug problem first and took a shot at shortening the supplied C4HD expander, and changing its shape to get the desired process step timing. The thin wall material was so hard and brittle, even a slight tightening on the micro-lathe chuck was enough to cause it to shatter. At this point I was missing an expander.
I didn’t want to order a replacement CH4D expander; it wasn’t the correct configuration. The expander rod adjuster had a 10-32 thread, the same as an RCBS part, and RCBS typically utilizes short expanders, so I ordered a 17 caliber assembly from RCBS with the intention of modifying to fit the CH4D sizer die.
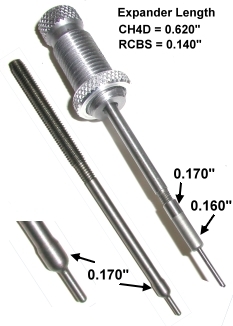
The photo on the left is probably the best way to illustrate the difference between the RCBS part, far left and inset, and the CH4D part still set in the expander rod adjuster. The expander’s contact surface is much longer on the CH4D part, by nearly half an inch, and it has a sharp shoulder stepped by 0.010″ that looked unfinished. The shaft is threaded, the expander is threaded to the shaft and the decapping pin is replaceable. The RCBS part is one piece, the threaded portion is integral to the expander and the decapping pin is not replaceable. The RCBS expander surface if larger in diameter, only 0.001″ less than bullet diameter. However, the case neck is formed by the sizer die to only 0.158″ inside diameter just before the expander is pulled through. The brass case neck will open, but the material will rebound and the neck inside diameter will reduce below the diameter of the expander; approximately 0.162″, or about 0.009″ smaller than bullet diameter, to provide the necessary neck tension when the bullet is seated.
Because of it’s longer length, the RCBS part needed to be shortened to fit the CH4D die, which resulted in greater range of adjustment without interference at the top, or striking the casehead at the bottom.

Trimmed and thread chased, the RCBS part is comparable in overall length to the CH4D part, but the trailing edge of the expander surface is moved well forward. Assembled in the CH4D die, the expander is away from the forming surface of the sizer die and there is a lot more useful adjustment available in the assembly. After changing the expanders, there was no problem forming brass.
Once Size Does Not Fit All
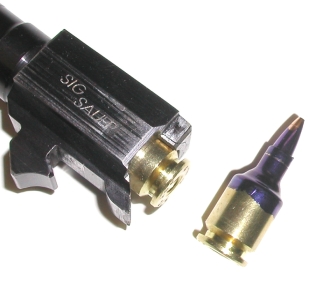
The problem I did encounter was anticipated. Once a bullet was seated, the case neck was oversize to spec, preventing it from correctly headspacing on the shoulder in the chamber. You can see in the picture the case overextends from the forward side of the extractor groove. A little Dykem Blue layout fluid on the assembled case made it easy to find points of contact in the chamber and verified there was no other interference contact on the case shoulders or body..
This mock up cartridge was 0.011″ over neck diameter case spec, or 0.004″ oversize for the chamber. There was no longer a problem with the expander and die, bullets seated normally and held with a good deal of neck tension. This left me with regular case length trimming as a step and a resolution to the neck turning requirement.
Just A Little Off The Top and Leave the Sideburns
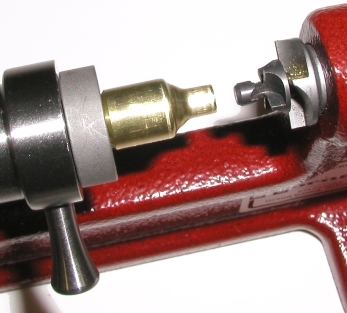
I had a dream I was going to set up my RCBS powered trimmer and crank out a 100 cases or so, then manual neck turn. Not really. As is the case with many trimmers, the RCBS unit has only an adjustable driving shaft, the shell holder position is static. Consequently, it will not handle very short cases, and the 17-357 RG is only 0.865″ long.
The Hornady trimmer, which received a positive review elsewhere on the site, has all the necessary adjustment and a neat little combo pilot/cutter for 0.172″ cartridges that screws right into the face of the standard cutter. By installing a 357 SIG shell holder, and I was able to crank out brass cleanly trimmed and square. I really like the Hornady trimmer, it is solid and precise and very durable.
A Quick Neck Turning Solution
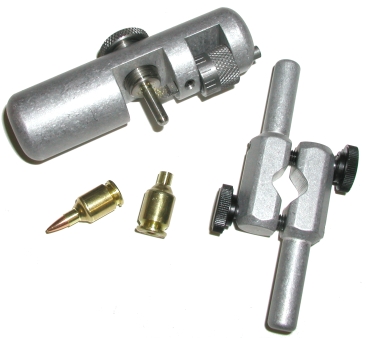 Unable to use my RCBS trimmer to turn case necks, and after reviewing several other setups that were generally available, I elected to try the Hornady neck turning tool. The only additional part I needed to purchase was a 17 caliber anvil and I was ready to go. Actually, for some reason the anvil would not clear the threads on the top of the cutter, so I had to run a 1/2-20 tap through the hole; then I was ready.
Great little tool. Very easy to set up and use, lots of control and actually pretty fast in turning out brass. The anvil depth controls length of cut, the small knurled knob controls depth of cut; it is indexed in 0.001″ increments and this is accurate. I’ll do a separate review on this tool because it is a good one.
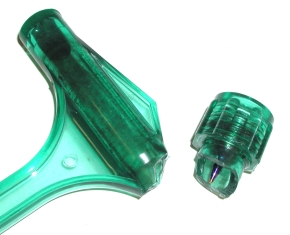 I’ll leave you with a thought regarding bullet mass and why little bullets are not prime for autoloaders. This is what an inertial bullet puller looks like after trying to tap out a 25 grain 17 caliber bullet from a non-crimped case.
I now have working dies and I can make good brass consistently. New brass, at least from Starline, does not require annealing during or after forming. The cases may require a number of forming and trim steps, but the Turret press makes the forming quick and easy and only standard tools are required for trimming and neck turning. For a while, this was a day I though would never come – long project. And now onto the great fun of making, and I that is an almost literal expression, brass.
How Much Wood Can a Woodchuck Chuck…

At near actual size, it seems like there should be a lot more cartridge for all the work; I began with a giant oak and ended up with a tooth pick, but I’m actually pretty happy with the results. Because there is a good amount of prep before loadable cases can be turned into production, I thought it might be worthwhile to highlight some of this time investment:
-
40 minutes to 7 step and full length size 50 cases. There is very little overhead and set up time so about 0.8 minutes per case formed from 357 SIG brass is good for extrapolation.
-
20 minutes to manually trim case length for 50 pieces.
-
30 minutes to manually neck turn and finish chamfer 50 cases.
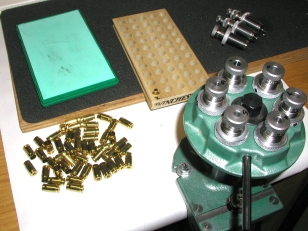 Overall, I spent a leisurely 90 minutes producing a block of 50 finished cases1.8 minutes per case. There is some good news for people like me, lazy people. This labor is mostly a one time deal, certainly case forming would not be necessary beyond a normal sizing step in reloading, and trimming and repeat neck turning, probably not again.
Interesting enough, and a tribute to Starline for quality cartridge brass, I did not lose a single piece in forming or trimming, no split necks, etc., so at least there is an excellent yield on effort. The only problem is it is boring, monotonous work and I was unable to convince anyone there was a benefit for taking over and assisting. I am hoping for case longevity.
Now What Will Fit In There ?
I worked up 28 loads utilizing 7 powder types and two bullet weights. This looks to be a pretty efficient cartridge and inexpensive with 20 and 25 grain Hornady bullets. The performance is substantially higher than a 17 HMR, even out of short pistol barrels, if the calculations hold and pressure really is in the 43k~45k range. I should have some range and chronograph data by the weekend.
More “The 17-357 RG – Real Guns Project Cartridge”
The 17-357 RG – Real Guns Project Cartridge Part I
The 17-357 RG – Real Guns Project Cartridge Part II
The 17-357 RG – Real Guns Project Cartridge Part III
The 17-357 RG – Real Guns Project Cartridge Part IV
The 17-357 RG – Real Guns Project Cartridge Part V
The 17-357 RG – Real Guns Project Cartridge Part VI
The 17-357 RG – Real Guns Project Cartridge – Finished
Handload Data 17-357RG
Thanks,
Joe

Email Notification