This is article number 1,000 on Real Guns current format, but 3,000 since Real Guns inception. What better subject than improving the trigger function of a 1911 pistol. For all of the “How to” articles and YouTube video that attempt to instruct and define the process of 1911 pistol trigger function refinement, the truth of the matter is that different pistol require different approaches. and shooters have different objectives. Subsequently, this is not an instructional DIY piece, but rather a sort of journal of me wandering through my SR1911 and attempting to get it to comply with my personal preferences; a creep free trigger pull between 3.5 lbs and 3.75 lbs.
The magic of 3.50 lbs to 3.75 lbs trigger pull…
Suggesting the amount of resistance a trigger should offer if fun, but more than a bit silly as a static number considers all people to be physically and neurologically, generally the same. Yes, that is also done when firearm form is determined. Thank you for noticing. But it is difficult to make major changes to form, so spend our days finessing what we can; sights, grips and certainly triggers. Is trigger work necessary? Probably not as 90% of gun owners won’t shoot better with a slick trigger. Is that because gun owners are mostly mediocre shooters? Not at all. It’s just that people are very adaptive and we are taught to learn how to operate a machine to its personality and then practice until we have satisfied with our level of skill.
I shoot double action revolvers with 10 lb triggers and squeeze box strikers with 7 lb triggers, both competently. In a self defense setting I can consistently hit center of mass at 25 yards. Handgun hunting, with optics mounted, I can stay within palm size groups at 100 yards where single action pull is kept between 3.50 lbs and 3.75 lbs. My 1911 pistols, regardless application are modified to the same because, for me, that feels the most comfortable and yields the most accurate results. I feel no need to elevate that rate for self defense, another pound of pull would add no margin if safety and I do not feel as though I have as much control with a lighter trigger. Subsequently, while 3.50 lbs to 3.75 lbs may not constitute magic, it does work for me.
The SR1911 and trigger enhancement opportunities…
Trigger pull within factory guns, even within the same manufacturer’s models, varies. This example of the Ruger SR1911 checked 4 lbs 11 oz with a small amount of creep. As a a 1911 type, it is pretty heavily sprung with an 18 lb recoil spring, 30 lb mainspring and nearly 3 lbs of effort required to move the disconnector, in isolation, against the sear spring. By comparison, my Series 70 Nation Match has a 16 lb recoil spring, 23 lb mainspring and only 8 ounces is required to move the disconnector against the sear spring. My planned use for the Ruger is to predominately shoot standard pressure loads with occasional use of +P rated ammunition. So there were some opportunities to reduce spring rates that effect slide racking effort and trigger pull.
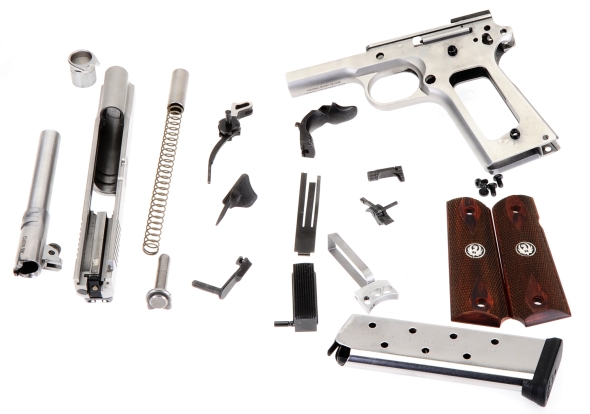
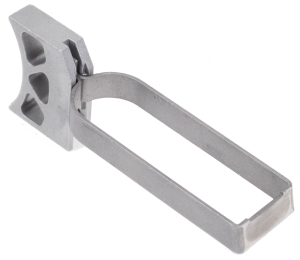 Where frame trigger track and hammer slot clean up can contribute to smoother movement of trigger and hammer, the Ruger’s frame was exceptionally clean, offering no real return on stoning efforts. The trigger bow… stirrup was straight, the disconnector contact surface was a little rough and the trigger moved freely in the frame under gravity with a magazine in place. Up and down clearance within the trigger guard was acceptable. The Ruger trigger has an overtravel stop integral to the shoe and it takes little to alter the front of the bow to minimize take up. No effort was made to do either at this point. The rear surface was cleaned up and polished; hard to tell in this photo, and the bottom rear edge of the bow was chamfered to increase sear spring clearance.
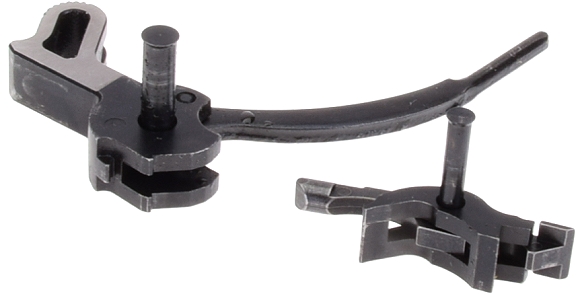
The Ruger’s hammer, disconnector and sear are MIM pieces. They are precisely dimensioned, appropriately hardened and made to function properly over the long life of the firearm. The MIM process permits the molding of metals into close tolerance, complex pieces without the need for multi-step, labor and machine intensive post processing. I do not think MIM parts are weak, or lack dimensional stability or wear out faster than solid material parts. I do think they do not take resurfacing as well as cast, forged or billet parts, or take a polish as well and flat spans tend to not be critically flat. Subsequently, I thought I would take a run at working with the Ruger factory pieces and see what results were achievable with traditional refinements.
Tools and equipment
I like to layout my work on the bench with a ratio of one tool to every one part of the subject firearm or five tools to every piece part where only sub assemblies are on the bench. It looks impressive as hell and the shear possibilities of tool selection and application justify the time I spend leaning back in my chair, giving the project a good think.

A Power Custom Series I stoning fixture and 45 adapter was used for this project, a $160 combination. There are tools that are one third the cost, but this one allows me to do both sear and hammer work and change adapters to work on virtually all popular, and some not so popular, handguns and rifles. In this case, the bottom left stones were not needed because the frame was clean and the medium fine India stone was not used because there is nothing on these parts that requires that severe of an abrasive. India stones are oil stones, the ceramic stone (gray and white) are water stones.The hammer/sear pin block comes in handy. Pin spacing is adjusted to a specific firearm, pins for other firearms may be purchased separately and the tool permits scrutiny of hammer sear fit as the work progresses.
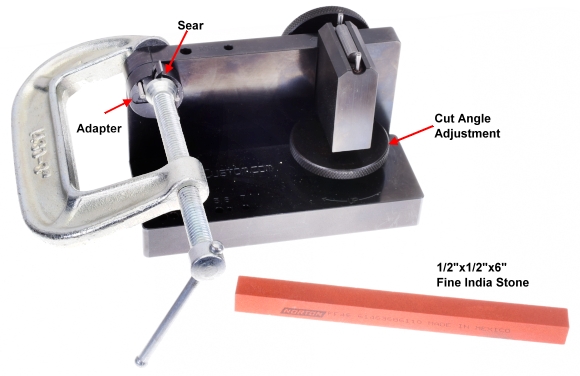
The Power Custom fixture, when used with the 1911, has one adapter with multiple pins to index the part by process step and two adapter orientation marks for sear versus hammer work. The instructions call for a parallel jaw machinist’s clamp to hold the part, but a C clamp with a center hole in its swivel head clears the adapter pins and stays out of the way while working. The stone support side is raised or lowered to set stoning angles, face and relief, settings for each adapter and firearm are covered in the included instructions. The stone runs over the roller, between two guide pins and rests atop the part being stoned. The sear face was cut slightly under 90° and polished until it was 0.030″ thick. Then a 45° relief angle was cut and polished until the face of the sear was 0.020″ thick.
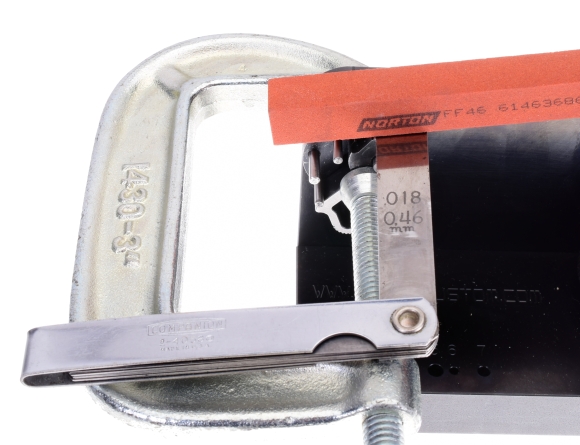
The adapter was rotated to the “H” position and the hammer hooks were squared to 90° with a safe sided hammer file and polished, being careful to remove only the minimum amount of material necessary. Then the hooks were stoned and polished to 0.018″ height using a feeler gauge as a hook height guide.
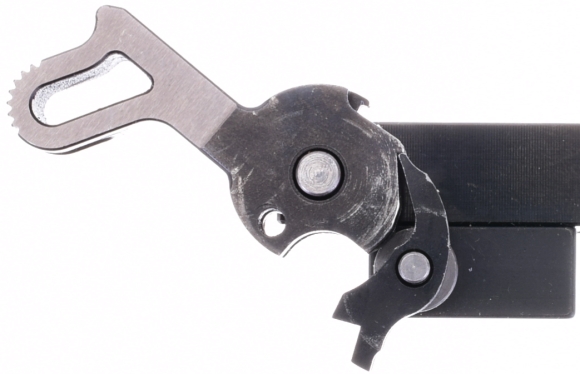
The result was a slightly negative geometry with the hook contacting approximately 60% into the sear face. The sear was square to the Power Custom fixture and the stones were fresh, good quality ceramic, but it took a bit of cutting to get to a point where the thickness of the sear face was uniform. Not nearly enough to make for a short sear, but I was concerned with the potential for a lack of surface hardness and I was not going to attempt flame hardening a MIM part.
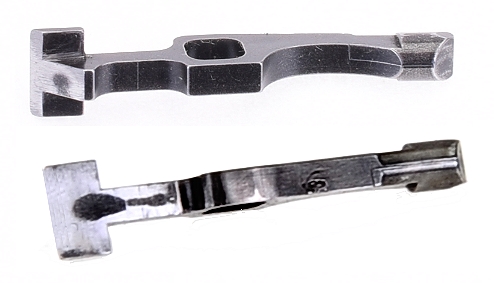
The trigger side and sear side of the disconnector were gone over with an x fine ceramic stones, the window was radiused where it faces the magazine well and the post that passes through the frame was cleaned up and burnished. After all of the handwork and patience to keep planar surfaces planar, the finish looked as though they were cleaned with a coarse Scotch Brite pad and bead blasted where the same treatment of regular cast pieces caused them to gleam. In addition to less than mirror like finish, contact surfaces were riddled with voids and parting lines. I did not want them on my bench, but the only place I could think of was the pistol… so I went on to a trial fit to see what gremlins would surface.
Putting the SR1911 together and wrestling the slide to cock the hammer, trigger pull checked 5 lbs 11 oz. Yikes!!… ! Pieces moved freely, engagement was right and even thumb pressure hammer snapping could only get the trigger pull down to… oh… 5 lbs 11 oz. I was tempted to grab a positive, “The pull was really consistent” and park the pistol in the safe as a rainy day project, but I already had a head cold and my wife had already donned a hazmat suit and locked me out of the house, which left me trapped in the shop, with a dozen boxes of tissues she had tossed from an upstairs window.
I pulled the hammer and used a trigger scale to measure how much spring resistance was posed by the trigger bow and sear spring center finger before the sear loaded the first finger. It checked 3 lbs. Jack Weigand published an article, “2 1/2 Lb trigger pull”, and excellent piece, where he suggested an 8 Oz reading at the disconnector finger of the sear spring. I was not trying for a trigger this light, so my target was twice that resistance, 16 Oz. In addition to the high sear spring rate, the SR1911 still had the factory 30 Lb mainspring installed and that had to be changed before working in the sear spring.
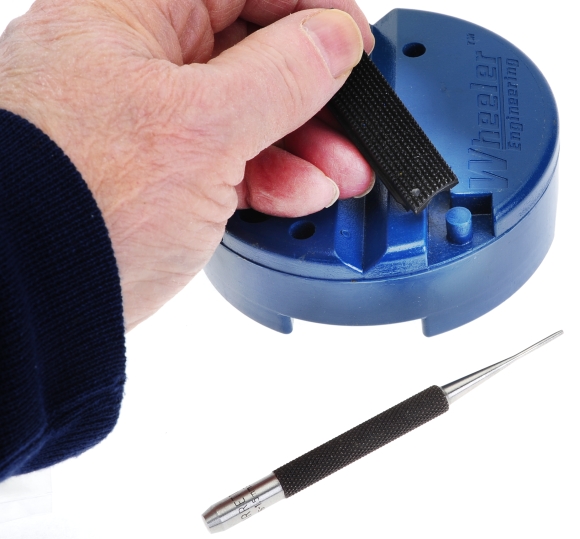
Using the stub dowel on the bench block to depress the mainspring in the mainspring housing, I was able to swap and 18 Lb spring, for the 30 Lb spring using only two hands, rather than the typical three or two and a vise. Assembling the rest of the pistol, pull dropped to 5 lbs 3 Oz, or a half pound lower. Wow! Fire off the confetti cannons and call it done… but then there is the little matter of the extra pound and one half, or so, of excess pull.

The disconnector finger was shaped like a recurve bow, dropping well below the sear finger on the left. A pair of parallel jaw pliers held the springs flat about a jaws width above the finger root. A pair of smooth jaw duckbill pliers were used to reshape from the front without disturbing other parts of the spring. With each minor adjustment, the spring was reinstalled, the mainspring housing was installed to properly position the spring and fingers and a pull reading was taken. The good news, the second attempt was rewarded with a 1 Lb pull, one third of the first reading, and with the mainspring housing in place, the fingers were contacting as appropriate. The bad news was that I had worked my way through half of the tissue boxes, the origins of finish on some of the small parts was dubious and I could not believe by lovely wife, my high school girlfriend, the mother of our children was going to let me spend the night in the shop under quarantine. Tough love… very, very tough… Light on the love.
The Ruger SR1911 was washed out, lightly oiled, and reassembled, including hammer, grip and thumb safeties. A little thumb pressure applied to the hammer, 20 or 25 snaps and then the trigger checked a consistent 3 Lbs 12 Ounces, my goal. The hammer was cocked, the thumb safety snapped on and an attempt to pull the trigger did not drop the hammer. The thumbs safety actuation as crisp, detented positions positive. The safety also passed the click test; engage the thumb safety, pull and release the trigger, disengage the thumb, and then just touch the hammer slightly to the rear to see if the safety is allowing the sear to move out of full engagement with the hammer. The grip safety worked correctly as well, without needing to adjust the right sear spring finger. The hammer at no time followed the slide.
All together, back together..
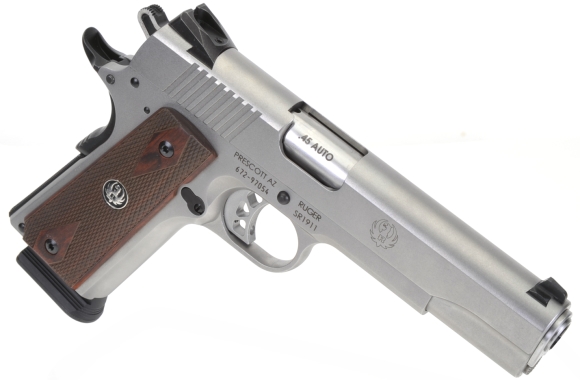
The Ruger 1911 is closer to my personal preferences. The trigger pull is much lighter with little pretravel and a crisp let off. The slide can be racked by humans and still contain and control the slide with standard and +P ammo. It functions reliably and disassembly and critical inspect showed no accelerated wear or damage of contact parts.
I am not done. Next up is a set of tool steel parts to replace the MIM hammer, sear and disconnector. The original pieces may work, they may be reliable, but I know those uneven surfaces are in there.. I may even replace all of the black Sonny and Tubs pieces. We’ll see.

Email Notification